What can a dog enclosure look like?
The first thing you have to do is determine the type of future enclosure. This issue is partly resolved according to the region where the country house is located. If construction is necessary in the southern region, then the place for the dog can be fenced with a canopy from the sun. But for the middle zone, you should take care of building a booth. In the northern regions, the enclosure must be equipped with a winter road.
Once you have decided on the type, you need to calculate the size of the enclosure, which will depend on the free space on the site and the breed of the pet.
Aviary standards
Many or few? This question will torment the owner of a four-legged friend during the first stage of construction. To bring some clarity, you need to know the minimum dimensions that can be limited to enclosures for dogs:
- At least 6 m2 for pets with a height at the withers of up to 50 cm.
- At least 8 m2 for pets with a height at the withers of up to 60 cm.
- At least 10 m2 for pets with a height at the withers of more than 60 cm.
These parameters should be used as a starting point when choosing the optimal space for a fenced area. To these data you need to add the number of dogs that will live in the enclosure. If you plan to have more than one friends, then you need to add at least 50% of the free space for each.
Optimal dimensions
The size of the enclosure is set in accordance with the height of the dog at the withers, i.e. up to 50 centimeters - 6 square meters, up to 60 centimeters - 8 square meters, over 60 centimeters - 10 square meters.
Other dimensions of the fence are determined based on the body dimensions of the pet itself:
- The width must be at least 1.5 times the length of the body, not counting the tail. But not less than one and a half meters.
- The length is calculated based on the width and area.
- To determine the height, you should take the dog by the paws and slightly lift it up until it stands at its full possible height. An additional half meter must be added to the measured height so that when jumping the dog does not hit the ceiling or jump out of the enclosure if there is no roof.
Materials for building an enclosure
When the size of the future structure has been determined, it is time to move on to procurement activities. But first you need to decide on the materials from which the dog pen will be made. And here too there is plenty to choose from.
The main materials for building a do-it-yourself dog enclosure are:
- tree;
- metal;
- brick;
- concrete.
Wood is the basis for the pet's house and the frame of the fence. This option can be considered classic. In this case, the enclosure itself is fenced with a welded mesh or chain-link stretched over poles. Wooden stands are installed around the perimeter and create space for your four-legged friend.
The use of metal can be combined with wood and brick. In this case, the fence is no longer a mesh, but a lattice. It is attached both between wooden pillars and between brick ones. Also often there are designs with metal stands, which is quite justified from the point of view of the safety and reliability of the entire enclosure.
The use of brick, and in some cases natural stone, is due to purely aesthetic and design considerations. When the area around the house is landscaped in a certain style, it makes sense to build the same paddock. Otherwise, the use of this material will depend only on the taste and intentions of the owner of the country house.
Concrete is used mainly to create the floor of the enclosure. But wood also claims this role, remaining a classic building material. The concrete mixture is also used to construct the foundation for the fence. Therefore, you should not discount it.
Requirements for the enclosure
In order for an animal of any breed and size to feel comfortable in its home and have the opportunity to shelter from heat or cold at any time, it is necessary to meet a number of requirements for the construction of an enclosure.
Find out how to cure a dog from diseases such as: bursitis of the elbow joint, piroplasmosis, subcutaneous mite, dirofilariasis, lichen, aspergillosis, demodicosis.
Dimensions
Before you build a dog enclosure with your own hands, you should decide on the size. The larger the dog, the more space it needs. Depending on the breed of the pet, the size of the living space should be as follows:
- for large dogs, more than 65 cm tall at the withers, such as Alabais, Great Danes, Greyhounds and so on, the length of the living space must be at least 10 m in length;
- for medium animals, up to 65 cm in height, such as Australian and German shepherds, collies, huskies and so on, the enclosure should be at least 7-8 m in length;
- for small dogs whose height does not exceed 50 cm, such as the Schnauzer, German Spitz, Fox Terrier, etc., the length of the room must be at least 6 m.
These parameters must be observed if the animal is inside the enclosure around the clock.
If your pet often walks outside its home, then the size of the total area can be reduced by 1.5-2 m. Important! There is no need to make an overly large enclosure, even for very large pets. Excess space will contribute to heat loss in the winter season, the dog will freeze.
Materials
To make the floor you can use:
- wooden boards;
- concrete;
- asphalt.
Ideally, when making the lower part of the enclosure, prepare three zones:
- the platform can be made of wood, on which the animal can rest;
- the space reserved for food can be made of concrete or tiled;
- The area for walking and performing natural needs is left in the form of soil or grass.
Next, you should consider what material the walls will be made of.
Do-it-yourself dog enclosures can be made of wood, mesh, slate, brick and metal rods.
Important! The door is made in the front wall, which is made of bars or bars. It must be remembered that it must open inward.
Locks on the door must be on both the outside and the inside. It is advisable to install an additional deadbolt in case the dog damages the main lock.
The roof can be made of any roofing material:
- metal tiles;
- corrugated sheeting;
- slate.
Equipment
The booth is one of the most important components of the enclosure. This is the dog’s refuge from weather changes, his personal space. It is usually made of wood and corresponds to the size of its inhabitant.
At the owner's request, the feeder can be safe, built into the enclosure so that the animal can be fed without going inside. It can be securely fastened with a latch so that the dog does not push it out, is equipped with a rotating mechanism and is installed at a height of 20-30 cm above the floor.
To make your pet a true protector and loyal friend, you need to train him correctly.
Depending on the wishes and means of the owner, the enclosure can be additionally equipped with:
- heating and ventilation devices;
- lighting;
- sewerage and drainage system;
- blinds protecting from the sun, wind or precipitation.
Wood flooring or concrete floor
The choice between types of flooring in the enclosure is a very important step. On the one hand, concrete should be the undisputed leader. This material allows you to completely eliminate digging under the fence, which will protect guests from the sudden appearance of a watchdog. But nevertheless, this method also has negative consequences.
In winter, outdoor dog enclosures with concrete floors pose a hidden threat to pets. The fact is that during frost the stone cools greatly. Then the negative temperature is transferred to the dog’s paws. Prolonged exposure to cold from concrete pavement can lead to rheumatism in your four-legged pet.
But wood is a more forgiving material. Having low thermal conductivity, it does not cause such damage to the dog. But he has his weaknesses. For example, poor resistance to fungi and mold, which will accompany the flooring due to the close location of the earth. This scourge can only be combated by using various impregnations and antiseptics.
It is impossible not to say about the earthen field. In this case, no flooring is made, and the dog walks directly on the lawn located inside the fence. But this method is fraught with problems associated with undermining. Four-legged pets are excellent diggers. They will quickly get out and disturb everyone around them. That's why it is necessary to do flooring.
Location
Creating comfortable conditions for both the animal and household members is the leading goal of this idea. It is not recommended to build a fenced area for your vocal guard:
- Near the fence, gates and gates. All passers-by, as well as cars, will irritate him. As a result, the dog’s morning or night serenades for the family are guaranteed. In addition, there is a possibility that he will get out and do a lot of dirty tricks.
- In the backyard. Four-legged friends have a herd instinct. If you completely isolate them, they will become sad and begin to howl and whine, and this gets on your nerves.
- Near the door of the house. The unpleasant smell and barking of the pet will make life unbearable for the family.
The optimal location for outdoor dog enclosures is the front area of the yard. It is better to place it under a branchy tree. The roof, of course, will hide the cute animal from the heat, as well as rain. However, hot iron will create a real steam room in the building. While the dense crown will be an excellent shelter from the sun.
On this topic:
What is Hill's food for cats and dogs?
Sep 13, 2017
We choose Akana food for our pets
Sep 12, 2017
BACK FORWARD 1 of 2
It is necessary to place the enclosure longer from drafts. Nobody wants their pet to get sick.
Does the enclosure need a roof?
The answer to this question may again be the region where the country house is located. But one thing is clear: the dog must have protection not only from rain, but also from the scorching sun. This means that it is necessary to make a roof for the enclosure. At least over most of it.
The issue of choosing a material can be approached in the same way as when installing a roof for a house. You can lay ondulin, soft or regular tiles. The choice depends entirely on the capabilities of the site owner. The main rule should be the following: the roof should not be noisy. This is important for the dog's peace of mind. When it rains, drops can knock loudly on the roof and irritate the animal. Especially if bad weather happened at night.
The design of the roof can also be left to the discretion of the designer. Typically, shed decks are made, which do an excellent job of draining water falling from the sky. But you can also find more complex projects, when the pet pen resembles a real house. Like, for example, in this photo of a dog enclosure
The main mistakes when creating enclosures for dogs
Chain-link mesh is not the best option for the walls of an enclosure, especially one where a medium-sized dog will live.
This type of grille fastening often leads to injuries.
A small enclosure is not suitable for permanent maintenance.
But it is ideal for temporarily housing an animal. The design of a homemade enclosure is not complicated, but still, when constructing it, the following mistakes are often made:
- It is best to avoid decorative forged elements, as they can not only cause inconvenience to the dog, but also injure it;
- the enclosure should be located so that the home guard can control the entire territory;
- when making lattice walls from rods, be sure to check them for welding defects that could injure the animal;
- In wooden buildings, it is best to avoid nails, as they tend to become loose and “climb out,” which will also lead to injury to the dog.
As you can see, it is not so difficult to take into account all the nuances and create an ideal place for permanent residence for your beloved pet. All that’s left to do is choose a project and get to work.
The door is an element of particular importance
You can only enter and exit the fence through the opening. It must be included in the design of the enclosure. But the entrance should not remain open, otherwise the dog will simply run away. Therefore, it is necessary to install a door leaf in the fence.
There is one rule for this design element. The door should open into the enclosure itself. This is a safety requirement that some owners of four-legged pets violate. In addition, the door leaf must have a strong lock. The entrance must be kept locked so that the pet does not leave its enclosure without the knowledge of the owner.
The lock mechanism should be easy to close both from the outside and from the inside. This circumstance will allow the owner to exit from behind the fence without any problems, even if the passage closes. The handle is installed at the discretion of the owner.
The door design is a rectangular frame. In the center, the canvas is reinforced with an additional spacer on which a lock can be attached. The material for the door is metal or wood. The choice depends on the overall design of the enclosure. Often a welded grille is used as a door. But this option is usually installed on the same fence.
Feeder device
To quickly and safely feed your four-legged friend, you will need to install a feeder. This element must be thought through before making an enclosure for a dog. There are always several feeder design designs to choose from. But the most optimal one will be one where the dog cannot get out and will receive a bowl of food and drink.
This device can be manufactured not only with a lattice fence, but also using a mesh. In this case, it is necessary to add additional bars to the wooden frame. This will create a small frame into which the rotating device of the feeder will be inserted.
If there are several dogs in the enclosure, then the places for eating and drinking should increase accordingly. The main thing is to provide the pets with comfortable conditions, and at the same time the ability to quickly restore order so that the inside of the fence is clean and dry.
Wooden aviary
How to make an enclosure for a dog with your own hands? First you need to pour the foundation.
Foundation
We remove the top layer of soil 20-30 cm along the entire perimeter of the enclosure - 5th in length and 2nd in width (for a small dog).
Fill with cement mortar in a ratio of 1:1:2:3 - cement, water, sand and crushed stone, respectively. Leave for 1-2 days until completely hardened.
If the soil is soft and loose, before pouring it is necessary to make formwork: lay boards along the edges of the hole and fasten them with nails or self-tapping screws.
Frame
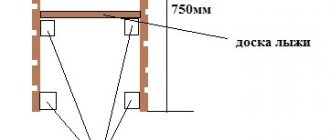
Now you need to knock down the frame, for which you will need 12 beams 2 meters long, 4 beams – 5 m.
3 beams 2 meters long need to be shortened by 10 cm each to give the roof of the enclosure a slope so that water does not accumulate on it. These bars will be the basis of the back wall.
We connect two 5 m beams and two 2 m beams in the shape of a rectangle with self-tapping screws. This is the base of the enclosure. We install shortened beams on one of the long sides: two in the corners and one exactly in the middle - the back part of the enclosure. On the opposite side we strengthen three beams 2 m long - the front part of the enclosure.
Making the top. We screw the remaining two beams, 5 m long, parallel to the lower beams of the same length with self-tapping screws. We do the same with three beams of two meters in length. Two will connect five-meter beams at the edges, and one will be in the middle to support the future roof.
On the left side you need to attach the remaining two-meter beam, shortening it by the required amount so that it fits between the lower and upper beams. It will serve as a border for the door.
Floor
We lay boards on the lower beams and attach them with self-tapping screws. The boards must be treated with sandpaper (or a special device) and a solution that protects the wood from insects and rot.
It is recommended to press the boards as close to each other as possible. They must be of good quality, without knots or cracks, so that the pet does not get hurt.
Boards for the enclosure must be of good quality
Walls
We make the back side and one side blank and fill them completely with boards. We hammer the other side to the border of the door, leaving an opening for the arch.
We trim the front side with mesh. We nail it to the bars. We knock down the door from the boards and hang it on the hinges.
The door must open inwards. Otherwise, the dog may escape by simply tearing off the hook.
Roof
We nail boards onto the upper supports, either horizontally or vertically, over the entire area. We treat with a special solution.
Booth
It is necessary to place a booth in the enclosure. It can be knocked down from boards. It is better if the roof is removable so that it can be easily cleaned.
We install the booth, and the wooden dog enclosure is ready
Booth or winter road
Where should a four-legged friend rest, hide from the cold in winter and from heavy rains the rest of the time? Of course in the booth. This building has been familiar to many since childhood, when every private home always had a similar place for a dog. But if there are several dogs in the enclosure at once, then one booth will not be enough and it would be most reasonable to build a small residential complex, which is called a winter road.
As a rule, these structures have a separate entrance from the street, through which the owners use it for regular cleaning. You can also build a window into it so as not to carry out additional electrical wiring. And there is no need to mention once again that such a room must be high so that a person can work and move without bending.
Both the winter road and the hut must be well insulated. All work is carried out as in a regular residential building. When the insulation is completed, the owner will be completely confident that the dog will not freeze even in the most severe frost.
It is advisable to make a platform on top of the booth. This is necessary for the dog itself, which prefers to have a good view of the surrounding area from a certain height. The platform is also the roof of the booth and it will also need a layer of insulation. Better yet, make an opening bed. Then you can easily and simply clean the inside of the booth.
The entrance to the booth or winter road is small. It is enough to cut a square of 60x60 cm format. The corners of the entrance can be slightly rounded. It must have a curtain. It can be made from strips of rubber, PVC, or simply hang burlap. Such a curtain will not let out warm air and the dog will live comfortably on frosty days.
Tools
Moving on to the practical part of building an enclosure for a pet, do not forget about the tool. The master will need:
- Hacksaw or electric jigsaw.
- Tape measure and pencil.
- Bayonet and shovel shovels.
- Screwdriver and screwdrivers.
- Hammer.
- Chisel or chisel.
- Sander.
- Wire cutters.
- Brushes, roller.
Depending on the design (if you choose the option of an enclosure made of a metal lattice), a grinder and a welding machine may be useful. But this is only if the master owns these tools, otherwise you can cause trouble.
In addition to the listed equipment, do not forget about self-tapping screws, nails and paint and varnish materials, which to one degree or another will be necessary during the work.
Earth, concrete and wood
Before you build an enclosure for a dog with your own hands, you will need to mark the future structure. Here it is necessary to identify all the zones in order to further move quickly and confidently towards your goal.
This is what the plan according to which construction should be carried out might look like. It is more convenient to mark using stakes and strings. Using this landmark, you can begin excavation work. It is not worth digging very deep, since the structure will not bear a large load. It is enough to go 20 cm deeper to then make a sand cushion.
Next, concrete is poured or blocks are laid. The main thing is to get a stable foundation for the future enclosure. If a metal lattice is chosen as the fencing material, then recesses must be made at the corners. The depth of these places must be at least 70 cm. When pouring concrete, racks made of metal pipes are inserted into the corners.
How to make a dog enclosure with your own hands
A good owner of a private plot should know how to make an enclosure for a dog with his own hands, use drawings and take into account all the necessary dimensions of the pet, the plot and the home itself (see photo).
Preparation of material and tools
First of all, you need to make a drawing according to the given dimensions - draw the yard to scale, determine the optimal location of the dog’s home. The drawing of the enclosure, in addition to indicating the place for the gate and feeding trough, should contain four main zones:
- winter road (if necessary a booth);
- platform;
- feeding area;
- an open free zone for natural needs.
Depending on what the future enclosure will be, it is necessary to prepare tools and materials.
To make a concrete floor, you need to prepare a plank flooring; there must be a ventilated space of at least 0.5 m between the coverings. The boards for making the entire structure must be well dried, treated with antifungal agents and sanded.
If you install gratings, you can use primed and enamel-coated metal pipes. It is advisable to fasten structural elements with screws made of stainless materials. The roof, if desired, can be either single-pitched, double-pitched, hipped, made of metal tiles, corrugated sheets, and so on.
Did you know? More than 20% of dogs of all breeds and sizes are susceptible to noise phobias - a pathological fear of loud and sudden sounds such as thunder, gunshots or fireworks. This condition of animals disrupts the natural functioning of their body.
Frame
Using a welding machine, you need to make a frame for the floor and the frame of the enclosure from vertical piles. The crossbars needed to secure the roofing materials must be welded to the vertical piles. In order for the structure to be strong and durable, the guides must be of high quality.
If the enclosure is wooden, it is necessary to fill the foundation with cement mortar, and then fasten the frame of wooden beams with self-tapping screws. It is important not to forget about the door opening.
You can protect your dog from flea and tick attacks with the help of Frontline.
Floor and walls
The angle for installing the floor can be front or side. To make it, wood is used (usually for a platform), tiles or cement (to decorate the dog’s feeding area) and soil (for the walking area).
Wooden boards must be polished and treated with a solution that protects against rot and insects. They need to be pressed tightly against each other when laying.
When applying flooring, the following nuances should be taken into account:
- A concrete or stone surface can become too cold in winter, which can lead to various diseases for the animal. It is worth covering part or all of the floor with wood.
- When using wooden boards, you need to think about the place where the dog will relieve himself.
- Thick tongue and groove boards should be painted only on the outside. Paint on the inside of the floor can negatively affect the health of the animal.
- If your dog likes to dig, you should not leave the ground uncovered, otherwise he can easily get out.
- To prevent water from accumulating after rain, it is necessary to make the floor at a slight angle.
The front wall made of metal pipes must be primed, painted and securely welded to the frame.
When making walls you need to remember the following points:
- One of the walls should be accessible to the dog's view.
- All elements of the structure must be firmly connected to each other and securely dug into the ground.
- Metal pipes must not contain rust, irregularities or burrs. Galvanized walls can harm the dog, and excessively thin tubes can ruin the teeth of those who like to chew on the fence.
- It should be remembered that ordinary chain-link mesh is not a very reliable material for large dogs that can chew through it. In addition, a pet can easily damage its teeth, skin or paws.
- The presence of two or three solid walls will prevent the appearance of drafts inside the enclosure and protect the animal from diseases.
- It is ideal to make a pet's home from natural, breathable materials such as wood or brick.
- The vestibule, door and walkway, if present, are usually made of the same material as the wall (a metal frame with a tongue-and-groove board or a profile pipe).
- The door width should not exceed 700 mm.
Did you know? For dogs, human hugging is a sign of dominance, so they don't take this process very well.
Roof
The roof should have a slight tilt towards the rear of the structure.
When installing a roof, it is important to consider the following nuances:
- Do not fasten with nails - the animal may be injured by them. It is better to use screws, staples, and so on.
- The roofing material should be soft and not irritate the dog when it rains. Any metal coating can become very overheated in summer and overcooled in winter.
- It is imperative to install a canopy to protect the enclosure from precipitation.
Arrangement
After installing the enclosure and kennel, you can take care of the dog’s feeding bowl, as well as bedding and your pet’s favorite toys. The animal should feel comfortable, not need water and food, and not be bored. Otherwise, the dog will look sick, drooping and whine constantly.
It is necessary to remember about the maintenance of the manufactured structure, especially if most of its parts are made of wood. The service life of wooden floors is no more than eight years.
Cleaning inside the enclosure should be carried out at least twice a month. In spring, be sure to treat corners with parasite repellents. In the summer, it is necessary to carry out monthly disinfection with solutions of “Creolin” or “Formalin” (3%). During the cold season, quarterly treatment is sufficient. It is also necessary to carry out mechanical cleaning of the enclosure area.
Flooring and frame
When the foundation for the enclosure is ready, they begin to install the strapping and install the frame. When choosing wood as the main material, timber is laid around the perimeter. Connections at the corners and along the length can be made in “half a tree”. In this case, the timber is sawed down to half the thickness (if the total is 100 mm, then the cut will be 50 mm) and each part is connected to each other.
Next, the frame of the future enclosure is installed. For this, templates are used that allow you to quickly assemble the entire enclosure. This way you can get the frames and complete the assembly even by yourself.
Perforated corners and self-tapping screws are used to fasten frame units. This creates a fairly strong “skeleton” of the future enclosure. In the part of the structure where the winter road is located, the racks should be installed every 50 cm. It would not be superfluous to insert jibs between them to give the entire structure strength.
Assembling a 6 meter wall
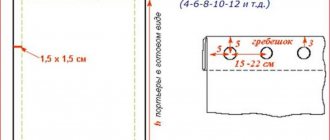
In order to assemble a wall with a length of 6 meters, you need to lay two three-meter boards 5x15 cm on the ground with ends facing each other for the top of the wall. And the same for the bottom.
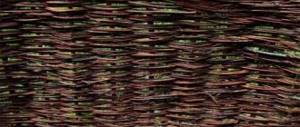
We roll out the mesh from above along the boards - flush with the edge of the board of the top of the wall and with a protrusion of 3-5 cm from the bottom of the future wall. We attach the mesh with a stapler every 20 cm.
An ordinary metal mesh for an enclosure will not work - the dog will chew it and can damage its teeth. Therefore, we use PVC-coated mesh. It will provide sufficient strength and is safe for the dog.
We connect three-meter boards together with a 10x10 cm post so that the mesh is between the post and the boards. Use 75 mm self-tapping screws to connect the parts.
Attach inserts made of 5x10 cm timber at a distance of 9 cm from the edge on each side of the wall. At this point the side and back walls of the enclosure will be connected.
Description of the dog breed English Bulldog - a former breed of fighting dogs in our time has become a real aristocrat.
Griffons are ideal for lovers of small dogs. Read more here.
Rabies is not common, but it is deadly:
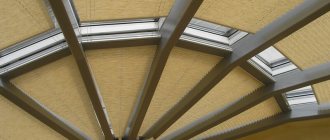
Roofing and insulation
When the frame takes its place, it’s the turn of the roof. The upper part of the enclosure is covered with rafter legs, onto which sheathing boards will later need to be nailed. The distance between the beams depends on the cross-section of the material used. For boards 50 mm thick and 150 mm wide, a difference of 60 cm is optimal.
Next, the sheathing strips are nailed down. For them, a 25x100 mm board is used. The material must be edged, that is, the sides of the planks should not have areas with bark. Depending on the type of roofing, the boards are nailed down with or without space between each other.
It is necessary to install a windproof film along the frame posts, and place insulation inside it. The latter is used polystyrene foam, basalt wool or similar materials. There should be no voids left when laying the insulation. This will avoid freezing.
Floor construction
Interior work begins with laying the floors in the enclosure. In the winter road they should be as well insulated as the frames and roof. But a double layer is required on the floor. To prevent the insulation from falling through from below, boards are nailed to the beams.
If the floor covering is chosen in the form of boards, then it makes sense to leave a gap at the edges. This will allow air to circulate and prevent mold and mildew from growing.
Covering the winter road with installation of doors and mesh
The enclosure is almost ready. All that remains is to polish it up. And for this, the winter road needs to be sheathed, giving it an attractive appearance. For this you will need a lining. This material can be secured with nails or using special clips.
A cordless screwdriver will be useful for this work. With its help, installation can be carried out using self-tapping screws, which eliminates damage to the edges of the lining.
It is also not difficult to stretch the mesh and anyone can conduct a master class with this material. For fastening, nails, staples or self-tapping screws with a press washer are used. One condition must be met. The fastening must be strong so that the dog cannot tear it off.
At the final stage, the door is installed. The canvas is screwed using loops and screws. When everything is in place, a lock or deadbolt is installed on the door. The dog's enclosure is ready.
The feeder can be mounted directly on the net or, if possible, between the posts. Now the pet has a place to live and eat. He, in turn, will faithfully guard the owners’ country mansion.