Canopy functions
Having looked at the definition of the term in different dictionaries, we can conclude that a canopy is an elegant stationary or portable canopy used for various purposes.
More than a century has passed since the appearance of the first prototypes. During this time, the curtains have undergone a lot of changes. Their design has changed, the variety of fabrics used has increased significantly, and the methods of fastening have changed. The first portable models were used in Ancient Babylon to protect rulers from the scorching sun while they were moving along the street. Nowadays it is almost impossible to find such structures, except on a film set or at a carnival. Most people associate a canopy exclusively with decoration above the bed and perceive it as a luxury item.
From a practical point of view, a canopy is a good protection against annoying insects, drafts, and does not allow dust to pass through. From an aesthetic point of view, it acts as a decoration. Allows you to transform a room and make it exclusive. This item gives the room solemnity and romance; it can be located around the perimeter of the entire bed, or decorate only the headboard.
The canopy is used not only in the bedroom, but also in the living room and attic. They cover sofas, armchairs, ottomans. With its help, you can perform zoning of the room, for example, combining an office and a bedroom in one room. This technique is perfect for decorating a studio apartment.
Historical reference
The history of the appearance of canopies goes back to the Ancient East (Ancient Persia), when these structures played the role of an umbrella that saved from the heat. They were primarily used by members of the nobility, including kings.
Later, the canopy was used in the bedroom as a curtain, protecting sleep from insects and drafts. At that time, people began to order such handmade fabrics made from fairly dense fabrics (velvet, satin), decorated with embroidery and precious stones.
READ MORE: Towel ring in the bathroom photo - Towel holder for the bathroom (44 photos): how to store on a towel rack, wall holders in the room and floor model, storage on racks
Attaching the holder to the ceiling
A crib canopy can be purchased at any children's store. They are often included in baby cots. Most often it can be purchased in sets along with a mattress and a pillow for a crib. In this article we will tell you how to hang a canopy.
- On a pipe with a loop
- Wall mounted
- Ceiling
Purpose of the canopy:
- Protects baby from direct sunlight
- Allows him to sleep more soundly
- The sleeping place protects from insects
- Creates the illusion of limited space
All this makes the baby's stay in the crib more comfortable and safe. Performs a purely decorative function to decorate the room.
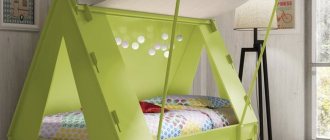
Canopy for a boy
Nowadays there are a huge number of similar products on sale. Initially, you should decide how you want to mount the canopy and what kind of ceiling you have in your house. The most optimal models are canopies, which are sold with fastenings. They can also be purchased separately. They resemble a large diameter pipe with holes at the top.
The pipe itself is attached to the wall of the crib, and a canopy is placed on top of it, or rather on a loop. Please note that it is best to choose cribs in which the fastenings are on the longest side, that is, in length. Many crib models have a hole approximately in the middle. This option will help to completely cover the entire area of the crib.
Instructions:
- The existing structure, which consists of a pipe, must be screwed onto the bed wall using a screw
- Place a loop on top of it. There are several features and designs of such a loop.
- It can be detachable and connected in the middle with a flexible elastic band. In this case, the canopy is simply inserted onto a thick wire, like a pin
- After this, everything is held together in the center with a soft tube, an elastic band
- Can also be hung with strings. In this case, the canopy is pre-tightened in the center with a ribbon in order to create beautiful folds and narrow the product upward
- After this, you need to check how firmly the canopy is attached, whether the loop can fall out of the tube if a child accidentally pulls on it
- Some well-known companies offer canopies, the loops of which are screwed to the pipe and there is no possibility of removing it from the mounting tube
- Therefore, the design is quite reliable
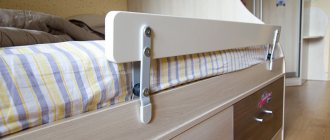
Canopy standClassic holder with loop
There are other canopies that are attached directly to the narrow part of the crib. In this case, it has more of a decorative purpose than a functional one.
The most interesting thing is that such a structure can be built with your own hands from thick wire. Please note that pieces of wire should not stick out.
We suggest you read the Time until you can listen to music
So that if the child moves around the crib, he does not get hurt.
Scheme for attaching a canopy to a loopScheme for attaching a canopyAttaching a canopy to a holderAttaching a canopy to a holderAttaching a canopy to a holderAttaching a canopy to a holderHow to decorate the place where a canopy is attached?How to decorate the place where a canopy is attached?
It is also possible to attach the canopy directly to the ceiling. This option is suitable if you have a stationary crib and you are not going to move anywhere in the near future.
Instructions:
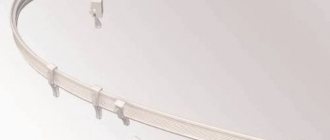
- A cornice is attached to the ceiling, into which hooks with organza and a canopy are directly inserted, which will cover the crib
- Most often, it is possible to purchase fasteners that describe a semicircle or square. It all depends on the stylistic decision of the bedroom
- Later, when the child grows up, the canopy can be made into a cute decorative element in a girl's nursery. It can become a princess dress, a sail. It all depends on stylistic decisions
- The ceiling mounting option is suitable if it is strong enough. It is possible to embed this cornice into a concrete ceiling
- It is better not to use this option if you have plasterboard ceilings. Because a small child can pull this canopy, hang on it, get caught or touch
- In this case, you risk tearing out the cornice along with part of the ceiling, which will compromise the integrity of the structure
Canopy on the ceilingCeiling canopyAttaching a canopy to the ceilingAttaching a canopy to the ceilingHow to decorate the place where the canopy is attached?
One option to secure the canopy is to use forged products that are attached directly to the wall.
Similar products are sold in children's stores, as well as at sites with garden tools, which sell a variety of forged products. Thus, the semicircle is screwed into the wall, and a canopy is attached to it with ties.
Please ensure that the fasteners are secure and that a child cannot tear out the forged product. Because if it falls on the head, it can cause injury to the baby.
It is best if it is natural, soft fabrics such as silk, tulle or organza. You should not give preference to dense canopies that have poor air permeability.
This can cause an increase in the temperature inside the crib, which will be surrounded by a canopy, and the baby’s restless sleep.
Forged canopy on the wallWall canopyPrincess room
Remember, the main purpose of a canopy is to create the illusion of comfort, as well as protect the child from insects and dust.
How to decorate the place where the canopy is attached? How to decorate the place where the canopy is attached? How to decorate the place where the canopy is attached? How to decorate the place where the canopy is attached?
- frame;
- frame;
- cornice;
- barbell;
- holder.
The last of these are most often used for cribs; they are divided into:
- Beds. There are special models that attach directly to the crib ledges.
- Wall-mounted. Round products that are attached to vertical partitions.
- Ceiling. This variety can have a round or square shape and allows you to hang fabric of any length.
- Floor-standing. The mobile version moves freely around the room, can be taken outside, or installed above the playpen.
With your own hands
Of course, the easiest way to get a canopy holder is to purchase a ready-made one. The purchased stand is quickly assembled and easily attached to any crib. However, you can build a simple structure yourself, using improvised means.
- The bracket can be made from a wooden stick or a small diameter metal-plastic tube.
- The canopy holder is twisted from thick wire. It can be in the shape of a ring, a rod or an oval. It can be used independently by attaching it to the wall or ceiling with a hook.
- The ends of the wire are fixed with an elastic band on the base.
- The structure is attached to the crib using a clamp.
When making a homemade holder, special attention should be paid to safety. The design should not sag under the weight of the fabric, so for the canopy it is better to choose light and thin materials (tulle, silk, chintz). The canopy itself is firmly and reliably fixed using rings, loops, seams or other means.
The material used for the frame must be of high quality and solid. The presence of cracks, dents, corrosion and other damage is unacceptable. It is not recommended to cover the bracket with enamel - the specific smell can cause discomfort and even allergies in the baby.
The canopy creates a special, magical atmosphere in the children's room. It doesn't just decorate the crib, but performs practical functions - it protects and calms the little man. Providing a comfortable sleeping place for your baby is the natural desire of every parent, which helps to realize the canopy. The main thing is that the structure to hold it is strong and reliable. Then the baby’s cozy corner will not only be beautiful, but also safe, which is of paramount importance.
Kirill Sysoev
Calloused hands never get bored!
Content
Since ancient times, beautiful structures made of bright curtains with lace were arranged over the cradle of babies to add coziness. Today, having evolved into canopies - canopies that cover the cradle - they continue to perform this function, thanks to various holders.
Assembling the tripod
First of all, choose the side of the crib on which the holder will be attached. As already mentioned, if the canopy frame is placed and secured at the baby’s head, its protection will be incomplete - the legs will most likely be open. It is better to fix the holder on the side of the playpen, so the curtain fabric will be evenly distributed over the surface of the crib.
It is worth paying special attention to the height of the edges of the canopy - these parameters are adjusted when attaching the holder. For ease of installation of the frame, the aluminum hinge is detachable.
The canopy holder easily attaches to the side of the crib
Frame making
It is more difficult to make a frame for a canopy. It can be ordered from a forging workshop, but you can make the device yourself. You will need the following tools:
- hammer drill with SDS chuck;
- pobedit drills 5x100;
- cordless screwdriver;
- Phillips bits, screwdriver;
- level, tape measure, pencil.
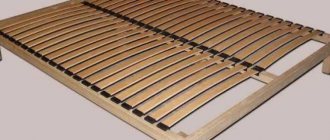
To do this, bend a metal rod in a semicircle (or U-shape) and attach the rings to it. Then the rod is attached to the wall at both ends or mounted on vertical supports.
The frame of the canopy can be made of wood. In this case, it is necessary to attach a thick beam to the wall. Wooden slats are mounted along its edges perpendicular to the wall. For this design you need fabric that is as light as possible. It is thrown onto the frame with some sagging between the slats.
You can also attach the canopy holder to the ceiling.
The design uses slats and strings to hang fabric. The device is finished with wood or plasterboard. An antique canopy holder is often installed. Supports are placed along the edges of the crib, allowing the structure to be strengthened and a variety of fabrics to be used. More elegant supports are also installed - forged or metal.
You can assemble a canopy for a crib in different ways. It may be stitched in a different way and require different hanging devices. These can be a kind of string-ties with which it is tied to a metal oval. There is an option in which the canopy is simply thrown over a metal oval.
There are ready-made canopy cribs for newborns on sale. All elements in them are selected in the same style. There is no need to select the color and texture of the fastenings to the crib itself.
Mounting methods
For reference. The holder is the load-bearing part of the overall structure.
So, the lightweight material is attached to a holder, which in turn can be fixed as follows:
- on the side wall;
- on the past;
- at the head of the crib;
- to the wall of the room itself;
- on the floor;
- on the ceiling.
The canopy consists of a fabric canopy and a structure holding it.
The canopy holder is a sealed or detachable metal ring, a tripod and attachments to it.
A little history
The canopy was invented in the East to protect from the sun. The rulers, when moving through the hot streets, hid behind folds of fabric to protect them from views and hot rays. Later, beds began to be covered with lightweight materials to protect themselves from insects. Arriving in Europe, the canopy somewhat changed its original purpose.
They still protected against insects, but dense fabrics retained a person’s warmth in a confined space, and in cold rooms they served as protection from piercing drafts. In Russia, a canopy was placed over baby cradles to hide babies from the unkind eyes of others and to protect them from the cold and insects.
Why is it needed?
Modern canopies have lost most of their protective functions. Delicate, light, openwork fabrics over cribs are largely decorative and make the room especially cute and cozy.
According to tradition, it is believed that the canopy performs the following functions:
- protects the baby from light and drafts;
- prevents the penetration of insects;
- protects from dust and noise.
In modern housing, most problems are solved in other ways. Well-fitted plastic frames protect against drafts and dust; window nets and mosquito repellents protect against insects. Nowadays, no one seriously puts a canopy on a baby's crib to protect the baby from mosquitoes.
A canopy is a touching and gentle way to create a cozy nest for your little one, where he will sleep sweetly in complete privacy, but will remain visible through a thin veil.
When using a barrier for babies in cribs, we must not forget about the negative features of canopies:
- stale air inside the crib when using dense fabric, impaired circulation and ventilation;
- accumulation of dust on the material;
- A mobile child can become entangled in the fabric and fall over the unreliable structure.
In small children's rooms, a canopy of any shape takes up space and makes the room overloaded.
Important: the canopy actually holds and accumulates dirt. You need to wash the fabric regularly so that the baby does not swallow dust every time the material moves.
- On a frame mounted on vertical support posts.
- On the ceiling cornice.
- On a round, square, rectangular frame suspended from the ceiling.
- On a semicircular wall frame.
- On horizontal rods.
The crown mount has a luxurious look. This variety is used mainly for decorative purposes, suitable for different styles, decorating the head of the bed with light fabrics. A canopy can be used even in a small room, since it takes up little space, does not visually reduce it, and can be attached temporarily.
We suggest you familiarize yourself with How to turn on a Zanussi washing machine and start the program
Finished products can be easily found in specialized stores. When choosing a design, special attention should be paid to its strength and the included fasteners. If necessary, it is worth replacing the fasteners with more reliable ones, after which you can proceed with the installation, which consists of the following:
- Determine the height and location of the object.
- We make markings and find the center of the head of the bed.
- We attach the product, mark the points for fasteners.
- We drill holes on the ceiling using a hammer drill and insert dowels.
- We fix the canopy with self-tapping screws.
- We fasten the textile fabric using ribbons, ties, and hooks.
The product is equipped with a frame and fabric protection. The mobile design can be installed on either side of the bed. The choice of the appropriate option depends on the location of the bed relative to the wall. If you attach it to the headboard, the fabric will only cover half of the bed. The side connection to the vertical surface allows you to install the protection in the center and completely cover the baby’s crib. Assembling and installing the frame is very simple according to the instructions:
- We connect and twist all the parts;
- We install fasteners;
- Select the required height;
- We fix the frame to the bed crossbar using screws or self-tapping screws;
- We straighten the material, tuck it over the sides.
Many parents make a crib canopy with their own hands, wanting to transfer all the positive energy to their child. For a simple design you will need 3 meters of natural fabric and wire for the frame. The frill can be made from ribbons or lace. There will be no problems with the pattern. You can find it on the Internet or come up with it yourself, taking into account the features of the crib and its location.
The basis of the design is the holder. We make it from dense, well-bending wire. It can be an oval attached to the ceiling or a loop on a stand made of a wooden block or plastic pipe. Any of the options must be well secured to the base to avoid a sudden fall. Light material will not cause harm to health, but can greatly frighten a child.
Before installing the canopy mount on the wall, you should carefully consider the location of the bed. This design will not be portable. When rearranging the bed, it will have to be dismantled and the integrity of the surface finishing will be compromised.
You can assemble the protection holder using two wooden blocks and a plastic or metal strip. We use dowels and screws as fasteners. We will fix the structure as follows:
- We measure 1 m up from the head of the bed and make marks on the wall;
- Drill the required number of holes;
- We attach two wooden blocks using dowels;
- We install the slats perpendicularly, screw them to the edges of the slats with self-tapping screws;
- We throw the fabric over the headband and secure it with ties or Velcro.
- Ties. Ribbons are sewn into the upper part of the fabric, which are thrown over an oval or straight holder and tied;
- Loops. Small loops are sewn along the entire length of the canopy. A ring is inserted through them and the structure is fixed with screws to the side or head of the bed;
- Eyelets. The fastening type is suitable for large rectangular beds. Metal fasteners are placed on the axle along the entire perimeter of the frame;
- Hooks. A kind of cornice is attached to the ceiling. Hooks on wheels are installed in the rail and the fabric protection is hooked with them. You can even hang heavy canvases.
The size of the pattern will depend on the type of canopy itself. For standard products, patterns are used - 1.5 x 2.5 m. If it is necessary to make waves or folds, take fabric 2 x 3 m. Dimensions include seam allowances. For convenience, we make a pattern half the size of the finished product. There are two ways to cut the material:
- We attach the paper pattern to the fabric and trace it with chalk. We cut out the resulting silhouette along the line with scissors. This option is suitable for obedient straight materials (chintz, linen, velvet);
- We fix the diagram to the material with pins and remove the excess, cutting exactly along the contour of the paper. The method is used for cutting organza, chiffon, mesh.
If you plan to make a canopy with a “crown”, then you need to add 10 cm in the upper part of the pattern. First of all, all the edges of the material, the sides and the bottom are processed. Then they begin to sew on lace and ribbons, and assemble large parts.
Varieties
The canopy holder for a baby crib is distinguished by the type of fastening:
- Located in the middle of the wide back
. This type is more appropriate for protecting newborn babies; it is also suitable when placing the cradle with the side attached to the wall of the room. - At the headboard
. This type of support is installed for older children. The bed is placed with its narrow side facing the wall. The fabric is fixed at the head and covers only the upper part of the cradle, which provides the child with access to the outside world. - Installed around the perimeter of the cradle
. This type is suitable for babies who sleep in cribs without protective sides. The device includes 4 holders in the corners and a frame that secures the fabric.
If we talk about types, canopy holders are also distinguished according to the following principle:
- Floor-standing
. Long fabrics are placed on a structure fixed in the floor. The disadvantage of this fixation is that the cradle cannot be moved. - Ceiling
. Long fabrics are attached to the ceiling, and therefore it will not be possible to move the cradle. - Wall mounted
. They allow you to choose any length of fabric and are a stationary type.
The shape of the holder is:
- oval
; - rectangular
(with a U-shaped or L-shaped bracket).
How to choose fabric for a canopy
The choice of material depends on the size and purpose of the protection. If it is necessary to protect the sleeper from drafts and the sun, choose long sheets of dense opaque material with fastening in the center of the bed. Different types of fabric create different visual effects and affect functionality; they have both positive and negative sides. Canopies for adults and children's beds are made from the following material:
- Cotton, linen. Natural fabrics do not transmit light, protect from drafts and dust;
- Chintz. Airy, light material creates comfort, protects from insects, and is well translucent;
- Organza. Transparent fabric looks beautiful and romantic, but is highly electrified and accumulates dust;
- Velvet. Dense, beautiful material protects from drafts and retains heat;
- Net. Used to create a cozy atmosphere. Such a canopy provides good air circulation, but allows the sun to pass through and does not protect from dust and wind.
Choosing a style
Why is it important to choose a canopy style? Don’t think that they are all the same and that they are all equally convenient to use. Not really. There are a lot of styles
It is clear that each has its pros and cons, but you need one that will be convenient for you. The most important thing is that the fabric does not constantly move under your hands. There should be nothing stopping you from putting your baby in the crib and then taking it from there.
There are a lot of styles. It is clear that each has its pros and cons, but you need one that will be convenient for you. The most important thing is that the fabric does not constantly move under your hands. There should be nothing stopping you from putting your baby in the crib and then picking it up from there.
Also pay attention to the length of the free edge. It should reach the legs of the crib. This is necessary so that the product can perform its role well, that is, not allow midges and dust into the crib
This is necessary so that the product can perform its role well, that is, not allow midges and dust into the crib.
You can also match the color of the canopy to the design of your room. It's good if it matches other furniture. This way you will make the nursery very cozy.
If the child’s room is very sunny, then you can choose a canopy made of medium-strength fabric. It will protect the baby from scorching rays. In moderate lighting, it is better to use a product made of lightweight material.
Useful tips for choosing, assembling and installing a canopy
- Before purchasing a curtain holder for a playpen, be sure to read the instructions for assembling it.
- Choose a ceiling canopy only if you are confident in your abilities and skills. This is undoubtedly a beautiful and reliable option, because the folds of such a canopy will completely cover the playpen.
- If you doubt the first option, purchase a simpler tripod that is screwed to the side of the crib. Every young dad can easily assemble and disassemble such a structure without any problems. At your discretion, it can be installed on any of the four backrests of the playpen.
There are many options for mounting protective children's curtains: the canopy is tied to the holder with ribbons, thrown over the fastening ring and secured with special elastic bands. Children's goods stores offer a wide range of tripods and frames. You can mount and hang a children's canopy by following the pictures in the included instructions or by watching a video on the Internet.
Proper installation of the canopy plays a huge role in its use. To avoid mistakes and simplify operation, when choosing a suitable design and installation option, you must take into account the recommendations of professionals:
- The fastening elements of the bracket on the wall must be at least 1 meter from the top bar of the headboard;
- Only reliable fastenings can be used;
- For a children's room it is better to choose a product of medium length. A canopy that is too long will get in the way underfoot, which will lead to contamination and deformation of the material;
- To more securely fix the structure to the ceiling or wall, dowels and screws must be used;
- The color of the canvas should be uniform and calm. Bright pictures will irritate and interfere with falling asleep;
- For ease of use, a special skewer is placed on the holder ring, which will allow you to correctly straighten the canopy without effort.
Beautiful protection
The technique of arranging a sleeping place with a light cape attached to the ceiling came to Europe from Ancient Persia. At some point, a person realized that on a hot summer night it was not very convenient and pleasant to protect himself from insects by covering the body directly with a cloth. This is how the first canopy was invented.
To do this, you definitely need to hang a canopy made of beautiful, cheerful fabric on it.
The canopy, fixed according to the instructions, will reliably protect the baby and give him and his parents peace, comfort and tranquility.
For centuries, this practical tool was used by both ordinary people and members of the nobility. At the same time, of course, the products placed in the royal bedchambers were distinguished by their beauty and luxury.
You can sew it yourself, but for those who are not confident in their tailoring abilities, special stores offer inexpensive kits that include the interior of the crib and a canopy.
A canopy is one of those things that, in addition to an aesthetic component, also contains a purely functional component. Such things never go out of furniture fashion, they can be transformed, the demand for them may increase or decrease, but they have been and will be. Today, this interior element is returning to widespread use. However, it is intended primarily for cribs.
But it’s not enough to buy a beautiful canopy; it’s important to correctly assemble the canopy for a baby’s crib, which the instructions will help you with, and also to hang it correctly.
This is the most reliable fastening, since the screws will not become loose from the inevitable touching of them during manipulations inside the crib.