Complexity
Working hours
A short digression about the materials that we will need:
1. I buy cardboard at an art store. Typically, for the base of the “playing field” (jars of jam, like here, for example), the cardboard thickness is 1.5 mm. For small parts (like berries here) - 1 mm. If you are not confident in your abilities (or you do not need two huge sheets of thick cardboard), then you can take 1 mm cardboard for all the parts (it is, of course, a little less dense, but for such games it is quite enough). This cardboard is sold in a format of 70 cm * 100 cm (that is, almost Whatman paper). Therefore, if you are going to buy such cardboard, make sure you have transport, or take tailor’s scissors with you, or accept that you will have to carry a stiff piece of paper home :)
I wore it :) Yes, it’s not very comfortable, but it’s quite possible :)
2. I use PVA glue. For working with paper, this is the most convenient option. It’s better, of course, to buy it at a hardware store (since the one sold in office supply departments is usually runny and warps the paper).
3. We will also need lamination film. You can buy a transparent film with an adhesive base, or hot-melt adhesive - it is glued with an iron (this is how our mothers pasted over the covers of our textbooks).
Well, we’ll figure out the rest of the materials along the way :)
So, let's begin! First of all, we glue paper with a printed game onto our thick cardboard. I apply the glue with a construction brush, 5 cm wide - this allows me to do everything quickly, and speed plays an important role here. Apply glue to the desired area, carefully apply the sheet and immediately smooth it with a soft cloth (I use an old terry kitchen towel) so that there are no wrinkles left. After this, we let our beauty dry for about an hour. This is what we get after the first manipulations:
The second step is lamination. I laminate with hot melt film.
We cut our whatman paper into landscape-size sheets, cut the film into the same pieces, lay it with the matte side DOWN, straighten it, cover it with a regular sheet and go over it with an iron several times. Important: before laminating a future toy, try laminating some unnecessary piece to understand what temperature it is better to set on the iron. I laminate at medium power - then the film lays almost without wrinkles. If folds appear, then go over this place with an iron again (also through paper) and then they will almost completely come apart.
This is what we get - almost a mirror shine :) And, at the same time, protection from moisture and scratches :) Put the iron and ironing board aside for a while and take up the scissors again.
First, we chop our sheet into small pieces, then cut it into shape. I don’t try to cut close to the outline - this has a bad effect on the strength and on the nerves of the cutter (we remember that our cardboard is very thick?). We give only a general form.
When everything is cut out, we return to the iron and go through the almost finished products again. This is necessary so that the film does not come off at the edges and grips even better.
So, the finish line! After everything is glued, laminated and cut out, all we have to do is assemble the toy. If you have a toy with clothespins, then take a glue gun and glue the clothespins.
If there is lacing, then we make holes with a hole punch (yes, it takes cardboard of this thickness) and select the lace.
If there is something with magnets, then we glue the magnets. This can be magnetic tape with an adhesive backing, or soft refrigerator magnets and double-sided tape.
Well, if this is a game with Velcro, then we will need Velcro with an adhesive backing.
You can, of course, get by with the usual ones, but in this case, you will need much more patience, effort and time, because this process looks like this:
In this case we use a glue gun. In order for the Velcro to adhere well to the base, we make notches in the places where they are attached and only then apply glue.
That's all - our toy is ready - time to give it to a happy baby and start developing while playing :)
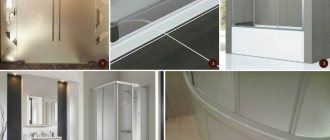
There are many decorative and functional tile suction cups on the market. They look interesting, are inexpensive and greatly simplify the organization of space. The only negative is that if applied incorrectly, the Velcro quickly comes off. In this article we reveal the secrets of reliable attachment of the accessory.
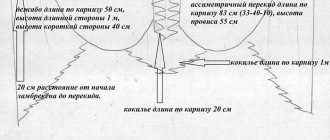
Bando
A bandeau (from the French bandeau - “ribbon”, “bandage”) is a lambrequin on a rigid base. Traditionally, the bandeau completely hides the cornice and has a figured bottom edge, which can repeat the silhouette of furniture parts, complemented by braid, fringe, scallops, applique or embroidery. Thanks to its universal shape, the bandeau is ideal for both a formal office and a cozy nursery.
Like any other type of lambrequin, a bandeau can either decoratively complement classic curtains or completely replace them.
What is the problem
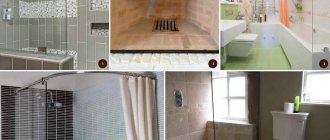
Fastening household items using suction cups is very convenient and fast, since no additional devices such as a drill or glue are required. Removing the annoying accessory will also be quite simple. Typically, towels in the kitchen and bathroom, soap dishes, hooks for washcloths, small shelves, etc. are placed in this way. Such items weigh a little, but vacuum Velcro does not need to withstand weight.
Why it’s not always possible to attach the suction cup to the tile for a long time
? Almost always the problem is unevenness of the surface. Lumps, cracks and other defects on the tiles weaken the vacuum structure. Uniformity and smoothness of the tiles is the main condition for a strong connection. Try to choose the most suitable areas. The best option is glossy tiles.
Advice
You should not try to glue the suction cup to a textured surface, for example, a tile with a pattern. Matte surfaces are also not the best solution: small pores weaken the suction cup.
Under pressure from heavy objects, the hooks on the suction cups quickly fall off. Correlate the size of the item and its purpose. For example, a large terry towel will be an excessive load for Velcro with a diameter of 1-2 cm.
The shape of the suction cup must also be correct - even and round. The microclimate in the bathroom or kitchen also plays an important role - constantly high humidity. This problem is difficult to fix, but try fixing plumbing leaks and ventilating the room more often.
So, what will determine the strength of the vacuum suction cup?
:
- From the integrity of the material and the presence of defects.
- The relationship between the size of an object and its purpose.
- On the quality of the surface material.
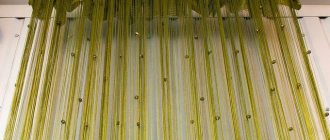
Lambrequins for the kitchen
Curtains with a lambrequin will decorate not only the windows in the living room, bedroom or children's room. They fit perfectly into various kitchen interiors.
Photo - 29 For the kitchen
You can hang asymmetrical lambrequins on a small window, which will visually enlarge it.
Photos - 30 Asymmetrical
The combination of tulle and brocade is a rich and worthy decoration for a large kitchen.
Photo - 31 Fabric combination
You can also come up with beautiful lambrequins for Roman blinds.
Photo - 32 Roman curtains with lambrequin
How to attach: instructions
A couple of tricks will help you cope with the task. These are not exactly standard methods of attaching suction cups, but they give long-lasting results.
How to glue Velcro securely, all stages
:
- First, degrease and wash the surface. Remaining dirt significantly reduces the stickiness of the suction cup. To degrease the tile surface, use a regular soap solution. Another way is to wipe with alcohol.
- Degrease the Velcro surface as well.
- If the suction cups come with mugs with a sticky side, do not neglect them: they will make the attachment stronger.
- Place the suction cup on the cleaned wall and apply maximum pressure.
You can attach suction cups to bare tiles, but the result will be short-lived. It is better to make additional mugs yourself or look for them complete with suction cups. To make it yourself, you will need self-adhesive polyethylene film, which is used for office purposes - for laminating paper without heating. Just cut out circles of the appropriate size, stick them on the tiles, and only then attach the hooks.
An easy way to improve the quality of adhesion is to apply an additional layer of Vaseline or a cream of similar consistency to the inside of the suction cup. This substance is safe for various surfaces. The method is used for further placement of light objects on suction cups.
We use sealant
Transparent silicone sealant will be invisible under the hook; it is much more convenient than a drill or a suction cup that constantly comes off. Sealant is a last resort; this method is recommended for future heavy loads on Velcro. It is worth considering that the sealant will not allow you to move the suction cup - it becomes disposable.
How to properly attach a suction cup to a tile using sealant:
- Degrease the surface.
- Select the smoothest area.
- If there are tubercles, they should be scraped off with a sharp knife. Under the Velcro the marks will be invisible.
- Apply sealant to the inside of the suction cup.
- We forcefully press the suction cup into the wall.
- If the glue leaks out, it’s okay: either we remove the remains with a rag, or wait for it to dry and carefully cut it off with a knife.
You can use the suction cup after a day. You need to wait time for the glue to completely harden.
The method is convenient in that it allows you to hang large items on such suction cups - bathrobes, terry towels, etc. Another advantage is relatively easy dismantling: a suction cup with a layer of glue can be easily cut off with a sharp knife. The remaining sealant is cleaned from the tile without damaging it.
Advice
It is important to use sealant for tiles and not glass - it looks unsightly. You can try glue-second instead of sealant, but the safety of the tile is not guaranteed.
Strengthening suction cups is a common practice for experienced housewives. Otherwise, there is no confidence that hooks and shelves will not fall at the most unfortunate moment. Don't limit yourself! Have fun buying decorative fasteners with suction cups: small accents will decorate the room, and the Velcro will hold tightly thanks to simple tricks.
We have also collected some interesting sewing tricks for us who sew. It turns out that sewing a hook neatly is not at all difficult. You just need to take the right thread.
But in this way you can easily lay out the folds. And I somehow struggled with the insertion into the blouse, several times I hemmed it and stitched it again in places so that there were even folds.
We laid the folds evenly, now, so that they do not run away, we squeak them with masking tape, and we will sew (if necessary) along the transverse clearings, between the strips of tape. Well, how simple!
This is very useful advice. Those fabrics that are difficult to sew and thick seams are much easier to sew through a piece of bag; the needle glides better than on tracing paper. You just need a transparent package.
But delicate fabrics, on which the foot does not slip, are easier to sew by gluing pieces of tape onto the foot. The painting again is removed without leaving a trace.
An easy way to always keep thread scissors handy. We glue the plastic hook in a convenient place on the machine (such hooks are already sold with an adhesive layer)
Glue a couple of magnets to the back of the saucer to keep the pins from falling apart.
Interesting pocket
Correct pocket: exact location (1″ = 2.54 cm), the rest is easy to calculate
How to sew Velcro
- When we cut, we try to do it without touching the hooks and loops that make up the Velcro. Cut to exactly the right size
- Let's now match the hooks and loops in several places - for stability
- We set the thread tension for medium or heavy weight fabrics.
- Let's make sure that the needle in the machine is sharp and super strong and lubricate it with lubricant.
- If there is one, we will replace the foot with a special one. If there is no such foot, we point the needle to the left or to the right - depending on the side that we are sewing and sew exactly along the edge.
- You can use beeswax to lubricate the needle.
- Never use Velcro that has an adhesive side; it will only make sewing more difficult and smear the needle.
A tricky way to make a beautiful frill right away on a sewing machine
Pockets
There are many methods used to attach curtains. Among them are Velcro, with which you can install curtains made of various materials.
Velcro curtains are convenient and practical primarily because they do not require holes drilled in plastic or wood
Strengthening the cornice is a simple operation, and there are several known ways to carry it out, including:
- on ties and braid;
- drawstring and loops;
- grommets;
- hooks, clips and clothespins;
- Velcro.
The latter, according to many, is the simplest. This does not require special knowledge, large expenditures of money or time.