The kitchen is one of the most important rooms in any residential home. For greater convenience, you can place a kitchen cabinet or buffet in it, including one made by yourself. A sideboard is a cabinet with shelves and a closed lower compartment; it is not just another set of additional shelves, but a whole design and practical solution for the kitchen. The modern market offers many options for buffets to choose from, but it is still difficult to choose the right size and suitable design, so kitchen cupboards are often assembled with your own hands.
How to make a wooden buffet with your own hands
Such functional furniture stands out among purchased ones: you have the opportunity to choose the material and texture yourself, choose the right color, design and look, and make a sideboard that is ideal and fits into the overall style of the kitchen. Another advantage is the ability to make a buffet that fits perfectly in size, while purchased furniture cannot offer a variety of sizes.
Important! To decorate a new sideboard, you can use various styles: painting in an unusual color, modeling, unusual glass. For the upper open part, it is better to choose beautiful dishes, and hide pots and pans in the lower drawer.
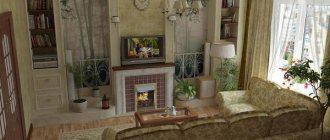
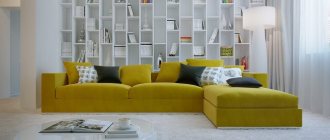
The buffet will fit well into any interior. It can be an antique sideboard, with carvings and made of real wood, or modern sideboards in a strict and laconic form.
Materials and tools
The variety of modern building materials allows you to choose any convenient material, based on financial capabilities and personal preferences. The most popular ones in our work are:
Fiberboard
The material is resistant to high humidity, durable, affordable and relatively easy to process. Mainly used for the back walls of cabinets, wall cabinets and drawers, without deformation and securely held on fasteners. The simplicity of this material allows you to experiment with it, and its lightness allows you to reduce the weight of the finished buffet.
Chipboard
Comfortable material with a variety of patterns on the surface is widely used for making furniture. It is quite durable, lightweight and easy to work with, strong and, thanks to its structure, repels water. It is easy to work with, it holds the cut shape well and is convenient when cutting and assembling, holding nails well. However, finished furniture should not be installed near heat sources. Otherwise, the release of harmful substances from the compressed resin into the air can lead to allergies and diseases.
MDF
The widespread use of this environmentally friendly material is due to its advantages: moisture resistance, beautiful structure. The principle of its creation is similar to chipboard, but it is made from higher quality materials and is not afraid of being near heat. The only drawback is the relatively high price. MDF holds its shape well and can be used to create decorative elements.
Wood massif
An ideal material for creating such furniture. It is environmentally friendly, and the properties can vary due to the choice of different types of wood, which also differ in physical properties. Pine, larch or oak are best suited for a buffet. Natural wood looks much better, but the cost will be comparatively higher. To save money, you can assemble a sideboard using various materials and use wood for the front parts, and create shelves and the back wall from cheaper analogues.
In addition to the material for cutting, you will need a set of tools. There are no special mechanisms or devices here; everyone can find them:
- drill;
- screwdriver;
- wood drills;
- roulette;
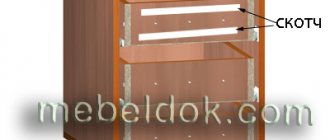
- duct tape;
- pencil for drawing;
- vice;
- Grinder;
- milling machine;
- sanded sheet;
- varnish coating;
- drawing.
The drawing is prepared in advance and contains all the necessary dimensions, number of units, thickness of all materials and their quantity. The drawing allows you to calculate everything in advance and purchase the required number of sheets and cuts.
How to take measurements correctly
To ensure that upon completion of the work there are no excess materials left or, on the contrary, a shortage is not discovered, all necessary measurements and initial calculations are carried out before work. To do this, use a drawing calculating the height and width of the product and all elements: shelves, doors, etc.
- Sketching a kitchen wall or corner on a sheet of paper will always allow you to keep before your eyes an image that can be considered three-dimensional. It is also necessary to sketch out all the elements located there: sockets, pipes, other furniture that cannot be moved.
- Carefully measure all possible distances and record them in the drawing: the ceiling may not be perfectly flat, so height measurements must be taken in at least two places. The desired depth of the chest of drawers is noted with additional consideration for the thickness of the doors and back wall. The height of the chest of drawers should take into account the fact that when installing it, it will be necessary to raise it and not damage the ceiling.
- At this stage, the calculation of the opening of the doors, the dimensions of the protruding parts of the decoration and the height of the chest of drawers are carried out. Control measurements of the chest of drawers are applied to the drawing and a general check is made: the chest of drawers must take into account the height of the ceiling, should not cover the window and, when using chipboard, should not be located next to the radiator.
Important! Measurements should be recorded in millimeters.
Veneered plywood
Description of the algorithm for making a kitchen pencil case and sideboard from natural boards
This furniture belongs to the middle class in terms of complexity of production; you must have not only a certain amount of work experience, but also a full set of woodworking tools. The furniture is divided into two parts: a pencil case and a sideboard. They can be mounted together or separately; the cabinet itself has two technological zones - the upper one with glazed hinged doors and the lower one with drawers and shelves closed with doors. Separating the kitchen cabinet and cabinet makes it possible to optimally use the free space in the kitchen; this technique is used in many types of cabinet furniture; we consider it quite successful. You don’t have to make two items at once, start with one (at your discretion), and then you can always continue working.
Description of the pencil case and sideboard
During the calculations, we were guided by the size of kitchens in Khrushchev-era buildings, and they, as you know, do not allow you to “expand with the dimensions.” In this regard, we had to significantly reduce the depth of the furniture; it is smaller than the standard one offered in stores. This will give you the opportunity to make furniture taking into account the characteristics of your apartment. Make boxes for pencil cases and cabinets from furniture panels. They can be purchased ready-made in stores (which is quite expensive in terms of price) or made independently (the option is more economical and advantageous in many respects). Self-made panels make it possible to minimize unproductive waste of expensive materials. We will tell you how to make furniture panels throughout the article; believe me, there are no secrets or difficulties here.
If you do not want to make furniture panels, then you can use laminated plywood or chipboards to make furniture. But keep in mind that in many respects these materials are inferior to natural boards.
| Buffet with pencil case |
Making parts and assembling the buffet
Let's start with this piece of furniture; it is much more complex than a pencil case. For the buffet you will need boards 25 mm thick; when clean, the thickness of the buffet parts should be 20 mm. Carefully process the boards with an electric planer on both sides, if you have a universal woodworking machine - great, if you don’t have such a machine - you will have to spend quite a lot of time and effort doing the work manually. In addition, there is a big risk of getting boards with different thicknesses, and this is extremely undesirable for making furniture panels - you will have to additionally plan or sand them.
The total width of the two cabinets is 2000 mm, the depth of the tabletop is 420 mm, the height is 2000 mm, the lower cabinets are 380 mm deep. The upper cabinets are smaller in size, 280 mm deep. At the very top we installed a decorative cornice; you may consider this detail unnecessary and use simpler purchased decorative elements. There are a great variety of them on sale today, the materials used range from metal or plastic to natural wood. You just need to coordinate your choice with the overall appearance of the furniture and the existing interior of the kitchen. The lower cabinet (buffet) has a height of 2000 mm and a width of 15000 mm.
| Buffet dimensions |
| Door frames |
| Door facades |
Making parts for a large cabinet
Tabletop width 420 mm, thickness of boards for manufacturing 30 mm, tabletop length 1500 mm. Make the boards for the tabletop according to size, process the edges for the tongue/groove connection, taking into account the overall width, make the connection using wood glue, clamp the set of boards with clamps until the glue dries completely, the exposure time should be at least 24 hours, depending on the specific brand glue. If necessary, sand the assembled tabletop with an electric sander. Using the same technology, you should assemble all other furniture panels from boards that you will use when making a sideboard and a pencil case for the kitchen.
Assemble side walls and partitions with a width of 380 mm, a length of 730 mm, the clean thickness of the boards should be 20 mm. Bottom dimensions: length 1500 mm, thickness 20 mm, depth 380 mm. We have already mentioned that the internal shelves can be made of plywood or chipboard; these materials will slightly speed up the process of assembling the finished buffet.
How to make legs for a sideboard and pencil case
The main purpose of these elements is to give furniture an elegant appearance, increase its stability and provide natural ventilation to the internal sections of the sideboard and pencil case. The fact is that quite often wet dishes, pots, etc. get into the interior spaces of furniture. The lack of effective natural ventilation can cause putrefactive processes in the wood. The lower supports allow you to raise the bottom above the floor surface and improve the flow of fresh air.
Cut out the legs from 70x40 mm bars, the connection of the individual elements of the legs should be done in a “mustache”, it is better to make it blind and not through. The profile of the decorative cutter depends on your personal preferences, the main thing is that it looks organically with the other elements. The same profile will need to be made on the upper decorative element. The length of the side parts of the legs should be 380 mm, the length of the front parts of the legs should be 200 mm. Fix the legs from the inside with self-tapping screws; to increase the strength of the connection, you can use wood glue.
| Legs |
Making an upper cabinet for a buffet
The product consists of the following elements:
- Two sidewalls 1150 mm long, 280 mm wide. The thickness of the boards is 20 mm.
- Lower and upper wooden shelves. Length 1460 mm, width 280 mm, make them from boards 20 mm thick.
- Internal vertical partitions. Length 760 mm, thickness 20 mm, width 280 mm.
- Facade wall. Install it between the bottom shelf and the countertop. For the back wall, you can use thin plywood or fiberboard; the back wall should fit into the quarters of the sides, bottom and table top. You can fasten it with small screws or nails.
| Buffet doors and drawers |
| Door fastening |
| Drawer |
Pencil case
You can start making it last. Make the legs and the top decorative strip in a similar way. Check all dimensions carefully, watch the corners. Use very high-quality paints for the final coating; we chose white, which is considered universal for all existing kitchen design styles.
← Children's rocking chair in a few hours of work Technology for making bedside tables for storing tools from boards →
We recommend watching:
Plywood FC | 6mm | 1520 mm x 1520 mm | birch | grade 4/4 | NS
310 rub.
Plywood FSF | 15mm | 1220 mm x 2440 mm | birch | grade 3/4 | Ш2
RUB 1,400
Plywood FSF | 4mm | 1220 mm x 2440 mm | birch | grade 2/3 | Ш2
700 rub
Plywood LAMINATED FOF | 12mm | 1500 mm x 3000 mm | birch
RUB 2,800 RUB 3,000
Plywood FSF | 40mm | 1525 mm x 3050 mm | birch | grade 3/4 | Ш1
5,000 rub.
OSB | 8mm | 1250 mm x 2500 mm
540 rub.
Plywood FSF | 18mm | 1500 mm x 3000 mm | birch | construction | NS
2,000 rub.
OSB | 15mm | 1250 mm x 2500 mm
1,000 rub.
Plywood FSF | 18mm | 1220 mm x 2440 mm | birch | grade 3/4 | Ш2
RUB 1,700
Plywood FSF | 6.5mm | 1500 mm x 3000 mm | birch | grade 4/4 | NS
1,000 rub.
Plywood NEEDLES | 18mm | 1220 mm x 2440 mm | coniferous | grade 2/3 | NS
RUB 1,600
Plywood NEEDLES | 15mm | 1220 mm x 2440 mm | coniferous | grade 2/3 | NS
RUB 1,450
Plywood FSF | 12mm | 1220 mm x 2440 mm | birch | grade 3/4 | Ш2
RUB 1,250
Plywood FC | 10mm | 1520 mm x 1520 mm | birch | grade 3/4 | Ш2
600 rub
Plywood NEEDLES | 21mm | 1220 mm x 2440 mm | coniferous | grade 2/3 | NS
RUB 1,900
Plywood FSF | 18mm | 1500 mm x 3000 mm | birch | grade 2/3 | Ш2
3,000 rub.
OSB | 18mm | 1250 mm x 2500 mm
1,200 rub.
Plywood FSF | 10mm | 1500 mm x 3000 mm | birch | grade 4/4 | NS
RUB 1,300
Plywood NEEDLES | 21mm | 1220 mm x 2440 mm | coniferous | grade 3/4 | NS
RUB 1,750
Plywood FSF | 18mm | 1500 mm x 3000 mm | birch | grade 3/4 | Ш1
RUB 2,200
We also recommend reading
09.10.2015 → Furniture
A small wall shelf with semicircular shapes - we make it ourselves from plywood
The wall shelf is designed for storing small souvenirs and can serve as a place for arranging flowers. In the article we provide a set of drawings and tips for manufacturing the product. The shelf is quite simple to make.
08.11.2015 → Beds, sofas
Cot for children with a pull-out mattress on wheels
We will tell you how to make your own simple and comfortable crib with a pull-out mattress. You will need some material, skill and patience. The cost of the bed is much lower than the prices existing in stores.
11/12/2015 → Do it yourself
How to create bent plywood profiles at home
To create exclusive plywood products, you often need to bend ready-made plywood sheets or make bent profiles yourself. We will talk about the ways in which plywood should be bent and give a description of the technologies.
11/14/2015 → Armchairs, chairs, stools, benches
How to make a wooden bench for a winter garden with your own hands
The presence of a winter garden is a sign of the good taste of the owners of a country house. But a garden cannot have only flowers; it needs to be filled with additional elements. A wooden bench is one of these elements, beautiful and necessary.
Comments
No one has left a comment yet
Buffet yourself: step-by-step instructions
After taking all the necessary measurements and cutting, the buffet is assembled in the following order:
- Preparation of large elements: marking the side walls, rear wall, bottom, etc. At this point, all parameters according to the drawing are taken into account.
- Preparing smaller parts of the sideboard, preparing side parts for fastening, holes for assembly, connecting partitions and main parts using fasteners.
- Mounting the housing and installing the internal parts using screws and angles, assembling the base parts according to the drawing.
- Placement of the façade slab with projections for the doors and back panel.
- The back wall is assembled, the canvas is fixed at the back and for convenience the finished buffet can be laid on its side.
- Installation of hanging parts: hinges, doors, additional design elements.
- Installing furniture in its place and checking the overall assembly for quality of installation.
- Decoration: installation of door handles, coating or decoupage.
Important! Professionals advise using a depth limiter, this will prevent you from damaging the wall by drilling through it.
Important! For convenience and to avoid errors, it is recommended to number and mark the parts.
Assembling a buffet at home is not as difficult as it might seem at first glance. Careful measurements, selection of materials and arrangement of the workplace will help you create a homemade piece of furniture that fits perfectly into the interior.
What types of kitchen buffets are there?
In the classical sense, a buffet is a rather massive closed cabinet located on the floor, and on top of it is a cabinet with glass doors.
However, here it is necessary to clarify that doors can be of two types:
- Completely transparent, displaying all kitchen utensils, which are neatly arranged on shelves;
- With a small transparent window through which only part of the entire contents of the buffet is visible.
A very unusual model with small windows
There can also be an open countertop between the top and bottom. Frequently used items, vases with fruits or flowers, and all kinds of figurines are most often displayed on it.
Note the built-in countertop
Based on shape and size, the buffet can also be divided into several types. But the most optimal of them is a two- or three-door cabinet with a glass display case. Lots of convenient drawers, shelves, and an open display case – very functional.
Advice! The lower closed cabinet can easily accommodate large kitchen utensils (pans, jugs, pots, wide dishes) and even small household appliances (steamer, blender, bread maker). And in the upper showcase you can put decorative items, for example, an expensive tea set.
True, such a buffet requires quite a lot of space, so it is unlikely to be suitable for small kitchens. The approximate dimensions of this beauty are: width from 120 to 200 cm, height about 200 cm, and depth about 45 cm.
However, there are also buffets that are more modest in size; they are lower and not so deep. You can also fit a corner model of a sideboard into a compact and harmonious design. It has a semicircular shape and fits perfectly into a corner without interfering with free movement around the kitchen.
Compact buffet for a small kitchen
Restoring an antique sideboard
Good day, friends!
I will tell you one wonderful story of an old dilapidated sideboard. In the first lines of my letter, I will say right away that we are not engaged in museum restoration, we are carrying out restoration work. These are slightly different concepts.
When Evgenia sent us a photo of this beauty with a request to repaint it and bring it into decent condition, Andrey and I could not resist the temptation to restore it. First, we agreed on the painting style. I sent a bunch of images with different style and color options. And we settled on olive shades. So let's start with the photo report.
This is how we saw him for the first time:
They transported it disassembled to our workshop.
The first and one of the most difficult tasks for us was the hundred-year-old smell. What haven't we tried? What methods have you looked for on the Internet and in the vastness of professional forums? They washed, washed, ventilated, washed again, sprayed, left various products on overnight. In the end, to be honest, I don’t know what helped. It seems to me that everything happened at once.
The second stage was sanding. They sanded with their hands, and with their feet, and with their nose, and with a grinding machine, and with whatever else they sanded.
Then Andrey started carpentry work, and I began preparatory work for painting. What do you want to pay attention to?
1. We sawed off the doors around the perimeter and increased them to the required size + made new trims:
2. Hid unnecessary holes from locks
3. We manufactured and installed a new countertop and baseboards
4. We made completely new shelves from solid pine (two shelves at the top of the buffet and one at the bottom)
5. Updated the legs of the counter (complete replacement of peeling veneer)
6. The top of the cupboard has brand new drawers and handles. The fronts were left in the lower part, new drawers and handles were made
7. New “anthers” were made
8. The sideboard is completely sanded by hand and using a sanding machine. Fully primed in several layers. After the primer, yellow spots began to actively appear, which also had to be dealt with in different ways. Fully painted, coated with several layers of unique furniture varnish (polyurethane with a patented formula.)
9. Selection and installation of new fittings (handles and hinges). Two metal “original” handles were cleaned, protected from corrosion, and painted.
I'm sure I forgot something, but the most important thing is the result!
Thank you very much for your attention. And most importantly, thanks to our dear customers for such interesting work!!!!
Sincerely,
Family workshop, Andrey and Anna
Where is the best place to put a buffet?
Here are some instructions, or rather recommendations, on this matter from professional designers:
- If your kitchen is spacious, then the dining buffet will look harmonious near the dining area near the table or opposite the entrance to the kitchen. In this case, the guests’ attention will immediately fall on the original sideboard with beautiful dishes or other decorations.
- If you have a separate dining room, then, of course, it is better to place a large buffet there.
Placing a buffet in the dining room
- For studio apartments, a so-called buffet bar is suitable. It can become a kind of space delimiter. With its help, you can successfully divide the room into a cooking area and a living room. In addition, with such furniture, you will not have to break away from the conversation during the cooking process, and prepared dishes and drinks can be served directly through the buffet.
- But even if you have an apartment with a small kitchen space, you don’t need to deny yourself the pleasure of installing such beauty. A sideboard can be used to “fill” a non-functional niche in the wall or a dead “dead corner”, as you can see in the photo below.
Sanitary requirements for buffets
- Dec 23, 2010 Parent category: Enterprises Category: Design and layout Published: - Dec 23, 2010
The room for a stationary buffet should be light, spacious and dry. The floor should not have cracks or potholes, and the wall panels should be painted with light-colored paint. The buffet should have two entrances - one for consumers, the other for delivery of goods.
And it is not allowed to place a buffet next to the restroom and smoking room. Buffets located separately from the dining room (external) and selling cold and hot snacks must have the following premises: a preparation room for preparing culinary products from a set of ready-made raw materials, a sales area for selling food and receiving it by consumers, a washing room for washing dishes and equipment, the washing room can be located in blank provided that it is separated by a partition. The presence of water supply and sewerage in the buffet room is required. Buffets located separately from the dining rooms must have cabinets for storing outerwear and workwear, a counter with a glass display case and refrigerated cabinets. In the dining area, tables should be covered with clean tablecloths. Tables with tops made of marble or plastic need not be covered. A separate room is equipped for washing visitors’ hands; visitors must be provided with soap and a towel. To dispense food, buffets must have spatulas, tongs, forks, spoons and other equipment. When weighing sausage, cheese, frankfurters, etc., first place clean paper or a plate on the scale platform. The dishes must be washed thoroughly and then rinsed with boiling water. To wash dishes, the plates are first cleared of food debris, and then washed with hot water with the addition of detergents. After which they are placed in nets on edge, scalded and, taken out together with the net, left until they dry. If there is no boiling water, the plates are rinsed with hot water from a boiler and placed on edge on a special shelf attached to the wall above the sink. Forks, knives and spoons are washed in the same way. Glasses and other drinkware are additionally wiped with a clean cotton napkin. It is not allowed to rinse glasses in stagnant water and wash a batch of glasses in the same water.
Dishes for storing food must be made of non-oxidizing metal (aluminum, stainless steel, tinned or enameled). Galvanized cookware can only be used for boiling water and food cannot be stored in it for washing dishes. Prepared cold foods and perishable foods, with the exception of those on display, must be kept in refrigerated cabinets. Under the glass display case, perishable products are displayed but in 1-2 servings in an assortment.
Buffet
Work organization
Sales of goods
Like
- Back
- Forward
Add a comment
JComments
How to fit a buffet into the overall kitchen interior
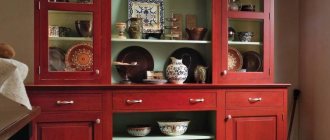
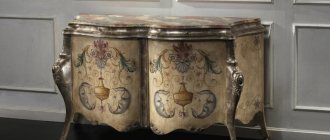
Of course, the most popular models are the traditional “old-fashioned” sideboards, made of noble wood with stunning engravings, carvings and balustrades on the facades, cornices, and plinths. Such models have an aristocratic appearance and are perfect for the classic style of kitchen interior.
Large model made of noble solid wood
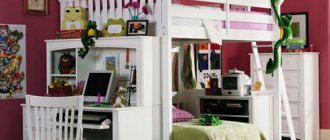
For a country-style kitchen, it is better to choose a rustic sideboard made of untreated wood, without elegant finishing, with numerous pull-out, lockable cabinets, or curtained with fabric in small flowers. But the Provence style will approve of white buffets with open shelves.
Provence style
As for modern kitchen interiors, there are suitable models for them too. Laconic forms and rigor are what characterize buffets of our time. And, it should be noted, they are made not only from wood, but also from plastic, acrylic, frosted glass, and decorations achieved using new technologies.
More modern model
Buffet finishing
Probably, many will agree that the new furniture looks impeccable, but, alas, the price is not at all pleasing. If you suddenly inherited your grandmother's sideboard, consider yourself lucky! After all, as you know, furniture used to be made for work, with the expectation of long-term use. And you can bring it into the proper, and most importantly, desired, form yourself, without spending a lot of money on it.
Five ideas for decorating old furniture
We offer you several interesting options for remodeling kitchen furniture.
Even at home, a kitchen buffet with your own hands can be transformed from seemingly shabby furniture into a real interior decoration!
- Painting and replacement of kitchen facades. An old wooden or painted surface must be thoroughly cleaned of grease stains and dust, washed with warm water and detergent and dried. Next, a light sanding with fine-grit sandpaper will be required. If there are cracks in the furniture, we fill them with a special wood putty. The already dried surface must be re-treated with sandpaper (only with medium-grain sandpaper). This is followed by a primer with universal paint and light sanding.
DIY buffet restoration
Most of the good old furniture from Soviet times was taken to the dacha in the 70s and 80s. To put it mildly, it was not used carefully. Carved sideboards, oak, walnut, antique and 60s, rustic, white painted, with mirrors and stained glass just beg to be put in order with your own hands.
How to restore old furniture with your own hands
1. Decide. Why is this being done? What should happen?
2. Assess the depth of damage and your strength. Will you do this in an equipped workshop or at home?
This is especially important when choosing varnish or paint, solvents and cleaners
3. Draw up a work schedule.
4. Carry out work in strict sequence: clearing, carpentry, finishing. Usually this is done the other way around. First they paint, and then it turns out that the veneer has lifted, the paint or varnish did not lie evenly on the old coating. A layer of white paint does not hide dark spots. No matter how much you paint, they still show through. There are cracks on the walls that became more noticeable after painting in light colors. The wood has been eaten away by furniture beetles. The antique mirror has become tarnished, which was not noticeable under a layer of dust before. A couple of legs are missing...
It is imperative to restore old furniture with your own hands (restoration refers to a set of actions to preserve the item). Try new materials, study technologies, analyze mistakes, go towards the goal. Perseverance and perseverance are the foundation of success.
If you have any questions about the restoration of an antique sideboard, sideboard, table, cabinet, antique chair, sofa, or any other antique furniture, please ask questions by phone or via our email.
Estimated cost of restoration (price as of January 9, 2019)
| Price, rubles | |
| Chair | 5000 — 20000 |
| Armchair | 10000 — 30000 |
| Sofa | 30000 — 60000 |
| Cost, rubles | |
| Table | 10000 — 40000 |
| Buffet | 30000 — 80000 |
| Closet | 30000 — 80000 |
Restoration of paintwork
By sending us a completed form with photographs, as well as asking a question, you will receive complete information about the item (what it is, material, age) and the cost of restoration work. Next, the restorer will come to the site, inspect it, and determine the final price of the restoration.
The final price will not change. Departure is free.
The benefits of making it yourself
If a home craftsman is comfortable with carpentry tools, it will not be difficult for him to please the housewife and make a buffet with his own hands, which is necessary in any kitchen.
For maximum convenience and comfort, you should equip it with not only beautiful, but also functional furniture, such as a buffet.
An excellent solution for any home is to install a corner kitchen cabinet.
A self-made kitchen cabinet has a number of advantages over its “store-bought brothers”:
- you can choose a unique design for it;
- choose the material to your liking;
- use original fittings;
- choose the color scheme of the buffet that best matches the kitchen interior.
To make the interior original, you can make it yourself, putting your soul into the work, using any materials.
The most important nuance when installing such a cabinet is calculating the trajectory of the door opening.
In addition, wood products are extremely beneficial for health: they do not contain toxic compounds and do not emit harmful substances, but they fill the room with the aromas of essential oils.
Sideboards and buffets for the kitchen do not have much difference and are very similar in appearance to each other, because... The ancestor of both is considered to be the closet.
A kitchen buffet is an excellent solution for your kitchen interior.
A wooden sideboard is durable and comfortable. It will last for decades and is easy to restore and repair.
A sideboard made of natural wood will look rich and elegant, but at the same time it will cost a much larger amount.
Another important advantage of making a kitchen cabinet with your own hands is the ability to make it in an original configuration and size that best suits convenience and comfort.
To get a beautiful product without spending too much, you can make the furniture body from cheaper raw materials, such as chipboard, and the facades from more expensive and beautiful ones.
Selection of materials for the buffet
Kitchen sideboards have many similarities with sideboards; both of these types of furniture evolved from a simple cabinet through evolutionary improvement. A distinctive feature of the buffet is the presence of a niche and a specific purpose - storing dishes. While sideboards can store towels, tablecloths and other textiles for the kitchen.
Modern building materials are presented on the market in a wide range, so the master has plenty to choose from. A thorough analysis of all options is a guarantee of producing a high-quality and durable buffet.
Important: the surface of the kitchen cupboard must be moisture-resistant, because the microclimate of the room itself is a negative factor with its constant temperature changes and fumes during the cooking process.
Today, the most popular raw materials for the furniture industry are fiberboard, chipboard and MDF boards, but solid wood also has a lot of fans. To understand which material to give preference to, you need to look at the technical characteristics of the most popular types:
- Chipboard, or particle board, is made from shavings pressed into a single sheet along with resin. A kitchen buffet made from chipboard is solid, strong and inexpensive. Chipboard holds nails well, making construction easier. And the rich color palette of the material allows you to choose any option. Despite its many advantages, chipboard also has disadvantages: the ability to release formaldehydes into the environment, which are dangerous in high concentrations for humans. The way out of the situation is to place a chipboard buffet at a distance from heat sources (stove, radiators, etc.);
- MDF, or Medium Density Fiberboard (means fiberboard with medium density parameters). The production is similar to the process of making chipboard, but instead of resin, a more natural component is used - lignin. To obtain a connecting link, wood is exposed to very high temperatures, so MDF can be called an environmentally friendly construction raw material. The material is more moisture resistant, which makes it advisable to use it for the construction of a kitchen buffet. Due to the soft structure of the MDF board, you can use it to make various decorative facade elements, make a white sideboard with a beautiful arch, etc. MDF has practically no disadvantages, except perhaps a higher price compared to chipboard (the advantages of the material are discussed in the article.);
- fiberboard board. Residues from woodworking industries are used to produce wood fiber material. They split into individual fibers, which are then glued together and formed into slabs at high temperatures. Distinctive features of fiberboard: resistance to humidity and temperature changes, lightness, strength, durability and affordable cost. A kitchen buffet made of fiberboard is quickly assembled, the material is easy to mill. The presence of so many advantages determines this type of material for the back walls of wall cabinets and the bottom of drawers;
- solid wood is a natural, environmentally friendly and noble material. An antique solid wood sideboard becomes a decoration for any kitchen. The type of wood is of great importance: pine sideboards are highly durable and the material itself is perfectly processed, larch has a higher level of resistance to water, oak almost does not rot and does not tolerate varnish coating well. A sideboard made of untreated wood is a symbol of style and presentability.
You can create an antique oak sideboard for the kitchen with your own hands, but you should prepare for high costs - the most valuable type of wood cannot be cheap. Therefore, many craftsmen prefer to make the frame of the buffet from inexpensive chipboards, and the facade from a more expensive and noble material.
At your dacha you can put a plastic buffet, especially in the summer kitchen. This will allow you to use a functional piece of furniture purchased at a low cost.
A person can make buffets and sideboards for the kitchen with his own hands if he is familiar with wood processing technology. Externally, the finished structure is a rack designed for arranging cups, tea cans, confectionery, etc. A kitchen cupboard may or may not have a back wall and doors at the front. The design of an interior item can be anything, some even manage to make and install a corner buffet in the kitchen.
Deciding on design and construction
Making your own kitchen cupboard opens up a wide field for the imagination of the home craftsman. He can make it, in accordance with his vision and ideas, in various styles:
Modern buffets for the kitchen can be made, guided by a step-by-step description of this process.
Cabinet designs can also be very diverse, including corner and round.
All homemade products radiate the coziness and warmth with which it was made.
Necessary materials
In the friendly family of kitchen furniture, the sideboard occupies a special place - it reigns in the kitchen and bears the features of an elegant sideboard and an ordinary cupboard. Previously, furniture was made “to last,” so the most durable and high-quality wood, well-seasoned and processed, was chosen for its manufacture.
This furniture option is practical, beautiful and takes up little space.
Today's offer of building materials allows you to choose the necessary option for making a buffet with your own hands. But one of the most popular bases for kitchen furniture has become MDF, fiberboard, chipboard and solid wood. The latter does not require additional characteristics, being distinguished by strength, durability, and beauty. As for wood boards, each of them has its own effective properties and disadvantages.
- Fibreboard is resistant to moisture and temperature changes. It is light, strong, durable, affordable and not difficult to process. A buffet made from this material can be quickly assembled. It can be made functional and visually attractive. Most often, such plates are used to install the back walls of wall cabinets, drawers and shelves.
- Chipboard is available in a variety of colors. This is a durable and inexpensive material from which you can make a comfortable, spacious and original cabinet that can easily fit into any kitchen interior. Among the significant disadvantages are emissions of formaldehyde into the air. To reduce their harmful effects on human health, it is necessary to place furniture made from chipboard away from heat sources.
- MDF is used quite widely today. It is manufactured using modern technologies, therefore it is an environmentally friendly material. It has high moisture resistance, which makes it more suitable for use in the kitchen. It has a soft, easily processed structure, which allows it to be used to create a variety of decor for furniture fronts of buffets and to give products a variety of shapes. The only drawback is the fairly high price compared to the cost of chipboard.
- Solid wood is a special chic and a demonstration of high taste. Environmentally friendly, natural material.
Tree selection
Breeds for making furniture are divided into three categories:
- soft: spruce, pine, alder, linden, aspen;
- hard: oak, ash, walnut, beech, larch, birch;
- super-hard: acacia, boxwood, yew.
Let's look at the advantages and disadvantages of some types of wood.
The structure of this wood is soft, so it is easy to cut, saw, surface planer, glue and paint. Pine can withstand high humidity conditions. Furniture made from it exudes a subtle pine smell and phytoncides, which destroy harmful microorganisms in the kitchen atmosphere.
Unfortunately, pine is susceptible to scratches and chips with slight mechanical impact on its surface. The service life of pine furniture can be a couple of decades. In hot conditions, wood releases resin, which can significantly deteriorate the appearance of the cabinet.
The most expensive and durable type of hardwood. The saw cut may be light or yellow-brown in color. An oak sideboard will decorate the most sophisticated interior. The surface of the furniture is varnished to highlight the beauty of the wood structure.
Oak is a durable, wear-resistant material that is not subject to rotting and can withstand sudden temperature changes. Oak furniture can last for centuries.
The main disadvantage is the high price.
Also applies to valuable wood species. The saw cut has a beautiful texture. The older the material, the darker its structure. Walnut lends itself well to processing. Various elements of furniture decor are cut from it. Walnut furniture is valued for its high performance and beauty.
Walnut is a rare material on the timber market and is expensive.
The cut of this timber has a beautiful soft light color. Furniture made from it has a dense structure. Birch veneer is used to decorate wardrobes and desks.
Wood is susceptible to rotting and can become deformed due to sudden temperature changes.
Required Tools
To make a kitchen buffet to your liking, you will need an individual set of tools, but among them there are those that you cannot do without, regardless of what material, design and configuration of the product the master chooses.
In the classic version, there are work surfaces. This part is always decorated with decorative elements.
- drill;
- wood drills;
- jigsaw;
- a circular saw;
- Sander;
- screwdriver
and other tools and devices that should be at hand.
The most common are closed cabinets.
Manufacturing process: step-by-step instructions
Before you take up the tools, you need to clearly imagine what kind of buffet you will make, and reflect your thoughts and ideas on the drawing, indicating all the details of the product.
A sideboard is part of the kitchen furniture.
First, the largest elements of the product that form its basis are prepared according to the available drawings, taking into account the necessary parameters. In order not to disturb the assembly order and not to lose the necessary parts, experienced home craftsmen advise numbering all parts.
It has the shape of an ordinary cabinet with a closed and an open part.
After completing the preparatory work, the cabinet is assembled in the following order.
- Preparing the side parts of the furniture, drilling holes in them. It is worth paying attention to the advice of experienced craftsmen who recommend using a depth limiter to control the distance between the recesses. Its use allows you to protect furniture parts from through drilling.
- Connection of buffet partitions
- Connection of the upper part of the product and the outer side parts. The top of the product is located on the end fasteners, and the side parts and bottom are pushed all the way.
- Installation of internal parts. First, the buffet body is mounted on the rear ends. Screws are used to secure the lower part, and mounting angles are used to connect it to the upper part.
- Assembly of base parts and their fastening. To mark the plinth, a drawing of kitchen furniture is used, according to which the panels are fixed on bars located at the corners of the structure.
- Decoration of the façade. The plate is placed in its place, and protrusions of the required size are left on the sides. They are needed for hanging doors and fixing the back panel.
- Securing the back wall. The sideboard body is laid out on its side to secure the canvas in the required position.
- Installation of doors and hinges. The left and right doors, the bottom and the top are marked with marks, after which the hinges are installed according to the marked marks. The cabinet doors are mounted in place, securely fastened on the hinges.
- Installing furniture in its permanent place, installing shelves and drawers, checking the quality of installation and ease of use of the product.
The designs of such cabinets vary.
However, in other designs you can also find kitchen furniture with engravings, plinths and cornices on the facades.
Buffet decoration
The final stage of making a unique kitchen cabinet, made by yourself, will be its decoration. Here can be used:
- ready-made fittings;
- handmade wooden or metal decorative items;
- ornaments and colored decoupage images;
- photographs, glass and plastic decorations;
- original decorative products, made by hand or to order, depending on the style of the product.
To assemble furniture you will need a lot of space, so before you make a cupboard with your own hands, you need to take care of the free space.
Due to decorative elements and the use of natural materials, cabinets are most often used in a classic style.