Today, even the oldest houses can be made in a modern style.
On the streets of the former countries of the Soviet Union, you can often see monuments of antiquity that remind city residents of their past - of the Soviet Union. In many cities, and especially in the periphery, such houses make up the majority. Therefore, many people have a question: “How to decorate your Khrushchev building and make it more modern?” First of all, the renovation should start from the ceiling - this will become an excellent basis for finishing the walls, floors and other surfaces in the house.
Ceiling heights in Khrushchev-era buildings: photo and design of a modern house
One of the main problems in Khrushchev apartments is the ceiling is too low. A height of 2.5-2.6 meters quite often may not be enough even for ordinary people. This problem concerns most houses that were built in the Soviet Union: this issue is faced by residents of so-called “Stalinka” houses - houses built during the reign of Joseph Stalin.
What are the opinions of different people regarding Khrushchev:
- Ceilings too low. This problem is the most common, since a more or less tall person will be able to reach the ceiling simply by standing on his toes. It is impossible to install a cabinet or refrigerator that is too high in a Khrushchev-era apartment, which limits the residents of such houses.
- Apart from the height of the ceilings, the area of the apartments and their rooms is quite small. This problem especially concerns kitchens: Soviet architects clearly “spared” the free space for this room.
Dependence on ceiling height
It is necessary to understand what the height of the ceilings influences so much that for many this parameter plays an important role.
- Of course, on your sense of self in this space. And the higher the ceiling in the room, the more spacious it seems.
- The volume of air in a closed space. As the volume increases, ventilation must become more effective, since there is more air that requires purification.
- Temperature distribution in the room. The higher the ceiling, the worse the uniformity of heat distribution. So, under the ceiling it can be plus twenty-five degrees, and at floor level – plus fifteen.
- Great opportunities open up for the implementation of bold design ideas. They can allow, for example, to create an original multi-level ceiling.
- In the end, low ceilings are unacceptable for tall people, if only because their openings are lower than with high ones.
In short, there are plenty of advantages of high ceilings. Therefore, we will consider the layout options in more detail using photos.
Stalinka
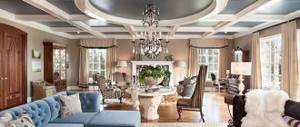
Probably the first characteristic that comes to people's minds when asked about Stalinist houses is high ceilings. Yes it is. The ceiling height is at 3-3.5 meters. But this is not the limit. There are also buildings in which the living space can have a ceiling of 4.5 (!) meters.
In general, Stalinist houses are bright and spacious apartments, as in the photo. Moreover, this applies not only to living rooms, but to their bathrooms, for example. Corridors and doorways are also marked large.
But that's not all. Spaciousness is characterized by halls, staircases, and the distance between the entrance doors of the apartment on the staircase. Here you will not find situations where doors interfere with each other.
This is a solid, high-quality construction “for centuries”, designed for people. We are talking primarily about load-bearing structures, since as partitions you can often find plastered shingles, which are not always executed correctly.
It should be noted that Stalin’s houses were built over thirty years according to a variety of projects; accordingly, you can find completely different layouts and quadratures. In one case there may be a narrow toilet with a three-meter ceiling, and in the second there may be a two-room apartment of 35 m2.
Interestingly, in many apartments there was only a toilet. A bathroom was considered a great luxury. Therefore, public baths were used.
Houses from the times of Khrushchev
There is no need to talk about the height of the ceilings in Khrushchev-era buildings. It will not be difficult for a tall person to touch at least the tip of his fingers while standing on his toes. At the same time, the low level of ceilings is accompanied by a small area of all rooms. One might say, extremely small. For example, a six-meter kitchen. Therefore, there is no need to talk about comfort in such an apartment.
Moreover, such crowding begins from the entrance. The stairs and landings are narrow. The door cannot be opened if the neighbor is open - a common occurrence for residents of Khrushchev. Photo to prove it.
The ceiling height is 2.5 meters. If there are samples with smaller parameters, most likely a floor on joists or a suspended ceiling is used, which “ate up” the space.
However, all these shortcomings are allowed if we take into account the main idea of construction - the maximum amount of housing for the maximum number of people.
Therefore, savings in everything. And low ceiling heights play an important role in reducing heating costs, as does space. After all, heat tends to rise, and the central heating tariff depends on the area of the apartment.
In addition, these houses are still more modern than Stalin’s ones. At least there are bathrooms here. And even though this is often a combined bathroom, the advantages are obvious.
Panel buildings
Here are several typical designs of panel houses, considering the height of the ceilings in such apartments.
- GI - large-block houses. Here the ceiling height reaches 250 cm. The bathrooms and kitchens here resemble storage rooms rather than full-fledged rooms.
- I-355, I-515/5, I-515/9ш - panel buildings with ceiling heights of 255, 248 and 255 cm, respectively.
- 606 series - ceiling height 270 cm, despite being classified as economy housing.
- 111-90 and 111-96 – large-panel houses. Here the height could reach 264 cm.
- P-44 - 264 cm, but already in P-44t and P-44k - 270 cm.
- P3m – 264 cm.
- Episode 137 – 270 cm.
Results
As you can see, builders do not have a uniform policy regarding ceiling heights. Different years, different layouts had their own characteristics. The only good news is that in any case, the ceiling height, at least officially, was not less than 2.5 meters, which, in principle, should be enough for “no frills” living.
Residential building series 1-335
History is a changeable thing. And it influenced and influences not only major historical events, but also how and where we live, what we dress in, and so on. Today we will talk about how our home has changed and what it is now, namely, what is the height of the ceilings in different houses, private houses, apartments, and so on.
Why is this so important?
Because the height of the ceilings in a residential building affects the flow and quality of life in a given room. So, what exactly does ceiling height affect?
- Firstly, it determines a person's sense of space
. The higher the ceiling, the lighter and more natural the tenant feels. - Secondly, an air purification system
. In low and small rooms, in which the ceiling height is low, there is correspondingly less air, so the purification system can be simple. Whereas in large rooms it is necessary to ensure a flow of fresh air. We will have to increase the number of air purification systems. - Temperature around the perimeter of the room and the entire apartment
. The higher the ceiling, the greater the difference between the temperature on the floor and above, at ceiling level. In this case, you will need to take care of the correct heat distribution system in the house. - Creation
. In a house or apartment where the ceiling height is high enough, you can realize your wildest ideas for its arrangement. Here you can afford not only an elaborate and complex ceiling, but also light and large windows that will visually make your home brighter and more beautiful. A large field opens up for the implementation of your own ideas. - In the end, comfort
. In an apartment with low ceilings, even the air usually feels stuffy and stuffy. In addition, if a tall person comes to visit you (or nature has not deprived you), this will cause additional discomfort and even deformation of the spine.
As you can see, there are many advantages to high ceilings that cannot be overlooked. Therefore, next we will talk in more detail about the types of ceiling heights in different houses. Although it is worth noting that today residents are trying not to be limited by the size of the apartment. Visually expanded space, visually high ceilings - everything to feel freer.
Note
So, the standard ceiling height is from 2.5 to 3 meters - this depends on the developer. The optimal ceiling height in new buildings is from 2.6 to 2.7 meters.
But such standards were introduced relatively recently, so many people still live in houses whose ceiling heights leave much to be desired. There has even been a whole movement in the architecture of residential premises, which allows you to visually increase the height of the ceiling.
How to make ceilings not seem so low
How to deal with the problem of low ceilings?
There are several ways:
- As you know, dark colors can increase the height of a room. But there is one drawback - they visually reduce its area and width. If your room is too small, then this option will not work for you.
- You can use non-plain wallpaper. The top of the walls can be dark and the bottom can be light. This solution is suitable for those with low ceilings in rooms with a small area.
- Vertical lines. This method is very popular not only in construction and design: short people are recommended to wear clothes with vertical lines. Wallpaper with this pattern is best suited for homes; it visually makes the room tall.
- Use of mirrors. As you know, mirror surfaces can increase space and make a room taller. This option is the most universal: it is suitable for any room.
- Curved ceiling. This method of finishing the ceiling can make your room visually taller.
It should be noted that these methods of enlarging a room do not actually add a single centimeter to the total area of the home; they simply solve the problem of people who are embarrassed by low ceilings: tall people will still feel awkward in such houses.
You need to avoid using too bright details in the interior: wallpaper or furniture in bright colors can draw attention to the overall size of the room.
If you have a small room, then you should adhere to minimalism: the furniture should be neutral shades. Its dimensions should be small.
Common features of buildings of the period
Despite the capital's renovation of Khrushchev buildings, which in other conditions would have been carried out long ago, and the tendency to scold or criticize such buildings, the construction completed its task. This was possible only during the period of state planning, when the first experience of wholesale buildings in Moscow, Sverdlovsk and Kuzbass was crowned with success.
In 1950, a decree “On reducing the cost of construction” was adopted, and 4 years later, also by law, a new decree was adopted, according to which more than 400 factories and 200 polygon-type sites were built for the production of prefabricated structures and parts from reinforced concrete.
Even before the release of the special SNiP, the construction of 4-story houses in Moscow began in 1956, and at the same time the 1-506 project started in Leningrad. But these houses still adhered to Stalinist characteristics, so the ceilings were high and the apartments were large and comfortable.
And only in 1957, after the decree “On the development of housing construction in the USSR”, houses began to correspond to the usual idea, and in 1963 the first revision of standard projects was carried out. Whatever the ceilings in the five-story Khrushchev buildings, they were built a lot and quickly, and people were happy to receive separate modern apartments.
They had a lot in common:
- Normal living conditions compared to barracks and communal apartments.
- Construction according to standard designs (from panels, blocks and bricks), almost always 5-storey in height.
- Preference was given to 1- and 2-room apartments, although 3-room apartments were also built.
- Central heating, sewerage and cold water, ventilation and kitchen stove.
Design features of houses
How many meters the kitchen is, whether there is a garbage chute and what the height of the ceiling in block houses depended on the project, in some of them it reached 2.7 m.
Contrary to popular belief, not all Khrushchev buildings were designed for a short service life, and not all, like the 1-515/5 (515) series, had ceilings with a height of 2.48 m.
It had its undeniable advantages - for example, radiators on interior partitions, the presence of an attic and a technical floor for communications, good sound insulation and strong load-bearing walls. How many years Khrushchev buildings are designed for is also variable.
There are those that are demolished, with a service life of 25 years, and there are options for brick construction, where the characteristics are even higher than those built after 1970, with strong walls that allow for redevelopment, which can last up to 150 years with correct use and major repairs.
The renovation program in St. Petersburg and Moscow included MKDs from short-term developments, which were planned as temporary, or had fallen into disrepair after incorrect operation.
Watch an interesting video on this topic below.
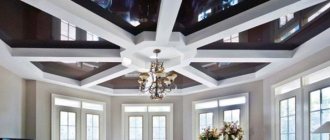
Two-level ceilings in Khrushchev buildings: advantages
There are several opinions regarding this issue.
The advantages of two-level ceilings include:
- Quick installation.
- There is no need to level the surface of the ceiling.
- Excellent aesthetic appearance.
- They will look good in any room: in the hallway, in the hall, in the corridor and in the bathroom.
Disadvantages of two-level suspended ceilings in Khrushchev-era buildings
Naturally, lovers of suspended ceilings in old houses also have opponents.
Why you can’t use two-level stretch ceilings in Khrushchev buildings:
- Suitable for large rooms only. It is not recommended to install this ceiling in a brick Khrushchev-era building.
- High cost of materials for the ceiling and for its installation.
- The height of the ceilings is further reduced.
If we consider the last point, it should be noted that suspended ceilings “take away” the ceiling height not only visually, but actually reduce it. Most experts do not recommend using two-level ceilings because they are expensive and make the problem of low ceilings more obvious. Of course, you can try to take a chance, but you should not install this type of ceiling with your own hands: it is better to entrust it to specialists who will do everything better.
Stretch matte
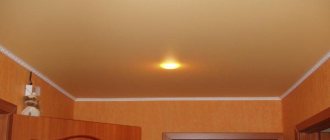
Matte ceilings in Khrushchev buildings are the most popular. There is no explanation for this: most owners just like it better. For lighting, many people choose spotlights.
The advantage of spotlights is that they save height: with a low ceiling, you shouldn’t rely on a luxurious chandelier. However, they can be used above dining areas.
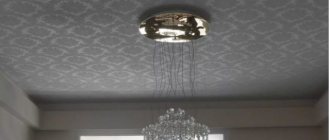
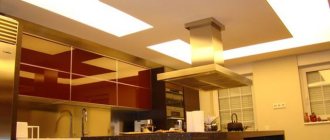
Sometimes on the ceilings in kitchens in Khrushchev-era apartment buildings there is such a combination of an ordinary chandelier and spotlights:
One of the popular misconceptions is the myth that “ordinary” lamps cannot be installed on suspended ceilings. We declare responsibly: it is possible.
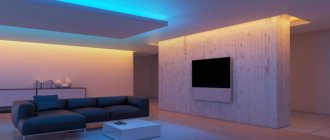
When installing a stretch ceiling in a Khrushchev-era kitchen, think about an LED strip. It does not take up space, but at the same time copes with the role of additional lighting and the role of creating an atmosphere. The ceiling itself is simply a background.
The most important thing is to think in advance about where to install the lamps. After installing the ceiling, if there is a lack of light, you will not be able to correct the situation on your own. Here the owners illuminated the “path” to the dining area.
Pay attention to the distance from the set to the suspended ceiling: the gap is about 10-15 cm.
However, in reality this is common practice and such a distance does not in any way spoil the overall appearance.
Look at a few more photos: the ceiling acts only as a background, and therefore white color and matte surface are a proven choice for many.
Preparing the ceiling for installation
Repair is a rather complex process, so before carrying out repair work you should carefully prepare and study the necessary information.
First of all, you should mark your ceiling.
This should be done as follows:
- At the lowest point of the main ceiling you need to mark a point, and then, using a water level, you should transfer it to all corners.
- Between the marks you need to fill a line using a chokeline.
- Then you should mark the surface for the CD profiles. Marks should be applied every 50 cm.
- You should put exactly the same marks on the opposite wall.
How to make a ceiling in a Khrushchev building with your own hands: installing a frame
The ceiling installation process itself is quite complicated.
Frame installation includes the following items:
- Installation of UD profile.
- Installation of the dummy dowel.
- Fastening U-shaped hangers on which CD profiles will be attached.
- After cutting the CD profiles, they need to be inserted into the UD profiles, but they should not be screwed to the ceiling.
- You need to screw the screws under the CD profiles and tighten the nylon thread.
- During the penultimate stage, all profiles should be screwed on: you need to navigate along the nylon thread that was previously stretched.
- At the very end, you should protect the electrical wires with corrugation.
The next stage is the installation of plasterboard sheets. This is the final stage, so the work should be done as carefully as possible.
Installation of plasterboard sheets
This process is the most complicated, so you cannot do it without the help of friends and acquaintances.
Algorithm for installing plasterboard sheets:
- The work itself should be done by two or three people. If the work is carried out by one person, then this will be a huge risk, since the plasterboard can be broken.
- The plasterboard sheet should be installed using self-tapping screws. Their length should be 25mm. About 60 screws are used for one sheet. The distance between them should be at least 30 cm.
- To prevent the sheets from tearing, it is better to use a special plasterboard attachment.
- The sheets must be applied end-to-end: one sheet must butt with half of the other.
- When installing plasterboard sheets, you need to bring out the wires for future lamps.
- The joints should be sealed with fugenfüller, and the screws themselves with putty.
History of the term and mass construction
The term was introduced by the name of the country's leader, and the trend was set from the moment when economy options began to appear next to earlier buildings. Those quickly built, with the hope of subsequent replacement, were called Khrushchev buildings. Previously, “Stalinka” buildings were built - functional, comfortable, designed for long-term use; they were designed under Stalin.
The houses, built within the strict limits of amenities and resources, were built with the goal of relocating barracks and communal apartments as quickly as possible.
The state's plans included the intention of providing each family with its own individual space and separate housing.
It is sometimes mistakenly believed that this name refers only to modifications of five-story panel buildings. This misconception is based on SNiP, developed in 1958, specifically for prefabricated series, in order to limit the concepts and norms of compliance with state standards. Initially, two-, three-story, and 4-story buildings of the following types were built:
According to the existing housing construction standards, houses of 5 floors could still do without an elevator, which in other options took up a significant part of the allocations not only for the arrangement system and the necessary mechanisms, but also for subsequent repairs and maintenance.
The beginning of the era of Khrushchev apartment buildings
The first experimental options were built back in 1948, in Moscow, Leningrad and Magnitogorsk, but over time it was discovered that frame-panel houses were much more expensive. Since 1958, dense construction of houses began, quickly assembled from standard panel parts. This made it possible to simultaneously build entire neighborhoods, and often residential neighborhoods for future happy new residents.
The creation of the Unified State Catalog of Construction Parts has greatly facilitated the development of new projects, and the introduction of building codes and regulations has made them safer. In large settlements, people received apartments in Khrushchev-panel buildings.
For the production of building materials, special enterprises were opened, from which delivery was carried out directly to the construction site. This was beneficial to both enterprises and the state. In remote villages and small towns there was no point in building such factories due to small volumes, and their delivery by road over long distances was expensive and unprofitable.
An alternative option was found in brick Khrushchev buildings, quickly erected from sand-lime brick. It was much cheaper than concrete panels, as was the construction of a small brick factory that served the needs of a limited area.
Installation of plasterboard sheets on the ceiling (video)
Despite its poor condition, Khrushchev is a work of art that tells us about the past. This is a real storehouse of knowledge about the Soviet Union, about our grandfathers and great-grandfathers. Khrushchev must be treated with respect, like an elderly person. If you respect your home and treat it like your relative, then Khrushchev will reciprocate your feelings, and your apartment will look amazing.
- Author: admin
Rate this article:
- 5
- 4
- 3
- 2
- 1
(0 votes, average: 0 out of 5)
Share with your friends!