Review: Elastic cork sealant Bostik - Goodbye holes, cracks and sills
Hi all!
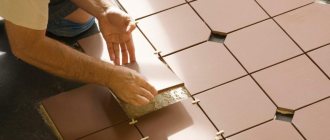
When laying laminate flooring, everyone encounters holes and cracks - it doesn’t matter whether these are specially left compensation gaps, floor dimensions not provided for standard laminate boards, or the joining of two types of laminate or a laminate-tile pair. The market offers several options for solving this problem, and after trying everything, we gave preference to cork sealant. We chose Bostik 3070, and were overall pleased with this product. So, this sealant (it may also appear on the Internet as “liquid plug” Bostik) is sold in polyethylene tubes - this way you don’t need any additional devices to squeeze it out. The packaging contains information about the areas of application of this cork sealant, and of course they are not limited only to flooring - liquid cork is also suitable for sealing joints of windows, doors and even log houses. Complete hardening time - 12 hours.
The composition is relatively environmentally friendly - cork, rubber, and solvent. The smell is a bit like glue. Moment is in a very weak concentration, so it is quite possible to use this plug in a room with children, the smell is barely audible and disappears instantly.
This cork sealant is produced in Germany; a 500 ml tube costs about 600 rubles
So, cut off the tip of the tube to get to the sealant. It consists of cork chips in a binder.
Sticky, but at the same time elastic and washes off well at the initial stage.
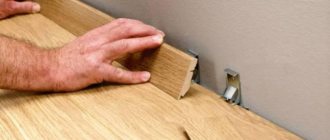
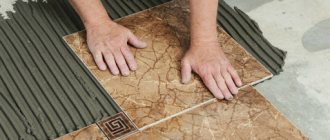
Now I’ll show it in action. So, one of our expansion seams turned out to be almost a finger thick.
I apply Bostik 3070 liquid plug into the seam, level it and compact it with a spatula. The beauty of this material is that after drying it remains elastic and will allow the laminate (or parquet) to expand and contract with changes in humidity. But, unlike acrylic floor sealants, cork sealant will not settle, meaning you won't get any dips when it dries or over time.
And here is the sealed expansion joint. Now there is no room left for dust and dirt, but it will still allow the laminate to walk.
In some places we had seams that were not even covered by the baseboard.
Since such a situation did not arise in visible places, but, for example, behind furniture, I sealed such holes with cork sealant, and then simply painted it - the manufacturer allows this. Of course, if you are sealing such a gap or joint in a visible place, you will have to work hard to match the tone of the floor covering. But I didn’t have such a task.
The same stitch six months later. Nothing has actually changed.
It's time to take stock. I liked Bostik 3070 cork sealant, and I found a number of advantages in it over acrylic sealants for floors. Firstly, it does not sag after complete drying. Secondly, it is easier to lay and the seam looks neat. It can be painted. It remains flexible and allows your floor to expand and contract while keeping the expansion joint protected from dirt and dust; when joining different types of coatings and especially different shapes, it allows you to create a nice joint and avoid installing scary and inconvenient thresholds. It has a fairly environmentally friendly composition. The only drawback I can think of is the price and the fact that when painting, it is quite difficult to match the tone of the floor. But overall, I was very pleased with this material and of course I can recommend it. Thank you for your attention, I hope my review will be useful!
Cork compensator between tiles and laminate: features of use
Installing a cork expansion joint between tiles and laminate is a popular method of creating joints between materials. Combining floor coverings helps realize bold design ideas and increases the life of the floor in areas of the most intense load. The compensator allows you to join tiles to laminate without using thresholds, which makes it possible to obtain a flat and uniform surface.
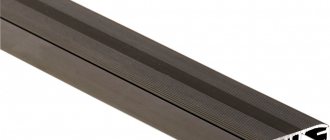
How to install an aluminum threshold
There are two types of aluminum thresholds:
- Open installation.
- Hidden installation.
Installation of an open-type threshold is simple - you need to lay it on the joint line, mark the installation locations of the dowels on the subfloor (if it is not possible to screw screws into the floor), drill holes and fix the threshold in place with screws.
Hidden installation is more complicated: it is carried out either at the time of laying one of the coverings, mainly laminate, or after laying both materials in the existing gap.
To solve the problem of how to close the joint between the tile and the laminate, you can use a special aluminum profile with a cable duct, covered with a rubber insert on top, or a solid profile installed close to the edge of the tile with the ends of the laminate inserted into the groove of the profile. The installation procedure depends on the type of material. Basically, the profile is attached to the subfloor using self-tapping screws.
There are thresholds designed to correct the difference in height between two materials. They are convenient if the tiles or laminate differ significantly in thickness.
Advantages of a cork expansion joint
Cork expansion joints are sheets of pressed cork that can be easily cut with a sharp knife. The popularity and high consumer demand of the material are due to a number of positive properties.
- Complete environmental safety of the compensator. The material is made from natural components, so it can be used in all types of residential and public spaces.
- Wide range of colors. Cork lends itself perfectly to painting in any color. With the help of special light-resistant colors it is possible to obtain surfaces of various tones and intensity.
- Easy installation and dismantling of the material. Any person, even those without experience in laying floors, can cope with the installation of a compensator. This significantly saves time and money when carrying out repairs.
- Excellent indicators of elasticity and elasticity. Compared to rubber and silicone expansion joints, cork is not subject to hardening. A unique property of cork is its ability to always return to its original form. This allows it to compensate for the regular expansion-contraction cycles of the laminate and maintain its performance throughout the entire service life of the flooring.
- High quality material. Over time, cork pre-treated with varnish does not chip or crack, which allows you to not worry about the integrity of the floor for many years.
- The low cost allows you to purchase a cork compensator at a price that is comfortable for the buyer.
- Natural antiseptic properties of cork, due to which the material is not susceptible to rotting and the appearance of mold and mildew. Cork is of no interest to insects and rodents.
- The cork expansion joint is resistant to ultraviolet radiation and is not prone to the accumulation of static electricity.
- When burned, the material does not emit phenol, chlorine, cyanide and other similar toxic substances. After treatment with a special compound, the compensator corresponds to safety class G1 (non-flammable substances).
Installation features
There are strict requirements for the transition between laminate and tile. Strict adherence to installation technology and careful execution will help achieve a positive result. The main requirement for joining surfaces is the absence of flaws on the edges of the tiles and laminate .
If the tiles are laid with the cut side facing the joint, then its edges must be thoroughly polished, and the edge of the laminate is treated with a special compound that protects the material from moisture.
In addition to tiles, laminate and expansion joint, you need to purchase wood glue and sealant, which will be needed to hide minor bending defects at the joint. The color of the veneered end of the compensator is selected in accordance with the overall color scheme of the floor covering.
Installation of a solid cork expansion joint is carried out when one type of coating has already been laid. First of all, you need to trim the height of the cork tape. This should be done using a sharp knife, having first outlined the cut location on the strip. It is better to glue the compensator with wood glue, having previously cleaned and degreased the installation site. The compensator installation algorithm is as follows:
- thorough preparation of the joint by clearing mechanical debris, removing dust and priming;
- applying a thin strip of glue near the edge of the lamellas;
- laying the compensator tape on the applied glue and fixing the end edge;
- applying sealant between the edges of the laminate and the expansion joint;
- removing excess sealant using a wet cloth and then wiping the joint dry.
Further installation of the tiles is carried out from the formed joint. This will ensure a tighter fit between the cork and the ceramic. After installation is completed and the sealant and glue have completely dried, the cork seam, which does not have a veneered end edge, is sanded and varnished.
Installation of a liquid cork expansion joint should begin by applying masking tape to all edges of already laid surfaces. The joint is cleaned of mechanical debris and dusted. Work should be carried out at an air temperature of at least 5 degrees. Installation of a liquid cork compensator consists of the following steps:
- pour the composition from the tube into a wide container;
- fill the seam with a spatula or an air gun;
- cut off excess sealant with a spatula;
- wait for the surface to completely dry, which depends on the thickness of the connector, the width of the seam and the temperature and is 24-48 hours;
- remove the masking tape and wipe off any remaining sealant from the floor.
Installing the liquid plug is very simple. The only disadvantage of installation is the need for careful and even distribution of the composition at the application stage, since it will no longer be possible to correct application defects and level the seam after the material has dried.
A cork expansion joint between the tiles and the laminate will allow you to achieve a perfect connection between the two surfaces and make the floor impressive and neat.
The entire process of installing a cork expansion joint can be seen in the following video.
Step-by-step instruction
For the sealing compound to be as effective as possible, it should be used in this way:
- Clean the surface from foreign substances. The material is thoroughly removed using a vacuum cleaner, detergents, water, and solvents to remove contaminants, including grease stains, dirt, and dust.
- To carry out the work, you should use a construction gun, spatula, sponge, and rags.
- Use masking tape to seal the seams.
- Apply the substance using a special gun, and then spread the composition with a spatula. To prevent the mass from drying out, the surface is sprayed with water from time to time.
The sealant does not set well at temperatures below 5 degrees Celsius. It is better to work with the substance when the weather is favorable, there is no rain and low temperatures.
- If there is a lot of substance, remove the excess with a clean cloth.
Getting the job done is easy. Anyone can do it.
Advantages and purpose of liquid stopper
To make this material, fine cork chips and a binding element are used. Liquid cork is used not only in construction work, but also for repairs; it can also serve as a decorative coating, insulation from external noise or insulation material. Liquid cork differs from other materials in various advantages. It is environmentally friendly, does not emit toxic substances, is resistant to mechanical damage, and has a high level of thermal insulation. Such material is not afraid of temperature changes, it does not deform, and the appearance of cracks is also excluded. Due to the fact that the material is elastic, you can carefully seal the seams without damaging the finishing surface. During renovations, cases may arise in which it is necessary to make a beautiful and smooth transition from one floor covering to another. That is, when laying different floor coverings in separate rooms or during zoning. To connect laminate and tile, these materials must be combined, and the transition must be smooth and not stand out too much.
Choosing a nut: advice from professionals
When choosing an accessory for decorating the joint between laminate and tiles, experts recommend taking into account the following factors:
- Purpose. The seam is designed for various purposes: a decorative element, an accent when zoning, preventing debris from getting into the space between materials, equalizing the difference in height. To choose a seam design method, you need to prioritize.
- Material. Thresholds made of aluminum and hardwood are the most durable, but they are also significantly more expensive than their plastic counterparts. Polyvinyl chloride has a low price, but it scratches quickly.
- Joint shape. Straight varieties can be refined using any threshold; for curved and broken ones, only flexible ones are suitable.
- Mounting method. Most people prefer hidden fastening methods. They are more labor-intensive to install, but the superior results make up for it.
- Accessory width. Narrow sills look more aesthetically pleasing, but require high cutting precision. Wide variations are less presentable, but hide almost any flaws.
Guided by the information above, you can independently design the joint between tiles and laminate, but it is more advisable to entrust this matter to professionals. Only experienced specialists who fully possess the necessary knowledge and skills will be able to turn your flooring into a real masterpiece of design art.
Reasons why different floor coverings are used
Various coverings are laid depending on the purpose of the premises in the house. For example, laminate can be used in the kitchen, in the hallway, and tiles can be laid in the bathroom, since this room is damp. That is, laminate is not suitable for a bathroom; it will be deformed and damaged due to high humidity. In such rooms, tiles are laid, and to make the connection between the coverings look beautiful, liquid cork is used.
Very often, in large rooms, two different floor coverings are used to highlight a certain area, so the kitchen can have a work area and a guest area. You can also allocate different zones in one large room for children and parents.
Using liquid cork to form a connection between laminate and tiles
Liquid cork contains cork chips and glue, which serves as a binder. Due to its hermetic properties, the material can firmly fix the connections between two floor coverings. Cork chips have high elasticity and flexibility, they are also soft and have an unusual texture. Carrying out the work of sealing the joints between the laminate and tiles does not seem difficult, but all seams are prepared in advance. When using this material, you need to stock up on a stationery knife and machine oil. First, it is necessary to treat the gap with oil, and then gradually fill the connection using a liquid plug. If two different coatings are located on the same level, then filling the joints will not be difficult. If there is a different level between materials, the seam must be aligned, focusing on the edge of the coating, which is located higher. After the liquid cork has dried, all excess protruding elements are cut off with a stationery knife, and then grinding work is performed.
When working with liquid stopper, you need to consider the following rules:
- The material must not be allowed to fall on the open surface of the coating, since it is difficult to clean it later, and after drying it is impossible to do this.
- The liquid plug should not be higher than the floor surface.
- The applied material should not dry completely; grinding is performed a day after filling the joints with liquid plug.
Common mistakes during application
Novice craftsmen often make mistakes when working with liquid stopper. The most common mistake is neglecting to thoroughly clean surfaces and degrease them. As a result, the degree of adhesion of the sealant to the materials decreases. Also, some people do not immediately remove the excess product that has come out, leaving this work for the future. But after drying, the cork is quite difficult to clean, and there is a risk of damaging the finished seam.
It is a mistake to level the sealant on the base that is at a higher level. In this case, an unsightly gap will form, and the fit of the material will not be tight. Liquid cork is not used for laying carpets and their joints with other materials; special glue should be selected for this purpose.
Arrangement of joints between different types of flooring
Despite existing limitations, cork sealing compounds are considered universal and multifunctional products. They allow you to solve various problems - from sealing seams to decorating walls. Their popularity is due to their affordability, high quality and environmental friendliness, which is why sealants are so widely used in the renovation of apartments and houses.
Basic rules for joining different floor coverings
To fill the joint between the laminate and the tiles, it is not necessary to use a threshold; you can do the job in another way, using a liquid plug. When laying coatings, the following rules must be observed:
- An important point is the order in which different types of flooring are laid. First, the tiles should be laid, and the laminate should be adjusted under it.
- When cutting tiles, there should be no chips or cracks, so the work is done carefully.
- When laying the laminate, it is necessary that the cut line be strictly straight.
- At the junction points, the backing under the laminate is cut off, and the boards must be attached to the concrete base using glue.
- After the materials have been properly joined, the connections between them are sealed using a liquid plug.
By following these rules, an even, neat seam is obtained between two different floor coverings. Liquid stopper for a smooth connection between laminate and tiles. Instead of thresholds, liquid cork is used to connect laminate and tiles. The connection between these materials is filled with a product that consists of moisture-resistant glue and fine cork chips.
Joining materials using liquid plug has its advantages
- The seams between tiles and laminate can be either straight or curved.
- Installation of such material does not require additional fixation, that is, self-tapping screws.
- Cork material combined with moisture-resistant glue has a high moisture resistance function.
- Laying such material does not require special experience or special knowledge.
How to properly join tiles and laminate without a threshold?
When using such a connection, first of all you need to pay attention to the difference in the heights of the two coatings. The ideal option is when there is no such difference. The easiest way to solve this problem is when it doesn’t exist yet, i.e. when the coverings are not laid. It is necessary to measure the thickness of the coatings. The tiles are always laid first. After the glue has dried, the laminate is laid. If a difference is discovered after installation, it will have to be removed using a substrate under the laminate.
We must also remember that there must be a technological gap between the laminate and the tiles after installation, i.e. neither should be tightly adjacent to each other.
The presence of a gap allows the laminate to change in size under the influence of temperature without causing harm to the floor covering as a whole. The gap size should not be less than five millimeters. There should also be a gap between the walls and the laminate (about a centimeter). It is covered with baseboards.
There are three ways to close the gap.
Grouting joints
It is used when both materials have already been laid. The procedure is simple. You will need silicone and grout mixture for the seams. The grout is chosen in the same color as for processing the joints between the tiles.
First, silicone must be applied to the edge of the laminate. There is no need to skimp on silicone. Experts allow it to fill two-thirds of the gap. The remaining space is filled with grout. The grout is carefully leveled. Next, the entire connecting mixture must be allowed to dry thoroughly.
At the final stage, colorless varnish is applied to the seam. This will allow the grout to retain its color for a longer time.
Cork sealant
Cork sealant
You can replace grout and silicone with cork sealant, which is also called liquid cork. This is a soft elastic filler, which is used, among other things, for sealing seams. Nine-tenths of this sealant consists of cork chips (hence the name), about five to seven percent are various polymer binders, the rest is water.
Manufacturers mainly use polyacrylate-based glue as a polymer additive. This glue has high adhesion to most building materials.
If no dyes are added to the sealant, it will have a light brown color. The addition of dyes allows the sealant to be produced in different colors.
The sealant is sold in tubes. It can be applied to the surface using either a special gun or a spatula. After filling the gap, you must carefully cut off the excess sealant and smooth the surface of the seam with a spatula. Drying time 8-12 hours.
Cork compensator installed in the gap
Cork compensator
You can join two types of coatings using a cork compensator. Available in various colors and sizes. The standard length is 90 centimeters, width – 7 and 10 millimeters, height – 15, 18, 20, 22 millimeters.
If the height of the compensator exceeds the depth of the gap, it is necessary to carefully cut the strip to the required size with a knife. Usually the compensator is installed after laying the tiles. The edges of the coatings must be smooth, sanded and degreased, as well as the base on which the compensator is installed.
The compensator is attached using wood glue; you will also need a sealant. Glue is squeezed onto the tile and the compensator is laid. Then it is slightly bent, sealant is applied and again pressed against the tile. The edge of the laminate is treated with sealant. Glue is applied to the free side of the compensator and the laminate is pressed tightly. After drying, the cork seam must be sanded and varnished.
Technology for filling joints between laminate and tiles using liquid cork
To complete the work, you need to prepare a stationery knife, oil and a tube filled with the mixture. The sharp corners of the tile are ground off, and then both coatings are wiped with oil using cotton pads or swabs. The mixture in liquid form is placed in a prepared tube, and then it is gradually squeezed into the joints between the board and the tile. Liquid cork is applied with a reserve, since it shrinks, but so that the material does not fall on the surface, it is very difficult to clean it off. If the surface of both materials is located at the same level, then the joining can be done without any special complications. With different heights of surfaces, they focus on the material that is located above, and level the cork covering over it.
After the liquid cork has hardened, the excess areas must be cut off using a utility knife; this work is done carefully so as not to damage the floor surface. This is usually done after a day, and the defects are removed immediately, before the glue dries. If the floors are oiled, this is easy to do. Then grinding and scraping are done, but the last stage will not be easy to complete. Liquid stopper is not used to protect the edges of the material, otherwise it will be firmly fixed to the base and it will be impossible to detach it. The mixture cannot be applied or leveled above the required level, as it will not fit tightly and cracks may appear. In order to perform grinding and eliminate excess, the material should not gain full strength, that is, this work is performed 24 hours after application. Thanks to the application of liquid cork into the joint between the laminate and the tile, an almost flat surface is obtained, without the use of thresholds. In the kitchen, some areas are laid with tiles, for example, near the stove, sink, washing machine, since this material is easy to clean and resistant to humidity. And the laminate is laid on the remaining surface, all connecting seams between the material are filled with liquid cork.
Sealing laminate and tile joints
An interesting design solution is to zone the area of the room by laying different types of flooring that differ in their structure. The right combination of materials ensures an organic appearance of the coating.
The joint between laminate and tiles can be designed in several ways. Before carrying out work, you need to study the technology of laying finishing floor coverings and design options for the joint between materials of different textures.
Floor design from materials of different structures
The junction of tiles and laminate well divides the room into zones.
At first glance, it seems that ceramic tiles and laminate are incompatible coatings. But with the right selection and combination of these materials in one plane, they look very harmonious.
The joint between tiles and laminate is used:
- For zoning the kitchen area. We lay the floor of the working area with tiles, and highlight the dining table area with laminate. The tiles are moisture-resistant and easy to clean, which is important in the area of the stove and sink. Laminate is warm and pleasant to the touch, but is afraid of constant exposure to moisture.
- We lay tiles in the hallway and corridor, in the remaining rooms we use laminate.
- When combining a kitchen and a loggia, we allocate the area with floor coverings of various structures. We use tiles only in places of high humidity. Laminate, thanks to its structure, is practically indistinguishable from wood and creates a comfortable atmosphere in the room.
- In rooms with a fireplace near the high temperature zone, we lay out the floor with ceramic tiles; in the rest of the space we use a warmer covering.
The floors in the kitchen and rooms are rarely laid out completely with tiles, since the tiles are cold in structure and unpleasant to walk on barefoot.
The combination of laminate and tiles allows you to create an impressive combination in different areas of your home.
Types of profiles used for joining tiles and laminate
We connect laminate and tiles using several types of fasteners:
- rigid profiles are produced from wood and aluminum, suitable for creating smooth seams. The planks are fastened with self-tapping screws, hidden fasteners or self-adhesive tape;
- Using sealants, plastic glue or cork chips, we fill joints of any shape: smooth, wavy, round;
- sheet cork expansion joints are suitable for creating smooth and rounded seams;
- We use aluminum thresholds for installing joints between tiles and laminate flooring located under the doorway. It hides the seam and compensates for the difference in height between materials;
- flexible profiles are bent manually in a cold or heated state, depending on the required bending radius. The slats are made of metal, plastic and rubber.
A transitional plastic profile smooths out height differences. To install it, you need to fasten the guide profile to the floor and snap the plug.
Types of thresholds
Depending on the functional purpose, thresholds are divided into:
- straight profiles - used if floor coverings are laid in the same plane or with a height difference of 1 mm;
- corner connectors are most often made of rubber and are suitable for fixing the covering of steps;
- leveling thresholds allow you to mask a difference in height by 3-18 mm;
- the final profiles are used to design the approach to the threshold or podium.
Types of joints:
The durability of the seam depends on the material used and compliance with the installation technology.
Advantages of seam design
Designing the joint will protect you from stumbling and falling.
High-quality joints between floor coverings with different structures should have the following properties:
- the durability of the threshold is the same as that of the finishing coating;
- joints must be designed so as not to trip over them;
- fit harmoniously into the interior of the room;
- protection of the seam from dust and moisture.
The design of the connecting profile should extend the life of the floor covering and be combined with the overall design of the room.
Options for designing the joint between floor coverings
You can close the joint between laminate and tiles using various methods, which differ in installation technology, cost and aesthetic appearance.
Making a joint with a threshold
The profile smoothes out the threshold joints well.
The threshold between the tiles and the laminate smoothes out the transition in height, closes the cracks, and prevents dust and moisture from getting between the materials.
Aluminum, plastic and wooden thresholds are available.
To create round joints, a bending profile is used.
Fastening methods:
- open method - all fastenings will be visible. We drive dowels into the floor, screw screws through the threshold;
- the hidden connection has internal fastenings.
The threshold for laminate and tiles is installed in a doorway or other seam quite simply. We drill a hole in the floor for the dowel. Thresholds are produced with ready-made holes or drilled during installation. We pass the screw through the profile and screw it into the dowel.
Thresholds are made to connect surfaces located at the same level and with a difference in height when transitioning from tiles to laminate.
Arc-shaped threshold
There are two types of connections for round and wavy connections:
- The soft joint is made from a flexible clamp attached to the floor. A plug snaps onto it. These elements are easily bent to the desired radius by hand. This overlay covers 1 cm on each side. Suitable for use when cutting material incorrectly.
- The aluminum profile overlaps the joint by several millimeters on each side; if you make a wider side, the profile will be difficult to bend. For more information about installation, watch this video:
It is used for perfectly even cutting of material; if the edges are cut crooked, the aluminum threshold will not block them.
Installation of an arc-shaped threshold
When installing a flexible plastic profile, it is necessary to provide a temperature gap of 5 mm between the laminated board and the profile. For more information about the use of a flexible transition threshold, see this useful video:
Sequence of installation of a PVC threshold:
- First, we drill holes in the floor along the joint line and insert dowels into them.
- Cut the strips to the required length.
- To give the profile a round or wavy shape, lower it into water at a temperature of 70 degrees and soak for 20 minutes. When heated, the strip becomes plastic, which allows you to bend it manually.
- We screw the threshold to the base with screws.
- Snap on the decorative plug.
Unlike the plastic type, the aluminum threshold is installed at the stage of laying the tiles, since the profile has special claws that fit under the tiles.
When the tile is laid, we collect glue along the edge and place the profile tabs under it. We insert laminate boards under the threshold.
When doing the work yourself, it is better to choose the first option for designing thresholds with a rounded shape, since it is easier to implement.
Docking without using connecting profiles
Let's look at how to connect laminate to tiles without additional connecting elements. To make a joint between tiles and laminate without a threshold, you need to be very careful when laying the coating. Without some experience it is difficult to do such work. It is necessary to lay both coverings so that along the outer edge they are in the same plane. For more information about the joint without thresholds, see this video:
Installation sequence:
- We accurately measure the height of tiles and laminated boards.
- We mark on the floor a line connecting the two floor coverings.
- We lay out the material on the floor as it will be laid in finished form.
- We make a template according to which we will cut the laminate and tiles before fixing.
- Cut off the part of the material protruding beyond the marking line.
- After laying the laminate and tiles, we rub the joint between them so that it is perfectly level. Once the tile adhesive has hardened, it will be almost impossible to eliminate defects.
- Finally, you need to seal the space with sealant. It firmly connects materials together and is a barrier against dust and moisture.
The joint between the laminate and tiles without a threshold is sealed with silicone sealant or mastic.
If you are planning a round or wavy joint, it is better to invite professionals to carry out the work. This method of joint design is not suitable for connecting tiles and laminate over a large area.
Cork compensator
Let's look at how to connect tiles and laminate using cork strips.
If the joining seam is long, it is important to use a cork expansion joint. It is made in the form of strips of pressed cork.
Upon completion of the work, the cork strips can be painted or tinted in any color.
Cork has the ability to shrink and return to its previous shape, which is important when combined with a laminated board.
Over time, debris will begin to clog into such a seam.
Compensator installation:
- We leave a gap of 2 mm between the tile covering and the board. During operation, the laminated board expands/contracts depending on the temperature and humidity in the room.
- We seal the seam with cork strips and insert them using a screwdriver. Additionally, there is no need to cover the seam with other materials.
The disadvantage of this method is that over time, dirt will clog into the seam.
Features of joining laminate with tiles
The finishing material must lie in the same plane.
The joining of laminate to tiles has its own characteristics. To make the surface look beautiful, you need to consider some rules:
- We lay the material in one plane. You can arrange thresholds between the tiles and laminate or make a podium. We design the location of the seam so as not to trip over differences in height.
- A prerequisite is high-quality preparation of the floor; it includes the installation of a level screed on which we will lay the finishing coating.
- The difference between tiles and laminated boards is compensated by laying a substrate under the laminate.
- The question often arises of how to join laminate and tiles to create a neat, even seam.
It is important to accurately trim the material; this is done using a template. Some profiles are small in width and may not completely cover the seam if not trimmed correctly. The gap left between the coatings will allow the materials to expand without compromising their integrity - When laying different types of flooring, it is imperative to leave an expansion gap of 5 - 10 mm, since these materials have different elasticity and expansion coefficients. If you do not leave a distance between the materials, the laminated board will deform during use.
- We lay the tiles first, and after the glue has completely dried, we adjust the laminate to fit it. If you lay the laminate first, then when laying the tiles, moisture will leak under it, and the laminated board may become deformed.
We looked at how to make a joint between tiles and laminate, the rules for installing a baseboard that ensures a smooth transition in height using a threshold. By adhering to these recommendations, you can qualitatively design the joints of laminate and tile in any room. A harmoniously selected combination of these materials will visually expand the room and give the interior a modern look.
gurupola.ru
Purpose
Liquid cork can be used as a sealant, sound insulator, insulation, and also as a material for cladding interior walls and facades.
This material can be used wherever it is necessary to ensure noise insulation, tightness, and thermal insulation. The sealant will cope with these tasks perfectly. In addition, the conditions for working with liquid plug are quite simple, so you can handle it yourself without the help of a specialist.
Sealant based on liquid plug
Advantages
Liquid cork sealant can be used in many areas of construction and repair. In addition, it has the following advantages:
- naturalness of the material;
- resistance to mechanical stress;
- high thermal insulation properties;
- resistance to temperature changes;
- elasticity;
- high adhesion to various materials.
Advantages of the material
Liquid cork does not shrink, so it can be used without fear of damaging the finish.
Rules for joining different coatings
Often during renovation work there is a need to join different finishing coatings, and the transition should be smooth and discreet. Depending on the purpose of the room, certain material is placed there. For example, tiles are installed in the kitchen, and laminate flooring is installed in the hallway.
Sometimes different materials are placed in the same room to divide the room into work and guest areas.
Joining tiles with parquet
Liquid stopper for laminate and tile joints is one of the options for connecting these coatings. This work is simple, but requires preliminary preparation of the seams. First, the seam is treated with oil and then filled with liquid cork. After the material has dried, the residues are carefully removed with a knife, and then the surface of the seam is sanded. These simple steps will help make the seam between different types of coatings neat and inconspicuous.
For joints
The parameters of liquid cork sealant allow it to be used for sealing joints between any coatings or a coating and a wall. Liquid cork will create a reliable and elastic adhesion between coatings, which is not afraid of either deformation of the coatings or temperature changes.
Sealant seam
This sealant can also be used to insulate window and door openings. If drafts are a concern, then treating the slopes of a window or door will help solve this problem.
For joints, it is best to use bostik 3070 sealant, which is recommended to be protected from weathering with elastic sealants.
For facades and interior walls
An excellent solution for finishing the facade would be to use soft cork. Thanks to its properties, the connecting material will prevent the façade surface from becoming dirty and will protect against moisture, noise and vibration. In addition, the appearance of the facade will look natural and quite rich, despite the cheapness of the material.
For those who have decided to change their usual wallpaper to something more original, liquid cork for interior decoration will come in handy. Interior walls will not only acquire an attractive appearance, but will also help protect the room from noise and moisture.
Application method
Liquid cork is applied to the walls using special equipment that sprays the material under compressed air pressure. The color range of the liquid stopper is also pleasing, allowing you to choose a color according to your preferences.
For parquet
When laying parquet, the problem arises of sealing the gaps between the wall and the wooden flooring. After all, during operation, parquet can change under the influence of temperature and moisture. Cork sealant can easily solve this problem. Due to its inherent elasticity, liquid cork allows parquet flooring to expand or contract depending on conditions without creating gaps.
Sealing seams
If the parquet has been lying around for a long time, then liquid cork will help eliminate cracks in the coating that have arisen over time. The sealant will help remove not only cracks in the floor covering, but also the consequence of these problems - creaking parquet.
Installation methods
Let's take a closer look at the installation features of each option.
Cutting tiles and laminate
When the seams between two materials are straight, there are no problems with their fitting, but it is difficult to trim the curved areas. To do this, you will need to make a template from available material (cardboard, polystyrene foam, etc.), using which to mark the future joint.
- A curved cut on laminate is made using a manual or electric jigsaw.
- The tiles can be cut to fit the curves of any shape using a grinder with a diamond tile disc, or manually with a jigsaw/hacksaw with a diamond string. You can also drill as many holes as possible along the cut line and break off the excess with wire cutters.
Installation of flexible PVC profile
Installation instructions for flexible PVC profile
- After laying the tiles and laminate, there should be a gap, the thickness of which will allow you to install the fastening profile and leave a temperature gap of 5 mm next to the laminate.
- Using a hammer drill, we drill holes for dowels in the expansion joint. If you have a heated floor running through the seam, then liquid nails can be used for installation, but it is better to exclude such cases at the design stage.
- We cut off the required length of the profile using a knife/hacksaw/jigsaw.
- We screw the fastening profile to the base with self-tapping screws.
- Before laying the decorative flexible profile, you need to soften it. To do this, place it in warm water (50-70 degrees) for 15-20 minutes.
- The decorative nozzle is inserted into the mounting profile and snaps into place.
Installation of flexible metal profile
- Before starting work, calculate the thickness of the tiles and laminate, taking into account the adhesive and backing - they must match.
- We manually give the required bend to the profile.
- Cut the required length using a grinder or a hacksaw.
- The profile has special claws for attaching it to the floor, so it is best to install it simultaneously with laying the tiles. The foot will be pressed against the tile with glue, and on the other side the backing and laminate will simply be inserted.
The profile is held in place by pressing with the tiles
Installation of aluminum threshold
A regular threshold with holes is installed as follows:
- Cut the threshold to the width of the doorway.
- Mark the drilling points at the joint.
- Drill holes, insert dowels and secure the threshold with self-tapping screws on top.
- To screw in self-tapping screws, use a screwdriver or screwdriver with minimal torque, otherwise the threshold will bend.
An important nuance: the measurement is taken taking into account the platband, and not just between the two extreme points of the box. Then the threshold is trimmed to fit the trim to avoid gaps.
If the threshold has hidden fastenings:
- The holes are marked on the base.
- A self-tapping screw with a dowel is inserted into the groove on the underside of the threshold.
- Holes are made in the floor.
- The threshold with the dowels on is inserted into the holes and hammered to the end. To avoid damaging it, strike it through a block pad.
Instructions for installing a threshold with hidden fastening at the junction of laminate and tiles
To remove the backlash, take a larger dowel and file the head
- Mark the outline of the sill on the flooring to ensure it is glued evenly in the center of the joint.
- Remove the protective film from the self-adhesive base and stick it on.