Tools for work
First of all, let's find out what task we are facing: do we need to convert an existing regular door into a compartment door or build a compartment door from scratch? Depending on which option you choose, the progress of the work will change.
For work we will need:
- Drill;
- Set of drills;
- Metal hacksaw or saw;
- Hydraulic level;
- Screwdriver Set;
- Guides;
- Reiki;
- Two fiberboard strips;
- Screws and self-tapping screws;
- Roller system.
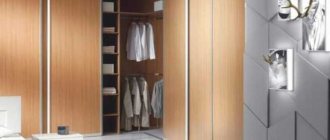
We install cassette-type sliding doors in a pencil case
For a cassette door you need to make a pencil case. Depending on the width of the opening, one or two sashes are installed. In the second option, two pencil cases are assembled on opposite walls. The cassette is installed instead of the partition. The structure is a hollow false wall. If the opening is located on a load-bearing wall, it cannot be dismantled. The cassette is simply attached. The septum thickens, but there is no other way out.
The production of the pencil case begins after laying the floor covering. The false wall frame is assembled from a profile or timber. The guides are attached to the floor and ceiling. 2 rows of racks are fixed to them. If the cassette is adjacent to a load-bearing wall, then it is enough to make 1 row of racks. An embedded beam is provided for the top rail. The depth of the pencil case corresponds to double the width of the sash. A gap of 5 mm is maintained between the end of the blade and the guide rails. The thickness of the pencil case exceeds the sash by 2 cm. Usually this value is 8 cm. Installation of the sliding system is the same as for a door that slides behind the wall.
Converting an old door into a compartment door
The instructions for those who want to know how to make a sliding wardrobe door and how to make a sliding ordinary door are not fundamentally different. If you do not plan to purchase a ready-made sliding door or make a new door yourself, but want to attach a sliding mechanism to your old door, you will need to do the following steps:
- Purchase the type of roller system you need from a door store. There are 2 types of roller structures: suspended and floor (rail). Floor-mounted ones are recommended for use in cases where the door weight exceeds 30 kg. We will describe the installation process of just the floor system.
- First, it is necessary to dismantle the door from its original place and restore it to its proper form: remove the old door hinges, fill the holes from the hinges, varnish or paint the door if necessary. Attach a handle that is comfortable for you.
- Attach the bottom rollers at a distance of about 6 centimeters from the edge of the door. In general, try to place the rollers at the maximum distance from each other and as close as possible to the edges of the door - this way the door will wobble less and will open smoothly.
- Using the same principle, mount the upper rollers and install the stoppers that come with the roller mechanism.
- Get the doorway in proper shape.
- Mount the guides.
- Nail strips of fiberboard to the top and bottom of your door.
- Install the door in its new location.
Types and features of sliding doors
Sliding doors save space. For light models, a top mount is sufficient
Among the many varieties of sliding doors, there are single-leaf and double-leaf models. In this case, the door leaf of single-leaf doors moves along guides parallel to the wall, and the leaf of double-leaf doors move apart from each other in different directions. Their silent and smooth movement is ensured by ball bearings and silicone-coated rollers.
There are also cassette and internal compartment doors (single and double leaf), the leaves of which, when opened, are hidden in special niches or inside partitions. Niches can be purchased ready-made along with the door or made independently, for example, from plasterboard.
It is extremely rare to find radius sliding doors, the leaves of which move along special guides that repeat the radius of the doors.
Regardless of the design, the sliding door must be equipped with a roll-out mechanism designed to move it. These mechanisms are:
- with one guide on top;
- with two guides located at the top and bottom.
The methods of fastening the guides, their shape and the number of roller mechanisms are determined by the design, dimensions and weight of the door leaf.
Draw-out mechanism with one guide on top
Roller mechanism for moving the door leaf
A mechanism with one rail on top is designed to move the door leaf along only one rail, which should be located above the door. The mechanism kit includes:
- steel or aluminum profile;
- roller mechanisms;
- locking elements.
The number of roller mechanisms is determined depending on the weight of the door leaf. If it does not exceed 70 kg, one set will be enough. Otherwise, the quantity must be increased proportionally.
To prevent the door leaf from accidentally jumping off the guide, there are locking elements installed on both sides of the profile. Special flags prevent door leaves from swinging.
After assembling the roll-out mechanism and hanging the door leaf, the door will seem to hang in the air. The advantage of this design is the absence of a bottom guide, which does not impose any restrictions on laying the floor covering.
Draw-out mechanism with two guides
Upper and lower guides for sliding doors
A system with two guides located below and above is somewhat more complex in design. It additionally includes a set of roller mechanisms and a metal profile that is installed on the floor or hidden flush with it. After assembling and hanging the door, the roller mechanisms move along two guides. In this case, the door leaf rests on the lower rollers, and the upper guide fixes it in the doorway. This kinematic scheme reliably holds the door in a vertical position, which is considered an advantage of this design.
The presence of a bottom guide complicates the installation of the floor covering. There is a need to constantly clean its gutter from debris.
Installation and production of a new door
Now we will tell you how to make compartment doors if you plan to throw out the old door and replace it with a new one.
To begin with, we naturally need the new door itself. You can either purchase it at a specialized store or make it yourself. In any case, first you will have to measure the dimensions of the opening and then either order a door of the required size or purchase components for its manufacture.
Installing a compartment door involves completely lining the door with a metal profile:
- Cut the metal profile to the required dimensions using a miter saw or hacksaw.
- Drill holes in the profile to attach it to the door.
- Prepare the door and install the roller system.
- Mount the guides at the top and bottom.
- Install stoppers.
- Install horizontal and then vertical profiles first. A special arm profile is used as vertical profiles, which will subsequently be used to open and close the door.
- Tighten the entire structure with self-tapping screws and install the door in its new location.
In some wardrobes, installing one sliding door is not enough. Then you can use two sliding doors at once. The operating principle will remain the same.
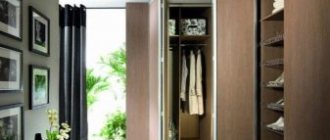
Is it possible to use IKEA sliding doors in a niche?
How to select and manufacture sliding doors correctly. Materials, shapes, colors and systems. How to create sliding systems with your own hands and stylishly fit them into the interior. · sliding compartment doors can be used on a variety of soils. We are waiting for you in our office. glass doors for a shower niche cost of glass. Convenient and practical sliding shower doors in a niche: recommendations for selection and use.
Main types and design features, installation by your own bnwtfu.xn—-7sbahr0ad4bkho0k.xn--p1ai: Michael. · What system to use for the doors that behind the second door there is a washing machine built into a niche and she recently installed SOFIA sliding doors in the bathroom and so behind them in.
How should sliding doors be installed? What is it like to assemble, install and dismantle interior doors yourself? How to install a door in a niche.
If there is a niche in a room or corridor of an apartment or house, the best solution for arranging it would be to install a wardrobe, which will make the space as functional as possible.
The built-in wardrobe is a set of internal elements and a sliding system for opening and closing doors; In most cases, such a structure does not have a frame for the ceiling, bottom, or walls.
Built-in wardrobe
Another important aspect is that the niche where it is planned to mount the structure must have smooth walls, floor and ceiling; otherwise, you will have to level the surfaces yourself using plasterboard parts. A flat surface for installing parts of the future cabinet and its sliding door system will allow the structure to last a long time and act as a safe piece of furniture. If there is a niche in any room of your apartment or house, install a built-in wardrobe there and enjoy its functionality.
Mirror installation
Many people install mirrors on compartment doors. This is due to the fact that such doors are most often used in hallways and dressing rooms. If you also want to additionally hang a mirror on the door, this must be done in advance, before you begin the installation process. The process itself is quite easy:
- Buy a mirror of the appropriate size or cut it yourself to size using a glass cutter;
- Prepare a self-adhesive film (we recommend using it over the entire area of the back side of the mirror for safety reasons - if the surface is damaged, the fragments will remain glued to the film);
- Carefully stick it on the mirror, getting rid of the “bubbles” using a plastic spatula (you can also use a thin needle, but this is not a completely correct method);
- Install a mirror on the door.
In general, such doors leave a lot of room for imagination in terms of building materials. This is one of their main advantages, along with silent operation and space saving.
To organize personal space in an apartment or house, you should install interior doors. This way, each family member will feel more confident. In most cases, doors are installed on hinges that open wide. However, technology is moving forward. The emphasis is on saving space. Taking this and other nuances into account, compartment doors were developed. In this article, you can learn the intricacies of how to make compartment doors with your own hands.
If you like this door option, then it’s worth considering the pros and cons. There are several types of them. For example, you can install one or two canvases that will move along the wall or in a false wall. In this case, it will be possible to isolate individual rooms. Sometimes doors can consist of several movable leaves and fixed side leaves. Most often, these doors are installed for the purpose of zoning a room.
Regardless of the type of door chosen, the principle of their installation is the same. The only difference will be the guide profile on which the door will move. As for the doors themselves, they can be made of different materials, for example:
- Laminated chipboard.
- Strained glass.
- Solid wood.
- Combination of several materials.
Based on the selected door material, their weight will be different. This means that the sliding mechanism system will be selected individually according to the weight of the entire structure. For example, if the door weighs about 30 kg, then installing 2 carriages will be enough. If the weight of the door increases, then the number of carriages must be added accordingly.
The main advantage of compartment doors is their ergonomics. However, this is not the only feature of such doors. The following points can be highlighted here:
- It doesn't take much effort to open or close the doors. Therefore, if there are small children, they will cope with this task on their own. You will not need to constantly get up for this procedure.
- If there are drafts, the door will never slam.
- Compartment doors can simultaneously perform two functions: zoning the area, and also dividing rooms into separate rooms.
- If there are disabled people in the family, then such doors (hung or on a hidden rail) do not have a threshold, and this is an additional advantage for safe movement.
But to be objective, these doors also have their negative sides:
- If false walls are built, then a clear lack of sound insulation will be immediately felt.
- If the door moves along the partition, then it is impossible to place large objects close to the wall.
- Locks for compartment doors are much more expensive than regular ones. Therefore, not everyone can afford such doors and their equipment.
Compartment doors are divided into 2 main types:
- Rail.
- Hanging.
Based on the name, it is easy to understand the difference. In hanging doors, the entire load falls on the guide, which is fixed at the top. In a rail opening/closing system, the opposite is true, the load falls on the bottom. If the mechanism was purchased from a reliable manufacturer, then both systems are reliable.
However, when choosing, it is important to consider some features. For example, there are rollers that can support the weight of a door up to 100 kg. Accordingly, add the weight of the door to this and you get a structure that will be extremely difficult to move. For this reason, it is worth taking seriously the choice of each door element.
In fact, making interior compartment doors yourself is not difficult. Moreover, not much material is required. We will consider in detail the necessary structural elements, and then we will be able to figure out how to assemble and install it ourselves.
- Laminated chipboard. You can make a door leaf from chipboard. To do this, it is better to choose a canvas with a thickness of at least 16 mm. If it is thinner, then during operation the door will sag, and as a result, after a while the door will lose its presentable appearance. You will also need an aluminum profile for edging the chipboard around the perimeter. This will extend the service life of the compartment doors, as it will add rigidity to the structure.
- System of rollers and guides. This one is simple. You should purchase a ready-made set of rollers and guides. To do this, give preference to a reliable manufacturer. You can also meet many DIYers who will design a roller system on their own. Moreover, it is necessary to decide whether the system will be suspended or on a rail. A suitable system is selected accordingly.
- Accessories. This includes a mortise lock and handles. They must also be reliable and of high quality. The lock for sliding doors does not have the usual tongue that sticks out from the leaf of a regular swing door. It has a special locking mechanism. The lock design has a special movable hook.
- Fasteners This means self-tapping screws or dowels that can be used to secure the roller system and guides to the floor or ceiling.
- Extensions and platbands. They will be needed in order to disguise all the fasteners, and to make the frame of the doorway itself beautiful.
In fact, this is the entire set of material that is necessary for the manufacture of sliding doors. As for the tools, the set consists of the following:
- Electric jigsaw.
- Screwdriver.
- Drill.
- Hand-held circular saw.
- A hand router, which is necessary for cutting grooves.
- Screwdriver Set.
- Pliers.
- Hammer, etc.
If you have all this, you can proceed directly to assembly.
The most important rule that applies to all types of compartment doors is a perfectly flat surface. Only in this case will the doors work flawlessly and for a long time. Therefore, before installing the doors, make sure that the screed is smooth and of high quality. If necessary, fill it strictly to the level. If this is not done, the doors may open or close randomly. The maximum difference allowed is up to 5 mm. If it is larger, it will be impossible to adjust the rollers.
Before installing the compartment door, carry out a number of works related to wall finishing. If you leave all this for later, then the doors can inadvertently be damaged. Even covering them with cellophane will not save you, because it can break through or you can accidentally catch it with a sharp object, for example, a spatula.
You should also decide exactly how the doors will open/close or along the wall, or whether you will need to make a false wall.
So, now let's move on directly to the manufacturing process. It is divided into several successive steps:
- First, install the guides. The top and bottom rails must be trimmed exactly. Otherwise, the design will not have a presentable appearance. As for the upper and lower guides, in relation to each other they should have a clear horizontal line. Therefore, when installing, use a plumb line or a very precise level of appropriate length.
- Next, you need to make the door leaf. Let's consider an example when the doorway has a width of 1800 mm. Accordingly, if there are 2 doors, then we divide this length in half, resulting in 900 mm for each door leaf. If the sashes will be installed on different guides, then it is necessary to add 50 mm to overlap one sashe with another. If not, then there is no need to add. In this case, a lock will be installed at the end of the two panels.
- After cutting the sheet to size, remove any chips along the edges. The chipboard is edged around the perimeter with an aluminum profile. This will make the door leaf sufficiently rigid and durable. Alternatively, the profile can be glued to the canvas or screws can be screwed into the end.
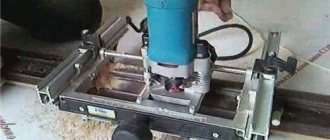
- The next step is to install the rollers. Without a manual milling machine, it will be difficult to complete this work. Although this will also depend on the chosen system. So, apply the roller to the bottom of the chipboard, from the edge at a distance of up to 100 mm. Trace it with a pencil. It is necessary to cut out a landing groove on the resulting sketch. Afterwards, install the rollers into it and secure it with self-tapping screws.
- Be sure to adjust the rollers. This work must be done only when the blade is installed on the guide.
- Finally, all that remains is to install the handles and locks. They cut in according to the same principle as the rollers.
During the work, be sure to take into account the difference in installation. If the door is hidden in a false wall, then the guides are installed first, and only then the partition. In this case, the guides should be covered so that during installation of the wall it is not damaged or heavily covered with debris. If the doors open along the partition, then the guides are simply screwed to the floor and ceiling after all finishing work.
As for installing doors, this is the simplest and final stage. Carefully place the rollers on the guides and check the functionality of the door. Pay attention to whether a gap forms between two closed panels. If yes, then the rollers need to be adjusted.
So, as you can see, it is quite possible to make such doors yourself. We learned that the installation does not involve complex technological processes. And if you have basic carpentry tools, you will be able to complete the work in a short period of time. If you already have experience in making them, be sure to write comments at the end of this article. We and our readers will be interested to know what difficulties you encountered during the work process.
Is it possible to use sliding doors in the kitchen?
Sections of the article:
- Advantages of designs
- Organization options
When choosing a door leaf to separate the kitchen from the rest of the house or apartment, the main requirements applied to the structures are good performance of the door leaf for absorbing noise and preventing the passage of foreign odors. But, despite the fact that sliding doors to the kitchen may be somewhat inferior in terms of sound insulation to conventional swing structures, they also have a lot of advantages.
The main advantage of sliding doors when installed in a kitchen opening is significant space savings. This is quite relevant, given the fact that in most apartments the kitchen and the passage to it have relatively small dimensions.
In addition, there is also a whole range of motivational reasons for installing sliding doors in the kitchen, among which are:
- The ability to combine several rooms of an apartment or house into one common space with the possibility of zoning by closing the sliding panel;
- Zoning of studio apartments;
- No need to allocate space for opening the door leaf;
- The mechanical components that set the blade in motion have sufficient strength and wear resistance, without requiring special care;
- The sliding door leaf can be made using various materials and have almost any color scheme.
To install a sliding door in the kitchen, any type of existing structure can be used. Quite often, fencing the kitchen area is done using:
- Kits used in sliding-type cabinets;
- Power suspensions with fastenings in the upper guide rail;
- Power suspensions with fastenings in the lower mortise wheel support;
- Sliding system of the “pencil case” type;
- Sliding system "accordion".
Organization options
In studio apartments, a sliding wall area is often created instead of using door leaves. The moving canvas can have a design of any complexity: from a strong structure with a frame, suitable for placing cabinets, to thin partitions designed to highlight thematic areas. With this solution, the kitchen passage can become a place for relaxation with interior elements and various household appliances located in it.
The implementation of this version of sliding doors to the kitchen is quite simple. The moving parts are based on powerful hidden wheel mechanisms. The upper part of the structure is equipped with support mechanisms that move along a guide rail.
It is thanks to the guide element that the correct movement and clamping of the structure to the floor is ensured. This design is one of the simplest engineering solutions, requiring a minimum of components, but at the same time having a high degree of reliability and ease of adjustment.
Pencil door
The design of cabinet doors can be installed in apartments with a wide kitchen passage without walls. To do this, using drywall, a hollow partition with a hole on the side is made. This imitation wall will occupy some part of the opening. When opened, the door leaf will fit into the plasterboard partition, thus hiding inside it. This design has a very neat appearance and is quite practical to use.
When strengthening the partition with power elements, it can be additionally used as a supporting wall for installing kitchen shelves or cabinets. This ensures a convenient door system and, at the same time, creates additional mounting space in the form of a wall.
In order to create a larger usable space, a structure with one door leaf is installed. However, if desired, you can assemble a sliding door to the kitchen, consisting of two panels. For this purpose, two hollow plasterboard partitions are made, placed on both sides of the passage.
This solution is very popular when the mechanisms used in sliding wardrobes are used for sliding doors to the kitchen. The door leaf itself has a standard appearance. To effectively place furniture in the kitchen, standing close to the walls and located to the side of the entrance and to create maximum free space, a system with two leaves is used.
A guide element in the form of a rail is placed above the doorway. The door structure itself is thus installed in a hanging position. If desired, it is also possible to install a lower guide. If it is present, the main load falls on the lower rail and the floor underneath it.
Types of sliding doors
Before you start making a door, you need to decide on its type, which depends on the dimensions of the doorway and the goals pursued by installing the sliding door.
For example, if you need to divide two rooms, you can get by with two canvases moving along the partition. If it is necessary to highlight separate parts of one room, the manufacture of compartment doors is carried out from a larger number of panels with fixed or mobile doors, built by hand.
The choice of guide profile also depends on the number of panels, and the installation technology itself will be the same in both cases.
In addition to the number of panels, sliding doors differ in the type of material on which their weight depends. In production can be used:
- Solid wood;
- Laminated chipboard;
- Strained glass;
- Various combinations of materials.
Depending on the weight of the leaf, sliding doors are divided according to the type of sliding mechanism and the number of carriages. The greater the weight of the door, the greater the number of hanging mechanisms that must be used.
Sliding interior compartment doors: hanging, radius, cassette, stained glass, plastic
The design of a compartment door consists of a door leaf, there are several of them, a set of guides, a roller mechanism and a cassette, which may not be included in this set. The roller mechanism includes the rollers themselves, a limiter and a stopper, which fix the door, preventing it from moving beyond its possible movement. When choosing a device for doors - interior compartments (photos can be seen in this article), you need to take into account how much the door leaf weighs. If it is light, then you can get by with two rollers, and if it is heavy, at least four. By the way, it is not recommended to save on such a mechanism. Therefore, the more expensive the coupe doors, the more you will have to pay for additional components.
There are a great variety of materials from which the canvas is made. It can be solid wood or combined materials - chipboard, finished with laminate or veneer, wooden blocks, glass or plastic. They may include different types of materials. Glass compartment doors are made of opaque or translucent glass. An interesting option is to combine these two glasses together with a transparent option. Such coupe doors will look unusual due to the glare of light and the play of dullness with shine. Glass doors are very popular; they create a feeling of lightness, which is important in small rooms.
Advantages and disadvantages
Usually, when installing a sliding door with your own hands, the goal is to save free space. Ergonomics is far from the only advantage of sliding doors; their advantages also include the following features:
- The doors open and close effortlessly and do not get stuck in a draft;
- With the help of compartment doors, the space of the room can be easily zoned;
- When installing a sliding door, there are no thresholds, which is important for people with physical disabilities.
The disadvantages are:
- Poor sound insulation;
- High cost of special locks;
- Serious restrictions or impossibility of installation next to the door of cabinet furniture.
Material selection
The most popular material for making sliding doors with your own hands is chipboard and its varieties, both Russian and foreign. In second place is glass - a material ideal for lovers of elegant solutions. Both materials can be easily combined in one design if desired.
The next most common material is mirror, which is used primarily in the manufacture of sliding doors for wardrobes.
The choice of one material or another depends directly on the personal preferences of the home owner, the interior design of the room, and material wealth.
Door jamb: measurements and choice of material
Let's start with the fact that you need to choose the right timber (lut) in the store. It should match the width of the wall into which the box is inserted. Luts come in different types, with different coatings and in all suitable sizes.
The materials from which the loot is made also vary:
- solid wood;
- metal.
If you buy it in the same place as the door, you will be offered an identical loot, which will be no different from the door. Door manufacturers often launch the production of wooden blanks for door frames. For the front door, it is better to choose a frame made of solid oak - it is more reliable and durable than MDF.
Before you start making the door frame, you need to take measurements
If suddenly the width of your wall is not standard and none of the proposed options are suitable, take a beam slightly narrower than the wall, and the remaining width can be compensated for by a good-quality board.
When the materials are ready and the tools are available, we move on to making the box.
Making a box begins with taking measurements. If desired, you can draw a drawing. Measurements are taken after the old frame has been dismantled and the opening has been repaired - the unevenness in the wall has been puttied. First you need to take measurements of the height of the future structure and the width of the doorway. It is not advisable to exceed the size of the loot, as this will make it more difficult to file off the extra pieces.
Manufacturing of sliding doors
After the difficult choice of design and material for the sliding door, you can begin to manufacture and install it.
Preliminary measurements
Before purchasing all the elements of a compartment door required for installation with your own hands, it would be a good idea to watch a video or consult with friends who have ever encountered such work. This will help you avoid mistakes when purchasing and save time on correcting them.
First, you need to take measurements of the doorway with maximum accuracy using a tape measure, preferably at several points in width and height. The width and height of the door leaf (if it is the only one) must exceed the corresponding dimensions of the opening by 5-6 cm. When installing several leaves, their total width is calculated taking into account the fact that they will slide one after another and move apart.
Tools and materials
In order to make compartment doors with your own hands, you need to prepare the following tool in advance:
- Screwdriver;
- Roulette;
- Plumb;
- Pencil;
- Level;
- A chisel or hand milling machine.
Materials you will need:
- Fasteners and door fittings;
- Beam 50x50 mm;
- Anchors for attaching timber to the wall;
- Platbands, extensions, door frame.
When purchasing ready-made doors, all necessary fittings, fastening and sliding elements are already included in the delivery package. But in order to make compartment doors with your own hands, you need to purchase them separately; they are available in almost any hardware store.
A wooden block will be needed to secure the guide to the wall. Its length is taken to be equal to the width of the door leaf multiplied by two. If there is no doorway as such and the door is installed as high as the ceiling, then the guide should be fixed directly to the ceiling.
The frame is a frame framing the opening to which the door leaf is adjacent in the “closed” state. Platbands and extensions will be required to decorate the opening and hide the fastening elements.
Preparatory work
During rough finishing, only the sliding systems themselves can be installed if the door is planned to be hidden in a niche built into the wall when opening. In all other cases, installation of the system should be carried out only after the premises have been finished.
Do-it-yourself installation of compartment doors cannot be started without checking the correct contours of the opening. The walls must be vertical and run strictly parallel to each other. If these conditions are not met, you must try to fix the opening.
If the door is planned to be installed in the opening of a plasterboard partition, then during installation a timber frame should be secured above it.
Sliding door installation
The box with the sliding mechanism must contain instructions for its installation. Different manufacturers often produce mechanisms that differ significantly in design, but with approximately the same operating principle.
When installing a compartment door with your own hands, it is important to adhere to the following sequence of work.
The door leaf is placed against the opening, and a top line is marked on the wall. At a distance of 7 cm from the mark made, strictly horizontally (using a level), a strip is drawn.
A beam is applied to the strip and, with the help of anchors, attached to the wall so that one part of the beam is placed above the opening, and the other, equal to the first, is located on the side into which the door will be pulled out. It is very important to secure the bar horizontally, otherwise the canvas will close and open on its own.
A rail is attached to the bottom of the block using self-tapping screws, in which a pair of holes for fastenings are drilled in advance at intervals of 15-20 cm from one another. The rail should be placed at a distance from the wall, allowing the door to move unhindered and freely.
Rollers with carriages are inserted into the guide so that they can move freely. Then the ends of the guide are covered with rubber shock absorbers.
It is preferable to install a compartment door with your own hands not with one guide located on top, but also with an additional bottom fastening. This will give the structure greater stability, however, over time, it may deform the floor covering.
There are several options for attaching a sliding door from below:
- Fastening on the lower end of the door leaf a profile in the shape of the letter U or a pair of parallel slats of small thickness;
- A device at the end of a small groove for a guide or lower roller;
- Installation of a metal guide on the floor across the entire width of the doorway. This method is used occasionally, because it creates an obstacle in the form of a small threshold, which creates some inconvenience.
The next step in making compartment doors with your own hands is to install a profile or create a groove for attaching the lower leash (or knife, roller, flag). It is convenient to cut the groove with a milling machine; if you don’t have one, an ordinary chisel will do. The width and depth of the groove should be made slightly larger than the corresponding dimensions of the lower guide element.
Brackets are mounted on the upper end of the door for fastening to the rollers.
The door leaf is temporarily fixed on the carriages, the lower guide is inserted into the groove and the door is moved to the maximum open position, while it is necessary to mark the location of the driver on the floor with a pencil. Then the canvas is removed and using a plumb line, the exact location of the lower guide, which must be attached to the floor, is determined.
Next, you should proceed to installing the sliding door into the prepared structure. For this purpose, it is necessary to put the canvas with a groove on the lower guide, and then fix it on the rollers. Using the adjusting bolts and using a level, the door is installed in a vertical position.
Thus, the installation of the door is completed and all that remains is to give the installed structure a completed look. A stand is attached to the side of the frame to the wall, against which the door will rest in the closed position.
Exactly the same rack is installed on the opposite side when the door is open. All fasteners are hidden under the extensions.
Afterwards, the trim and door handles are installed, attached to the top beam and uprights using glue or finishing nails.
Those who want to learn how to make compartment doors with their own hands are convinced that it is not so difficult. All that remains is to consolidate the theory with practice. The application of little effort and minimal material costs will result in a reliable and beautiful interior door, which also significantly saves space, which is especially important in small apartments.
Making and installing any interior item with your own hands is not only a pleasant process, but also saves the family budget. The master himself can choose the materials and design he likes. So assembling a compartment door with your own hands may seem like a difficult task, but with the right instructions and skill it is quite doable.
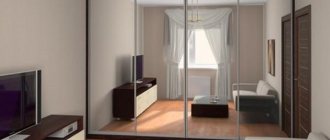
This type of sliding door is most relevant in small spaces, where every free meter is worth its weight in gold. The saved space can be used for other necessary things. Sliding structures are often used in a dressing room or corner closet. The unusual design will add its own flavor to the overall interior of the room and can visually expand the space.
The assembly plan, installation and calculations presented below will tell you how to make compartment doors with your own hands and assemble the desired structure. Another name for them is compartments.
Preparatory activities
Taking measurements
This is easy to do if you have a tape measure on hand. For those who are settling into a “new building,” it is much easier. If the house is being renovated, then it should be taken into account that the installation of compartment doors will be much more complicated if the measurements are made inaccurately. And this is quite possible, since the openings must be trimmed.
First you need to dismantle not only the platbands, but also the box. After cleaning this section of the wall, its condition and the need for reinforcement are determined. At this stage, solutions may vary. For example, widen the opening, install a partition made of gypsum plasterboard (multi-layer plywood) instead of the dismantled part of the old one. This will help not only to take the correct measurements, but also to understand how to install the compartment door.
Most recommendations do not take into account that several installation options are possible, so the owner has a choice:
- two small sliding doors;
- one is fixed, the other is mobile;
- how the canvases will be joined - simply close together or overlap each other;
- a wide canvas that slides into the septum cavity. For example, from the same drywall.
Perhaps this is the whole difference in the methods of self-installation of sliding compartment doors. The principle of their functioning is identical - movement along the guides in one direction or another.
Material selection
Everyone has their own preferences in terms of aesthetics, design, and so on, but a number of installation features are worth noting.
- Glass (high strength) or solid wood. What they have in common, in addition to high cost, is significant weight. This means that you will have to install a larger number of carriages and carefully develop the drawing to avoid distortions and snags. Consequently, the installation of doors will be greatly complicated.
- Board materials (MDF, OSV, chipboard). The option is cheaper and easier to install. For each sash (taking into account the low weight), two carriages are enough. In addition, if necessary, you can restore the canvas and eliminate its minor defects without the help of a professional.
- Cloths that are too cheap wear out quickly. When choosing slab materials, you need to pay attention to the density of the products. And it is desirable that they be laminated.
- The top rail is mounted on the ceiling or wall (when the height of the sash is chosen less than the opening). In the latter case, if a wooden block is being prepared, you need to take into account that its side should be approximately twice as thick as the canvas.
- All necessary components (rollers, guides, locks, fittings, fasteners) are supplied with the doors. But if you decide to purchase them at retail, for canvases made independently, you should take with you a developed installation diagram with the dimensions of the opening. The manager will tell you what exactly may be needed and in what quantity (for example, how many carriages should be installed).
Required materials and tools
For sliding doors with a lower guide roller, you will need the following materials:
- Door leaf (the dimensions of the door leaf itself should be 5-7 cm larger than the doorway in height and width);
- Wooden block 50/50 mm (the length of the block is twice the width of the door leaf);
- Necessary accessories (metal guide bar, fasteners, rollers);
- Cash cards 2 pcs.;
- Door handles;
- Accessories 2 pcs.;
- Box-shaped stand (for a tight fit of the door in the closed position);
- Jigsaw (with chipboard file) and other tools;
- Anchors;
- Finishing nails and screws.
Laminated chipboard is well suited for making door panels.
How to make indoor door panels from laminated chipboard with your own hands
So, the principle of operation of doors of this type is clear. Now you need to prepare two main parts of the door leaf, which will subsequently need to be assembled and installed on the sliding mechanism. The mechanism itself can be purchased ready-made, but you will have to tinker with the door leaf yourself. Make sure that all accessories are of high quality.
Two identical frames are cut from a sheet of laminated chipboard. You can assemble or prepare preliminary drawings. Their usual height is 200 cm. We select the width according to the size of the doorway. A standard doorway fits into the following parameters and drawings: 400/600/800/900 mm. These are standard room dimensions, but it is better to calculate the exact width and length of your opening.
Using a jigsaw it is not at all difficult to cut out the necessary frames from chipboard. Preliminary diagrams will help you do everything right. The main thing is accuracy. It is much more difficult to line the ends of chipboard. For a beautiful appearance, you will also need carved glazing beads, which can be ordered or purchased at any woodworking workshop. You need to carefully calculate the thickness of the glazing beads, or use quarters.
For the outer ends of our rectangles you will need a special trim tape. An adhesive composition is applied to its inner surface. It becomes active when heated. We apply the tape to the end and iron it with a well-heated iron. When the tape cools, it will stick very firmly to the base. Also, before gluing, you need to thoroughly clean the surface. There may be excess left on the sides. They can be removed with a stationery knife or fine sandpaper.
How to make a compartment door with your own hands: assembly and installation
After preparing the canvas, you can begin installing the guides and inserting the handles. This work is not difficult and depends on the rollers themselves and the type of sliding mechanism. As a rule, it will be necessary to cut a special landing groove. The depth and width of the groove will depend on the rollers. Some types of rollers may require a narrow and deep groove, so a router is indispensable. It will be better if you prepare drawings and diagrams in advance.
To install handles, you need to cut a rectangular hole in the chipboard that will correspond to the purchased handle. You can simply mark the thickness for the hole with a pencil. Next, insert the handles and fasten them tightly to the canvas with ties.
Installation of guides and installation of door leaves
Now the door panels are prepared, and you can attach the guides in the doorway. There are two of them: below and above. The bottom rail is easier to deal with since there is already room for mounting. But in order to assemble and secure the top one, you must first prepare the fastening. A strong wooden beam is suitable for this.
We take the length of the beam based on the width of the resulting door leaf multiplied by four. This is how we calculate it if we have two canvases moving in different directions. If the canvas is solid, then, accordingly, the length of the fastening and the guide will be equal to the width of the canvas multiplied by two.
When the top track is secured, doors can be hung on it. It is enough to simply assemble and place the canvas on the side. The doors are fixed and adjusted vertically. Then the lower guide is attached. To keep the doors tightly secured, you just need to press the rollers up. Here a lot will depend on the mechanism of the rollers. They are easier to install when the rollers spring up and fix the structure.
This completes the installation and the entire structure is ready. All that remains is to install limiters so that the sliding doors do not “pop out” of the fasteners.
Sometimes, for compartment doors, the lower and upper guides have to be installed before installing the door leaves. That is, assembly and installation occur separately. In this case, you need to achieve an ideal level vertically and horizontally. A plumb line and level will help here.
Advantages and disadvantages of do-it-yourself compartment doors
As mentioned above, the main advantage of sliding compartment doors is considered to be significant savings in usable space. They can also be adapted to divide a room into zones.
An equally important advantage of do-it-yourself compartment doors is their easy installation and functionality during assembly. There is no need to accurately measure the dimensions of the door frame. Sliding doors will always be a couple of centimeters larger than it. If installation and installation are done correctly, the compartment doors open very smoothly and almost silently.
Among all the obvious advantages of compartment doors, there are also disadvantages. The main drawback is poor sound insulation. The installation and design itself does not imply tight closure without gaps. So, sitting in a room with the doors closed, you can clearly hear sounds from other rooms. Such an interior door is not very appreciated by lovers of peace and quiet.
Sliding doors are an excellent solution for any room, regardless of size.
How to make a door frame with your own hands (video)
If, when purchasing a new interior door, restoration of the old door is impossible, you can do it yourself. At the same time, it is very important to follow simple rules so that the finished box looks no worse than the factory version.
Similar materials
A high-quality plywood door can be installed between rooms in an apartment or house, and at the entrance to a home. It is quite possible to make such a design with minimal financial costs with your own hands. The process technology is relatively simple.
Any home craftsman can make a door with his own hands from sheets of plywood. To do this, he first needs to decide on the type of structure he plans to create. There are two options here. You can build a single-layer or frame structure. Single-layer doors are made from one sheet of plywood, which is reinforced along the entire contour (and always on both sides) with wooden slats. Visually similar products are ordinary paneled structures produced in a factory.
Plywood for making doors
Homemade single-layer doors are characterized by low heat and sound insulation. For this reason, they can be used exclusively as interior structures.
Frame doors have a higher level of noise and heat protection. They are made in the form of structures sheathed with plywood on both sides. Moreover, stiffening ribs or a layer of insulation are placed between the sheets of wood material. Due to this, frame doors can be installed at the entrance to a house or any outbuilding. Frame structures must be made from moisture-resistant plywood sheets. It is optimal to use materials marked FSF. It is also possible to use FC plywood, which is cheaper. Its resistance to moisture can be increased by impregnating the material with drying oil or PVA glue.
Having decided what kind of door you will make, start drawing up a project. To do this, you need to measure the parameters of the existing door frame and, based on them, draw up a drawing of the future design. There is an important thing to remember at this stage. The geometric parameters of the created product are always taken to be a couple of centimeters smaller than the dimensions of the box.
If you do not comply with this requirement, the doors will not close tightly after installation.
Door opening measurement
Now you can purchase materials. You will need wood strips 11–15 cm wide and plywood sheets directly, as well as insulation (if you make frame-type doors from plywood with your own hands). Professionals recommend using polystyrene foam or inexpensive polystyrene foam as a thermal insulation material. It is advisable to take only first grade plywood sheets. Especially for cases when you plan to cover the finished structure with colorless varnish. It is allowed to use second-grade material, but be prepared that the appearance of the door will not be the most attractive.
All work on the construction of the door structure is carried out using simple tools. You need to stock up on an electric drill, sandpaper, a hacksaw (it is better, of course, to use a jigsaw, with it the process of cutting and fitting wood goes much faster), a pencil, a screwdriver, a tape measure, wood glue, and a screwdriver. It is also advisable to prepare an electric router. It allows you to make a lock socket in the door with the highest quality possible, as well as cut grooves and tenons for assembly into a single strong structure of the frame being created.