We reupholster a chair at home - without complications and unnecessary steps
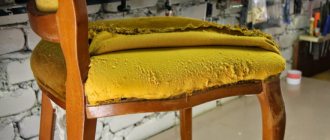
Natalya Preobrazhenskaya October 1, 2020 Regular Houzz contributor. Interior designer and decorator, head of the interior design studio “Cozy Apartment”. Regular Houzz contributor. Interior designer and decorator, head of a design studio... More Email SaveComment6Like53PrintCode Click “Insert” to add an article to your website or blog. If your favorite soft chair is worn out and has lost its appearance, do not rush to throw it away. Replacing old upholstery is not at all difficult. No money for a restorer? — Try pulling the chair with your own hands. And we will tell you how to make neat and beautiful upholstery yourself. Important: Before you begin, make sure that your furniture is not antique: look for manufacturer's marks on the chair. If you find it, go to a restorer. Only he will be able to reupholster the chair without disturbing the production technology. In all “correct” antique chairs and armchairs, the seat is supported by springs, and the filling is horsehair and sea grass. And for fastening, not a stapler is used, but small forged nails. Reupholstering antique chairs is not an easy task. But if your chair is not of historical value, feel free to get to work. You will need:
- dense furniture foam rubber, glue for it (if necessary) and padding polyester;
- fabric for rough upholstery (such as calico), decorative fabric, decorative cord;
- glue gun and glue, furniture stapler and staples;
- tape measure, hammer;
- leather scissors or tailor's scissors, knife;
- pins;
- iron.
Upholstering chairs with your own hands is not a dusty business, but, nevertheless, I advise you to cover the floor surface before starting work Step 1. Remove the old upholstery Remove the old braid, fabric and upholstery from the back and seat of the chair using scissors and a knife. Step 2. Glue the foam base If the old soft base of the chair is well preserved, as in our case, it does not need to be changed. If the condition is not very good, replace it with a new one. Apply a thin layer of glue to the wooden seat of the chair and place foam rubber: this is necessary so that it does not move during the upholstery process. Press and leave for 10-15 minutes. Tip: The foam blank can be cut in advance to the size of the seat. Or you can glue the foam rubber in a piece, and after gluing, trim off the excess. Step 3. Apply a layer of padding polyester The size of the padding polyester piece should be slightly larger than a piece of foam rubber in order to freely cover it on top, as if wrapping it around. Step 4. Stretch the rough upholstery Tightly, like a drum, stretch the fabric for the rough upholstery over the padding polyester. It should be thin but durable (for example, calico). Carefully staple the edges of the rough upholstery. Tip: During the tightening process, you will most likely encounter a situation where the fabric is tightened tighter in some places. In this case, use a thin screwdriver to pull out the staple, pull up the fabric and secure it again with a stapler. Step 5: Pull the upholstery over the back of the chair To make the upholstery on the back of the chair, first stretch the decorative fabric over the back of the back using a staple gun. Take fabric with a margin of 2-3 cm to make stretching more convenient. Before stretching, it is better to iron the decorative fabric so that the chair does not look wrinkled. Step 6. Fill the back After this, put a layer of padding polyester in the back, then pull the rough fabric tightly with a stapler, then again a layer of padding polyester. At this stage, the padding polyester is laid in a “slide” so that the back of the chair is convex. Place foam rubber on top of the padding polyester and reattach the layer of rough fabric with a stapler. Step 7. Upholster the chair with fabric Now you need to upholster it with decorative fabric. Iron the fabric and, using the drum principle, secure it with a stapler along the edge of the seat and back. After upholstery, trim off excess fabric with scissors. Tip: Don't forget about the bottom of the chair - it can also be decorated with decorative fabric. Step 8. Decorate the chair with braid. To hide the edges and places where staples are attached with a stapler, you will need braid. I advise you to put it on glue. To ensure that the braid lies flat, secure it with pins while it dries. After a couple of hours they can be removed. The reupholstery of the chair with your own hands is finished - the chair is ready! YOUR TURN…
Preparatory stage
Before stretching, you should make sure that the chair frame, legs and elements holding the seat are intact and free of defects. The same applies to the back, since in most cases it is covered with the same material for beauty.
The preparatory stage also includes the following actions:
- Selection of filler - polyurethane foam, foam rubber (density 30-50 kg/m3, thickness 40mm);
- Measuring the seat and backrest to determine the amount of material required for upholstery and upholstery;
- Choice of leather color and type – it comes in different brands and manufacturers;
- Tightening and repair of frame elements, backrest and legs.
Equally important is the purchase of a special tool with which you will need to cut sections of the canvas according to size and stretch it onto the chair (pattern, stationery knife, stencil, furniture stapler).
Procedure for reupholstering a chair
The restoration of chairs can be divided into a sequence of actions. Each of the points requires explanation, but the general algorithm of actions can be summarized in a few dozen words:
- Remove the upholstery and soft part.
- Disassemble the frame into its components.
- Assess the condition of the frame, check the connections. Unstable connections should be disassembled, cleaned, and re-glued.
To make a restored chair comfortable, you need to correctly calculate the thickness of the layers.
Now you know in general terms how to reupholster a chair. But there is something to be said for each point - there are many different tricks that will make the job easier and the result more attractive.
Soft pie: materials, thickness
Before reupholstering a chair, you will have to study some information about what exactly to use when restoring a chair or armchair. Please note that you can use not only the materials listed in this paragraph. We have described the most common, synthetic, inexpensive, with acceptable characteristics. If desired or necessary, you can use natural analogues - copra in mats or rolls, batting, dried sea grass, horsehair, burlap and other materials that are exotic today and once traditional.
Most common materials
What materials are needed to reupholster a chair?
When restoring a chair or armchair, foam rubber or polyurethane foam (PPU) is used for the soft part. We are talking about foamed polyurethane foam, not sheet. There is also furniture latex. It and polyurethane foam differ from foam rubber to the touch. They are more like rubber (latex is generally like rubber); when stretched/compressed, they tend to return to their previous shape.
To be soft enough, the density of these materials should be 30-35 kg/m³. Foam rubber and polyurethane foam are sold in large sheets - the minimum size is 1*2 meters. So that's enough for more than one chair. Latex is usually available in some standard sizes, but is most often made to order.
Different thickness, density, rigidity, different manufacturing technologies
What is better to use for upholstering chairs - foam rubber, latex or polyurethane foam (PPU)? If we talk about quality and durability, then latex or polyurethane foam is better. They will last up to ten years or more without signs of wear, they absorb better and wear out less. The best of this pair is latex, but it is much more expensive than even polyurethane foam, not to mention foam rubber. Therefore, if you are on a limited budget, choose foam rubber. If durability is important - polyurethane foam or latex.
Now on the thickness of these materials. For the back, a thickness of 3-5 cm of foam rubber/PPU/latex is sufficient, depending on the degree of desired softness/hardness, but for the seat it is better to use materials with a thickness of 7-8 cm or more. If the base is solid - made of plywood, without springs or tapes - a thickness of 10 cm is needed. Otherwise the base will be felt.
The three most common materials are foam rubber, polyurethane foam and latex.
A padding polyester is laid on top of the foam rubber. Its thickness is small - 1 cm in a free state or so. It’s easier to navigate by density: 150-200 g/m². This layer is needed so that the foam/PPU/latex rubs less. This way, restored upholstered furniture will last longer.
If you want the chair or armchair you have reupholstered to last longer, another layer of spunbond is stretched over the padding polyester - this is a non-woven material made from a polymer melt using a spunbond method. Spunbond costs very little, but significantly extends the life of the seat. This layer is found in expensive furniture and increases durability (foam rubber/sintepon does not rub) and comfort of use (upholstery fabric does not fidget). A possible disadvantage is the accumulation of static electricity. But this is observed only when natural wool or silk is used in upholstery.
How to cut and fasten
The foam is cut to fit the size of the seat. The easiest way is to make a template at the initial stage: attach a sheet of cardboard to the seat, trace it and cut it out. This template will be needed more than once, so it’s better to make it.
It’s better to make a template right away, especially if you will be dragging several identical chairs
We cut out foam rubber and padding polyester strictly according to the template. In some cases, it is worth making it wider and longer by 3-5 mm so as not to feel the edges of the base. The cut foam rubber is glued to the base using furniture glue. There is a special glue in a can for foam rubber. It is more convenient to use, but it is not easy to find everywhere.
The padding polyester is laid on top - one side is more “rough”, so we place it on the foam rubber/PPU/latex, level it and smooth it with our hands. After this, it is problematic to separate the laid layers (you can try). If this method does not seem reliable enough to you, you can glue the connection by applying a mesh of suitable universal glue or the same glue for foam rubber.
Latex is usually made to order, so the edges are rounded for greater convenience.
One point: if the base of the chair is not rigid - springs, tapes, a snake - the glue you should use is not the one that forms a hard crust after drying, but the one that remains elastic.
If you decide to also use spunbond, it must be cut out with a margin, attached with staples to the base, evenly straightened and stretched. You should not pull too hard - the material is non-woven and is easily damaged. It just needs to lie without folds. Carefully trim the excess to the level of the chair/chair frame.
Stages of reupholstery
After the tools and materials are prepared, you can proceed directly to the reupholstery.
Removing old upholstery and disassembling the frame
First, remove the old upholstery. An anti-stapler is useful for this:
- turn the chair upside down;
- use an anti-stapler to pick up the staple on the fabric;
- pull it towards you while pressing on the chair;
- one side of the staple will come out, then pull it out completely with pliers;
- repeat for all staples.
If there is no anti-stapler, the staples are picked up with scissors.
Next, they disassemble the frame by gently tapping it with a hammer. If it is fastened with screws or nails, they are removed. All parts are inspected for damage and fungus. Cracked or broken parts are replaced, the rest are cleaned and varnished as necessary.
Creating a soft substrate
The soft backing is cut out of padding polyester or foam rubber. First, make a pattern on cardboard in accordance with the dimensions of the seat. Then, according to the pattern, a part is cut out from the material for the backing.
Next, the cut foam rubber is glued to the seat using PVA glue. The synthetic winterizer is laid in one or several layers depending on the desired thickness of the substrate.
The optimal thickness for the back is 3–5 cm, for the seat — 7–10 cm. Each layer must be glued to the underlying one so that they do not move. It is recommended to add burlap or horsehair to the middle - this will prevent dust mites from getting into the upholstery.
In order for the upholstery to last longer, a layer of spunbond should be placed on top of the foam rubber or padding polyester. This is a non-woven material, it is also used to make medical masks and disposable gowns. Spunbond is inexpensive and is sold in large rolls.
How to cover a chair: fabrics, stretching
Before you reupholster the chair, you will have to find fabric. And it’s not as simple as it seems: there are not just a lot of upholstery fabrics, but a lot. Moreover, it is often problematic to outwardly distinguish one material from another: not every professional can distinguish artificial suede and some types of microvelor; chenille and jacquard are similar, and sometimes velor is very similar to flock. Nevertheless, you need to have at least the slightest idea about which upholstery fabric is best for upholstering a chair or armchair.
Only one collection from one manufacturer
First of all, decide on the color scheme and type of fabric surface (hairy or smooth). Otherwise you will get confused. Otherwise, you will have to choose “by touch.” Tactile sensations should be pleasant - the chair should be re-stretched so that it is pleasant to use. In summer you will have to touch the upholstery with leather. So this is an important selection criterion. Well, then, let's talk about the types of fabrics and their areas of application:
- If you have pets, it is best to reupholster upholstered furniture: Flock. It is smooth, without loops. So the claws are difficult to catch and damage is usually minimal. But not everyone likes the feel of it.
- Microvelour and velor.
Also smooth fabrics with fine pile (not loops), the claws simply slide. This is what the flock looks like - For animals with long hair, microvelor is better - it is easier to clean.
Other fabrics can also be used if you like them. But they are less practical than those listed above. In any case, you need to pay attention to the density of the fabric. Normal upholstery fabric should have a density of at least 200-250 g/m², as well as high abrasion resistance (15-20 thousand abrasion cycles). These characteristics can be found in the fabric specification or checked with the seller.
How to reupholster a chair: tighten the straps
You usually don’t need to sew anything for the back or seat of a chair. All you need to do is cut out a piece of fabric of a suitable shape with allowances for stretching. Next we proceed like this:
- We fix it in front, tighten it and fasten it at the back. We install both fasteners in the center.
- We stretch and fasten it on the right and left - in the center.
- Then we stretch the fabric evenly and fix it alternately on the right and left.
- Also alternately in front and behind.
How to reupholster a chair: stretch the fabric evenly to avoid wrinkles
The main thing is uniform tension without folds. The fabric is usually secured with staples, placing them at a distance of 3-5 cm from each other. The staples hold the fabric quite well and do not pierce it. If there are signs that they will break through the surface, you need to reduce the force of the impact.
The second option is to use small cloves. A thick tape is needed under them - just so as not to tear the fabric. Nails are a good solution, but they take more time to reupholster the chair. When using nails, they should not be too long so that they do not stick out from the back side and tear the foam.
How to upholster a chair: step-by-step instructions
The first step is to repair the frame, the cracks and chips of which need to be glued and puttied. Weak connections must be sealed using a wedge and glue. If there are damaged springs, then they need to be replaced with strips of jute tape. It is better to replace the plywood bottom with a new one, but you can simply clean it of filler and glue residues. Next, the frame must be painted or varnished, but the surface must first be treated with a primer.
The next step is reupholstering the seat. To complete this step, you must follow the following instructions:
- Cut out parts from fabric and filling. If the old upholstery has been saved, you can make new elements using its template - otherwise you will have to use cardboard or thick paper.
- Draw the outlines of the parts on a plywood sheet and add a few centimeters for allowances.
- Cut out the filler with a sharp blade or utility knife.
- Make a fabric pattern using the same template. The main thing is that the drawing does not move. In addition, you need to leave a 10 cm allowance for the hem.
- Glue the filler to the top side of the base.
- Wait until the part dries.
- Cover the foam with upholstery fabric so that the base is correctly positioned relative to the pattern.
- Carefully nail the edges of the material to the seat with a furniture stapler. However, it will not be easy to complete this step yourself, since the fabric needs to be stretched evenly on all sides. If you violate the execution technique, the filler will quickly deform.
- Trim excess pieces of fabric.
If the seat cannot be detached from the frame, all operations must be carried out on the chair. In addition, it is recommended to cover the springs with burlap or other dense fabric.
Upon completion of this work, you need to cover the back of the chair. How to do it? The answer is: the execution technology is similar to the previous step. It is advisable to tie the fixed back with jute ribbons and cover it with burlap, and then attach the filling. If you plan to decorate furniture with a carriage tie, you should cut out small holes in the foam rubber or padding polyester and fabric for furniture buttons.
Base with straps or snake spring: features
Chairs and armchairs can be made with a wooden frame to which ribbons or a snake spring are attached. For very old chairs/armchairs, the bands may be inelastic - just a thick strip of tarpaulin or similar material; new chairs are made with bands made of synthetic material with “rubber bands”. They are attached to the frame using nails (old furniture) or staples (modern). When fastening with nails, a strip of thick fabric is laid under the fasteners; usually nothing is placed under the staples.
Old chair with canvas strips
When restoring a chair or armchair, it is advisable to use a tape of the same width or close to it. This way it will be possible to maintain the number of transverse and longitudinal stripes. This is if the previous “load-bearing” capacity of the seat suited you. If it was uncomfortable, you can either increase the width of the belts or add more stripes. Or you can do both at once.
The normal distance between the tapes is about 30 mm. Maybe a little more/less, but not much more.
You can use either elastic furniture tape or simply dense tape, such as slings or tow straps. The elastic one will “play back” when landing, the hard one will not. But this does not mean that sitting will be uncomfortable. Softness is provided by foam rubber and related materials, and tapes/springs only soften the fit. Therefore, if you have an old chair or armchair with springs, and they need to be restored, it is easier and cheaper to replace them with ribbons.
In terms of softness of landing, they will be a little stiffer, but not so much that it would be worth bothering with re-tensioning the springs. If desired, you can install snake springs. They also provide elasticity, albeit less than traditional ones.
Springs can also be like this - this is a “snake”
How to fasten and with what force to pull
The straps are attached to the frame, approximately in the middle of the bar. Take the tape, fasten it with three or four staples in the opposite direction, wrap it and fasten it again. Then they tighten it and fasten it on the other side. This is a reliable way. And don’t be embarrassed that the attachment point is thick. Foam rubber will be laid on top, it will level out all these little things.
Conventional springs can be replaced with elastic furniture tapes
Now let’s talk about how hard to tighten the elastic bands. The tensile force on the seat should be 12 kg, on the back - 9 kg. In practice, the specified tension can be set using a steelyard:
- We fasten one side of the tape.
- We hook the steelyard hook to the second side of the tape and pull it until the desired number is on the dial.
- Use a marker to make a mark.
- Now we know how long the tape needs to be pulled to get the desired tension.
This procedure will have to be repeated with transverse and longitudinal stripes. And if the shape of the seat or back is uneven, then you will have to calibrate each strip separately in this way. And one more thing: when you cut, do not forget that the tape still needs to be folded and secured. That is, you still need to leave 3-5 cm from the mark - for the hem.
At the bottom of the tape, springs rest on them... too difficult to restore
If you think that you can tighten the tape simply by holding it with your hands, you are mistaken. Men with strong fingers can still pull it off, but women are unlikely to succeed in this trick. Professionals use a special tool, but it’s hardly worth buying it just to reupholster a couple of chairs. In specialized stores there are grippers for tapes with holes. They are much more convenient, and you can hook a steelyard hook into the hole.
The second option is to take a wooden block with a cross-section of 40*40 mm or so, 40-50 cm long. Attach medium or fine-grained sandpaper to the central part. We glue the emery and additionally fix it with staples (or nails). We leave the edges of the bar - 15 centimeters each - free. These will be the handles. We wind the tape onto this device (a couple of turns), grab it with both hands and pull.
Snake springs
There are different types of flat snake springs - in the form of a spiral made of thinner wire or actually in the form of a “snake” made of thicker steel. You can also reupholster a chair with their help. In armchairs and stools they are usually attached along the seat. They are fixed to the frame using special fasteners, and they are fixed with nails or staples with long legs. In its normal state, the snake is slightly curved towards the future load (as in the photo).
This is how you can update the chair - install snake springs
According to its properties, a chair “with snakes” turns out to be a little more elastic when seated than with ribbons. Otherwise there are almost no differences.
Features of a cake with ribbons or springs
If you need to reupholster a chair with ribbons or snakes at the base, a layer of fabric is placed between them and the foam rubber. Fabric - any thick fabric. Teak or similar material will do. This layer protects foam rubber/PUF/latex from premature abrasion. It has no other functions.
Technical fabrics that are used when they want to upholster a chair: teak, calico, spunbond, linen
A layer of this fabric is glued to the foam rubber underneath. The fabric dimensions may be slightly larger to prevent the edges from curling up. Otherwise, the layers of the soft part of the chair are similar.
Features of re-tensioning the base with belts or a snake spring
To restore old chairs on canvas, you will need synthetic rubberized belts of approximately the same width. They are fixed in the center of the bar towards the frame. The new strip is secured with staples, rotated and fixed again. Then it is secured and tensioned on the opposite side. A soft substrate is placed on top. The tools you will need are a steelyard and a furniture stapler with staples.
You need to pull with a force of 1 kg on the seat, 8 kg on the back. When one side of the belt is already secured, a steelyard is hooked to the other end and pulled until the desired number appears. The desired length is marked with a marker.
To replace the snake spring, it must be fixed to the frame using special fasteners, and they, in turn, must be mounted using brackets on long legs. When positioned correctly, this part has a slightly curved shape. If you want the upholstery to last longer, place a fabric layer between the twisted wire and the pillow. This is done so that the foam rubber does not fray over time.
If the reupholstery of the chair is successful, you can try restoring other, larger upholstered furniture: an armchair, a sofa, a kitchen corner. The work is carried out according to the same principle, only the dimensions and shape of the product change. Restoring old broken things will help you save on buying new ones, and will also become a fun hobby for people who love to make things.
To update the appearance of chairs or stools, you can change the upholstery. To extend the life of a new coating, you need to choose the right material. Additionally, the coating should be in harmony with the interior. There is a huge variety of options for high-quality furniture renovation.
Do-it-yourself chair reupholstery
Old furniture in the house usually brings melancholy and despondency. Holes and abrasions in the upholstery, peeling paint and unfashionable design make you want to convoy boring interior items to the nearest landfill. And even if the new chair is flimsy and unreliable, there are so many positive emotions from updating the interior. But you can get much more pleasure by giving a second life to an old thing. Creative potential is in each of us, and some tips will help to realize it.
Methods for restoring old furniture
Restoring old furniture is a labor-intensive process, but undoubtedly creative. The use of various techniques, a wide choice of materials and their combinations allows us to obtain a unique item of its kind. The methods used in repair depend on the type of furniture and the degree of its damage, but they are all united by the preparatory stage: removing the old coating from the surface of a wooden product using any available method, for example, sandpaper, starting from coarser and ending with fine-grained sandpaper.
- Traditional methods of updating furniture include varnishing and staining. In this way, you can update the coverage partially or completely.
- Another popular and inexpensive method is lamination, that is, covering the surface with film. It is more suitable for flat surfaces. When gluing, it is important to start from the center, gradually moving towards the edges. This will avoid unsightly bubbles.
- Veneer coating is a more professional type of restoration. The materials you will need are special glue, an iron and the actual veneer sheets. The technology is not very complicated - 2 layers of glue are applied to the surface, veneer is applied and ironed from the center to the edges. The method is somewhat similar to the previous one, but the result looks much nobler.
- Of the fashionable trends in updating furniture, greater preference is given to the techniques of decoupage, craquelure, and paint painting.
If the object of restoration is upholstered furniture, for example, a chair, then in addition to basic measures, it will probably be necessary to change the upholstery. When updating soft surfaces, sometimes it is enough just to alter the decorative fabric. But most often, internal breakdowns that require major repairs are hidden under the cover.
What features of chairs need to be taken into account when restoring?
Before you begin repairs, it is important to determine the type of chair, its purpose and design features. It is necessary to assess visible damage and try to predict possible internal ones. This data will help us understand what tools and materials will be useful to us. Several classifications will be discussed below.
The following groups are distinguished by purpose:
- For home. This group includes chairs for the kitchen, living room, office and other rooms. Most often they are universal and can be used in any room of the apartment;
- For the street, models are most often made from plastic and polymers. There are examples of wooden outdoor chairs, but they must be treated with moisture-resistant impregnations;
- Office chairs are mobile, have a back and sometimes armrests, and are equipped with height adjustment;
- Bar stools have a height of up to 80 cm, and come with or without a back. The seat of a bar stool is most often round; the presence of upholstery depends on the model.
Depending on the method of making the frame, there are the following chairs:
- Carpenter's chairs are the easiest to make, which were made during labor lessons at school;
- Turned - so named because all round elements are made on a machine;
- Bent chairs are made using special equipment. The wood is treated with steam, given the desired shape and dried;
- Cast or stamped models are made from metal or plastic.
According to the type of seat, chairs are divided into the following options:
- Tough. These are models without flooring;
- Semi-soft. These include chairs without a spring block with 2-4 cm of foam padding;
- Soft chairs. For elasticity, they are equipped with springs and a layer of foam rubber, the average thickness of which is 3-5 cm.
By the presence of armrests:
- Chairs with armrests can be hard or soft, upholstered in leather or textiles.
Removing old upholstery and inspecting the frame
The initial stage of reupholstering a chair is its disassembly. When dismantling each part, remember and mark what was where, this will make it easier to assemble the finished product. The first step is to remove the seat; to do this, you need to remove all the fasteners (bolts, nails, staples, metal plates). The backrest is disassembled in the same way, if there is one.
After this, you should inspect the frame of the chair for hidden damage, cracks, loose joints, check the condition of the springs; those that have become unusable can be easily replaced with jute tape. Next is the disassembly of the seat and back: removing the staples and carefully removing the finishing fabric and filling. You shouldn’t throw them away right away, as it’s easy to make a pattern using them and measure the approximate fabric consumption. The plywood base must be cleaned of any remaining foam rubber and glue; if it is cracked, then cut a new one. The next stage is the preparation of materials and tools.
Removing old upholstery
Furniture restoration begins with dismantling. How to properly remove old fabric? First of all, we unscrew the seat - we use a screwdriver to hook up the fasteners, remove the nails, unscrew the screws, and remove the metal pads. Use an anti-stapler or a flat-head screwdriver to remove the old staples.
We put the fasteners in a container, it may come in handy.
Then we inspect the base of the chair, if it is loose, it needs to be strengthened - fill the cracks with sealant or PVA glue, you can cover them with putty, tighten the weak points. We remove the old upholstery and carefully remove the foam rubber. If you didn't throw away the fabric you removed, use it as a pattern.
Remove the remaining foam and glue from the seat frame.
How to choose materials?
Having assessed the scope of work, you can proceed to compiling a list of materials. Upholstery replacement typically requires the use of the following materials.
Upholstery fabric
The choice of upholstery is entirely a matter of the taste of the master and the features of the interior. But there are nuances here: not every fabric is suitable for upholstering a chair at home.
Therefore, you need to follow several recommendations:
- The aesthetic appearance of the future cover should be combined with practicality. Options with a strong odor and fading should be avoided. Probably, low-quality, toxic dye was used in production.
- A thick fabric with a pile will help a beginner hide imperfections in the upholstery. At the same time, when cutting out parts, it is important to take into account the direction of the pile. If you forget about this feature, the color of the parts in the final product may differ.
- To save on fabric consumption, you should prefer a smooth material with a small abstract pattern. This texture and texture allows you to place the patterns sparingly, in any direction.
- If the highlight of your design should be a pattern or large ornament, then get ready to buy more fabric. In this case, when cutting, the direction of the lines is important. The mismatched pattern on the seats and back stands out and looks sloppy. For example, if the red stripe abruptly turns into blue, or the details of the ornament are shifted relative to each other.
- When choosing decorative upholstery, consider the purpose of the chair. For example, for kitchen chairs you should choose a material that is durable and easy to clean.
- Leatherette upholstery will add solidity to the furniture, but it will not be much more durable than other types of fabric.
These tips do not imply limited choice at all.
Types of upholstery fabrics can be varied:
- The most common fabric in the production of upholstered furniture is tapestry. This fabric is two-layer, it has a rich texture and texture. But it captivated furniture makers not only with its beauty, but also with its strength, durability and practicality. It is washable and does not fade in the sun. The tapestry has antistatic properties, due to this, dust does not collect on its surface.
- Another popular option is chenille. This is a beautiful, affordable fabric made from fluffy chenille threads. The fabric woven from such a thread turns out to be voluminous, and it is soft and velvety to the touch. The use of chenille threads in various types of weaving (tapestry, jacquard, satin) allows you to obtain interesting textures, and the combination of different colors (their number sometimes reaches eighteen) creates unique patterns. The best option for reupholstering chairs at home are samples with a mixed composition. The presence of artificial fibers increases the wear resistance of the fabric. The main disadvantage of chenille is its hygroscopicity: water stains it and it is likely to deform, so it is not suitable for kitchen chairs.
- Flock is an artificial analogue of velvet. It meets all the requirements for upholstery fabric: pleasant appearance, durability, ease of care (easily washed with water), and is not afraid of animal claws.
- Velor is one of the most expensive and impractical upholstery materials, velvety to the touch, impressive, but wears out quickly. Suitable for furniture that is rarely used.
- By upholstering a chair with genuine leather, you will get a practical item that will last for many years. But this material is quite expensive, so the consumer is offered leather substitutes: eco-leather and dermantine. Leatherette has adopted the external characteristics of real leather, but is inferior in quality. Leatherette upholstery will last from 2 to 5 years, depending on the intensity of use. Perhaps reupholstering it with eco-leather will slightly increase its service life.
Filler
For upholstering upholstered chairs at home, the choice of filler is not so wide: padding polyester or foam rubber. Having settled on padding polyester, pay attention to its color and smell. A shade different from white, as well as the presence of a pungent odor, indicate the use of second-class or toxic raw materials in production. Check the structure of the material and its strength. A fabric of uneven thickness and density that can be easily torn by hand is definitely not suitable. Suitable foam rubber can be easily distinguished by its structure: the smaller the bubbles, the higher the density and quality. In order not to be deceived by the seller, make sure that when pressed the sample does not make a cracking sound (this is the artificially sealed cells bursting).
- If the chair is spring, you may need jute tape. It can replace springs that have become unusable.
- Elements for decoration: ribbons, lace, cords, buttons and others.
- Cardboard or thick paper for the pattern.
- Primer, paint, varnish or stain for the frame.
- Plywood sheet.
- PVA glue.
Chair cover
- First, you should carefully remove the old casing and clean the surface of the filler that has become unusable. Then you should make a template and cut out the prepared or purchased material. A pattern cut out of thick cardboard is applied to the seat and traced along the contour with a pencil. The allowance requires a margin of 7-10 cm.
- Using the existing stencil, you can cut the leather fabric with scissors or a knife. Next, a filler is placed on top of which a leather sheet is placed. For fixation, the above stapler is used.
- The leather has good density and is not capable of tearing when stretched. Therefore, furniture, in particular chairs, must be well stretched and there should be no wrinkles left. The tightness of the seat can be checked by touch. Excess material is cut off.
- When upholstering, as a rule, the seat of the chair is removed and only installed back after all work is completed. Sometimes this rule may not be observed, it all depends on the quality of the furniture. The backrest is covered similarly to the seat, taking into account its shape and bend. As for the filler, much less is required than for the seat.
Replacement process step by step
- Frame repair. The old coating is removed, all cracks identified during inspection are carefully glued, and chips are puttied. Loose connections are sealed, for example, by inserting a wedge, and additionally fixed with glue. The failed springs are removed, and strips of jute are fixed in their place in a checkerboard pattern. If the bottom is made of plywood, then depending on the condition, it can be replaced with a new one or cleaned of residual glue and filler. The frame is covered with paint, varnish or stain, or one of the modern decorating techniques is used. In order for the new coating to last longer, the surface should be treated with a primer before painting. A white primer is suitable if you are going to use paint; a colorless primer allows you to preserve the wood grain, so it is suitable for varnishing. After the primer has dried, the surface is sanded and painted in at least 2 layers.
- While the frame dries, the seat is reupholstered. The first step is to cut out parts from fabric and foam rubber. If it is not possible to use old upholstery as a template, then a pattern is made from cardboard. To do this, outline the plywood base and add 2-4 cm for allowances. Using a stationery knife, cut out the filler. Then a fabric pattern is made using the same pattern. Remember that displacements and inconsistencies in the drawing are not acceptable. When cutting out fabric, leave a 10 cm allowance at the hem.
- The next step is covering the seat. If the seat is a separate part, then the filler is glued to the upper side of the base. Once the glue has dried, lay the upholstery fabric wrong side up and cover it with the foam side of the seat. Make sure the base is positioned correctly in relation to the pattern or design. Sequentially nail the edges of the fabric to the base using a furniture gun (1-2 cm steps), trying to avoid large folds. This step is difficult to complete on your own, because the fabric needs to be pulled tightly and evenly on all sides. Here it is important to observe the “golden mean”: if the foam is pulled too tightly, it will deform and wear out faster. Trim excess fabric. If the seat is inseparable from the frame, then all manipulations are carried out immediately on the chair, and if there are springs, it is advisable to cover them with thick fabric, for example, burlap, and lay the filler on top of it.
- Next is the back. The steps are almost identical to the previous step. Before covering the fixed back, cover it with jute strips, then cover it with burlap and attach the filling. If you want to decorate the back with a carriage screed, then cut holes in the foam rubber and fabric where furniture buttons will be inserted.
All the steps described above also apply when the chair being restored did not originally have an upholstered seat.
The initial stage is removing the old upholstery
First you need to disassemble the chair. When performing dismantling work, it is necessary to remember the location of each individual part, since this information may be needed during assembly. Before upholstering a chair, it is necessary to remove the seat, that is, remove all its fastenings: nails, bolts, staples and steel plates. If there is a backrest, it must be disassembled in the same way.
The next step is to inspect the frame for hidden defects, chips, poor-quality connections, and also check the condition of the springs. If the latter elements have become unusable, they should be replaced with jute tape. When this stage is completed, you can begin to disassemble the removed seat: remove the staples, remove the finishing fabric and filling.
Assembly and finishing
All parts are ready, so you can start assembling. If, when dismantling the chair, it was written down and noted what should be fastened and how, then there will be no problems. Just glue all the parts together and screw them in reverse order. Now all that remains is to finish and decorate the finished product. The ugly back part of the back should be covered with fabric, carefully sewing along the edge. The bottom also needs to be hidden. The seams can be decorated with braid or decorative furniture nails, lace or even beads. It all depends on your imagination.
Examples and options
Traditional methods of restoration were described in detail above, but no one canceled creativity. If you have some unwanted leather belts, use them for upholstery. They need to be intertwined in the form of a basket and secured from below with self-tapping screws. Interesting results can be obtained using the patchwork technique. The main thing is that the fabric characteristics of the flaps meet the requirements for upholstery fabric. For a more formal interior, you can use patches of pastel colors. Instead of painting the frame, you can braid it with twine. Some craftsmen even weave seats from thick and durable rope.
Conclusion
To summarize, we can say that reupholstering an old chair with your own hands is a completely doable task.
The main thing is to follow a few rules:
- When disassembling, it is important to note the order and features of fastening the parts;
- The choice of material depends on the purpose of the chair. In any case, it is better to give preference to universal fabrics;
- It is advisable to evaluate the quality of the filler before purchase, and not after a week, when the chair sags again;
- Vanity and haste in such work are unnecessary. Each stage must be thought out and carefully executed.
You will find a master class on reupholstering a chair in the following video.
Popular posts
- Chair for dressing table Chairs for dressing tables in Moscow - 189 Products Company from Moscow, delivery 29643 a In…
- Silicone sanitary sealant Silicone sanitary sealant white in Moscow - 1491 products Company from Moscow, delivery (tomorrow) 140...
- Shelf in the hallway Currently, there are a huge number of different options for shelves in the hallway, and this is directly ...
- Insulation of the floor in a wooden Insulation of the floor in a wooden house from below: materials and installation technology SHARE ON SOCIAL NETWORKS One of the common…