DIY console table.
Tables mounted on the wall are a very convenient purchase, especially if the room area is limited. This table can be used in a bedroom, nursery or as a computer desk. You can make such a piece of furniture yourself; this will require a minimum of tools and some basic work skills.
Cantilever furniture, that is, furniture hung on the wall, has recently become increasingly popular. Wall-mounted cabinets in the bathroom, cabinets, shelves, tables, all these products have one important factor in common: they take up less space than objects of the same size installed on the floor.
The table you see in the pictures is made in the simplest version. To work, we will need to purchase or glue together two joinery boards 1500 mm long. and width 400-450 mm. . You can also use narrower shields, 300-350 mm. , you can decide for yourself whether the depth of the table is enough for you to work.
The sides between the table top and the bottom shelf are cut from the same panel, the height of the parts is 150 mm. . Planed oak boards 25 mm thick are used here. If your shields are made of 20 mm thick coniferous wood. , then it will be necessary to install an additional middle jumper between the shelves for rigidity.
The table dimensions can be 1500 mm wide. , height 200 mm. , depth 400 mm. . For those who are less familiar with furniture making, I will tell you that the width of a piece of furniture is calculated along the wall, and the depth from the facade inwards, in this case to the wall.
You can assemble the parts on dowels or furniture ties. I think dowels should not be considered in this case; furniture ties are good because there will be no holes on the tabletop. But I would advise you not to be too clever, and screw everything together using eurekas (confirmations) or self-tapping screws with a diameter of 4.5-5 mm. , and then close the caps with plugs. Of course, in both options it will be necessary to pre-drill holes in the tabletop, bottom shelf and at the ends of the lintels.
I would like to clarify the technology of work. First, assemble the table using confirmations and adjust the parts. Then remove the tabletop and attach it to the wall separately. When installing corners, check the accuracy with a level; an inclined table is very uncomfortable and you quickly get tired of it. The corners are attached to the wall with dowels and nails, three to four corners, for each three dowels 50 mm long. with a diameter of 5-6 mm. .
Before final installation of the table, it must be painted. Painting is a general concept; you can use varnishes, stains, and opaque paints. In this case, the oak parts are treated with tung oil.
It’s been a while since I told you about furniture making. Let's talk today about our console table, which my husband and I made last November, last 2014, for printers in our home office.
So, 4 legs 45x45 mm - furniture timber, 3 long pieces of 18 mm furniture board for shelves and tabletop and 4 boards for the drawer. Well, and a few decorative blocks to decorate the table in the form of crosses on the sides.
To begin with, we attached long drawers to the legs, after which we secured the legs to the tabletop on four sides with self-tapping screws and fastened them on the sides.
It turned out like a long bench with high legs :))
Then we turn this entire structure over and attach the bottom shelf from below through the shelf directly into the legs. Self-tapping screws can be recessed using a special countersink drill.
Then we attach the middle shelf from below using KREG. It will give the table rigidity.
Decorative bars for the sidewall. We measure, saw off and adjust to the size of the sidewalls:
I simply glued the decorative strips onto universal Titanium liquid nails, which glue wood perfectly.
I decided to make the lower legs small. These are the remaining pieces from the bars. They were also attached to the screws from below, having first sunk them into the leg, after which the resulting hole can be primed and sanded before painting. Additionally, I coated it with glue before attaching the small leg. To be sure.
Let's move on to painting. I will paint the table in 2 colors so that the bottom layer appears under the top. To do this, I lightly painted the table in the first layer, which will be black. The entire first layer Of course, it is not necessary to apply as much of the first layer as I applied, I just haven’t decided yet where I will make the scuff marks. And it is enough to apply the first layer in those places where they will be.
Now coat the abrasions on top of the first layer with ordinary Vaseline. Vaseline will not allow subsequent layers to soak into the first layer and the places that were coated with Vaseline can be easily sanded off. Apply Vaseline to those places where abrasions usually form on furniture: protruding corners of legs, tabletops. And various decorative details that wear out over time.
The main layer will be gray. To do this, I mixed the leftover gray paint that I had left over from painting the kitchen cabinets with white paint:
We apply 2 layers of base paint, after which we take sandpaper and sand those places that were coated with Vaseline.
Don't forget to sand the paint between coats, especially after applying the first coat. The paint raises the lint. Use sandpaper with fine granules, 220-240. Then the paint will lie smoothly and the coating will be smooth and even.
As a finishing layer to protect against dirt, I apply water-based decorative wax as usual. In this photo you can just see the wax. Then it will be absorbed and the coating will look even.
Some details of the table: I don’t know about you, but I don’t like perfectly smooth chipboard. It's somehow unnatural. Oddly enough, I love pine (for painting) because it is soft and the structure of the wood is slightly visible (this will not happen on hardwood). It's so nice to run your hand over a wooden surface.
What could be better than a beautiful, comfortable table? Maybe two of these tables? Or the same table, but much more compact? We know how to turn the most ordinary table into a narrow console table, with two legs, with our own hands. Or divide it into two and make a rack. Do you know?
Today we will tell you how to turn an ordinary table into an elegant console. You can create a real exclusive from a sawn table with your own hands. You've probably admired them in stores, where prices are often steep. But you can make such a “piece copy” yourself. And it will be much cheaper than the store-bought version.
The best part is that this table can be made from absolutely any high table. You can even take an old tabletop and screw beautiful legs to it (for example, from IKEA). And there are plenty of ways to decorate this item.
Another opportunity to save money is to buy a beautiful (high-quality, new) but heavily discounted table. After all, as you know, stores reduce prices on furniture that has been on display or has even a tiny defect.
In this issue we included 3 master classes on this topic (all from sawn furniture), as well as 20 additional ideas:
- how to make a dining or work table on two legs;
- what to create from the second half of the table;
- how to decorate your improvised console;
- how to make designer shelving (using the same principle).
Happy creativity and great results!
__________________________
master class No. 1. console table for a narrow hallway
Is there little free space in your hallway? Or do you like miniature things? Or maybe you're attracted to the idea of a classic console table, but you can't afford such a thing? In any case, you will certainly love this idea - a tiny console table made from... a very ordinary table.
Here's what you'll need:
- rectangular table (for example, ISALA from IKEA),
- a piece of fabric 30 cm with a width of 1.20 m (choose any one you like),
- aerosol glue for fabric, jigsaw, screwdriver, tape measure, pencil, scissors, sandpaper, 2 screws and 1 metal corner (for greater reliability, you can take 2 corners and 4 screws), masking tape.
How to make such a console for the hallway with your own hands.
1. First, cut the table into two parts, lengthwise. A tape measure and a pencil will be useful for marking. Sand the edges with sandpaper to avoid splinters.
2. If you have a table with removable legs, secure two of them; if the legs cannot be removed, your console is almost ready.
3. Then fasten metal corners on the back side of the tabletop: one in the center or two at the edges (what to do with the corner further, see step 7).
4. Cover the edges of the table with masking tape - this is necessary so that glue does not get on them. And then prepare a piece of fabric of the desired size and spray glue over the surface.
5. Gently lay the fabric on the tabletop. Make sure that there are no bubbles left (if they appear, smooth the fabric). If there is excess fabric left on any of the edges, trim it with sharp scissors.
6. Once the glue has dried, the tape can be removed. And admire the work of your own hands - the original designer console.
7. Attach the free part of the mounting bracket to the wall, making sure that there are no gaps between the console and the wall.
What else can be added to such a table?
If it is a mirror, it will serve as a dressing table. Hang shelves or a writing board on top - useful for the kitchen or dining room.
If you made it for the hallway, hang a couple of hooks for bags and umbrellas.
Don't want to fuss with fabric and glue? Choose beautiful stickers.
And the table can be painted in advance in some interesting color, varnished, covered with patina... In general, there are many options. All you need is a tabletop and beautiful legs.
__________________________
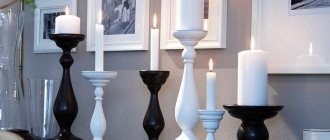
New trends in console colors
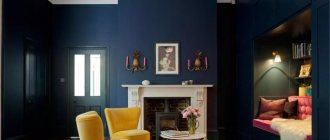
A snow-white table is one of the most popular options. It looks great in contrast with a dark wall, acting as a striking accent that attracts attention but adds lightness to the decor. In a room with a bright interior, a white console table will help balance the color scheme.
White glossy furniture is perfect for rooms with a lack of light and cramped space, as it will actively reflect light, thereby making the space wider. This is one of the models related to modern interior style.
Furniture with a matte snow-white surface looks no less beautiful and is characterized by versatility. This version of the console is suitable for both classics and Provence.
Tables in natural wood tones suit any style. In light colors this is a popular shade of bleached oak, and the most fashionable of the dark ones is wenge.
By giving preference to such furniture, you can rest assured of its quality, because the seemingly simple design is reliable, and variations on the theme of transformers will fit perfectly into any room, regardless of its stylistic design.
master class No. 2. a bedside table on two legs made from a sawn table
This compact piece can decorate your living room or bedroom. It is done according to a similar principle. However, there are some nuances that we will talk about.
You will need an old dining table, wood paint and 2 blocks.
Here are the differences from the previous master class
.
1. Shorten the legs, because a side table (or bedside table) is usually lower than a dining table.
2. The table should be cut not along the long part, but along the short part.
3. A product painted in a bright color (with a brush or spray gun) looks especially impressive.
4. A stable position is secured not with corners, but with a pair of bars (approximately 1/2 the width of the already sawn-off tabletop). They need to be connected to each other and screwed to the wall. The finished bedside table is placed on top.
__________________________
master class No. 3. two consoles from one sawn round table
And this tutorial from Sarah Dorsey is a great example of using both sides of the table. One of them (yellow) became a console under the TV in the bedroom. The second one (painted blue) serves as a bedside table in the hallway.
How to make such semicircular console tables with your own hands.
1. Take an old round table, remove the old paint or varnish, and sand down any rough edges. Apply primer.
2. Cut the tabletop with a jigsaw into 2 equal parts.
3. Sand the edges and paint them in colors that you like and match the color palette of the room.
4. If you wish, you can also create an accent section of the wall, as Sarah did for the yellow model.
And below is another example of using two parts of one table
. One (only the tabletop is painted) is for the hall or dining room, the second (completely painted) is like a dressing table for the bedroom.
__________________________
Where is the best place to put a furniture console in Provence style?
- In the hall
- In the living room
- In the office
- In the bedroom
- In the kitchen
Usually, a functional independent model is selected for placement in the hallway or it is included in the kit. The location is determined in accordance with design and ease of use. The size and shape of the product should be such that there is enough space in the drawers for gloves, brushes, shoe polishes and other accessories. In a large corridor, you can decorate the wall with a large mirror, in front of which there will be ikebana or a souvenir brought from a trip on a beautiful stand.
Most often it is proposed to place a furniture console under the TV system, opposite the dining group or recreation area. You can creatively solve the problem of a narrow window sill - use a console to mask the heating radiator, while simultaneously decorating this area of the living room. The tabletop is used as a stand for pots with plants and various souvenirs in the Provence style.
A console of suitable width and height can successfully occupy the space between windows or doors. There are many options for placing it in a recreation area, for example, next to a sofa, so that it can serve as a table or bar. It is convenient when the console is installed under a TV hanging on the wall. In this case, the product serves as a stand for various types of technical devices (game console, router, etc.)
The working area of the office is complemented by consoles for placing office equipment, folders and books next to the desk. The console should be placed closer to electrical outlets for easy charging of your tablet or phone. The lower shelves are also filled with various things that a person working at a desk needs to have on hand. Large furniture structures can sometimes serve as a separate desk for work. Decorative types of consoles are used to place plants, souvenirs and corporate photographs.
In this room you can find a place for a console near a closet, bed or window. Also, two identical products placed on both sides of the bed will replace the usual bedside tables in an original way. Table lamps will be an additional decoration. But more often than not, a piece of furniture with several drawers turns into a compact dressing table. This area of the bedroom is equipped with a large mirror on the wall.
One of the options for using a console table is a workplace where you can sit with a tablet, make a to-do list, and check your email. For those who like to have breakfast or dinner in bed, tall, long designs with wheels that roll over the bed have been developed. After use, they are moved to a free wall.
Furniture consoles in the kitchen often become shelves to keep spices, salt or sugar on hand. The size matches the rest of the furniture set. There are transforming models that turn from a compact bar counter into a full-fledged table, allowing several people to sit for lunch. Consoles for decorative purposes are covered with a napkin, and collectibles, beautiful bottles, and ceramic plates are placed on them.
what other consoles can be made if you cut an old table?
Using the same technology you can make a narrow dining table on two legs
.
This compact model will be greeted with a bang by owners of small kitchens where there is no room even for a snack. To do this, again, you will need a square table - you can buy a modern one, but your grandfather’s inheritance will look especially chic. The technology is exactly the same. Just don’t forget to first remove all the “internals” - drawers, folding mechanism, etc.
But what to do with the second half of the table if you don’t need the second console (see master class No. 3)?
If you want to use such a valuable resource with maximum benefit, make a two-tier console bar with a shelf
. The main difference is that the legs of the upper part are shortened by about half (they can be larger or smaller, depending on the tasks of the rack).
How can you use such a console? Whatever! It is ideal not only for the hallway, but also for the dining room or minibar. By the way, pay attention to how the author of the idea coped with the task of storing bottles: they are stored in tubes for stationery. And the glass holder can be hung from the bottom of the second tier.
In addition to the kitchen and dining room, such a compact table on two legs will be useful in other rooms.
If you strengthen a small rack on top, you will get a workplace
needlewomen or in a children's room.
And if you also have an old door leaf, a shelf and a couple of brackets, you will get an original design with vintage charm
(don't forget to paint everything the same color and create a patina effect).
About that (more than 50 photos), see our special guide.
And in this section there are several more examples of such narrow consoles, made with your own hands from sawn tables.
And another option for “waste-free production”. Do you recognize the good old LACK from IKEA in this turquoise table? Yes, that's him. How did they make him so tall, you ask? It’s very simple - connecting two legs into one. If you desperately need free space under the table, take this idea into account.
A console (console table) is a small table that occupies space under a window or mirror and has a narrow table top. Depending on the overall stylistic decision, this table can be equipped with either straight or curved legs. In this article we will show you how to make a massive, high console table with your own hands.
.
Console - TV stand
Use a TV shelf. This looks exclusive, since the use of a stand in this direction is not so common. This option is suitable for those who have a plasma monitor with a wide diagonal at home. Indeed, with such a configuration, it becomes impossible to accurately arrange the accompanying elements of the stereo system and similar electronics. Therefore, the wires remain open for everyone to see.
Before deciding to install a console in the hallway for these purposes, think carefully about whether you are ready to give up additional devices.
As you can see, this kind of stand is a convenient element of the interior. It is distinguished by its compactness, special style, and elegance.
Manufacturers of furniture consoles, focusing on consumer demand, produce a variety of designs, diluting one line with colors and textures, thereby making their range more diverse. The same factor affects the range of possibilities for use for different purposes and in any room. Therefore, if it is possible to integrate such a piece of furniture into the interior, be sure to take advantage of it.
Before purchasing the product, decide on the intended purpose and location of the console. This way you can purchase the most functional item for your interior.
Cutting the board
Also, in order to make the upper and lower parts of the table, we need a board 3 meters long, 10 cm thick, and 20 cm wide. We cut it into pieces using a circular saw.
You need 4 boards for the top and bottom of the console table, 150 cm long. We cut it with a circular saw and, as you can see in the photo below, we get these components of the table.
Additionally, you need four boards 10 cm wide and 145 cm long. They will rest vertically on the boards cut above. We need 4 squares along the edges (see photo), 10 cm on each side.
What is a cantilever bridge?
A cantilever bridge is built using brackets, which are horizontal structures supported at only one end. With the right materials and engineering, a steel truss cantilever bridge can span more than 1,500 feet (460 m). This type of bridge was used for pedestrians, trains and cars. Cantilevers are especially useful for spanning a waterway without sharing it with river piers.
Engineer Heinrich Gerber built the first cantilever bridge in 1867. He invented the articulated beam just a year ago. With this new invention, Gerber was able to lengthen the cantilevers and build a bridge that was long enough to cross Germany's main river.
As of 2010, the Quebec Bridge in Canada holds the record for the longest span of a single cantilever. The simple cantilever bridge is 1,800 feet (549 m) long. In Scotland, Forth Bridge is another famous cantilever bridge. Made of steel, the Forth Bridge uses balanced cantilevers on river and land supports to create a span of 3,300 feet (1,006 m).
The cantilevers must be firmly anchored on one side to support the required weight on the free-standing side and avoid shear stress. A common example of a small cantilever is a diving board. One side is securely attached to the ground so that the other side can support a person's weight above the water. The consoles must resist tension in the upper supports and compression in the lower ones.
Sometimes the gap or waterway is too wide to be covered by one cantilever on each side. In this case, a beam bridge or truss bridge is often placed between the brackets of two cantilevers, connecting them into one bridge. This type of bridge is known as a suspension span bridge.
Balanced cantilever is another technique for covering longer distances. In this situation, engineers build a pier in the middle of the river. They then secure two consoles to the pier, each pointing in the opposite direction from the other. These cantilevers, or anchor arms, meet with other cantilevers anchored in the ground or on another pier to create one complete bridge.
The first step in building a cantilever bridge is to build and connect the arms to the bank. River piers for balanced cantilevers should not be constructed until the cantilevers that touch the ground are completed. If a beam bridge or truss bridge is needed, it cannot be added until the cantilever is ready. A beam bridge is often built off-site and lowered into place by crane.
More on the topic:
- Electrical measurements Do you know what electrical measurements are? What are electrical measurements? Electrical measurements are...
- Electrical Impedance Do you know what electrical impedance is? What is electrical impedance? Electrical impedance is often just...
- Electrical Project Manager Do you know what an electrical project manager is? What are the different types of electrical project manager jobs? Leaders...
- Electrical socket Do you know what an electrical socket is? Electrical outlet socket An electrical outlet is a device that…
Forming the top
Having retreated 2.5 cm from the edge, we place our workpiece on top of the board and generously lubricate both sides with carpentry terminals.
Place the board on top of the workpiece again. We get a pie like the one in the photo below. From below, you can additionally screw the end blank to the board using screws, which we screw exactly near the outer legs on the left and right.
An indispensable item for the living room and office
The console can serve not only as an elegant stand for a vase, souvenirs, lamps, figurines and other decorative items. It is often used to accommodate a narrow aquarium or potted plants. An elegant table looks good under a wall-mounted TV instead of a simple cabinet. In the office, it is convenient to store paper and office supplies that you often use. As a rule, these things are in the way on the table, you want to put them away, but they are not far away so that you can reach them at any time.