DIY bed repair
Sleeping on a squeaky or wobbly bed is unlikely to be comfortable or comfortable, but you shouldn’t rush to throw away the furniture and replace it with new ones. If desired, the bed can be easily and quickly repaired at home. Repairing will not only help you extend the life of your favorite furniture, it will save your budget - after all, the price of a new bed in a store is a decent amount.
In order to properly and efficiently restore a bed at home, you need to diagnose the type of damage.
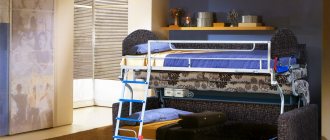
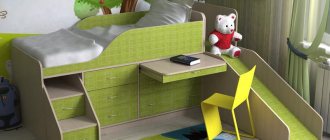
DIY children's bunk bed
The design and manufacturing technology are quite simple, the dimensions
close to a standard single bed. Therefore, although such a bed is considered a children's bed, it can easily accommodate both teenagers and, if necessary, adults.
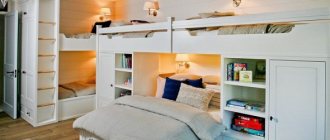
The design scheme is simple, we make two identical beds and place them on top of each other, add a ladder and a fence to them. You can just as easily disassemble a bunk bed and use it as two separate beds. There are two drawers under the lower bed.
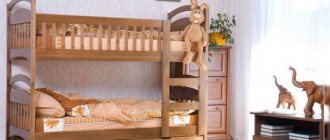
According to the manufacturing method, this bed is not a complex product, and it is quite possible to make it at home yourself, with your own hands. Here are the dimensions of the bed that I recently made, the dimensions of the mattress and the height of each bed you can determine for yourself.
The fence on the lower bed was made temporarily; one child is still very small. The fence is attached to the Eureka and can be removed at any time.
You need to start designing a bed by determining the size of the mattress; this bed is made for custom-made mattresses 800/1900 mm. , the thickness of each mattress is 160 mm. . I made the bed from birch, using planed boards 25 mm thick for all the details. . To make the legs, I touched and glued two boards together. The beds are the same, so all the dimensions of the parts are similar.
It’s better to start work by making the headboards; in my opinion, the remaining parts are easier to make. Each back consists of five parts, two legs and three jumpers between them, assembled on spikes. Back height 1000 mm. , width 870 mm. .
Back leg length 1000 mm. , width 80 mm. , thickness 50 mm. .
Backrest jumpers length 710 mm. , width 150 mm. , thickness 25 mm. . Plus two spikes 50 mm long. , width 120 mm. , 16 mm thick. .
When all the back parts are prepared, all the sharp edges need to be filled in before gluing, it is best to do this with a hand router. Remember that when making children's furniture, it is highly recommended not to leave sharp edges and ends. Of course, you can use a simpler method of assembling the back, but I think the classic version, with spikes, is the most reliable.
The next most important parts are the sides of the bed; they are assembled from two parts. The sidewall itself is 1900 mm long. , width 150 mm. , 25 mm thick. . From the inside, a support block 1900 mm long is glued to the sidewall and at the same time attracted with self-tapping screws. , 40 mm wide. , 25 mm thick. . The support bar is installed level, flush with the lower edge of the sidewall. The slats of the lounger and the base for the mattress are installed on the support bars across the bed. All edges of the sidewall are hemmed with a hand router, using the same profile as the headboards.
Bed side profiles.
When the main parts are prepared, primary assembly can be performed. I assembled beds using through furniture ties. Of course, the caps of the ties are visible from the outside, but they are more reliable than internal ties with footings. Due to the fact that the thickness of the headboard legs is 50 mm. , I had to look for ties with bolts 100 mm long. . I couldn’t find any ties of that length, so I used 6/100 mm bolts. from metal frame dowels, head for a screwdriver. They just fit the barrel nuts for the ties.
Bed assembly, outside view.
Assembling a bed using furniture ties, attaching a ladder to Eurokas, view from the inside.
The bed bed is made of slats 800 mm long and 70 mm wide. , thickness 22 mm. . If the slats are installed with an interval of 90-110 mm. , then you will need 11-12 slats for each bed. To prevent the transverse slats of the lounger from diverging, they are screwed onto two longitudinal slats 1900 mm long. , 40 mm wide. , thickness 22 mm. . The entire lounger must be removable; it is installed between the sidewalls on support bars.
The lower bed turns out to be noticeably higher than the standards. The fact is that during production, the wishes of making high and deep drawers for toys and linen were taken into account. More precisely, the boxes are roll-out, on rollers. Instead of handles, there is a recess in the middle of the top edge.
DIY children's bunk bed, continued. Manufacturing of stairs, bottom drawers and fencing. The bed can be used as a bunk bed; if necessary, the bed can be disassembled and installed as two separate beds.
The bed is assembled from two identical beds. Can be made and used as two separate beds. A bunk bed can be assembled using dowels without glue. At the upper ends of the legs of the lower bed, and at the lower ends of the legs of the upper bed, I drilled 30/16 mm sockets. , depth 75 mm. . The spikes are 140 mm long. made from hardwood, birch, oak, beech or ash. The tenons should fit tightly into the sockets, but the tenon should be inserted and pulled out by hand, without a hammer.
Repairing bed slats
If the bed slat (slat) is broken so that it is not possible to seal it, you will need to buy a new element. Bed slats can be found in furniture stores, or you can order them online. Slats are made in single copies in carpentry workshops. Take dimensions from the element and contact a specialist. In just a few minutes they will make you a new slate for your bed. In workshops and stores you can order and buy not only lamellas, but also lath holders. Although these elements are made of durable plastic, they can also break under constant load.
If the entire base fails, you can make a new one using boards or thick plywood.
Features of leg repair
Replacing the legs usually does not pose any problems. A broken leg can be replaced with a new one, and if it is loose, replace and tighten the fasteners.
When replacing the legs, be careful when dismantling the element - it is important not to damage the bed base during the work, replacing which will be a difficult and expensive process.
How to eliminate a squeaking bed?
It is impossible to sleep and get a full night's sleep on a creaky bed. A loud and unpleasant sound can disturb sleep and prevent you from falling asleep quickly. When planning to fix a defect, the first thing you should do is find out exactly what material your furniture is made of. If the structure is made of MDF or chipboard, then the cause of the squeak may be both the fittings and the base boards. Metal beds most often begin to creak at the places where the screws are installed.
To identify the cause of the creaking, the bed structure will have to be completely dismantled and then completely reassembled. During the assembly process, all fasteners are carefully screwed and tightened. If you are not sure that you can disassemble and then correctly assemble the bed, you can try to solve the squeaking problem by treating all joints with different substances: special furniture lubricant, wax-based or silicone-based compounds.
Let's write down the instructions for eliminating bed squeaks step by step:
- First, you should check the tightness of all fixing elements, tighten and strengthen all nuts, bolts, screws and screws. It is also recommended to treat all fittings with a special furniture lubricant.
- Check the mattress: its springs may be squeaking.
- You should also coat all joints in the structure with wax, soap or silicone.
- Pay attention to the slats too. If they are the ones making the creaking noise, you can replace them or change the distance at which they are installed.
- Her legs can also creak in the bed. The creaking of the legs is eliminated by replacing this structural element.
- It is worth checking the evenness of the boards on the base. They should not lie flush against the sides of the structure. If one of the boards creaks, try swapping it with other elements or simply turning the base over.
The cause of the squeak may also be in the fastenings. The easiest way to solve the problem is to replace the old fasteners with new fixing elements. If you do not want to face the problem of squeaking, when buying furniture you should give preference to metal and forged bed models.
Choosing high-quality fasteners for bed repairs
Do you want your bed to serve you flawlessly for many years, and to have to repair it as rarely as possible? Pay careful attention to the correct selection of fasteners. Professionals categorically do not recommend using conventional fasteners - bolts, screws, angles, ties. These types of fixation elements quickly fail. It would be best to choose special types of bed fasteners for repairs in specialized stores. The classic combination of a bolt and a foot can provide excellent fixation of all structural elements.
Please note that not all bed damage can be properly repaired at home. If the base of the furniture has dried out, broken, or you need to renew the varnish coating on the bed, then it is better to entrust this work to professionals. Specialists will help you quickly bring your bed into functional condition, and at the same time, the services will be cheaper than buying new furniture.
Features of disassembling beds of different types
Ordinary beds are designed quite simply. Sleeping furniture usually consists of a base, sides and 2 backs. For an experienced craftsman, it will not be difficult to disassemble them and then reassemble them. The main thing is not to lose screws or damage fasteners when separating parts. Difficulties may arise when you need to disassemble loft beds, transformers or bunk structures. Since the assembly of these interior items is quite specific, dismantling will not be easy. It’s good if you still have the instructions for assembling the bed. By following all the instructions from it in reverse order, you can disassemble an interior element consisting of even several dozen elements. True, instructions are often lost or thrown away by owners as unnecessary after the assembly of products is completed. If you are not sure that you can disassemble a custom bed and then put it back together, it is better to invite a furniture assembler. A person with experience will do the job much faster, saving you a lot of useful time.
Disassemble the bed
, and then “5 Masters” specialists will help you put it back together. We work with all types of sleeping furniture: from simple single and double beds to complex multi-level structures. The set of professional tools that our employees have at their disposal will greatly facilitate the dismantling and assembling of furnishings.
Each of us needs to know the basics of properly disassembling and assembling a bed in our own apartment. You may need to disassemble a child's room or bed for adults unexpectedly. The reasons may be rearranging furniture, moving to a new apartment or house, replacing old furniture with new ones.
Design dimensions may vary. This article will tell you how to properly disassemble and reassemble the product.
How to disassemble the bed? When disassembling yourself, you should install the furniture in a horizontal position. If you left the instructions when purchasing, you can use them during disassembly. It will be difficult for one person to disassemble furniture on their own. One of the important points is the correct selection of wrenches.
You should always start dismantling the bed from the base and only then proceed to removing the frame. To access the base from it you need bed linen, a mattress and pillows. To disassemble the base of a wooden bed, you will need a special key for unscrewing screws and self-tapping screws.
The nuances of repairing a bed at home, step-by-step recommendations
New furniture means comfort, coziness and aesthetic pleasure. But some 7-10 years will pass and your favorite bed or sofa begins to age: the wooden frame cracks in places, the upholstery tears, the foam base sags. Many owners are beginning to look at the bed differently and are thinking about replacing it. Of course, you can buy new furniture, but you can also try to repair it. Repairing beds and sofas helps extend the life of once-loved furniture, as well as save money in the family budget. If you have the desire and a little knowledge, you can easily restore your furniture. First you need to understand what is the cause of the breakdown.
What to do if a squeak appears
It is inconvenient to fall asleep on a creaky bed, and it also causes discomfort to those around you. It is impossible to accurately determine the location of this unpleasant sound. It can come from the base or partitions, metal connections of the product.
Basic measures to eliminate squeaking:
- The first step is to determine the material from which the bed frame is made;
- Check all connections. It is necessary to tighten the connecting elements: screws, self-tapping screws, bolts and nuts. For reliability, they can be treated with a special furniture compound. Wax and soap can also serve as a replacement for this composition;
- Carefully inspect the mattress, especially the spring one. The cause of the unpleasant sound may be springs;
- If lamellas are used instead of springs, then broken elements can be easily replaced with new ones;
- Particular attention should be paid to the legs at the base of the bed. Now the choice of legs is huge and choosing the right ones will not be difficult;
- If squeaking is caused by boards lying too close to each other, there are several options for eliminating it - the boards are swapped, the base is turned over, or the contact points are treated with lubricant.
The most successful and 100% way to get rid of squeaking in connecting elements is to replace old fasteners and assemblies with new ones. And it is not necessary to call a specialized company for help for these purposes; you can independently repair the bed at home.
Advantages
There are many positive aspects:
- When assembled, the structure takes up minimal space . The arrangement of sleeping places one above the other allows you to save space, which is very important for small children's rooms, because the saved space can be used for games or other necessary furniture.
In the area occupied by one bed you get two sleeping places at once
- Reliability and durability . Since furniture of this type is subject to increased loads during operation, the structures are made stronger than standard ones, which ensures a long service life. All bunk beds from renowned manufacturers meet the highest quality and safety standards.
- Variety of options . There are many models on the market, each of which has its own advantages. Designs vary in size, design, color and a number of other factors. It will not be difficult for you to choose a suitable modification for any interior.
Restoration of children's upholstered furniture
If a child's bed is broken, it should be repaired immediately, because deformation of the surface of the bed will eventually affect the child's health, posture and well-being.
The places in children's beds that most often fail can be:
- Lifting mechanism in a sliding or built-in bed;
- Wooden partitions of the base and the frame itself due to normal wear and tear of the material or any external mechanical influence;
- Fragile decorative legs installed on furniture under strong impact (intensive play by children, jumping on the bed);
- Poor quality mattresses and product deformation, which negatively affects the child’s health;
- Additional elements: armrests, drawers and sections.
Before you buy new furniture, you should try to fix your old bed. Broken parts can be replaced, and some elements can be fixed yourself. There are several types of lifting devices in furniture design and each has its own characteristics. To repair the bed lift mechanism, you need to have some knowledge and skill, so it is better to entrust this process to a specialist.
The main reasons for the breakdown of children's upholstered furniture:
- Children, unfortunately, often treat furniture carelessly. They perceive it as an element of the game, jumping on it, using it as a trampoline;
- The wood from which the structure of a bed or sofa is made tends to delaminate and dry out. Natural wear and tear of the material leads to various breakdowns of the product;
- Sometimes design flaws lead to premature failure of a furniture sample. This is the incorrect placement of lifting devices or legs at the base of the frame. As a result, the furniture body is affected by significant mechanical loads that break the furniture;
- Poor quality assembly of the structure, when the lifting mechanism is installed in places not provided for in the furniture assembly diagram, due to the incompetence of the worker who performs the operations.
Thanks to the variety of building materials and tools, you can try to repair a bed at home. The result should be some nice furniture. A renovated bed is a new object in the interior of an apartment for little money.
It is worth noting that it is quite difficult to repair beds with built-in lifting mechanisms of complex design. It is recommended to change the side drawers, lamellas or the base itself for an orthopedic mattress. It is better to purchase factory-made walls where lifting devices are installed. The procedure for repairing a children's bed is no different from the step-by-step restoration of large adult bedroom sets.
Purpose of the cross bar
It has already been noted that instead of a crossbar, a thick sheet of plywood can be used. It is worth noting the advantages and purposes of the lattice in order to understand that it is preferable.
Selecting the type of fastening for the slats at the base of the bed.
- Reducing the load on the sleeping place. Thanks to this, the quality of the product is enhanced and the service life is increased.
- Has spring quality. The bar is elastic and therefore all the load that acts on it is distributed evenly.
- During sleep, your spine will take the correct position.
- The grille is attached using special holders. This makes the structure reliable and subsequently avoids squeaks and noise.
- The bar is positioned in such a way that natural ventilation of the sleeping area can be carried out from all sides.
The process of creating a bed base and frame from slats
Restoration
Repairing a bed at home includes several stages:
- The surface where the work is planned to be carried out is covered with film so that dust and dirt do not fall on the floor;
- The furniture is disassembled according to its structural elements: sides, backs, armrests. They are numbered and added up;
- Fastening parts are set aside separately;
- Remove and disassemble upholstery material;
- Inspect the bed frame for cracks and other damage. If any are found, parts of the furniture are replaced;
- They make new upholstery and assemble furniture;
- You can include some decorated elements in the design of the furniture, for example, installing mirrors in frames similar to the decoration of the bed at the headboard on the sides.
We assemble and disassemble any furniture
Assembling new furniture
Having a full set of professional tools allows our craftsmen to quickly and accurately assemble furniture of both domestic and foreign origin.
Assembling furniture after moving
Upon completion of the move, our company’s workers will assemble furniture of standard and non-standard formats in the shortest possible time, regardless of its quantity.
Dismantling and transportation of furniture
In order to rationally use the space of the car and transport furniture in a minimum number of trips, our specialists will disassemble it into parts and then carefully load it.
Moving furniture
The furniture is carefully loaded into the car, after which it is secured with special belts, which allows the property to remain unharmed on a trip of any duration.
Rearrangement of furniture
When rearranging furniture, our company’s specialists are guided by two main rules - rational use of space and extreme accuracy.
Furniture packaging
Before transportation, our specialists pack the furniture using professional packaging materials. Packaging will protect your furniture from possible damage, dust and precipitation when moving not only around St. Petersburg, but also to another city and country.
Furniture dismantling
Our specialists dismantle the furniture so that it takes up minimal space in the vehicle. Thanks to the use of professional tools, the fastening elements of the furniture remain intact.
Cleaning of apartments and offices
Before assembling/disassembling furniture, it is necessary to clean it to avoid contamination of its elements. After assembling and arranging the furniture, dust and dirt will also remain in the room. Our specialists will quickly and efficiently carry out wet cleaning at your home or office, and you can relax. We will bring all the necessary equipment and cleaning supplies with us!
Mattress restoration
The main condition for restoring upholstered furniture is a strong frame. The mattress is also one of the structural elements of a soft bed, which requires proper care. One mattress lasts a child for about five years, after which it is better to replace the product with a new one. This is because the baby is growing and gaining weight and height. As a result, the mattress deforms over time and loses its orthopedic properties.
Spring mattresses are very popular, and they still remain in first place in the list in terms of sales. This product has an excellent orthopedic effect and a long service life, which often reaches up to 12-15 years. The service life depends on the use and storage of the product and may differ slightly from the indicated figures. If it breaks down, you don’t have to buy a new mattress in the store; you can try to restore it.
You can repair your bed mattress at home. To do this, you need to stock up on the following tools: a hammer and nails, a furniture stapler and slats, a foam roller and fabric for upholstery.
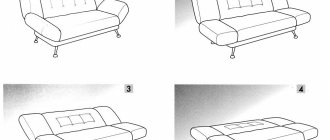
First, you should make sure about the type of mattress. The first option is intended for use on sleeping beds, the second - on sofas. Their difference lies in the shape of the corners: mattresses in beds have right angles, while sofas have rounded ones. Operations to restore the product are accompanied by the presence of debris and dust. Therefore, it is recommended to carry out work outdoors. If this cannot be done and the mattress repair has to be done within the apartment, then prepare a vacuum cleaner in advance to get rid of excess dust and dirt.
The main steps on how to repair a spring mattress for a bed with your own hands at home:
- The workplace must be prepared in such a way that the mattress can be accessed from all sides. An excellent solution would be to install four stools at the corners of the mattress. The product is placed on stools with the soft side. The paper clips and fastening parts are removed from the base, and the thread is removed;
- Change the flooring and clean the fabric insulating base of the springs from dust. Cut the harness and release each spring;
- Eliminate defects and put the base of the mattress in order: attach torn slats and pieces of fabric in place;
- Install each spring vertically so that it rises 10 centimeters above the level of the frame;
- The old springs are fastened to the slats using belts;
- Once the installation of the springs is complete, they begin to be tied. To do this, nails are driven along the edge of the frame. The upper part is tied using a rope of small diameter. They work in rows - first the transverse rows, then the longitudinal ones. The rope is not pulled too tightly to avoid the springs tightly fitting to each other;
- The rows are tied diagonally and the nails are bent;
- The resulting network with springs is covered with lining material. Usually it is fabric that is clamped by slats on the frame.
Parsing is a delicate matter
The choice of transportation and packaging method directly depends on the size of the bed. A classic bed can be a single (80-100 cm wide), a double (160-200 cm wide) or a single bed (120-140 cm wide). Even the most compact option is practically impossible to take out of the entrance, load and transport without disassembling. Therefore, it is imperative to disassemble the bed: otherwise, how can you transport the bed in the trunk of a car?
You can speed up and simplify the process by ordering the services of a furniture assembler. A specialist will arrive with the necessary set of tools, quickly and carefully unscrew and remove all parts. But this service costs money. Want to save money? Then you will have to deal with the problem yourself. What is needed for this? First of all, understand what elements your bed consists of. Traditional package includes:
- base (this can be a sheet of chipboard or thick plywood, lamellas, armored mesh or frame mattress);
- two backrests of the same or different heights (some beds have a decorative backrest and a small footrest);
- sidewalls that help maintain the stability and strength of the frame, and also serve as support for the base.
Typically, all elements are attached to each other with self-tapping screws, furniture bolts, and also using grooves. To disassemble such a bed yourself, you will need a screwdriver and a hammer with a rubber attachment. The latter is convenient for knocking out parts stuck in the grooves without damaging the coating. Additionally, it is worth stocking up on an open-end wrench of the appropriate size to make it easier to remove the nuts.
If you are not confident in your own skills and do not want to spoil the item, you can turn to professional assemblers. They will get the job done quickly and accurately. The cost of the service is fully offset by the time saved.
Back to Contents
Basic Rules
Repairing broken bed elements does not require such a careful approach as, for example, repairing mirrors, but it still cannot be done without preliminary preparation. It is also necessary to select materials and tools, find out the cause and type of damage. In addition, it is important to follow certain rules for carrying out work:
- before screwing in the screws, holes are specially drilled for them, the depth of which is 2/3 of the length of the fastening element, and the diameter is 3/4 of its diameter;
- before screwing in the screws, the prepared hole is filled with PVA glue or a polymer-based emulsion;
- It is better to choose nails with a ring notch;
- It is also recommended to coat the joints of parts with glue;
- nails are hammered only some time after gluing the parts (12–16 hours).
Failure options and fixes
To repair a bed at home, you must first find out the cause and type of damage. Most often it is necessary to restore the legs, slats, frame of the product, as well as the spring mattress. The technology for carrying out work is different in each case.
Leg repair
If the entire structure is attached to the legs, then bed repairs must be carried out very carefully. When parts become loose, the fasteners must be tightened. If they break, it is better to completely replace them. To do this, the nuts are unscrewed, damaged components are removed, and others are installed in their place and clamped with fasteners. Ready-made parts can be purchased or made independently. If the master is a beginner, then the first option is preferable.
Most often, children's beds have to be repaired. The reason is that this type of furniture for a child is not only a piece of recreation. He can play on it, jump, do what he likes. This often causes damage to the lamella. If the damage is minor, then it is enough to fix the element with glue. Otherwise, the part is replaced. Moreover, now you can purchase not only the lamella itself, but also its holders, which are most often damaged.
If the damage is minor, then it is enough to fix the element with glue
In the event of a serious breakdown, the failed part will have to be replaced.
Frame frame
Although this part does not experience maximum stress, failure of the bed frame is common if it lasts more than 3-4 years. The problem may be as follows: the crossbars that connect the backrests pop out. The reason for this is the wear of the coupling bolt. To correct the situation, you need to drill several holes in the end of the cross member. After this, insert guide pins into the outer holes, and a tightening bolt into the middle one.
Another type of failure is the loss of the metal fitting connecting the front backrest and the crossbar of the furniture. To solve the problem, you should simply fix the element in its place. To do this, wind the thread around the foot in the opposite direction to the twist. The diameter of the product should be slightly larger than the size of the loosened hole.
Before fixing the part, the hole is coated with glue, and then the component is installed in place. A screw or self-tapping screw is also screwed into the back of the furniture, securing the footing on the back side. Once it has hardened, the bed can be used.
After 3-4 years of use of the product, the tightening bolt may fail, which will lead to breakage of the bed frame
If the cause of the breakdown is associated with a fallen out fitting, you should fix the element in place by winding a thread around it and lubricating the loose hole with glue
Lifting mechanism
Different types of lifting mechanisms are installed in beds, therefore their repair schemes are not the same. Before starting work, the type of structure is determined and a visual inspection is performed. The algorithm for repairing the bed lifting mechanism is as follows:
- First, the structure must be removed and disassembled. It is advisable to photograph the entire process or write down the sequence of unscrewing the parts so as not to get confused during assembly.
- Conduct a visual inspection of the mechanism to identify broken parts.
- Replace damaged components and assemble the structure.
- Place the product in place.
To prevent the lifting mechanism from breaking for a long time, it must be periodically lubricated. Thanks to this, the friction of the fragments, as well as their wear, will be reduced. In addition, the protective oil film will prevent rusting and corrosion processes.
To ensure that the lifting mechanism lasts as long as possible, it must be lubricated periodically.
Benefits of DIY restoration
An alternative to restoration - artificial aging of furniture
- Saving money . A good modern bed costs a lot of money, so why not restore old furniture, which in the end will be no worse.
- Old furniture is better quality than modern furniture . Until the end of the eighties, Soviet beds were made to last and last, while modern products will last no more than ten years without repair.
- Fashionable retro ambiance element . Retro is in fashion, and therefore, by restoring an old bed, you will get a unique element of the surroundings for a very small amount of money.
- Old furniture can be modernized . With the right approach to restoration, a bed can not only be restored to its original appearance, but also modernized. As a result, furniture that was otherwise thrown away will be relevant when arranging modern interiors.
- Gaining valuable experience . If the bed restoration is successful, you will gain valuable experience that will be useful when restoring other furniture in the house.
Where to begin
Most iron beds are in excellent condition and for their restoration it is enough to select a mesh of the appropriate size
No matter what you decide to restore, you need to start by identifying and assessing the damage that will have to be repaired during the restoration.
If the wear of the bed is insignificant, you can do without disassembling and limit yourself to eliminating cosmetic defects on the back and foot. If there is a lot of damage, the bed will have to be disassembled into individual structural elements, cleaned of accumulated dirt, after which it will be possible to identify all the defects and decide on their elimination.
When is restoration appropriate and when is it not? Any furniture can be restored, even in very poor condition. But you need to understand that the worse the condition of the furniture, the more time, effort and money will have to be spent on restoring it.
Chipboard is a short-lived material, but if desired, it can be updated
An important point is the material from which the bed is made. The easiest way to restore metal products is to simply clean off the rust and oxides, after which you can start painting. Furniture made from chipboard is the most difficult to restore. After more than 10 years of use, particle board loses its former strength, and therefore I do not recommend restoring old broken chipboard beds.
The most popular option is restoring wooden beds. Such furniture, being made in the 50-60s of the last century, is now distinguished by enviable durability and all you have to do is repair chips, cracks and abrasions.
Features of partial restoration
Attention. When repairing the frame, we use dry wood, which does not deform or crack during the drying process.
Required tools and materials
During the restoration you will have to do a lot of sanding, and therefore you cannot do without a sander
Furniture restoration requires a variety of tools, including:
- Devices for disassembling cabinet furniture - hex keys for confirmations, spanners for bolted connections, screwdrivers for self-tapping screws and screws.
- Equipment for roughing and grinding the surface - an industrial hair dryer for softening the paint, a sanding machine with a set of sandpaper of different grain sizes.
- Painting tools - brushes, rollers and sprayers for applying paint and varnish materials, as well as spatulas and sandpaper for applying a leveling layer of putty.
Wood putty is an effective remedy for removing deep dents and scratches.
In addition to the tool you will need:
- Paints and varnishes (paints and varnishes) - including varnishes, paints and stains.
- Primers and impregnations - these materials reduce the absorbency of wood, increasing adhesion to coatings.
- Putties - used to level the relief on wood.
- Oil and wax impregnations and mastics - to mask cosmetic defects of the old coating.
Brief characteristics of restoration compositions
Varnishes vary in texture and come in glossy, semi-gloss and matte. Also, varnishes can be colored or colorless.
If wood is treated with stain or other coloring compounds, it is preferable to use colorless varnish.
The use of varnish over paints and enamels is due not so much to the decorative as to the protective effect.
The use of oil impregnations is allowed only on solid wood surfaces.
Methods for eliminating minor defects
Mix 1 tablespoon of vinegar and 2 tablespoons of unrefined sunflower oil in a small bowl until an emulsion is obtained. Next, dip a thick cloth in the composition and oil the abrasions. As the composition is absorbed, apply it again.
As a rule, for cosmetic masking of abrasions, three layers of the product will be sufficient, with a break for the previously applied layer to dry. To mask scuffs on dark furniture, it is better to use olive or castor oil instead of sunflower oil.
On the market and in auto parts stores you can purchase a repair marker that masks scratches on the paintwork. This option can also be used for cosmetic restoration of furniture.
Scratches are degreased and rubbed with soft wax. The applied layer of wax is softened with a hairdryer.
After the softened wax has cooled, polish the surface with a soft cloth and no traces of repair will be noticeable.
Varnish layer renewal technology
Let's look at the instructions for updating the varnish layer using the example of restoring the headboard of a bed.
After the putty has dried, the headboard is sanded down to wood using 200 and then 80 sandpaper.
We sand the wood with a sander or float. If you hold the surface with your hand, it will not work.
After the wood has been sanded, remove the dust with a solvent.
The varnish is applied in several layers with a break for the previous layer to dry. After this, the surface can be polished.
If you prefer a glossy surface, as in the photo, use a glossy varnish. If gloss is not needed, use varnish with a matte texture.
Finishing the product - decoration
Decoupage consists of making decorative appliqués that are cut out from special napkins and glued on top of certain areas of furniture.
Various methods are suitable for artificial aging, including applying and then sanding paint, brushing wood (combing out soft fibers), etc.
If earlier the thinnest gold foil was used for gilding, today there is no need for such expenses. Inexpensive “golden” paint can be bought in a can at any construction market.
For a better effect, gilding can be used not only in decorating the bed, but also when decorating other furnishings in the room.
You can cover the headboard, footboard and sides, as shown in the photo. Under the leather upholstery we place a foam filler.
How to eliminate a squeak
It's uncomfortable to fall asleep on a bed that creaks. In addition, this unpleasant sound can irritate others. In houses with thin walls, even neighbors can hear it. To get rid of a problem, you need to determine the cause of its occurrence. Depending on the type of breakdown, eliminating squeaks in beds with your own hands is done as follows:
- The frame of the product is carefully inspected beforehand. Pay attention to all connecting elements. If they are loose, they are tightened. Additionally, screws and bolts are lubricated with a furniture composition based on wax and soap. Excess gaps in the wooden frame of the bed can be eliminated using a cork seal. Additionally, it is recommended to use furniture glue.
- Often the cause of squeaking is the springs of the mattress. Due to the constant load, they become unbalanced. You can correct the situation by turning the product over. If this does not help, then you need to replace the springs and purchase a new mattress. It happens that the product rubs against the frame of the bed and a squeak appears. The defect can be eliminated by preventing contact of the mattress with the wood.
- An unpleasant sound is often produced by broken slats. If they cannot be repaired, then it is better to replace the incorrectly functioning elements.
- It is also necessary to slightly rock the legs of the bed. In this case, creaking occurs in the area where the supports connect to the frame.
- The cause of the unpleasant sound is defects in the supporting structure - cracks. If they are numerous, then it is better to replace the housing. Single damage is filled with furniture glue and reinforced with a metal plate.
- The creaking occurs due to the fact that the bed is on an uneven floor. In this case, it is better to move the furniture to another place or replace the floorboards.
The simplest and most reliable way to eliminate squeaking is to update old parts. It is important to pay attention to the lifting mechanism.
The cause of a squeaking bed can be loose connecting elements.
Due to the constant load, the mattress springs become unbalanced. To eliminate the squeak, it is recommended to turn the product over or purchase a new one.
Broken lamellas that produce an unpleasant sound must be replaced
Creaking may occur in the area where the supports connect to the frame.
A crack in the frame can be filled with furniture glue and reinforced with a metal plate
The crib assembly technology depends on the type of bed
• A classic bed is a piece of furniture that can be installed anywhere in the room (against the wall, in the middle of the room or in a corner). Such a bed can be single, double or large luxury for fans of increased comfort.
Basically, a double bed is assembled for spouses and young couples who prefer to sleep together. The reliable assembly of this type of bed will please the owners for many years. As a rule, classic-style beds are installed in bedrooms, since they occupy a fairly large area and are not equipped with transforming mechanisms.
• The bed is often assembled with a lifting mechanism. This product is adjustable in several positions depending on the model. A person can choose a certain incline for a more comfortable sleep. The service life and appearance of this product depends on an important factor - this is the assembly of the lifting bed, taking into account all the nuances.
• Assembling a sofa bed is popular among buyers. Such furniture is a full-fledged sleeping place at night and an ordinary sofa for relaxing or receiving guests during the day. A convenient thing for installation in small apartments. An Ikea bed assembly that converts into a sofa is often used for several reasons: spectacular appearance, high quality and durability.
• The leading position in demand remains the assembly of bunk beds. This product contains two sleeping places at once, occupying a minimum amount of space. Assembling a bed of this type at home means providing comfortable places to sleep for two family members in one room. It is possible to assemble a bunk bed with drawers; this option is aimed at a large family. You can put pastels and other things as needed in the drawers. It is better to entrust the installation of a bed of this type to an experienced specialist.
• For many buyers, assembling a wardrobe bed is the most suitable option. The uniqueness of such furniture lies in the “ability” to turn from a bed into a closet. This apartment arrangement option is suitable for people who prioritize the availability of free space. Correct assembly of a transformable bed cabinet will not expose the owners' cunning move, since an ignorant person will not distinguish such a sleeping place (assembled) from an ordinary cabinet. Transformer beds, which can only be assembled properly by a master, are used by families of various social statuses, financial capabilities and taste preferences.
• Children's sleeping places should be especially comfortable so that babies have good dreams and gain energy for development. Professional assembly of the crib will provide your child with a healthy, restful sleep. Many parents prefer to assemble a playpen bed for their child in order to use this product for both sleeping and playing. Assembling a crib of this type means providing your baby with safety and additional space for entertainment and relaxation.
Troubleshooting spring mattress problems
The mattress is an essential part of the bed design that provides comfort. This item requires proper care. It is better to change it every 5 years, but if this is not possible, then it is recommended to correct the shortcomings that appear yourself. Standard beds use a spring mattress that deforms over time.
For repair work you will need the following materials and tools:
- nails with a hammer;
- slats;
- upholstery fabric;
- furniture stapler;
- foam;
- spare springs.
Repairing a spring mattress involves the following steps:
- Preparation of the workplace. The product must be placed so that it can be approached from all sides. It is better to place it on stools placed in the corners. The base is freed from fasteners and paper clips.
- Replacement of internal parts. The fabric that insulates the springs is cleaned of dust. The old element binding is removed.
- Elimination of defects on the base of the mattress. The torn parts are sewn back into place.
- Restoration of springs. Each element must stand strictly vertically and rise 10 cm above the frame level. To fasten the parts, slats and belts are used.
- Strapping. This process requires a responsible approach. It is necessary to hammer nails along the edges of the frame. A thin rope is used to tie the top of the springs. First, the rows are processed across, and then along. Do not pull the string too tightly so that the springs maintain a vertical position and do not touch each other. Additionally, the strapping is done diagonally, after which the nails are bent.
- Finishing. A lining is placed on the resulting mesh, which is fixed to the frame with slats.
Wooden bed for a beginner
Are you tired of your old bed? Many of us still continue to use old Soviet furniture in our apartments, which were once created for the needs of the working class returning home to spend the night. It was never distinguished by special aesthetics or a scrupulous selection of materials, and therefore had special value.
So if you're still sleeping on an old Soviet bed, you know how to end it. Pay attention to the plans for making simple platform beds from natural wood, which even a beginner can handle assembling.
An author from the USA made this bed for his daughter for only $50. This is a negligible amount for residents of America, since finished furniture from a furniture showroom will cost several hundred. Moreover, the bed is made of natural wood, and this is real luxury by modern standards.
In order to make a wooden bed at home, you will need fairly modest equipment, metal consumables, such as furniture screws, and wooden boards, bars and slats. But more about this:
Materials:
— wooden blocks with a cross section of 70 x 50 or 75 x 50 mm for making the frame; — support slats for the flooring under the mattress or lamellas with a thickness of at least 25 mm; - slats or thin boards for making a base for a mattress; - planed boards for a wooden headboard of the same thickness; - decorative slats for framing the headboard according to the thickness of the boards used; — decorative protective oil-toner or primer-toner for wood processing; - white paint for decorating the headboard; - furniture screws; - metal corners to strengthen the frame if desired; - glue for woodworking.
Tools:
— a circular saw or miter saw (you can use a sharp wood saw with a fine tooth); - electric drill; - screwdriver; — a grinder, if necessary; - soft cloth for oiling wood or paint brushes for priming and drawing the design of the headboard; - construction tape and square; - pencil.
Step one: preparing lumber for work
If you manage to purchase properly processed boards, the entire process of making a bed will be simplified significantly. Not to mention the list of tools and equipment you will need.
This means that the boards must be carefully and evenly planed, have a smooth surface and a suitable degree of drying. Before ordering material delivery, make sure that the bars and boards are the same thickness. In this case, the error will not have fatal consequences, except, perhaps, for the untidy appearance of the finished structure.
You don’t have to put forward such requirements for slats. All that is important to you is the flat plane of one of the edges, on which the lamellas or boards under the mattress will be fixed. However, it is also advisable to treat them with protective compounds, and if the surface of the wood turns out to be loose and uneven, their consumption increases significantly. But this is sometimes the most expensive item of expenditure.
Step two: preparation for assembly
Assembling a wooden bed frame with your own hands is not such a difficult task. The main thing is to stick to the sequence. The accuracy of the markings and high-quality cutting are also of great importance.
The most convenient tool for cutting lumber for furniture making is, of course, a miter saw. It allows you to maintain a precise, even angle, so that all parts of the structure fit evenly and tightly to each other. However, until recently, a miter saw was an unaffordable luxury, and everyone did without it.
You can just as easily use a circular saw or a hand saw for wood. And in order for the corners to be even, buy and use a construction square, which allows you to mark bevels at a certain angle, including at an angle of 90°.
The author used simple butt-to-butt pocket joints. This allows you to avoid making complex grooves, which are so intimidating for novice home craftsmen. Pocket joints are joints made using furniture screws or wood screws, twisted at an angle so that the head is recessed into the wood.
All holes are pre-drilled using an electric drill. They can later be filled with epoxy sealant or wood putty. However, it is better to place them in such a way that the connections are invisible to the eye.
Step three: assembling the frame of a wooden bed
The author advises starting assembling the frame by making the front and back panels. Both panels are identical and consist of six parts: four frame parts and two braces, which also double as decor.
All parts are connected end to end, so pay special attention to marking and fitting. Start by assembling the frame using screws and glue. Saw off the braces at the desired angle and install in place.
Screw the longitudinal bars of the bed frame. Fix support slats or bars on them for laying slats or boards under the mattress. At this stage, you can strengthen the frame using metal corners and connectors. It all depends on what load is expected during operation. However, first it is necessary to complete all wood processing work. So feel free to move on to the next step.
If desired, you can also make a hanging panel - the head of the bed. It is assembled from planed boards and framed with slats. The dimensions of the panel are arbitrary and depend on the size of the bed itself. In any case, it perfectly complements the bed and will help you fit it into the interior.
Step four: protection and decorative processing of wood
The author used a toner primer that perfectly tints natural wood, imitating valuable wood species, but at the same time preserving its natural texture. It also protects the wood from moisture, dust and the formation of fungi.
You can also use a decorative toner oil or varnish with a toning effect. All these compounds are new generation products. They give an interesting effect, slightly different, but generally similar. The most durable coating of all of the above is varnish. It also protects the tree from minor mechanical damage.
Apply the coating of your choice in several layers according to the instructions. Give each new layer time to dry.
Step Five: Finishing Touches
Install slats or treated boards to form a base for the mattress. Also screw in metal fittings, if provided for in the design.
Place a level wooden headboard on the wall. The author used a laser level, but you can use a regular one. Place the mattress on the base.
Become the author of the site, publish your own articles, descriptions of homemade products and pay for the text. Read more here.
What is a lamella
Before you begin, you need to familiarize yourself with the description of the features of the lamellas in more detail. Lamels are wooden structures that have a curved shape. Their characteristic features include a high level of elasticity and elasticity. It is thanks to these features that the mattress can be securely fixed.
Such wood products are laid out at a distance of 2-5 centimeters. This allows slatted beds to be used by both thin and overweight people. The thickness of one plank reaches ten millimeters, and the width does not exceed thirty. However, cheap beds can use boards 4-5 millimeters thick.
Main causes of breakdowns
Sometimes people find that the board in their bed is broken. There are several main reasons why a wooden plank can break:
- Exceeding permissible loads. Wooden slats have certain load limits that should not be exceeded. However, some people still overload them, which later leads to breakdowns. Therefore, it is recommended to familiarize yourself with the permissible loads of the slatted bed in advance.
- Marriage. Sometimes manufacturers install low-quality products made from defective wood. This often happens when using overdried wood, which quickly breaks even under light loads.
- Long-term operation. Slats may break if used for more than ten years.
How to choose new ones
Sometimes it is not possible to repair old products and you have to replace them with new ones. Before purchasing new boards, you will have to understand the specifics of the purchase.
When making sofa grilles, lamellas are used, which may differ in size. Therefore, before purchasing, you should familiarize yourself with the main types of such products:
- Wide. These designs are purchased if you need to replace the slats on large sofas where bonnells with springs are installed. The width of such boards does not exceed seven centimeters.
- Narrow. They are considered a universal material, as they are suitable for any mattress. Experts advise buying narrow slats for beds that have spring mattresses. This will increase the strength of the structure. The width of narrow lamella materials is 4-5 millimeters. The thickness of such planks is small and reaches only three millimeters.
Quantity
Having decided on the dimensions, you need to figure out the optimal number of slats. Some people don't know how many boards they need to buy to strengthen the base of the bed.
Experts recommend buying a lot of lamellas, since the strength of the product depends on this.
To determine the required number of slats, take into account the dimensions of the bed. For example, for double structures, at least thirty planks are purchased. For single beds, 15-20 pieces are enough. However, some manufacturers install more than thirty slats to make the sofa more elastic and resistant to stress.
Most often, slats for sofas are made of wood. It is used to make adhesive plywood, which is laid in several layers to create a more durable surface. Products made from plywood are characterized by good elasticity and elasticity. The lamellas can also be made from the following materials:
- Birch. Budget products are made from young birch trees. Such structures are not very durable and therefore are not recommended to be used.
- Beech. To make more reliable bed bases, beech is often used. This wood is flexible and highly durable.
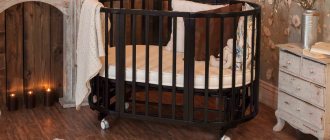
How to restore an old bed?
Old beds can be made from a variety of materials.
This includes wood, metal, chipboard, MDF, or a combination of these materials.
Plus, the beds are structurally different; there are some nuances during restoration.
If you have such a vintage metal bed with armored mesh,
We disassemble the bed, separate the backs from the mesh (base), there are grooves in the mesh frame, and on the backs themselves there is an element inserted into the groove, we lift the mesh frame and remove the back from the grooves.
The mesh frame is made of metal corners.
Spica is also metal.
First of all, we remove rust from the metal, either mechanically or with a rust converter.
Next, using a remover, or a hairdryer + spatula, we remove all layers of paint from both the bed frame and the headboards.
Degrease, prime and dry.
The frame can be painted black, or the same color as the backs.
At the finish, paint in two layers and dry.
It is best to paint with a spray gun, a more complex brush, a lot of small and round elements (for example, the “rods” of the backs).
Chrome-plated (sometimes simply painted) backrest handles can be polished using GOI paste.
Dry the paint and assemble the bed in reverse order.
Of course, old beds are different and not all are worth repairing. The fact is that beds made of chipboard that have begun to crumble cannot be repaired, since when the main parts are replaced, little remains of them. But old, reliable metal beds can and should be repaired, and they will serve you faithfully, especially in the country. Yes, it is at the dacha that due to temperature changes, chipboard beds easily begin to collapse. So let’s take, for example, this metal bed.
Here's what to do with her.
- Disassemble and wash with warm water and soap.
- clean with fine sandpaper.
- Check the connections for an hour and, if necessary, weld them.
- Degrease.
- Paint it. In this case, I usually use aerosol paint to paint the car, but you can just use it from a can and with a brush.
As a result, you will have a reliable bed for many years to come.
It all depends on what material your bed is made of.
If it is metal, then the fastest way to restore it is to remove the old paint (there are also beds with chrome inserts, the chrome will have to be removed mechanically) with a paint solvent, then treat the rusty areas, and after degreasing, spray paint it with any color, up to silver and gold.
If the bed is made of wood and is classified as consumer goods, then the best way to give it a second life is to cover it with fabric or leather. In this case, you do not need to clean the old surface, you just need to cover it with available material. To do this, you will need the covering material itself, glue and a gun with staples.
Is the bed with high metal bars with armored mesh? A furniture rarity, although you can still find it in rural areas.
It is better to carry out restoration in the fresh air. First, disassemble the bed and clean all metal surfaces of old paint and rust. Paint can be removed using a hair dryer or a special remover. If you don't have a hair dryer, you can try a blowtorch. Then sand all surfaces using medium-grit sandpaper and wash with white spirit. If the mesh is sagging, you can remove it all and instead use wooden slats or a sheet of plywood, cut to the size of the metal frame (metal frame) and fasten it into the old holes (fix it after painting the frame). Instead of a regular mattress, it is better to buy an orthopedic one.
Metal frames and frames can be painted, first with metal primer paint, let dry well and then coat with base paint, you can buy metal paint in aerosol cans (the paint should be designed for metal and rust resistant).
Source: www.remotvet.ru
How to repair and replace slats
At the initial stage of repair, it is necessary to get rid of damaged planks. They are carefully removed from the groove, moved to the side and removed from the structure. Some types of lamellas are attached using special holders. In this case, you will have to use pliers or a screwdriver.
Some people use a hammer, but it is not recommended to use it so as not to accidentally damage the structure.
If the slats are broken in the central part of the bed, you can swap them with the outer slats. This is done when one or two planks are broken. If more lamellas are broken, you will have to buy new ones. In this case, it is recommended to buy the same products as before. The purchased products are carefully attached to the bed using clamps. After installation, you need to check the reliability of the fastening and make sure that the slats are not loose.
How to repair slats?
Slats are called slats attached to the base of the bed. In the above description, the slats are boards fixed at a certain distance from one another. Real lamellas are bent-glued wooden plates. At the same time, the type of wood can be almost any.
Important! The peculiarity of the lamellas is their flexibility and elasticity. They provide the orthopedic effect of the product and make sleep as comfortable as possible. Due to the fact that the plates are located at a certain distance from one another, ventilation of the mattress is ensured.
If you notice that 1-2 boards in the center of the bed are broken, the easiest option is to swap them with the whole boards at the head or foot of the bed. The load there is less, and the orthopedic effect is not so important. But, of course, it will not be possible to do such a manipulation all the time. If only because the number of lamellas is not infinite. In addition, the functionality of the furniture will suffer significantly.
It is much more rational to buy lamellas separately. The standard length of such a product is 0.9 m, with a width of 53 or 68 mm. In this case, the repair procedure is as follows:
- Cut a piece of the desired length from the finished product.
- Place a piece of lath holder on both ends.
- Insert the prepared section into the grooves of the frame.
If you are not renovating, but making a bed yourself, you need to remember the following basic rules on how to make slats for a bed with your own hands:
- The minimum number of slats in a single bed is 15 pieces. In a double design, respectively, - 30.
- The distance between the slats should not exceed the width of the slats.
- The lamellas can be secured using special tips or frame stands.
Important! With all the advantages, flexible bed slats are the weak link. If you don't want to constantly repair the bed, you can replace them with two 12 mm thick plywood sheets. The sheets must first be connected to each other and then to the frame to form a rigid structure. To provide ventilation, make several holes in the plywood sheets. In addition to the fact that the structure is durable, such a bed will not creak.
For beds, slats can be made exclusively from wood. The most commonly used are birch and poplar. This material was chosen for its flexibility and resilience. Wood also contributes to excellent ventilation of the mattress.
A double bed with slats is an ideal orthopedic sleeping option.
Experts believe that 30 slats are enough for a double bed, and several times less for a single bed. Manufacturers do not adhere to this opinion and place 20-22 pieces. But if you decide to make slats and a bed with your own hands, you can independently calculate their number.
Double bed option with a standard set of slats.
The benefits of making furniture yourself
Among the advantages of making your own bed and slats, the following factors are noted.
- Environmentally friendly. Natural material, that is, wood, cannot adversely affect human health.
- Durability. A product made with your own hands will last for many years. The bed can withstand heavy loads, which confirms its strength.
- Custom size and design. The bed will be made with your own hands according to your drawings. You can adjust its size and shape to the desired parameters. You don't have to look for a place to place a large bed.
- Saving. This applies not only to indoor space, but also to funds. You independently calculate the amount of material needed and purchase them. This will cost several times less than buying a ready-made product in a store.
Option for self-installation of lamellas
The designs of single or double beds made of wood are quite similar and quite simple. Both types of furniture consist of the following parts.
Durable lamellas with metal fastenings, installed by yourself.
- The mattress on which a person will sleep is located on a flat base or slats. For the first option, use a thick sheet of plywood. The lamellas are transverse strips. This design is preferable. The mattress will not deform on it; the slats themselves are quite elastic. This design is more comfortable for sleeping.
- Planks or plywood are placed on a frame made of high strength beams.
- Side panels or legs can be used as a support to which the frame is attached.
Slats are a durable orthopedic base for beds.
When choosing the size of your future bed, it is recommended to rely on the parameters of the mattress. It is also worth considering the location and location of the product. The standard size of a single bed is 200-210 cm long and 90-100 cm wide. For a double bed, the length remains the same, but the width is 180-200 cm, that is, it doubles.
Standard slats for bed bases.
The height of the product is a rather subjective parameter. It all depends on your preferences.
How to repair a lifting mechanism with your own hands
Sometimes the bed lifting mechanism, which is responsible for transforming the structure, breaks along with the slats. The following signs indicate a breakdown:
- spontaneous lowering of the orthopedic base;
- jamming of the mechanism when lifting or lowering the structure;
- creaking and other extraneous sounds that occur during operation.
If one of the listed symptoms appears, it is necessary to disassemble the lifting mechanism. To do this, the mattress is removed from the bed, after which its base is unscrewed. Then the fasteners are unscrewed, with the help of which the mechanism is screwed to the structure. It is difficult to repair such a product yourself and therefore it is better to take it to a specialist who professionally repairs furniture.
Methods for restoring an old bed
If the bed is too old, you can restore it and make it look like new furniture. During the restoration process, it is necessary to carefully inspect the structure and identify parts that require replacement. Most often, the springs and mattress are changed during restoration. Sometimes people decide to replace worn side panels. To do this, you will have to purchase new panels that are suitable for the restored sofa. If the side parts are not very worn, you can sand them and varnish them. It is recommended to use varnish mixtures that have a mahogany tint.
Dismantling the bed.
If, in theory, it is possible to transport a sofa or a wardrobe, for example, in an unassembled form, then it is most convenient to transport a bed by disassembling it - this is the opinion of the employees of New Level LLC, who organize a professional move. A bed is a fairly large load, especially a double bed, unless you plan to transport a couch bed or a baby cradle - such beds can be transported assembled. Transporting a standard size bed fully assembled and fitting it even into a freight elevator, not to mention a stairwell, is a very difficult task.
If you still decide to transport the bed without disassembling it, we recommend contacting the specialists of New Level LLC. Employees of New Level LLC will calculate the dimensions of the body, send the necessary loader outfit and tell you the cost of transporting the bed. A significant advantage is the ability to transport the bed inexpensively by including a package of these services in the total price of transporting the bed!
Dismantling the bed is one of the simplest options for disassembling furniture. A typical bed consists of a base, sides and backrests, connected by simple fasteners. However, if you decide to transport a bed of a non-standard design, for example, a two-tier or canopy bed, it is better to contact a furniture assembler for this purpose.
Before moving your bed, remove all bedding and mattress. When disassembling the bed for transport, mark each part, including fasteners, to help you during reassembly. It is better to store fasteners and small parts separately. It is most convenient to follow the factory diagram when assembling and disassembling.