Items created with your own hands, be it designer jewelry or interior items, create a unique atmosphere in the house. You won't find these unique items in stores. They are not produced randomly, they are made by hand, with inspiration and love. These products bear the imprint of the owner’s soul, his warmth. Items made in the art of patchwork give the home a special charm. One of the most original textile interior decorations is a patchwork bedspread. Sewn from scraps of colored fabric, it will delight with its warmth and brightness, which are especially lacking in the cold season.
History of patchwork
A patchwork or bedspread using the patchwork technique is a type of decorative and applied art that has long traditions and stylistic features. Using patchwork, a handmade technique, you can create incredibly beautiful things from scraps of fabric.
It is difficult to determine how the patchwork technique originated. The first blankets were found in Egyptian tombs. These products were distributed throughout the world. Each country had its own patterns of assembling patchwork covers and ways of implementing these patterns. The reason for the patchwork craft lies in poverty, due to which the remnants of old and worn clothes had to serve as material for a new life, for new products.
The preservation of the patchwork technique was widespread in the New World. American settlers, short of fabric, used even the smallest scraps of warm blankets for repairs. This marked the emergence of the traditional American bedspread.
The patchwork quilt took a long time to make. To create it, various patterns characteristic of a particular area were used. These patterns include the following types of ornament:
- "Mexican Rose"
- "Lone Star"
- "Sawtooth"
- "Tulip" and others.
The idea of multicolor patchwork geometric selection has its origins in arts and crafts.
This is interesting!
Every girl's dowry necessarily included a patchwork bedspread.
Many ceremonial quilts from bygone eras adorn museums today. With the advent of the sewing machine, a patchwork-style bedspread is no longer just one of the ways to get out of difficult life situations, but an entire fine art. A new direction is emerging in fashion - folk romanticism, which even fashion designers who use patchwork elements in their work are interested in. Amateur patchwork clubs began to appear in the USA and Europe, and from that moment on, two directions began to be distinguished in this technique: patchwork mosaic and appliqué. Now patchwork is experiencing a rebirth.
Stages of work
- Fabric preparation. New fabric should be soaked in hot water to avoid subsequent shrinkage of the finished blanket. After about half an hour, rinse the fabric in cool water, dry and iron.
- Reveal the details. To make a blanket measuring 120 by 200 centimeters, you need to prepare 56 squares of fabric measuring 21 by 21 centimeters, and for the center of the blanket one large square of 41 by 41 centimeters. It is better to make a square stencil from thick paper and mark on the fabric using it.
- Connecting squares into ribbons. First, you should sew squares of different colors in pairs. To do this, the squares are folded with the right side of the fabric inward and machine stitched along one side. Then the connected pairs are unrolled and ironed. After this, two pairs of squares are taken, also connected face inward and sewn from the end side. The operation is repeated until the ribbons of squares reach the desired length.
- Connecting ribbons from squares into a canvas. Before joining, all ribbons must be ironed, while the seams on the wrong side are pressed all in one direction. The two ribbons are connected so that the squares of different colors are side by side, and the seams face outward. The ribbons are sewn along one side, unrolled and ironed again. This is how the entire top side of the blanket is assembled.
- Making the bottom side. The bottom surface of the blanket can be made, like the top, from square pieces, or it can be sewn from ready-made strips of fabric, or it can be cut out as a single piece.
- Product assembly. The desired number of layers of synthetic padding is laid between the ironed top and bottom layers of the blanket. The padding polyester should protrude beyond the edges of the product so that it can be trimmed with scissors in the future. Using pins, the entire product is sewn along the longitudinal and transverse seams between the flaps, each seam is quilted on a machine.
- Finishing the edge of the blanket. The protruding padding polyester and threads are carefully trimmed, the cut of the product along the perimeter is hidden under strips of fabric with the edges folded inward, and the corners are carefully processed. Before stitching, you need to carefully secure these strips with pins.
Sewing a patchwork quilt is an interesting creative process, during which a novice needlewoman can gain invaluable experience, and an experienced craftswoman can use leftover fabric that has no use. At the same time, you will get a unique thing, because no one will have a second one like it. Therefore, you should take a little time to create your handmade masterpiece.
What materials can be used for a patchwork bedspread?
Fabrics for modern patchwork technology are selected depending on style and personal preferences. This is perhaps the most interesting and creative process.
Cotton, batik, silk, wool and their combination with embroidery and other interesting details are usually used. When choosing fabrics, it is better to give preference to the brightest and most durable materials. Beautiful, bright, modern textile products made from Japanese and American silk are perfect for this purpose.
You should also know that half-wool and woolen fabrics require a base, since the product will subsequently undergo deformation, and it is recommended not to use fabrics of different composition and thickness for quilted fabric.
One of the fashionable trends in patchwork production is the use of materials that were popular in a particular era. For a bedspread, recreate a specific era rather than simply combining lines of one fabric with another. Such products look very cute and nostalgic. A quilt made in this style will resemble your grandmother's beautiful and quite charming quilt.
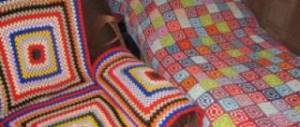
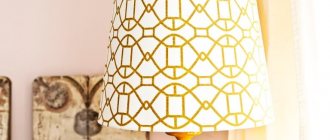
Tablecloths, bedspreads, decorative panels, furniture covers, carpets and other textile patchwork products can create an original and comfortable interior. Products made from patches are used to decorate mirrors, lampshades, and pillows. You can buy them, but it’s much more interesting to create them yourself. You just have to dream a little, choose the fabric texture, pattern, mix colors and create your own unique masterpiece. There are simply no limits to perfection in the fascinating world of crafts.
How to sew a patchwork quilt with your own hands. Step-by-step instruction
The first step is to think about the appearance of the product, color combinations of elements. It is advisable to choose colors so that the composition is in harmony with the overall interior design. The idea should be moved to the sketch. For this, a regular checkered notebook sheet is suitable, on which the future patchwork composition can be marked with colored pencils. The simplest diagram of the front side consists of squares of the same size connected to each other. You can come up with more complex patterns yourself, pick them up on the Internet, or purchase them in a specialized store, along with a craft kit.
We sew a children's patchwork quilt for beginners. Part 1: Creating a block
If you are expecting a baby and want to make something for him with your own hands or want to make an unusual gift for a child, you can sew him a patchwork quilt. It's not as difficult as it might seem at first glance.
What we need for this:
1. Fabrics for patchwork. I advise you to use high-quality 100% cotton. It does not shrink, does not stain and retains its color for a long time. We will need colored scraps and plain fabric for the background. I will use white and bright fabrics of different colors, you can choose any color scheme. I advise you to use small drawings, since large ones in a block do not always look good. You can buy fabric in the store by the meter, or you can buy ready-made cut pieces of 50*50 cm. I use a piece of white cotton, several 50*55 cm scraps and a few squares left over from other blankets. We will also need fabric for the border (optional).
2. Insulation. Cotton, bamboo or padding polyester. You don't have to buy it right away. It can be purchased once your patchwork top is ready.
3. Wrong side. Again, I recommend 100% cotton, the color can be any, but it’s better if it matches the tone of the patchwork top. You can also buy the backing after creating the top, so it will be easier to decide on the color and size. Basically, patchwork fabric has a width of 110 cm. If you plan to use it for the back of a blanket, you need to calculate the width of the patchwork top no wider than 100-105 cm. Otherwise, you will have to sew the back in two parts or look for a wider suitable fabric.
4. Tools: cutter, cutting mat, ruler, scissors, sewing machine. If you don't have special tools, you can cut everything with scissors.
So this time we will be making quilt blocks.
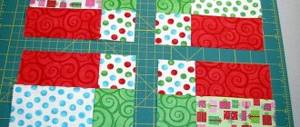
First you need to prepare the shreds: cut the fabric into squares. The squares can be any size, but I don’t recommend making them small. I will make squares 20*20 cm. The number of colored squares should be equal to the number of white ones. I'll be making a 4*5 block quilt, so I'm cutting out 20 colored and 20 white. If you're in doubt about how much to cut the fabric, you can always cut more as you go.
Be sure to cut off the edges of the fabric! If you use a cutter, you can cut several layers of fabric at once.
When our fabrics are prepared, we can begin stitching the block. In order to make the “Wings of the Mill” block, take 1 colored square and 1 white square and place them right sides together. All the beauty of the fabric should be inside. If necessary, chop with pins.
Using a sewing machine we sew the block around the entire perimeter! It is better to use needles for cotton, thicker No. 90, 100. Seam allowances should be the same everywhere! It is very important. I use the standard machine needle position, which gives a 6mm seam allowance.
The red line shows where the stitching should go.
Now we place our block on the mat and cut it diagonally from corner to corner.
We have four triangles. We go to the ironing board and with a hot iron and steam without revealing our part. This way we will relax the seam, it will not wrinkle and will fit better. This must be done every time after sewing the parts together: loosen the seam, open the part with an iron and iron it.
We relax the seam on four parts.
We open the part with an iron. The allowances are pressed onto the dark side. You can always place the triangles with the dark side up and open them with an upward motion of the iron.
We cut off the “ears” that appear.
Now from our four squares you can put together the “Wings of the Mill” block. All your blocks should be stacked the same! For convenience, you can put the first completed block in front of you and stack the rest while looking at it.
It's time to sew our block! First, we sew the halves together: top to bottom (or left to right, whichever is more convenient for you). If you want, you can pin it together. Make sure that the corners lie well and evenly. Since we pressed all the seam allowances onto the dark side, they will blend together perfectly.
We sew on a machine. For speed, you can sew them in a chain, one after the other, without cutting the threads. This significantly speeds up the work.
The result is a chain like this. We cut the thread, relax the seam, and open the parts with an iron. It is important that the allowances are smoothed in different directions. On one side up from the middle, on the other down. This way the middle will fit better and there will be no excess thickness of the fabric. The red arrows show the direction of the allowances.
Sew the two halves together. To make the middle beautiful, we carefully combine the fabric and secure it with a pin. If you pressed it correctly, the seam allowances should be facing in different directions.
We stitch on a machine. We go to the ironing board, relax the seam and open our block. The center should converge at one point.
If it so happens that the block is not quite even at the edges, it can be trimmed. This is one of the few blocks that can be cut to any size. They should all end up the same size. Therefore, it is better to do this at the end, when you have all the blocks ready.
We sew together all the remaining blocks in the same way. You can measure the resulting square and estimate how many blocks are needed horizontally and vertically. My block turned out to be 24*24 cm, therefore 5 blocks in length will be 120 cm minus about 3 cm in allowances = 117 cm. Then a border will be added (more on this in the next master class) and the final size of the patchwork top will be larger.
Sew a patchwork bedspread: the final part
The front side is not the whole product. Next, you must sew the front part to the back with your own hands. Chintz is an excellent backing fabric. Batiste can also be made inside out.
Next, adhere to the following work scheme:
- Place the piece of fabric for the backing face down on the table;
- Place padding polyester on top of the backing fabric if your bedspread has the function of a blanket (otherwise padding polyester is not needed);
- The next layer is the front side, that same patchwork of squares;
- Either baste it yourself, or you just need to pin the entire product together and quilt it on a sewing machine.
In order for the bedspread to have a shape, it is necessary to use a sealing material in the form of padding polyester.
How to quilt an item correctly? The easiest way to do this is along the borders of the squares, but if you envision some kind of pattern, you can quilt along the pattern. True, for beginners this is a rather difficult task (a separate master class on stitching will help you in this case).
The last stage is edging. This is easy to do: take a strip of fabric approximately 8 cm wide, and the length should be slightly longer than one side of the product. The fabric needs to be folded in half, applied to the front side of the item and sewn. Fold the excess edges of the edging to the wrong side of the item, fold the edging onto the wrong side of the product and stitch from the front side. The line will go across the canvas. The other sides of the item are edged in the same way.
Varieties of patchwork
You can make a baby patchwork quilt with your own hands for beginners using a pattern in different ways.
Let's take a look at the most interesting options for such work:
- The standard patchwork technique involves step-by-step stitching together individual textile fragments of geometric shapes. This is the simplest technique, accessible even to beginners;
- Sewing using the quilting technique differs from the traditional one in that the scraps are sewn together with different lines on a sewing machine. Often, to create a blanket, the fabric is supplemented with a lining of batting or other insulating material;
- An unusual technique of crazy patchwork is creating a blanket by sewing together fragments of different sizes and shapes. Moreover, to connect the elements, you can choose any stitches, and for additional variety, use beads, bright buttons, beads and other decorative elements;
- Patchwork according to the Japanese method involves the use of silk fabrics with geometric patterns and ornaments. Blankets of this type look elegant and catchy, so they will be an excellent addition to the interior;
- Handicraft lovers will probably be interested in another technique - knitted patchwork. Each piece of the quilt is knitted separately, and only then all the elements are stitched with dense threads to create a complete product. There are also techniques for linking motifs in the process of work.
How to make a patchwork quilt
The traditional DIY quilt process for beginners involves three main steps:
- search for suitable materials. To create a harmonious design, you will need fabric in at least two colors. You can take patterned textiles, but in this case it is better to stick to a single theme (for example, decorate a blanket in a floral style or choose fabric with a geometric print);
- sketch of a sewing pattern. It is important to decide what the blanket will look like in order to cut the component elements correctly;
- connecting fragments using threads.
At the stage of choosing materials, you need to look for fabrics that you have at home, but have not been used for their intended purpose for a long time.
If you are making a blanket for an adult, purchasing new textiles can be quite expensive. It is not at all necessary to use a long, solid fabric: you will still have to cut it, so you can use a huge variety of small scraps of bright or pastel colors as a source material.
Attention! If you find scraps of different shapes, it doesn’t matter: it will be easy to put them together to create a stylish blanket for your home.
Now let's start with the diagram. If you are sewing a patchwork blanket for the first time, it is better to use ready-made templates. You shouldn’t choose an overly complex technique: a product made from identical squares will look no worse than a blanket with many elegant patterns.
You need to start sewing small: sew several scraps together to create a separate block. After creating a certain number of blocks, start attaching them to each other.
Do not forget that the top of the blanket must be sewn onto the lining. It is possible to stitch the product either by hand or on a sewing machine - with a straight stitch or using a special foot.
Tip: if desired, the elements of the patchwork quilt can not be sewn, but connected with knitted threads using special hooks.
The time spent on creating such a blanket directly depends on the required dimensions and parameters of the constituent elements. Therefore, you should not make the fragments too small: if you want to create a more interesting design, take several fabric options in harmonious shades.
DIY patchwork bedspread
To make a thing really cute and beloved, you shouldn’t delve into the jungle of a complex process the first time. Using leftover fabric, you can truly enjoy the process of sewing pieces together. The result is a very cozy and warm blanket. It will definitely become a favorite thing at home that you will want to wrap yourself in while watching a movie or your favorite TV show.
Important! For the first time, it is better to sew even squares or flaps with straight edges of the correct shape. Cutting out original shapes from fabric and sewing them together will be a real challenge for a beginner.
Style Description
Patchwork is a sewing style that came to us from England. Literally translated, this word means “sewing from scraps of different colors.” And it characterizes this performance as fully as possible.
For the first time, things were sewn from leftover fabrics for reasons of economy. A little later, when the craftswomen realized how beautiful and original such products looked, they began to produce cute and cozy things from pieces of fabric, especially on purpose.
Experienced craftswomen note that patchwork is a very complex sewing style that requires a lot of attention and painstaking work from the craftswoman. But upon completion of the work, truly original models of bedspreads, baby blankets, skillfully sewn napkins and other products for creating comfort in the home come out from under the seamstress’s needle.
Necessary materials
It is noteworthy that patchwork is an accessible sewing style. If desired, any craftswoman, even a beginner, can sew a beautiful bedspread. To get started you will need a little:
- sewing machine;
- a set of fabric scraps;
- fabric for the reverse side of the product (usually this is a single piece of fabric, for a bedspread approximately 1.5 x 2 m);
- needles, sewing pins;
- threads in the color of the selected fabric;
- tailor's scissors.
Important! Experienced craftswomen advise taking scraps of approximately the same texture and density, and also comparing the thickness. In this case, the product will look harmonious.
Don't diversify your choice too much. 6-7 different shades, combined with each other, will be enough. Some seamstresses choose one main color and complement it with several other shades.