For the proper development of a child, it is important not only the play area, but also the recreation area.
The life of a child is associated with play, with copying the everyday life of adults, and if you have a desire, you can greatly diversify the life of your children by making beds for children with your own hands, for example, in the form of a car, a house, or even a ship. On this topic:
How to make a beautiful and beautiful wooden bed with your own hands...
Jun 16, 2019
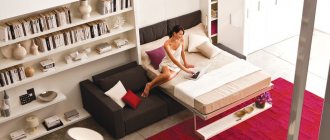
Folding beds - rational use of small-sized...
Jan 18, 2019
Durable and beautiful DIY bunk bed
Jan 13, 2019
How to choose a loft bed for children
Jun 16, 2018
Such a bed can be purchased in a store, but it will cost a lot of money and, as a rule, furniture with such a design is not mass-produced, and it is not easy for production to complete an individual order, as it requires large expenses. Therefore, the cost of such furniture has always been high. But you can make a crib for a newborn with your own hands according to drawings and photos.
What material to choose for making a bed for children with your own hands
In order to make a children's bed yourself, you need to purchase some materials and tools. It is best to make baby cribs from wood with your own hands; coniferous species are suitable for this: pine, cedar, spruce. You can use plywood or MDF. It all depends on your capabilities and abilities.
When making beds for children with your own hands, it is preferable to use natural wood, as it is more environmentally friendly than other materials. Wooden furniture has always been highly valued for its qualities, which include strength, durability of the product, and beauty. When using a wooden bed, children's sleep will be much stronger and more peaceful. But before you begin the creation process, you need to purchase a mattress. Because the stock will be made exactly according to its dimensions. And it doesn’t matter whether you make a bed for a girl with your own hands or for a boy. It is better to buy a mattress in a store. Fortunately, modern industry makes them for every taste.
Choosing a mattress
When purchasing, you just need to take into account some features of the product you are purchasing:
- Rigidity. If the child is small, you need a more rigid option so that the baby’s back is secured. For an older child, you can buy a softer product. Double-sided mattresses are also sold, that is, with sides of different hardness. Coconut fiber is used as filling in such products. For children over three years old, the mattress is changed and blocks of independent springs are used, which are inserted into separate pockets, which helps to evenly distribute the child’s weight.
- Filler. Be sure to read the information about the mattress filling. As a rule, the manufacturer puts the “eco” or “bio” label on its product. Wool is often used as a filler. It is highly undesirable to use mattresses filled with cotton wool or foam rubber. Moreover, they can be passed on by “inheritance” from child to child. Cotton wool and foam rubber tend to accumulate harmful substances, fall off and crumble. Therefore, the mattress becomes uneven and can create problems with the spine.
- Upholstery. The drapery of the mattress is also important. It is desirable that these are natural materials treated with antiseptic compounds against fungi and parasites. A children's mattress should be easy to maintain, so it would be a good idea to consider having a removable cover.
You also need to take care of purchasing paints and varnishes. you can choose a shade depending on whether you are making a bed for a boy or a girl with your own hands. Well, in addition, you will need to purchase carpenter's glue for the possible connection of parts of the structure being created.
What paint is best to use when painting a crib?
Furniture manufacturing plants usually use oil paints; antiseptic agents are added to them to protect the wood from rotting, and they give the products a bright color. This has a positive effect on the appearance of the product.
The varnishes used to cover the surface of the bed are water-based. They highlight the texture of the wood and are pleasant to the touch. But there is no need to wash the surface treated with such products with active detergents, as it quickly becomes unusable. It will be enough to wipe the surface with a damp cloth. To paint a homemade children's bed, you should buy compositions with non-toxic components.
In this case, a good option might be:
- Water-based paint, also called acrylic. It has increased wear resistance, is not afraid of water and wet cleaning. Has an affordable price.
- Nitroenamel paint. Forms a durable film and dries quickly. The democratic price guarantees that everyone can buy it.
- Water-based paint. Not harmful during use, masks wood damage up to 1-2 mm deep.
- Covering the surface of the bed with oil and wax. It emphasizes the structure of the wood very well and protects it from damage.
Some people want to see the wood texture of a homemade bed without being covered with paint, then it is necessary to use acrylic varnish. It has no pungent odor and can withstand ultraviolet rays. All other varnishes are either highly toxic or short-lived.
If you have the opportunity to purchase more expensive types of wood, such as oak, ash, larch, your product will look richer, but remember that these types are more difficult to work with, since they have a completely different (more dense) wood structure and are difficult to process .
All materials can be purchased at hardware or specialized stores and timber trading centers.
Features and Benefits
A bed for a princess girl 3 years old and older should be comfortable, because the child will sleep on it every night. A sound and restful sleep is the key to a child’s good mood for the whole day. Therefore, you need to choose a bed for a girl carefully and approach this issue from all sides.
A children's bed should be optimal in terms of softness.
In no case should it be too soft so that the child falls through, because this is bad for posture. But it should also not be too hard so that it is impossible to sleep on it. The size of the bed, and especially its length, is very important. Try to choose one so that your child fits in it at full height and nothing restricts movement. Otherwise, the sleep is unlikely to be complete.
Painting a crib
Acrylic-based paints are used to coat furniture during finishing. The process is simple, but it takes time.
Before painting the surface, you must carry out the following steps:
- Disassemble the bed into its component parts.
- Prepare surfaces for painting: sand the surface with sandpaper. If there are old layers of paint or varnish, treat them with remover and remove them with a spatula.
- Degrease the surface, especially if there are resinous places in the form of knots on it. This can be done with any solvent (it is better to use solvent or turpentine).
- If necessary, repair minor surface damage with putty.
- Before painting, after sanding, be sure to prime the surface.
- Apply paint or varnish (at least three layers) using a brush, paint roller, sponge or rag. You can use a spray gun, but this will result in a large consumption of paint and varnish material.
After applying the first layer of paint or varnish to a previously primed surface, you need to wait until it dries. The painted surface can be sanded again. This is done in order to remove small wood fibers from the surface that have risen as a result of staining. After this, apply two more thin layers of paint or varnish one by one.
It is recommended to carry out work on making a bed and carrying out paint and varnish finishing outside the living space, preferably in a specially designated room for household needs.
What tool do you need to have?
To make a children's bed with your own hands at home, you will need a minimum of tools. As a rule, every owner has everything he needs in a drawer.
To make a sleeping place for a child, you will need:
- Plane. Necessary for possible trimming of the ends when assembling a do-it-yourself crib from wood.
- Drill with a set of different drill bits
- A screwdriver with a set of bits or just a set of screwdrivers, but it is better to have both tools.
- Chisel, hammer or mallet.
- Carpentry clamps, you can make them yourself to compress parts while gluing them. It all depends on the complexity of the project you choose.
- A sanding machine with a set of sanding pads, or just sandpaper of various grits. But then the processing process will take longer.
- An electric jigsaw with a set of saws for sawing wood, plywood, MDF, or a hand saw. But then again the quality and speed of work will be significantly reduced.
- You will also need wood screws and furniture fittings to assemble a children's bed.
The number of tools will depend on the materials from which you will make the children's bed. If it is a board, then you need to take into account the degree of its carpentry. In the case when these materials are made of plywood or MDF, their sizes and appearance.
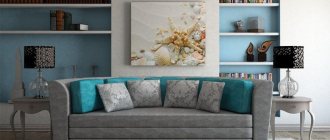
Interesting solutions in interior design
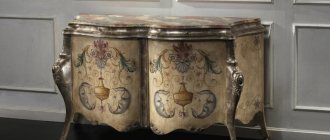
If the children's room is made in a classic palace style, then for greater authenticity a bed with a canopy and a luxurious carved headboard is suitable.
For a child's room made in Provence or shabby chic style, it is better to choose a bed made of steel with forged elements. If this option seems too “heavy” to you, then you can replace it with a traditional wooden model.
For a room in a modern style, for example, Scandinavian, it is better to choose a laconic frame in white or any bright color.
What details are the main ones in the design of a bed?
All the parts for making cribs for children with your own hands can be purchased ready-made, and then you can complete the assembly yourself, or you can purchase a “semi-finished product” and make all the structural components from it, based on the size of your bed.
The main details include:
- bed legs;
- tsars, transverse and longitudinal;
- slats for setting the bottom of the bed;
- headboard;
- side guards.
All the above parts connected together form the basis of the product. The methods for assembling a children's wooden bed with your own hands and attaching the parts may be different, as it depends on the design features and the material from which it is made.
For example, if the bed is made of wood:
- The drawers must be well planed and sanded. Make grooves in them for installing slats on which the mattress will lie. The distance between the holes should be no more than 5 cm. This indentation is necessary to prevent the mattress from falling through the cracks between the slats, which will lead to premature wear of the mattress. The slats are either glued to the frames or screwed with self-tapping screws.
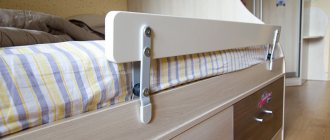
- Side rails are designed to prevent a child from falling out of bed while sleeping. Making your own children's bed with sides will help protect your baby from injury. They are attached to the backs of the structure using self-tapping screws, or they can be inserted into pre-prepared grooves.
- Bed headboards can be of different designs. If the system is framed, then it can be filled with a plywood panel, which is easy to make yourself, or you can order it from craftsmen to make a wooden panel, but this will cost more.
After assembling the bed, the question arises about choosing decor for the product. Inaccuracies made during the manufacture of parts will appear during the assembly process in the form of cracks. If there are any on a wooden product, they will need to be covered with putty and subsequently cleaned with sandpaper.
It is also necessary to prepare a primer, stain and varnish. We must not forget that paint and varnish materials must be environmentally friendly, since the bed is made for a child.
Manufacturing instructions
To obtain a high-quality and functional product, we advise you to follow the instructions below in detail.
Frame
The frame of the crib consists of the backrests and the base itself, on which the mattress will later be laid. The width of the frame should be calculated based on the size of the mattress. The frame is made of two crossbars. We make these crossbars from edged boards. The length of the bars is calculated independently, it all depends on the age up to which the crib will be used for a girl or boy. Typically the standard length is 120 cm.
How to make a frame:
- measure the required length of the crossbars using a tape measure and make notes with a pencil;
- Using an electric jigsaw, we saw off the boards for the crossbars to the required length, there should be only two of them;
- from the edges of the crossbars you need to attach a 25x50 mm strip to glue and screws;
- it is 10 cm shorter in length, so we leave dimensions of 5 cm at each end;
- You need to drill a hole for the screws; it should be drilled close to the edge so that the wood does not burst;
- using corners we connect the frame with the headboards. Secure with self-tapping screws and glue. We fix it in 4 corners;
- At the end of the fastening area, cover with wood putty mixture.
Frame Location of fastening strips Footboard
Base
Next, a base is made on which the mattress and other bedding will be laid in the future. It is advisable to use a material of good strength that can withstand heavy loads.
How to make a base:
- from 20x20 slats you need to cut boards that will serve as filling for the base;
- they should be cut so much that they completely fill the entire base. You should not save, if there are few of them, in the future they will quickly break;
- they should be attached to the frame slats. They need to be attached with emphasis;
- the installation step should be 10 cm, 2 screws should be used for each plank;
- For installation of each self-tapping screw, a hole should be drilled in advance. When tightening the self-tapping screw, its head should go completely into the wood;
- the holes should be coated with wood putty mixture;
- After the putty dries, everything needs to be sanded.
Plank fastening scheme
Installing the slats Cutout under the bed leg Attaching the cross slats
Legs
Instructions for the process of making a crib for a child are not complete without making the legs. The legs of the crib are made according to the following scheme:
- You need to cut blanks from 50x100 timber. They should be long under the head, and shorter under the foot;
- you need to complete 4 blanks. 4 for the headboard and 4 for the footboard;
- Using glue, you need to glue the blanks in pairs. To do this, you need to take one workpiece, attach it to another and make sure that they are inserted evenly;
- we twist them using self-tapping screws;
- when fastening workpieces with self-tapping screws, the heads of the screws should be recessed deep into the wood so that they hold tighter;
- We seal the fastening points with wood putty;
- when everything is dry, the surface of the wood should be thoroughly sanded.
Coat the boards with glue and fold them in pairs. Finished legs.
Holes for dowels
For the headboards you will need boards that have a groove with a width of 25 mm. If you have a router available, these holes can be cut and turned yourself or in a carpentry shop. Holes for dowels must be drilled at the ends of the planks with grooves. During drilling, it is necessary to determine with particular accuracy their distance from the edge - they must be strictly at the same level on all planks.
The holes should have the same depth, which is equal to half the length of this piece of wood. These holes need to be drilled with a drill. And in order not to make a mistake, you need to mark the size of the recess on the drill and stick a piece of paint glue.
Holes for dowels
Headboard
The headboard should be made according to the instructions:
- From edged boards you need to cut planks that have the same length dimensions. They are needed to fill the headboard and footboard;
- the groove for inserting the slats under the headboard must be filled in advance with glue;
- insert the planks into the grooves and fix them evenly;
- Holes for dowels should be drilled in the leg. It is better to attach the backrest and mark the insertion points with a pencil;
- drill holes in the marked places and pour glue into them;
- we place the backrest in these holes, this must be done tightly so that there are no cracks or distortions;
- we make the second back.
An important point regarding gluing parts. After gluing, all elements will be movable, so it is important to set everything exactly 90 degrees and leave it until dry. Otherwise, during further assembly, you can simply damage the entire structure.
Headboard diagram The shape of the headboard can be any Decorative headboard with legs Finished side parts of the bed
Assembly
After all the elements of a children's bed for a girl or boy are ready, you need to check for chips and various defects. Features of preparing bed elements for assembly:
- if there are any chips, they need to be repaired with a putty mixture;
- when everything is dry, all elements need to be sanded;
- After sanding, the components must be treated with a primer or stain. This will protect the material from moisture and preserve its properties for a long time;
- When all the elements are dry, everything needs to be painted. The color of the paint depends on the gender of the child; for a girl, you can use gentle tones - pink, red, white, light green, yellow. And for a boy, blue, blue, green, yellow are suitable;
- We paint all the elements with paint, you can use multi-colored paint. Perform this step as you wish;
- if the bed is made to look like a house, then you need to show your imagination and draw all the necessary elements. If the bed is a house, then you need to note the windows, roof and other important elements. If it’s a dolphin, then you need to show all your artistic skill and paint it in the form of this animal;
- After drying, you need to purchase textiles of the desired color and pattern for a bed for a girl or boy.
We attach the headboard to the foot of the bed.
Kids do not strive for maximum verisimilitude; for them, some visual similarity is more important if there is an element of a fairy tale. This is why every child dreams of his own home - he does not perceive his own room as such. At home, you can build a temporary house from chairs and a blanket, but it is not very plausible, and it will not last forever. If you have a personal plot, you can build a real tree house, this will cause a storm of delight in the child, but not even every dad can do this with his own hands. But a children's bed-house is a solution that allows you to make your baby happy without extra effort.
What design of a children's bed to choose
There are many options on how to make a child’s bed yourself. Which model to create depends primarily on your skill.
When choosing a design, you must take into account:
- dimensions of the children's room;
- child's age;
- the child's wishes;
- your capabilities.
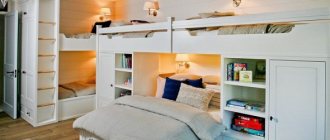
If you are looking for how to make a bed for a girl with your own hands, you can consider several options. For example, it is not difficult to make a two-tier bed: with a bed at the bottom and at the top, if you have two children. A two-tier bed is also suitable for one child. In the area of the second tier you can make a bed for relaxation, that is, a bed itself. And the lower part will be a play area, or combine play and work areas. For example, put a desk there where the child will do his homework. You can make improvised windows from fabric and give the bed the look of a small house. Since making a bed for a child yourself is not difficult, you can get creative and create something very original. For example, build a baby rocking bed with your own hands using drawings and photos from the Internet.
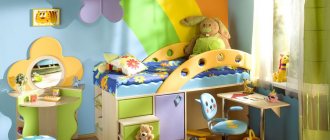
Crib in the form of a house
If you want to make your own children's bed from 3 years old, we offer an option in the form of a house. Such a design is not difficult to manufacture and with the minimum of tools listed above, you can safely get to work. When making such a bed yourself, you can adhere to a free style and experiment with proportions and colors, while taking into account the preferences of children.
As an example, let's take a bed design with dimensions:
- height 178 cm;
- length 175 cm;
- width 91 cm;
- mattress measuring 80 x 165 cm.
Tool:
- hacksaw or electric jigsaw;
- screwdriver;
- drills with a diameter of 6, 10 mm;
- measuring instrument, pencil, ruler, square, tape measure;
- wood glue;
- sandpaper for grinding and cleaning the surface;
- self-tapping screws size: 4.5 x 30, 6 x 70 mm;
- wood glue for gluing parts together.
For this design, you need to take 13 square bars, preferably 45 x 45, the length of the bar should be:
- standing supports 1200 mm – 4 pcs;
- cross beam 829 mm – 2 pcs;
- roof rafters 730 mm – 4 pcs;
- axial bars for roof 1660 mm – 3 pcs.
To make the bottom of the bed, two beams are suitable, the size of which is 38 x 67 x 1660 mm and 2 slats 9 x 67 x 1660 mm, as well as slats.
Since we need to make a bed house for a child with a roof, we choose a gable option so that the parts fit tightly together, we file the upper edges at an angle of 45 degrees.
To make the walls, we use 1200 mm long posts in this design. They will act as load-bearing supports to which the roof of the bed - house - will be attached. For its manufacture we use timber 730 mm long.
Bed in the shape of a car
Your children's delight will know no bounds. What are the features of making this type of bed? Considering the activity of children, it does not matter to them whether it is a regular design or whether it has play functions. A child's bed is subject to greater stress, despite significant differences in weight.
Features of the crib-car:
- An important requirement for such a product is the strength of this design.
- When creating, you should take into account the dimensions and make it for growth, since in this case you won’t be able to make an extendable children’s bed with your own hands.
- Equally important is compliance with safety during registration and further operation. This refers to the selection of paints and varnishes, the material from which the bed itself is made, various stickers and electric lighting. All this must comply with a certain safety class.
When making a bed frame - a machine, you need to take into account your experience and the weight of your child. The base is a frame structure with legs, or a box, which is reinforced with transverse crossbars. When making a car bed for a boy with your own hands, a beam with a cross section of 50 x 70 mm is used; during assembly, the frame is reinforced with metal corners. The headboard and headboard, as well as the sides, are attached to it. We must not forget that the size of the frame must correspond to the size of the mattress, a difference of +1.2 cm is allowed.
It is preferable to make the bottom of the frame where the mattress will be placed from slats, although it can, if necessary, be made solid from plywood 10 mm thick.
The main design detail of this design will be the side panels, imitating the silhouette of a car. They are made from plywood, chipboard or MDF. It can be made from wood, but if you do not have the skills to glue wood, then it is better to choose any of the above materials.
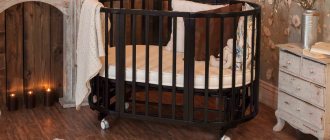
DIY crib for a newborn - drawing, video
Size
When choosing a bed for a girl’s nursery, you should definitely pay attention to its size. There is no need to purchase a large bed with an “adult” design for a three-year-old child.
To ensure that choosing the size of the bed does not cause difficulties, you need to remember the following parameters:
- For children under 3 years old, the optimal bed size is approximately 120x60 cm or 120x65 cm.
- For girls aged 3 to 5 years, the sizes correspond to the following parameters: 140x70 cm, 160x70 cm, 80x190 cm or 195 cm.
- For teenage girls from 10 years old, the size is 80 x 190 cm or 90 x 200 cm.
Assembling a machine bed
First, you need to develop a design for a children's bed. A specific car model is taken as a sample. Here it is important to observe the parameters, colors, and line bends. In general, you will need a design drawing. Then you need to make a template for the part and cut the material according to it. Also, using the children's bed project with your own hands, you need to prepare the details of the headboard and footboard of the bed. Next is your improvisation and imagination: you can make headlights and a car bumper by drawing them, or you can make them from scrap materials.
The machine can make a children's bed in two ways:
- All decorative elements are attached to a wooden frame.
- The composite decorative elements themselves, depicting the outline of the car, are a frame.
In both cases, you will need to make your own drawings of children's beds. The blanks are made using templates, cut out of plywood or MDF using a power tool, the edges must be sanded, and thermal tape is glued to them.
Of course, it wouldn’t hurt to equip this bed design with fake wheels and a steering wheel. But masters do not always create such details. The presence of a steering wheel can create problems in maintaining the bed. But you can draw the wheels or make them yourself, this will complicate the design a little, but what can you do for your beloved children. The bed can also be equipped with night lights and installed in the form of sidelights and car headlights.
As you already understand, the choice of materials for this crib design is quite extensive. When using plywood, furniture wood panel or MDF, this type will take 1-2 sheets. You can purchase confirmations and keys to them at a hardware store. Using screws you will connect the parts of the bed - cars.
The holes into which fastening materials enter are best closed with plugs, or, at worst, puttied. But if it becomes necessary to tighten the fasteners, the putty will have to be picked out for a long time, and it will clog the screwdriver socket. Therefore, it is better to stick to plugs. The drawer fastenings must be reinforced with metal corners, this will strengthen your structure as a whole.
6 basic steps on how to assemble a bed machine
- We assemble the frame in the form of a frame structure or assemble a box with the installation of partitions. It is better to fasten parts using confirmations, having previously drilled holes for them.
- Prepare the sides and end backs by cutting them according to a template from plywood or MDF, or other material.
- Carry out an approximate assembly of the structure in order to identify and eliminate errors during the manufacture of bed parts. After removing defects or if there are none, the parts are prepared for painting.
- In a bed model where the side decorative structures are the frame, preliminary assembly is also required.
- After painting and subsequent drying, the bed parts are assembled using self-tapping screws and confirmators. The screw heads must be hidden with plugs. Rollers can be installed at the bottom of the bed frame, if desired.
- The last step will be to decorate your baby crib with various attributes, such as a steering wheel, imitation car tires, headlights, and so on. It all depends on your imagination.
Advantages of making a baby crib with your own hands
In fact, you can make many models of children's sleeping places, as well as beds for teenagers, with your own hands.
It all depends on your desire and imagination, as well as the child’s dreams. A do-it-yourself sleeping place has a number of advantages over what the manufacturer of consumer goods offers us. Advantages of DIY design:
- A do-it-yourself add-on baby crib is created taking into account all the needs and wishes.
- You can build in drawers for things. This will save you from purchasing additional furniture.
- That the quality of their own work differs significantly from what is offered by enterprises that produce consumer goods.
- The bed is made only from safe materials.
- The cost of the product will be much less than the price of the product offered for sale in a furniture store.
If you have an urgent need to buy a sleeping place for your child, don’t hesitate, feel free to get down to business. There are always ideas for making a baby crib with your own hands. And you will not only gain the experience you need in life, but also receive respect and recognition from people close to you. And how happy your children will be.