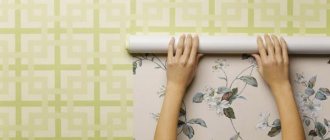
Some may find applying liquid wallpaper with their own hands a rather complicated and lengthy process, but in practice everything is somewhat different. Even a beginner can cope with such a task, if the surface is properly prepared from the beginning and the mixing technologies are followed. Know how to apply liquid wallpaper correctly, and, of course, have a tool special for this material on hand.
What tool is needed for the job?
When working with liquid wallpaper you will need:
- an ordinary spatula up to 10 cm wide;
- stainless steel iron;
- trowel;
- spray bottle with water.
Note: it is not recommended to use ordinary putty spatulas as a leveling tool, since with them it is difficult to monitor the thickness of the applied solution. It is better to use a hand tool such as a metal smoother. It will significantly facilitate the application process and reduce the consumption of purchased material.
Application algorithm
Let's move on to consider the technology of applying liquid wallpaper. This is an important point, because finishing material requires a special approach.
To make everything clear for beginners, we will provide step-by-step instructions in which we will tell you how to glue liquid wallpaper on a wall.
First of all, find out what is the best way to apply the mixture to the surface, and prepare a set of tools that you plan to use in your work:
- metal or plastic grater;
- ironer;
- different spatulas;
- trowel;
- spray.
Let's move on to the question of how to properly apply liquid wallpaper. In fact, we are starting the main part of the repair, during which we will explain how to use the composition.
The technological process is carried out in stages:
- The mixture prepared for application is checked for consistency. If, after the specified time required for infusion, the wallpaper turns out to be too thick, add about one liter of heated water and mix the mixture thoroughly;
- the temperature in the room should be within fifteen degrees Celsius, the humidity content should be within the permissible norm;
- How is wallpaper hung? Laying the material begins from the corner area, the mixture is applied with a trowel held in relation to the wall surface at an angle of fifteen degrees. If you are working with liquid wallpaper for the first time and are just learning how to apply it to the wall, use a transparent trowel to see the result of your own labor;
- how to start laying the composition, remember - from the corner. Experts recommend applying the material from a light area to a more shaded one - all uneven places will be immediately noticeable. It won’t be possible to level them, but it’s quite possible to beat them;
- According to this scheme, the entire surface to be repaired is finished, time is waited (no more than an hour), and a lamp placed at an angle to the wall is turned on. Uneven areas are smoothed out with a spatula dipped in water;
- It is allowed to ventilate the renovated room, but the possibility of constant drafts is excluded. Another technique that speeds up the drying process is prohibited - the use of heating devices.
If you can’t figure out how to apply the wallpaper mixture to a surface, try applying the material with a spray bottle. The repair process will speed up somewhat, resulting in a smooth wall that does not require additional leveling. Remember that working with such a device is accompanied by certain problems - without proper skill, the layer will turn out uneven.
What is liquid wallpaper
Liquid wallpaper is a dry mixture packaged in plastic bags. In fact, this is decorative plaster. Initially, it was based only on natural cellulose flakes, but now manufacturers have significantly diversified the range and, in addition to cellulose, wallpaper can now contain silk, various dyes, granules, mica, pellets, foil and glitter. To improve the quality characteristics of liquid wallpaper, most manufacturers add components containing antifungal and antistatic additives. The usual adhesive for KMS wallpaper rolls serves as a binding agent.
It is worth noting that liquid wallpaper is not always sold ready-made. Sometimes there is a separate packaging of components. In a sense, this makes the process of preparing the material a little more complicated, but it also gives complete freedom to implement creative ideas. Different combinations of fillers make it possible to obtain a textured or smooth seamless coating that is interesting in color, which is not achievable when pasting with roll analogues.
What to consider
It just so happens that not all of us have certain skills and knowledge in art. If a person does not have a predisposition to create artistic delights, it will not be easy for him to create an interesting pattern on liquid wallpaper. However, there is always a way out, incl. and in this situation. So, the most common option is to use a stencil. Using this device, you can create both simple and convex images, since its main task is to draw the contours of the future image.
We recommend watching this interesting video instruction:
In addition, it is also necessary to take into account some features of the room in which the drawing will be applied. So, for example, in rooms with a small space and area, it is advisable to use paints in cooler and pastel colors, which can visually “expand” the volume of the room. As for the color for the base, it is best to use white paint. And in general, the use of various dyes (colors) allows you to diversify the palette and make the image more original, better compatible with the rest of the room’s interior.
The use of patterns with liquid wallpaper can completely transform the interior of both individual rooms and the apartment as a whole. Pay attention to interesting image ideas that allow you to apply not only small drawings, but sometimes entire paintings and panels. Happy renovation!
The best posts
- How to make a plasterboard ceiling in the kitchen with your own hands
- how to level a laminate floor
- How to make a plasterboard box in the bathroom - step-by-step instructions
- DIY decorative corner fireplace made of plasterboard
- Drywall figures or how to make the interior stylish and fashionable
- Painting drywall - step-by-step instructions
- How to paint drywall: little tricks
- Wiring under drywall: lay it out correctly
Related article: How to seal a doorway with plasterboard - installation diagram
Their advantages and disadvantages
The liquid finish fits well on brick, metal, wood, and drywall. The advantages of liquid wallpaper include:
- decorative eco-friendly material with a variety of colors;
- good sound and heat insulation;
- the ability to hide small flaws in the walls;
- durability of the solution applied to the surface;
- reusability;
- ease of restoration of the coating.
There is only one drawback - the high price, but the result is worth it.
Walls for liquid wallpaper: preparation before application
Although, as indicated in the instructions, decorative solutions can hide many unevenness and other flaws, before applying liquid wallpaper, the walls must be properly prepared so that cracks, rust and other unpleasant aspects do not appear after the mixture has dried. Remains of finishing material, loose layers of plaster and whitewash, bolts, and nails protruding from the wall are removed.
Preparing the wall surface before applying liquid wallpaper for different types of walls occurs differently:
Concrete walls. To avoid rust, concrete walls with metallic inclusions are painted over with oil or latex paint. If necessary, apply a starting and finishing layer of plaster and putty. To reduce absorption, concrete and brick walls are covered with a gypsum mixture. Mandatory work includes priming the surface. White primer is applied in two layers.
Drywall and plywood. Since the slabs of these materials are fastened with self-tapping screws, the heads of the screws are puttied. For ideal cladding, builders recommend applying putty not only to the joints of the sheets, but also to covering the entire surface. After which a primer is applied.
Attention: decorating solution cannot be applied to whitewash! It definitely needs to be washed off and the walls allowed to dry!
Application technology
With strong pressure, the material flattens and loses its shape. If you do not press, the layer will be very thick and consumption will increase. On average, one package is enough for 3 m² of flat surface. Coating thickness – up to 3 mm. The drying period for surfaces is two days. The liquid from the solution will evaporate, so the material requires a well-ventilated area. Liquid wallpaper application technique:
- we collect the composition with a tool, with our hands;
- Place a portion of the mixture on a spatula, wall and rub;
- Level the surface with a grater.
Methods of applying liquid wallpaper
How to glue liquid wallpaper? They apply the material from any place - they lie flat. Even if you have moved to a new house, you do not need to wait for the building to shrink - the plasticity of the wallpaper will not allow cracks to appear on the surface. Before application, remove any remaining old paper, putty, glue or paint. Remove metal objects from the wall to avoid staining, stains and streaks.
For paint
How to apply liquid wallpaper to a wall? It is impossible to whitewash and paint without preliminary preparation. It is better to protect it with a plaster mixture. After drying, it is worth treating the surface with a quartz primer. Don't be afraid of cracks or minor dents - a popular finishing material will hide these imperfections. Try not to keep the color of the walls bright, otherwise it will show through the popular plaster.
- Strengthening nails with acrylic powder for gel polish step by step
- Hormonal drugs for women after 50 years
- Symptoms of sunstroke in adults
In the bathroom
How to properly apply liquid wallpaper in rooms with constant dampness? Remember: the material is not moisture resistant, so it must be coated with a special repellent varnish. Choose products from one manufacturer. Two layers of protective substance will prevent water from being absorbed. If there are leaks from plumbing fixtures and pipes, paint over them with oil paint. Otherwise, rusty stains will appear.
On drywall
Convenient, popular material is used to level walls. However, the joints and attachment points are visible. Cover the screws with oil paint, so you need to putty the entire surface. Next, we prime the walls and paint them with water-based emulsion. Our goal is to fix the putty, because it is not a water-repellent material. After drying, we can apply plaster.
To the ceiling
We remove the remains of whitewash, paper, and glue from the ceiling. It is better to remove the lighting fixtures and turn off the electricity during operation. Level the surface with putty and prime. Carry out the application process using a grater in a circular motion - then you will get an unusual chaotic pattern. To check the quality of the work, use a flashlight to illuminate the area with wallpaper from the side - all irregularities will be visible.
On plywood
First of all, check whether the wooden surface is well fixed and whether there are any deformations on it. Do not take sheets that are too thin - they bend when exposed to moisture. Before applying the popular plaster, the plywood is primed (2 or 3 layers), and then painted with water-based or oil-based paint. Once everything is dry, you can start working with the original plaster.
Proper preparation of liquid wallpaper is half the battle
Preparing liquid wallpaper takes 6–12 hours, so you can start preparing the solution already at the stage of priming the surfaces. As mentioned above, liquid wallpaper can be sold both in mixed form and in separate packaging. In the first case, the finished dry mixture is fluffed by hand before adding water. If the components were packaged in different bags, the contents of all bags are poured into a large container or onto pre-spread cellophane and also mixed thoroughly.
Attention! Follow the amount of water and dry powder specified in the instructions. You cannot dilute half the packet or double knead. Otherwise, the composition will be uneven and the necessary properties will be disrupted.
The correct way to mix liquid wallpaper:
- The fluffy mixture is slowly poured into a container with clean, warm water at 20–30 degrees and constantly stirred.
- Since there are no caustic substances in the composition, everything can be done by hand. This way you are guaranteed not to damage the long fibers and ensure more thorough mixing.
- If liquid wallpaper comes with a set of glitter, granules, and dyes, then add it to the water first and stir. Then add glue. It is this method that allows you to achieve uniform distribution without sticking or lumps.
Note: usually one kilogram of liquid wallpaper is enough to process 3-4 square meters, and not 5-6, as the manufacturer claims.
Ready-made liquid wallpaper can be stored in a closed container for more than a week without loss of quality. To avoid their frequent drying out, it is worth leaving the diluted mixture in one container, and pour the required volume for working with one wall into another container.
Applying liquid wallpaper: step-by-step instructions
Let's take a closer look at how to apply liquid wallpaper to a wall.
After the previously prepared surface has dried and the wallpaper has swollen, they begin decorative wall cladding.
Technology for correctly applying finishing material to the wall with your own hands:
- Home repairs are carried out in a room with normal humidity and at a temperature not lower than 15 degrees.
- To timely identify all irregularities, the distribution of the composition starts from the light corner to the dark.
- The solution is applied with a stainless spatula from a trowel onto the wall and leveled with a trowel to an absolutely smooth surface. The tool is not held flat, but by slightly raising the front edge by 5–15 degrees relative to the surface. As a result, the layer should be about 2 mm thick. If the mass turns out to be very thick in consistency and does not stick, you can add a little water. However, it should be borne in mind that the finished composition should not drain. Some types of liquid wallpaper may have a slightly larger or smaller thickness.
- The wallpaper in the corners is leveled using technology: the liquid mixture is distributed from the corner in the desired direction. After filling the space with a trowel soaked in water, the unevenness formed during the work is removed.
- The treated wall is left to dry for an hour. The use of heating appliances is prohibited. Ventilation is allowed, provided there are no strong drafts. After this, turn on the lamp and position it so that it illuminates the surface at an angle. All irregularities are smoothed out with water and a smoothing iron.
Tip: You can create a background image by changing the direction. In one area the composition is applied in one direction, in another area the direction changes, for example, by 45 degrees.
To ensure that the walls are well protected from moisture, damage and dirt, it is recommended to treat them with glossy or matte varnish. The work is done using a roller in 2-3 layers. After this, the walls and ceiling with liquid wallpaper can be easily cleaned.
How to glue liquid wallpaper on a wall
How to apply liquid wallpaper at home? An experienced builder and an ordinary housewife can handle the process without any problems - no special knowledge or skills are needed. If you have at least once applied putty to the wall with a spatula, then you will not have any difficulties with this material. You won’t be able to spoil anything, since you can remove it and re-arrange it. You will save nerves and money.
- Vitamins for the eyes: list and reviews
- How to remove fat from the sides quickly, exercises and diet. How to remove fat on the sides at home, video
- How to determine a person's location by phone number online
What to apply
What tool should I use to apply liquid wallpaper? The procedure is carried out with a spatula or roller. How to apply liquid wallpaper to walls? Special tools have been developed - graters. They have a narrow blade and are made of clear, durable plastic. With this tool it is convenient to control the process of smoothing out wet fibers. A little creativity and you will create an original textured design.
Let's sum it up
Liquid wallpaper is a modern material, which in its quality characteristics is in many ways superior to other finishing materials. In terms of creating a unique design with a rich texture, liquid wallpaper has no equal competitors. To work, you don’t need much: you have a minimum set (mixture, water, a spatula and a grater) and a properly prepared surface of a homogeneous layer with a minimal tendency to absorb water. The applied liquid plaster is leveled, dried and varnished.
Now you know how to apply liquid wallpaper and you can make repairs in your apartment yourself without the involvement of strangers.