I continue to decorate my room and in this post I wanted to talk about how I repainted the furniture. If you remember, I started by deciding on the general mood of the room, the color palette and creating a moodboard. I wrote in detail about this stage.
The second stage was painting the furniture. The furniture in my room is very old. She's probably the same age as me (yes, she's also thirty-flirty-and-fabulous). Of course, there was an option to sell it for pennies on Avito or even just take it to the trash. But I thought this was a great chance to experiment with painting furniture. In the end, if nothing works out at all, then I will always have time to throw it away.
To paint lacquered furniture I used:
- the cheapest brushes (set of three);
- two liter cans of Dulux Aqua paint (white and coral, I chose the color in the store based on palettes - about 1000 rubles per can);
- white spirit and countless newspapers.
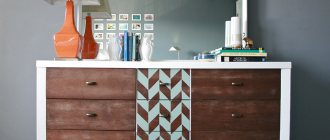
I had a bedside table, a wardrobe and a cabinet with a trellis. I chose a rather complicated painting method (to begin with, of course, it would be better to choose something simpler - paint everything one color). In my case, the main color was white, coral inserts on the fronts and gold accents. So here's my step-by-step guide to repainting old laminated furniture.
Furniture plays almost the main role in the interior of a room. But it often happens that after repair the headset does not fit into the new design. This deficiency can be corrected in two ways - by purchasing new furnishings or transforming old ones. The second option is cheaper. Therefore, many owners are thinking about how to paint the closet and update other furnishings. You can do this yourself. You just have to stock up on free time and the necessary materials.
Decoupage is one of the types of decorative painting of furniture in order to update the appearance
Choosing paint
At home, you can paint cabinets with acrylic paint. It can be diluted with water or given the desired shade by adding pigment. The main advantage over alkyd or oil is the absence of a pungent odor.
Coloring is a very simple process. Even a novice painter can cover furniture with acrylic without streaks or smudges. The applied layer can be washed off only in the first hours after painting. If the layer dries, this will no longer be possible.
The final result depends on the choice of paint
You can repaint a wooden cabinet for the living room or kitchen furniture made of MDF with alkyd enamel. Glossy, matte and semi-matte paint applies evenly to the surface. Has many colors and shades. Has a slight odor. Therefore, painting should be done in a well-ventilated area.
Paint selection
Now directly about what you can paint with. There are a lot of paint options on the market. Here the main attention is paid to the material from which the furniture is made. In addition to paints, varnish is actively used. It creates an attractive appearance and has excellent protective properties.
Varnish is the basis of the composition. An appropriate coloring pigment is added to it. That is, start by choosing a varnish base, which can be:
- alcoholic;
- epoxy;
- oil;
- polyurethane;
- alkyd;
- nitrocellulose.
If you want to use paint, then listen to a few tips.
- Acrylic compounds are considered the traditional choice for furniture. They are durable, quick-drying, safe and do not have a strong unpleasant odor. At the same time, they are diluted with water;
- Working with a spray can is much easier in terms of doing the job. They also use acrylic compounds. Lay flat on the surface, no need to use rollers or brushes. But the price is higher and the consumption is more impressive;
- Enamel ones are mainly used for treating wooden surfaces. Their advantage is that they create a glossy and shiny structure;
- If you need a matte effect, use oil-based formulations;
- The laminated surface is painted using polyurethane and alkyd compounds;
- Epoxy enamel is generally not bad, but it takes a very long time to dry, plus an unpleasant characteristic odor remains in the room for a long time;
- In theory, laminated chipboard and MDF can be coated with acrylic latex paint, but then you will have to use a special primer and apply it in 2 layers.
Conventional white base paints, which contain a large number of pigments, are very popular. This allows you to create your own shades and experiment without spending a lot of effort, time and money.
Removing old paint
We often come across furniture based on chipboard. Even if it is quite worn out, it can be restored and fit into the interior favorably.
Any repainting procedure begins with preliminary preparation. And sometimes you have to first get rid of the old paint before applying primer, putty and new paint.
There are 2 ways to clean surfaces.
- Chemical method. Here you will need to purchase special chemicals that are designed to remove old coatings. Here, start from the material that previously covered the furniture. The means are distinguished by adaptation to a specific material. Be sure to use gloves when working;
- Thermal method. The essence is the effect of heat. A hair dryer would be an ideal option. First, hot air is supplied to the surface. This allows you to soften the paint or varnish, which is then simply removed with a scraper.
Now you can safely putty, sand and prime before applying the finishing coat of your chosen paint or varnish.
Materials and tools required for work
To prepare and repaint the cabinet, you will need the following tools:
- brush, paint roller or spray gun;
- paper-based tape;
- putty knife;
- sandpaper with an abrasive layer of medium and fine fraction;
- block for securing the emery.
A spray gun is a convenient tool that requires experience and dexterity, but allows you to get a very even layer
Using a grinding machine or drill with special attachments will help speed up the preparatory work. In addition, you will need a wide container of water and rags for drying and cleaning the surface to be treated.
The master himself determines what is more convenient for him to work with - a roller or a brush.
The brush applies the paint carefully, the layer is evenly distributed over the surface to be treated. Using this tool it is convenient to paint small furniture elements, as well as places where it is difficult to reach.
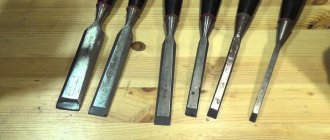
It's better to have several brushes on hand. A wide one will be needed for applying enamel to parts with a large smooth surface. It is more convenient to handle corners, panels and other decorative elements with a thin brush.
What materials can be used for painting
There are two options to resolve the issue:
- continuous finishing of surfaces, often resulting in a change in the color of the furniture;
- partial touch-up of individual areas.
In the first case, the amount of work increases, but from the point of view of the result, the task is much simpler. It is necessary to apply a layer of coating, which should not exactly match the original color of the furniture.
You can completely change the color, use several shades, or apply other techniques. With local touch-up, you essentially need to restore the surface. This task is much more difficult, although sometimes the size of the problem area is quite small.
For finishing, you can use any paint and varnish products, but high-quality results can only be achieved with the help of expensive and specialized materials. Ordinary finishing varnishes or paints from a hardware store will not give the expected result, although each user has his own quality criteria.
The best option is polyurethane or nitrocellulose varnish (imported, domestic brands do not meet technology requirements), durable paint. It is recommended to use materials for car finishing. They have sufficient hardness, strength, and do not change color.
Expert opinion
Korzhavin Daniil Dmitrievich
Designer of stylish home furniture
If you use regular white enamel, after a couple of years it will turn yellow and start to look sloppy. Therefore, you need to choose high-quality and durable paints.
The final coating is always made from a layer of varnish. It is well polished, allowing you to get an even and high-quality coating that is practically no different from the factory one.
Technological features
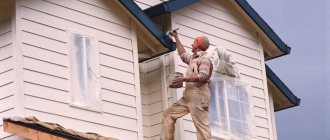
You need to paint the cabinet outside (when there is no wind) or in a room with good ventilation. All tools and materials must be located near the work site. First you need to unscrew all the fittings.
The enamel should have a liquid consistency. When thickened, it is diluted with a solvent (alkyd) or water (acrylic).
The first layer has a lighter shade than the main one. After complete drying, the paint is applied a second time, if necessary, completed with a third layer. The strokes are applied carefully, moving in one direction.
A thick layer of paint gives a more saturated color. To achieve translucent wood grain, which is important for the Provence style, painting is carried out once and with liquid enamel.
Expert opinion
Victoria Chernikova
Decorator
Masking tape helps you get the job done neatly. It is used to seal small decorative details while the main area is being processed. After this, the tape is removed and enamel is applied to the unpainted elements.
If you plan to have several colors, cover the different areas with tape.
A few days later, when the paint is completely dry, the cabinet is varnished. This is necessary so that the surface does not fade and is not damaged by any mechanical impact. After the varnish has dried, removable parts are installed.
Features of painting MDF and chipboard
To paint an MDF cabinet in a different color, you need to carefully prepare the surface - degrease and sand. The primer is applied in at least two layers, then dried.
Painting is carried out using a brush or roller (this is the most inexpensive method). But it is better to use an aerosol or spray gun. The enamel is applied in a thin layer, dried, and the manipulations are repeated 3-4 times.
It is better to process doors made of MDF and chipboard in a horizontal position. Then the layer of paint will evenly cover the area and no drips will appear.
Features of painting natural wood
A solid wood cabinet is painted following the technology described above. But the natural material is more durable than chipboard or MDF. Therefore, pre-treatment of furniture should be carried out using a hair dryer. The old varnish and paint are heated with hot air and easily removed with a spatula.
We will look at how to repaint a chipboard cabinet in this article. After all, if a chipboard cabinet has become old and shabby, this is not a reason to throw it in the trash. Any cabinet will look brand new by simply repainting it.
Old furniture should not be thrown away if the problem is only cosmetic repairs; the fact is that it is often made of higher quality and durable materials, unlike modern ones. With proper care, an old cabinet will last even longer than a new one. And the cost of the work will not be significant.
The same applies to any other piece of Soviet-made furniture. Painting is done around the perimeter of the cabinet. All instructions are given below.
All work can be done entirely with your own hands. You can see this in the video in this article and photos. The work is done in stages, each stage is important in its own way.
You should also not forget about preparing the plane. Not just the appearance, but also the durability will largely depend on the quality of this work.
Note: It's worth noting that the material doesn't really matter that much. You can repaint both wooden furniture and chipboard furniture. The main difference between chipboard furniture is that this material absorbs moisture less, so the process of complete drying will take much longer than wood. In addition, chipboard does not require a large amount of primer before painting, so it is much easier to obtain the desired color.
Previously
Before you start painting the cabinet, you need to remove all removable parts - handles, hinges, doors and drawers. Ultimately, only the frame should remain of the cabinet. The place where you are going to paint the cabinet should be well ventilated; if possible, it is better to work with paint in the fresh air.
In order to prepare the surface of an old cabinet for painting, you need:
- Skin with varying degrees of grain;
- Flat brush;
- Unnecessary rag or sponge.
Please note: It is not easy to apply an even layer with a brush. Therefore, it is better to use a spray bottle. Then you can apply the paint as efficiently as possible.
So:
- First, using a rag or sponge, you need to wash and/or clean the surface of accumulated dirt and dust. After cleaning the cabinet from dust, you can begin to remove the previous layers of varnish and paint (see How to remove old paint from wood without problems). Old paint is removed using coarse sandpaper; hand movements should be circular and sweeping. To ensure that new layers of paint lay smoothly and without roughness, thoroughly clean the surface of the cabinet from any uneven surfaces.
Important: Rub the surface carefully so as not to accidentally erase the veneer layer along with the remaining varnish and paint. You will have to tinker with the grouting of unevenness resulting from careless work.
- Some parts will need to be removed. Then there may be fringe along the edge. It will need to be removed. Otherwise it will be difficult to secure it back.
Cleaning up the edge
- When the surface of the cabinet is well treated with coarse sandpaper, you need to sweep away the dust using a flat brush. When cleaning the cabinet from dust, you should not use a rag, as the dust will only get into the microcracks on the surface and will not allow the paint to lie flat.
- Using fine-grain sandpaper, you need to treat those areas that were not possible to treat with coarse sandpaper. Usually these are corners, edges, some protruding elements. Once you have thoroughly worked on the surface with fine sandpaper, sweep the cabinet again with a brush.
We do plane processing
You cannot paint a cabinet in a dusty room, so the room should be washed thoroughly before painting. As noted earlier, dust can have a negative impact on the quality of the paint job.
What paint is better to use
Many people think about how to paint a chipboard cabinet. Water-based acrylic paint is the best choice for updating a cabinet, because it has a lot of advantages.
- The paint only needs to be diluted with water to obtain the desired color saturation; if you make a mistake, you can easily wash it off and paint the area again. Equally important when working indoors is that acrylic paint has virtually no odor. It is worth remembering, however, that after drying, acrylic paint acquires stronger properties, since the water evaporates from it. This must be taken into account when painting in several layers.
- It is not at all necessary to paint the cabinet one color, because there is a whole surface for experimentation. You can, for example, make a two-tone wardrobe using a neutral color, beige, for example, as the base. And to paint parts you can use contrasting colors.
- If the required color is not available, you can add color to white paint. If the closet is intended for a child's room, then you can show more imagination by using stencils with images of flowers, animals, and so on.
- To choose the right shades, you can try painting a small area of the cabinet first so you can get an idea of what color will look best.
How to prime
The process of priming before painting cannot be ignored; without it, it simply will not be possible to paint a chest of drawers or cabinet with high quality.
- The surface must be primed (see Priming wood before painting - features of the process). The primer will prevent moisture from being absorbed into the surface of the cabinet, which will speed up the drying process of the paint. Plus, after priming, the desired color will not be lost; after the paint dries, it will remain the same as it was when painting.
Attention: If you paint the surface without priming, then after drying some of the paint will be absorbed into the cabinet material, and the color may differ from what was intended.
- If you are going to paint the cabinet with acrylic paint, then the primer should be chosen on the same base - acrylic. The components of the paint and primer will interact well with each other, which will make the painting of the cabinet and other furniture better.
- Acrylic primer is very easy to use. Please read the primer instructions carefully before use. It is important to pay attention to the time it takes for the primer to dry, because paint should be applied to the surface only after the primer has dried. To buy the right amount of material, measure the surface of the cabinet before painting.
- For painting tools, a special roller is suitable for priming; try to apply the primer in as thin a layer as possible. When you finish priming its surface, leave the cabinet to dry for the time specified in the instructions.
Which tool to choose
When thinking about how to paint an old chipboard cabinet, you need to immediately worry about the tools. As a rule, the choice is between a roller and a brush.
So:
- In this case, it is important to take into account your own skills in working with the tool and preferences
. But, nevertheless, it is more practical to paint the cabinet with a brush. Unlike a roller, it can apply paint in a more even layer; moreover, a roller will not be able to paint inside corners and other hard-to-reach areas. - Specialized stores offer a huge selection of different brushes and rollers
. The choice of tool should be taken no less seriously than the choice of paint.
Attention: Buy high-quality tools from reliable manufacturers; you should not save money on this. Low-quality brushes may lose bristles during the painting process; they will remain in the paint, and it is impossible to remove them after painting. For easier work and convenience, it is recommended to purchase a set of brushes of different sizes.
Painting an old dark cabinet a light color
This is what the cabinet looks like, which we will paint and give it a completely new look.
We decided to paint the cabinet in rich light shades: ivory and light green. But first you need to clean the surfaces well. First of all, we disassemble the cabinet as much as possible, removing from it everything that can be removed: doors, handles, pulling out and disconnecting drawers, etc.
For this we will need various screwdrivers and other tools.
Preparing for painting furniture, cleaning surfaces
Now you can start cleaning the surfaces. The most important thing is to remove the varnish layer, paint residues, wax, grease and other contaminants. The easiest way to do this is with coarse sandpaper. We take the sandpaper and go over each part with sweeping, wide movements along the fibers. Just don't put in too much effort.
Otherwise you can wipe through thin veneer! If this suddenly happens, you will have to putty the surface to heal the “wounds” inflicted on the tree. And this is extra work that we don’t need at all.
After treating the surface with coarse sandpaper, you need to sweep it with a wide brush. It is important! Be sure to use a brush, not a rag or rag. Why?
Yes, because with a rag you will drive some of the dust back into the microholes on the surface of the furniture.
Now we go over the surface of the part again, but with fine sandpaper. Particular care must be taken in hard-to-reach areas that were difficult to reach with coarse sandpaper. Again we fan the surface with a brush.
Another important point. Before painting parts, you need to thoroughly clean the room. This is done to prevent small dust particles and specks from getting onto the surface of the furniture during painting or immediately after the process is completed.
We wipe the surface of the parts with a damp, freshly wrung out clean cloth. Then we wipe it again, this time dry.
Selecting paint, primer and brushes
In this case, we decided to use acrylic paint and the same primer. This paint is odorless, easily diluted with water when thickened, and can be mixed to obtain the desired shades.
We will paint with brushes. This makes it easier to get a uniform color over the entire surface, including in hard-to-reach places. Don't use cheap brushes, because the result may be completely unsuccessful.
With the primer everything is simple - since we take acrylic paint, then the primer is the same. In this case, the paint will stick much better.
Parts painting process
First, apply a thin layer of primer. There is nothing complicated here, but it is better to first read the instructions on the can of material. The primer can be carefully applied with a roller.
You can use a brush to cover some areas.
Initially, it was planned to paint the cabinet in two colors. I was able to buy ivory paint at the store, but to get the desired light green shade I had to mix white and green paint.
First we paint all the parts with a lighter paint. In our case - ivory. You can paint in one layer, or in two.
Before applying each layer, you need to wait until the previous one is completely dry.
After painting the furniture in the first color, you need to seal the parts that you will not paint with the second color. You can not seal them completely, but only along the contour. And after that, we paint the necessary surfaces in a light green color.
If we want, we then apply a second layer. After drying, remove the paper stickers.
After the paint has dried, carefully apply acrylic varnish on top. We will apply it with a foam sponge. It is advisable to apply 2-3 layers of varnish.
Before applying each one, wait for the previous one to dry.
After the varnish has dried, screw all the handles on. How to clean silicone sealant at home? We assemble the furniture completely.
And now you can gild individual elements. As a result, we get this wonderful view in the Provence style:
How to paint a cabinet
Now let's directly look at how to paint a cabinet made of chipboard. So, before painting, you need to ventilate the room well and leave the windows open. If you can paint the cabinet outside, do it there.
- The first layer should be lighter than the tone you chose. Make sure that the paint does not thicken; to do this, simply dilute it with water periodically when you notice that it has begun to harden.
- The final color of the paint depends on the number of layers applied. If you painted the cabinet in one layer, the surface structure will show through. This is well suited for a Provence style interior.
- To get a denser coating, you need several layers of paint. Apply each new layer only after the previous one has dried. Work with the brush in only one direction, so the paint will lie more evenly, and when it dries, its surface will be even.
- If you decide to use paint of two or more colors, you should seal the borders with masking tape, so the colors will not mix with each other when painting, unless, of course, you do not need such an effect initially.
- The cabinet will dry completely in a few days, after which all that remains is to apply clear varnish over the paint. This is necessary to protect the painted surface. When the varnish has dried, you can assemble all the cabinet parts together.
As you can see, with the help of brushes and paints you can give old furniture a new life, turning it into an updated and interesting piece of furniture, just by using your imagination and a little effort.
Painting allows you to transform furniture, which becomes a bright accent in the interior. The method of updating depends on the wear and tear of the model and the design project. Dyes and varnishes allow you to restore even old cabinets and sideboards. The method of decorating interior items is available for independent execution, is economical, and allows you to embody original decorative ideas. Before you paint the cabinet with your own hands, you need to determine the color combinations and type of material.
Similar articles:
Significant damage to varnish
When furniture has significant damage, the question arises of how to remove old varnish from a wooden surface. The reasons may be:
- cracking of the coating;
- a large number of minor damages that spoil the appearance;
- deep cracks, etc.
To remove old varnish from furniture, use special chemicals or remove the coating mechanically.
The first option is preferable because it removes the varnish without damaging the wood. Mechanical action is used in cases where deep chips and cracks form on the surface.
After removing the old varnish and restoration work, the furniture must be re-coated with a layer of protective agent. You should choose it correctly so as not to spoil the appearance of the tree.
Choosing a varnish for restoring lacquered furniture
To restore the paintwork, the following materials are used:
- shellac polish;
- nitrocellulose varnish;
- pentaphthalic varnish.
The first material allows you to emphasize the texture of wood, it gives an original shade to the surface. It has a consistency similar to water. For restoration, 40-60 layers are applied to wood.
This allows for exceptional color depth.
Nitrocellulose varnish is used for restoration of large surfaces. It is applied using a special sprayer, which evenly distributes the product over the surface at high speed. Otherwise, the drops will freeze each separately.
Application with simple sprayers will result in the formation of air bubbles.
To coat furniture with pentaphthalic varnish, you do not need to have special tools or follow special techniques. This makes this product optimal for use at home. The minimum number of layers is four. To obtain a semi-matte surface, use a tampon.
The glossy effect is achieved using a brush and finishing sanding.
Choosing a wash
An inexperienced user may be faced with the question of how to remove the varnish of old furniture. To completely remove the varnish coating, use a remover. It is a special chemical composition designed to soften and remove paint and paint.
When choosing, you need to pay attention to the consistency of the wash. When you plan to clean horizontal surfaces, use a liquid product. To remove varnish from vertical parts, you should choose a gel or paste remover.
If you are cleaning a large area, it is worth taking a powdered product, as it lasts longer.
Washing technology
To remove old varnish from furniture at home, you need the following tools and materials:
Work should be carried out outdoors using personal protective equipment. The chemical is applied evenly with a brush over the entire surface. Particular attention should be paid to deep areas of damage.
The furniture is then wrapped in plastic film to enhance the effect. Wait for the time indicated on the packaging, remove the film and use a non-sharp spatula to remove the old layer of varnish.
At the end, the remaining remover and varnish are removed with water. If necessary, after the surface has dried, begin mechanical cleaning using sandpaper. After roughing, the furniture is sanded with fine-grained paper to remove all unevenness.
Color selection and design
You can give standard furniture an original design by painting. Using materials, you can make the surface glossy or matte, perform monochrome decoration or combine contrasting shades, as well as complement the finish with artificial aging and decoupage. When choosing a shade, you must take into account the color scheme of the room.
The classic option is to paint the furniture white. This will add freshness and light to the interior; the item will become a bright accent in the room. White furniture can be painted antique with your own hands by combining bleaching and sanding.
Rich shades can prolong the use of old furniture. Popular colors are green, yellow, red, orange, etc. When using bright colors in furniture design, designers recommend painting the walls in neutral tones. Cream, gray, powdery shades will become the background for rich colors. The colors of the facades are harmoniously combined with the neutral texture of wood.
Furniture painting is used to create an interior in the Provence style. Powdery pastel colors are popular in decoration. You can create a rare product by adding . The material will give a lightly worn effect to wooden surfaces.
You can change the design of your kitchen by painting the kitchen cabinets; this option is simple and economical. The buffet can be monochrome or multi-colored - with a combination of bright and neutral colors.
Typical furniture can be transformed using the decoupage technique, creating a model in a retro style. Painting a rack will be an interesting design solution when using stencils, unusual color combinations, and artistic painting.
Cabinet Painting Tools
To paint a cabinet yourself, you need to assemble a set of tools. You will need sheets of sandpaper, spatulas, a grinder, primer, putty, solvents, masking tape, a paint tray, glue, and a hair dryer.
Painting is done with brushes - narrow or wide, rollers - velor or foam rubber. A spray bottle or electric spray gun will help to apply the layer evenly. The equipment is used to process large surfaces.
For work you will need protective equipment: special clothing, glasses and gloves, as well as auxiliary materials: soft rags, sponges.
In order to determine how to paint an old cabinet with your own hands, you need to study the compatibility of the dye with the material from which the furniture is made.
Acrylic-based coatings are the most popular for painting furniture, because... dry quickly, easy to apply, resistant to damage. The paint is diluted with water, which saves materials. The compositions do not have a strong odor and disappear quickly, so they are suitable for decorating children's rooms and kitchens. The material is applied with a brush or roller.
Natural wood is also painted with alkyd dyes. The material contains coloring pigments, kerosene solvent, and antiseptic additives.
A popular type of paint is in cans. The material is easy to apply and dries quickly. The paint is distributed evenly.
The choice of material is also influenced by the design project, because... the surface can be glossy or matte. For glossy products you will need enamel varnish paint, which adds shine to the surface. Matte shades are obtained after oil treatment. Transparent paints will help preserve the natural structure of wood.
How to prepare a cabinet for painting
Painting work should be carried out outdoors or in a sufficiently ventilated area. When preparing an old polished cabinet for processing, it is necessary to free the frame by removing removable parts: hinges, doors, handles, drawers, etc.
Then dust, old paint and varnish are removed from the surface of the furniture. To paint the cabinet evenly, you need to clean the surface with sandpaper: first coarse-grained, then fine-grained. It is necessary to eliminate defects down to the wood layer in order for the fresh coating to lay smoothly.
Then the remaining paint is removed with a wide flat brush. A rag for surface treatment is not recommended, because... the material helps to clog paint residues in wood crevices.
After cleaning the surface, it is necessary to clean the room so that dust and dirt do not spoil the fresh coating.
Cabinet painting process
The cabinet is painted in several layers. The quality of the surface depends on the number of coatings. Painting in 1 layer allows the wood structure to show through, which is typical for the Provence style. Thick coatings require several coats of paint. Strokes are made in one direction. Each layer must dry thoroughly.
When combining several colors, the material of a lighter shade is applied first. After drying, begin applying a dark tone. Painting tape is applied to the boundaries of the areas so as not to damage the boundaries of the surfaces.
The furniture is allowed to dry, then a clear matte varnish is applied to protect the painted surface. The work is performed with a foam rubber sponge. The varnish can be applied to the surface several times. The furniture must be dried, then the elements must be assembled, drawers, doors, and fittings must be installed.
Painting stages
You can work outdoors or in a well-ventilated area, preferably wearing a respirator. If you decide to use a spray can, cover the floor and all objects around with polyethylene. When working with a roller or brushes, it is enough to cover the surface under the furniture.
Preliminary processing
Before you repaint the furniture, you need to prepare it: remove the doors, connecting elements and locks, seal the glass and mirrors. Wash and dry heavily soiled areas. Next, clean the surface of old paint. For this purpose use:
- Chemical compositions. They are selected in accordance with the type of previous coating.
- Heat treatment. The surface is blown with hot air from a hair dryer, and then the softened old layer is removed with a spatula.
Furniture that has been cleared of paint should be carefully inspected for defects. This may include weakening of adhesive joints, abrasion of the fabric in moving places, or cracking. To paint over scratches on furniture, they must be cleaned of dirt and putty applied. After drying, sand it with sandpaper.
In order for the paint to lay evenly, the surface must be sanded at least twice. First, they go over it with a coarse abrasive, then with a fine-grained one. The treated areas are vacuumed or cleaned with a brush.
Applying paint
Prepared surfaces are degreased with alcohol or white spirit, then primed in 2–3 layers. Each new layer is applied after the previous one has dried. Then you can start updating. Options for painting furniture:
- Toning. Suitable for wooden surfaces. A transparent or translucent layer is applied.
- Complete repainting: coating in several layers.
- Varnishing. The finishing agent is applied to the painted or renewed surface. Gives a glossy effect and protects furniture from damage.
Tips for repairing furniture depending on the type of damage
Toning
Complete repainting
Varnishing
What is the best way to paint veneered furniture (chipboard faced with thin wood sheets):
- Before painting, determine whether or not to preserve the texture of the natural material.
- Depending on the decision, choose varnish or paint.
- Disassemble the product into parts, carry out repairs, clean the surface, apply a primer.
- Secure the coating with polyurethane, glypthal or water-based varnishes.
How to repaint laminated furniture:
- Clean the surface of the product from dirt and grease using detergents.
- Apply the abrasive over the entire area of the smooth coating to make it rough.
- Fill scratches with latex putty and prime with polyurethane primer.
There are several ways to apply paint directly. In production and in workshops they use special painting equipment, and at home - improvised tools. Large surfaces are treated with a roller, small and hard-to-reach areas with brushes and a sponge. You can repaint any area with a spray, the main thing is to achieve uniform spraying. It is recommended to cover the surfaces with 2-3 layers of paint, each time you need to wait until the previous one has dried.
If an aged effect is desired, the first coat should be white or another light color.
Final finishing
After painting the furniture, you need to wait for it to dry completely. How long it takes depends on the type and thickness of the coating. To preserve the staining result, the furniture must be varnished. For work, use brushes, a roller or a spray gun. When spraying, you should follow safety precautions: stay in a ventilated area, wear goggles and a respirator.
If furniture is intended to be decorated, the selected elements are applied to the surface before varnishing.
It is recommended to treat wooden furniture for a garden or balcony with special oils. They protect products from damage, rotting, and cracking. Oils with trans-oxide pigments protect furniture from damage by ultraviolet radiation.
Specifics of upholstered furniture repair depending on the type of fault
The final stage is removing the film and masking tape. Then - assembly of parts, installation of fittings. The furniture can be used after at least 8 hours.