Tools and Fasteners
Even if a set of furniture modules seems like an ordinary construction set to you, where you just need to connect all the parts together, you cannot do without a serious tool. To work you will need:
- A hammer drill if you have concrete or brick walls, or a good drill for a wooden house.
- A screwdriver - even the simplest and cheapest one. Just don’t use a screwdriver, otherwise the process of assembling the cabinets will take you too much time.
- Jigsaw – you will use it to cut holes in the countertop for the sink and hob.
If you don’t have any of the above, you can ask your friends for a suitable tool or rent it yourself.
In addition, prepare a standard set: hammer, key wrench, level and angle, tape measure, pliers. Also carefully check the completeness of the kitchen set and, if necessary, purchase fasteners and accessories:
- Pens;
- Loops;
- Pull-out mechanisms for drawers;
- Tires and canopies for the upper modules;
- Legs for cabinets;
- Furniture ties.
Preparing the premises for the installation of a custom kitchen
Before installation begins, old furniture, appliances, plumbing equipment, etc. are removed from the kitchen. The room is cleared of anything that could interfere with the assembly and installation of the headset.
If required, pre-prepare the walls. The bases for hanging furniture must be strong and reliable. It is advisable to install it on concrete or brick walls, reinforced multi-layer drywall, etc. The floor and walls are leveled, the geometry of the room is adjusted (right angles are drawn).
If the kitchen area has already been finished, it is protected from dirt and dust. Floor coverings, walls, window sills (with the exception of areas where kitchen furniture will be installed) are covered with thick film, securing it with adhesive tape.
Before installation, it is necessary to ensure that technical requirements are met.
Installing a sink, connecting faucets, organizing drainage : hot and cold water outlets are located at a height of 60 cm from the floor, no further than 50 cm from the mixer, sewer outlets are connected at a height of 30 cm from the floor.
Connecting a washing machine, dishwasher. Already existing or separate sewerage and water supply outlets are used. Employees remind you that the connection point to the water supply is located at a height of 60 cm from the floor, no more than 50 cm from the installation site of the equipment, the connection point to the sewerage is located at a height of 30 cm from the floor. To connect dishwashers and washing machines to the network, separate lines with automatic machines are installed, sockets are installed at a distance of up to 1 m from the equipment at a height of 3-5 cm from the floor.
Connecting an electric stove and oven. The machine and wire cross-section are selected according to the power of the equipment. The stove and oven are connected to separate lines. Sockets are located no more than 50 cm from the equipment, at a height of 3-5 cm from the floor.
Refrigerators, hoods, microwave ovens , etc. Plugs into standard electrical outlets.
Cabinet assembly
Before assembling individual modules, be sure to check the correct dimensions and position of each part. By tightening a screw once in the wrong place and redoing the work, you risk breaking the nest in the loose chipboard. In this case, you will have to restore the hole with ground shavings mixed with wood glue.
Having selected all the boards for each cabinet, we assemble the modules one by one. Regardless of their purpose and features of further operation, the installation principle remains the same:
- Drill holes in the bottom and ends of the side walls for wooden dowels and through them, coat the ends with PVA glue, connect the plates.
- To give the body rigidity, you can immediately knock down the upper parts of the sidewalls with a connecting strip (if it is provided for in the design of the cabinet) or a lid in the case of a wall-mounted module. After checking the parallelism of all sides, finally secure the parts with furniture screws.
- Mark the inner walls and screw the hinge mounting strips or drawer guides to them.
- Turn the cabinet upside down and install the legs or nail the thrust bearings - depending on what is included in the kit.
- If you are working with a top row cabinet, at this stage you can already screw adjustable awnings to the inner corners of the side walls.
- Nail the back wall made of fiberboard, close the screw heads on all surfaces with plastic plugs.
The finished cabinets (still without doors) are installed in a row in their places. At the same time, they must be checked for level, if necessary, adjusting the position of each module using the screw-out legs. After this, the cases can be connected to each other with furniture ties - 4 for each pair of cabinets - or left as is.
If in some modules the back or side wall interferes with the supply of communications, they are not removed, but simply cuts of the required size are made.
Price for professional kitchen assembly
Prices for popular services:
- Assembly and installation of the headset - from 2500 rubles.
- Installation of a sink - from 500 rubles.
- Replacement of facades - from 1200 rubles.
- Insertion for gas and sewer pipes - from 200 rub./point
- Connecting lamps – from 150 rub./point
- Installation and connection of built-in household appliances – from 500 rub./unit.
On average, you should expect professional kitchen assembly at a price of 10% of the cost of the unit, excluding additional work. You can obtain more detailed information from the dispatcher by calling or contacting us in any convenient way.
| Furniture type | Cost based on order price (furniture) |
| Kitchen set | 3-10% |
We provide a guarantee for all types of work.
All assembly prices do not include the cost of consumables. The cost of consumables is negotiated with a consultant over the phone or with a specialist directly during the work.
- The minimum cost of assembly is 1,200 rubles.
- The minimum cost of kitchen assembly is RUB 2,500.
- Travel outside the Moscow Ring Road - 30 rubles. for 1 km.
- Over 50 km - price is negotiable.
The cost of additional services is discussed with a consultant over the phone. Large and complex projects require an on-site appraiser. The appraiser's visit is free. ATTENTION! Please note that it is the client’s responsibility to prepare the site for furniture assembly.
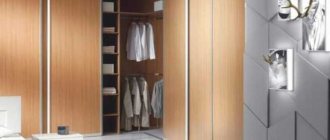
Hanging cabinets
It is more convenient and easier to install cabinets in the top row on a special rail - a metal profile screwed to the wall. Before this, you should decide on the position of the floor cabinets and the thickness of the tabletop. Already from its surface it will be necessary to measure a convenient distance to the upper modules (usually 60 cm). To the intended strip along which the lower edge of the row will pass, add the height of the cabinets and draw a line again, strictly according to the level. The tire itself is mounted 3-5 cm below the drawn upper border.
A considerable amount of weight is transferred to the profile, so the metal strip must be fastened very securely - using self-tapping dowels. But after this, the only thing left is to independently put the wall cabinets on her beard one by one, moving them closer together in one row. You can adjust the position of the modules in space using adjusting screws on already installed canopies. The upper cabinets, like the lower cabinets, are fastened with furniture ties - here a pair is enough for each “adhesion”.
Drawers
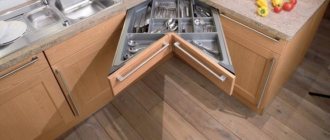
Here again you will have to assemble three-dimensional boxes from individual elements, but taking into account some nuances. The back and side walls of each box are connected through the same dowels, and the bottom is simply inserted between them. But the facade will be correctly secured through a special eccentric screed. The sidewalls usually already have round recesses for the bushings, where the main part of the fittings is installed. A screw is screwed into the facade and inserted with the head first through the end exit into the groove of the sleeve. All that remains is to turn it to firmly fix the screw.
Guides with rollers are screwed to the lower corners of the drawer, placing the wheel at the back. On the counter slide on the walls of the cabinet, the rollers, on the contrary, are placed closer to the “exit”. On self-assembled drawers, all you have to do is screw on the handles and you can place them in their places. To do this, you need to place the box on top of the module guides, placing its rollers behind the wheels on the walls of the cabinet, and smoothly push it inside.
Tabletop installation
Once you've been able to put together a kitchen yourself, installing a simple flat stove on an even row of base cabinets isn't that difficult. It is enough to adjust it to size and fix it by placing it on furniture dowels glued into the upper ends of the installed modules. However, before this, you still have to cut holes in it for the built-in hob and kitchen sink. In both cases, the work is performed according to the same scheme:
- Markings are applied using a template or using upside-down equipment.
- A cut is made along the line with a jigsaw. In order not to fray the decorative film and not wait for the unfinished piece to simply break off, it is better to tape the place of the future cut with tape.
- Be sure to seal the edges, especially where the sink will be installed, to protect the chipboard from water penetration and swelling.
After this, the sink and stove are installed in the prepared holes and fixed from below with the provided fasteners. The tabletop itself, after all this work is completed, is covered along the outer contour with a decorative plinth. It is also advisable to place it on silicone, so that if something happens, liquid from the table does not pour over the cabinets.
Lastly, doors are hung on the modules.
To do this, round recesses are made in them for the second part of the furniture hinges. The cups are placed inside these holes and screwed with short screws, after which the freely hanging arm of each loop is inserted under the screw head on an already installed mounting plate in the cabinet body.
So we figured out how to assemble a kitchen without the help of professional installers. This work is not so much difficult as it is painstaking and requires precision. Be sure to use the diagrams and included assembly instructions and you will succeed.
Assembling and hanging wall cabinets
If you start, as the pros suggest, by assembling wall cabinets, then you first need to mark out the room. After all, in fact, wall cabinets are tied to floor cabinets geographically - their boundaries, most often, will completely coincide with what is on the floor. This operation is easier to perform when the bottom row is already fully secured and its location is clearly marked. That is why many non-professionals tend to take a different sequence of events, installing floor cabinets first. However, even if you start from the top, it is not very difficult to mark where the floor cabinets will be installed and then install wall cabinets according to these marks - after all, all cabinets have standard sizes.
This is the worst option, so to speak - when wall cabinets have to be hung, as they say, “manually”. It's inconvenient and quite long. However, assembling a kitchen with your own hands can also have such a pitfall. In addition, in this case, twisting the cabinets together cannot be avoided, since it is almost impossible to align all the cabinets (especially on adjacent walls) clearly in level, even for a professional. The problem is that over time, the fasteners can gradually sag, causing a difference in the height of the hanging cabinets. When connecting cabinets to each other, this probability is practically reduced to zero; in addition, it is initially much easier to align them on the same level.
Fortunately, current technologies make it possible to perform these operations with considerable comfort. For this purpose, the following materials are purchased:
- special fastening strip for wall cabinets;
- special Euro canopies;
- self-tapping screws with dowels.
After assembling the cabinets, approximately 135-140 cm is measured from the floor. This will be the bottom edge of the cabinets. It is possible to attach a wall border here, which eliminates the gap and improves the appearance of the final result, but this is not necessary.
Then a hole is made in the back wall of the cabinets through which the canopy eyelet will be threaded. The canopy itself is screwed directly to the side wall. All lugs in all cabinets are at the same level and cannot move. Using a puncher and self-tapping screws (the easiest way is to use “quick installation”), a fastening strip is nailed to the wall, which is a steel strip several centimeters wide perforated in the middle, reinforced with bends at the top and bottom. The upper bend is also functional: it is on it that the ears of the canopies will be hung. There are many advantages to this method:
- it's fast and inexpensive;
- Even one person can easily cope with hanging cabinets - after all, hanging them and taking them down is a pleasure;
- The cabinets can be moved anywhere with ease using the fastening strip.
To consolidate the effect, wall cabinets can still be connected to each other, especially if no one is going to move them later.
Assembly of floor cabinets
Floor cabinets are assembled in the same way as wall cabinets.
- First, the cabinet is roughly rolled up using the instructions. It indicates where and what self-tapping screws and screws should be used. It is permissible to replace them with others, but this should not be done: a non-professional may encounter their disadvantage, since in the kit their number is clearly calculated and distributed throughout the entire structure. Manufacturers rarely supply consumables with extra supplies, so it is better to strictly follow the steps specified in the assembly manual. The only thing you can afford is to experiment with the number of nails for attaching the back cover, since their number and place of driving in are not regulated in any way.
- In contrast, by the way, to internal drawers, which must fit into the assembled cabinet in clearly marked places in order to avoid various problems. To do this, holes are made on the walls of the cabinet, even at the factory, into which guide slides are screwed, along which the drawers will subsequently “ride”.
- The rest of the fastening points are usually designed in the same way: the manufacturer makes the holes where necessary; it will be much easier for the assembler to work when in most moments he can act intuitively. For example, when connecting the side walls with the upper/lower plane, holes are also made for corrugated dowels and for confirmations, which are tightened with the key included with the furniture. The situation is the same with legs, if there are any: you won’t have to screw them on at random.
Connecting the kitchen into one
When the floor boxes have already been assembled, all that remains is to make holes in the back walls for all communications and connect them together. When you clearly know how to assemble a kitchen yourself, this operation is, of course, simplified, but it still remains the most difficult stage in assembling a kitchen. The task will become even more complicated if the set has a corner cabinet. Then, in addition to installing the sink and carrying out communications, the need to join the parts of the countertop will be added.
- Oddly enough, the first step will be to install the assembled modules in place. Even if later there is work to be done with installing a sink, cutting the countertop and other “fascinating” things, the installed and assembled modules will not interfere with this, because the countertops can be removed, processed and easily put in place.
- Next we need to make a hole for the sink and cut the countertop, if there is a corner cabinet - this can be easily done using a jigsaw. The parts of the tabletop are connected to each other using a special corner pad. It is sometimes attached to the side walls using metal corners, but more often it is simply attached to the chipboard strips using self-tapping screws. In any case, all planes after cutting and end faces are necessarily treated with silicone sealant.
- The entry points for communications are determined, and holes are made for them in the rear walls using a jigsaw.
- The last step will be the installation of a protective and decorative plinth on the back side of the tabletop. It is screwed or glued directly to it, and must be coated with silicone.
If cabinets do not have legs, they are usually placed on a special side, which is like legs, at the same time performing a decorative function. If legs are present, in most cases the manufacturer includes a decorative strip that covers them, thereby creating an attractive appearance.
Share with friends: