Repair and decoration
05/30/2018 Anastasia Prozheva
Many people install interior doors with their own hands to save money. One of the stages of this process is inserting loops. When carrying out all the manipulations, there is no need to rush, since the future operation of the entire structure depends on how well everything is done. Let us consider in detail what you will have to face and how to do everything correctly. To make everything more clear, we also suggest watching the video.
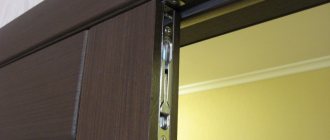
Door hinge
For ease of operation, it is best to place the door on its long edge so that the lock side is at the bottom.
Taking measurements
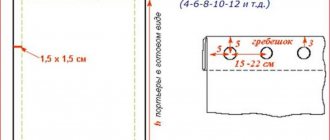
Inserting hinges into an interior door begins with markings. To do this, you need to retreat 20 cm from the lower and upper edges of the canvas. Two of their boundaries are marked with a pencil: the upper and lower. Then the loop is applied and outlined in order to thus obtain its even contours. It would be more effective to attach it with two self-tapping screws; in this case, it will be possible to obtain the most accurate measurements.
By the way, the screws that need to be screwed in are not the ones that came with the kit, since the latter will need to be used only once, when the hinges will be installed directly. Or another option: use a blank made of thick cardboard that matches the dimensions of the working part.
Types of loops
Before buying hinges, you need to understand their features and the designs on the market. This will allow you to choose the right model for your particular case.
First of all, it matters which way your wooden doors open. So, there are loops:
- right-handed;
- left-handed.
If you have not yet fully clarified this point for yourself, take universal ones.
To determine the type, you need to stand on the side in which the canvas should swing open, and see where its movement will be directed (to the right or left) - the hinges are selected accordingly.
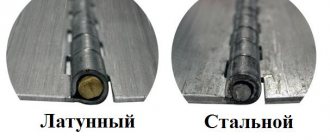
They also differ in material:
- brass (they are flexible and therefore not suitable for heavy sashes);
- alloy (also not very strong);
- steel (the most reliable and durable).
Varieties:
- the most popular type of hinges is card hinges, with fastening plates on the sides;
- corner ones are used for pendulum-type doors;
- screw-in (screw-in) plates do not have, but are equipped with threaded pins (suitable for lightweight MDF panels);
- secret – used on entrance doors and not visible from the outside;
- Italian ones are very reminiscent of the furniture we are used to.
They are also distinguished by the type of installation:
- invoices are mounted directly on the surface of the canvas and box;
- mortise ones require flush installation in special recesses;
- screw-in ones only need holes in both the frame and the sash itself.
This is a special non-separable type of card loops, the design of which allows you to do without insertion. It is the one that is most suitable for inexperienced home craftsmen.
The butterfly is used on doors that are mounted in an already installed frame.
This option also has a number of disadvantages:
- to remove the canvas, you need to unscrew the screws;
- sometimes distortions can form over time;
- not suitable for solid wooden sashes;
- the surface on which they are attached must be perfectly flat.
How to install a butterfly with your own hands? You will need these tools:
- screwdriver or screwdriver;
- wood drill;
- awl;
- pencil;
- roulette.
Self-tapping screws come complete with hinges, so there is no need to buy them separately.
The order of work is as follows:
- along the edge make indents of 200 mm on each side;
- attach the attachment;
- mark places for screws;
- drill holes (1.5 mm);
- fix the hinges;
- the door is applied to the frame and marks are placed on the latter;
- make holes there for the screws and complete the installation.
The procedure itself is quite simple - no template is needed here.
Prepare:
- ruler (30 cm);
- pencil.
- determine the opening side;
- along the end we measure 200 millimeters from each corner;
- make notes;
- we apply loops to them with the top part towards the line;
- draw a contour;
- the plate should protrude slightly beyond the end dimension - this will ensure free opening;
- if there is any natural defect at the attachment point, the hinges are moved slightly lower.
Working with a chisel
It is best, of course, to carry out the insertion with a milling cutter - a tool that a professional specialist cannot do without. But if you can’t use it, a hammer and chisel will come to the rescue. The latter must be well sharpened.
First of all, you need to outline the outlined contours with a sharp knife, deepening it by about 2-3 mm. This move will help you work better with a chisel in the future. Now you need to make a selection: insert the sharp part of the chisel into the scratch formed by the knife and, by briefly hitting it with a hammer, make a small indentation. It is important here not to overdo it so that the hole fully matches both the size and thickness of the loop. The latter should fit into the workpiece almost perfectly, not rise above the door leaf, but also not be very deep. Don't rush to finish the job with a chisel. It’s better to spend more time, but do everything carefully and efficiently.
Related article: Methods of attaching insulation to the wall
By the way, a chisel may not always be the working tool. It is convenient for making cuts on a canvas made of hardwood. If the material of the interior door is soft, then you can use a sharpened cutter.
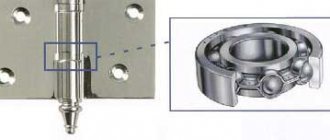
Design features of door hinges.
Overhead hinges remain quite popular, and their design is periodically improved. For example, modern models are equipped with bearings, which allows, instead of the massive structures of previous years, to use much smaller ones, but designed to hold doors of the same weight. In addition, today overhead hinges, which are mounted without insertion, are also the basis for creating door decoration.
In general, such hinges are distinguished by the simplicity of their design. They consist of a pin and two blades - one of them is rotatable, and the second is fixed to the box.
The reliability of such hinges is often questioned by craftsmen who do not recommend installing them for entrance doors. However, the point here is not even in the hinges, but in the fastening screws, on which the entire load falls. Therefore, even if the hinges themselves are made of high-quality material, their installation without insertion is not recommended for heavy entrance doors.
Professionals believe that installing mortise hinges makes the door structure more durable.
The hinges can be coated with various coatings, which allows you to select them for doors of any color. In any case, they can be painted.
Mortise hinges similar to a butterfly are often used for interior doors. This is where their second name came from - butterfly loop. Their design has a card form, which consists of two inseparable parts.
About rounded hinges
Please note that you can make a recess for them with your own hands without a special tool, i.e. milling cutter, it will be almost impossible. The smaller the radius of their round corners, the more difficult the operation is to perform. So, if you are not going to involve a specialist, then it is better to think in advance about purchasing rectangular hinges.
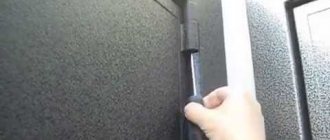
Screwing in self-tapping screws
Inserting a hinge into an interior door with your own hands ends with its fixation using self-tapping screws. But before you screw them in, you need to make small holes for them with a drill. Thanks to this, it will be possible to avoid possible cracking of the door leaf. Only after this do the screws take their place, and their heads should not rise above the surface of the part. It is also important to choose the most suitable drill size, which will determine how tightly the screws fit, because the reliability of the fastening depends on this.
Features of the sidebar
As you know, hinges can be detachable or non-detachable. If you have to deal with the former, then half of it is put on each part, after which the box stand is attached. The position of the hinges is marked on the jamb post, and then all stages of their insertion are carried out in the same way as described above. By the way, it is more convenient to carry out all manipulations with the stand of the box, and not with the whole thing.
If detachable parts are inserted into an interior door, you need to ensure that the landing pins always face upward, otherwise it will be impossible to seat the door leaf. And, of course, in the case of detachable parts, before you start working with a chisel, it is necessary to take accurate measurements so that ultimately there are no problems with opening and closing the door.
Article on the topic: How to properly glue 3D wallpaper: important points and recommendations
Butterfly door hinges: installation tips
The complete set of interior doors is not complete without the appropriate fittings. Along with handles, chains, eyes and various inserts, manufacturers include loops in the sets. Perhaps this is the main element of the door set, on which the quality of fixation of the leaf in the opening depends. Typically, traditional hinge models are used, the design of which involves inserting into an array - for this purpose a special groove is formed.
The development of technological methods for manufacturing and installing doors has led to the development of a “butterfly” hinge, which does not require insertion. The new fittings have other fundamental differences, which are characterized by both pros and cons. Correct installation will preserve the advantages and minimize the disadvantages of the finished door structure.
Design Features
The main difference between butterfly hinges, which also affects the features of installation and subsequent operation, is the fit to the door surface. Such fittings do not require the creation of grooves for insertion - the looped card is placed on the surface and also twisted. The fastening sides are designed so that when the doors are closed, one part is built into the other, which explains the name “butterfly”. The number of screws varies depending on the set, but on average corresponds to classic sets of mortise hinges.
Installation process
To understand how to install a butterfly hinge correctly, you need to take a closer look at its design. The technology for installing overhead models, as noted above, is determined by the specifics of their work. The absence of the need to form grooves is a significant advantage of such hinges; otherwise, the installation process follows the usual method.
First, the location of the loops is marked. It is advisable to apply them with the inside, and then fix the drilling points. The gap from the edges of the fabric should be at least 200 mm - the average distance not only for a butterfly loop, but also for conventional versions of this fitting. Then neat holes are made for the self-tapping screws, which are usually supplied complete with hinges. The final touch will be directly screwing the sides of the “butterfly” to the door frame and leaf.
Installation nuances
The apparent ease of the installation process and, in particular, the absence of the need to create niches in the array captivates many. But all the advantages of butterfly door hinges end there. Only after installation can one appreciate how ambiguous such fittings are.
The fact is that you can get the proper effect from using hinges without insertion only if the installation is impeccable. Compared to traditional models, butterflies do not provide a wide field for modification. Firstly, the sides must fold perfectly, otherwise an unevenness will form - the door will spring back or, at a minimum, not fit tightly. Secondly, you will have to come to terms with a small gap, which, naturally, is formed from protruding loop cards. And one more unpleasant moment, which also characterizes butterfly door hinges and the design without a mortise as such, is the impossibility of removing the door leaf without unscrewing the screws.
How to fix errors?
It is impossible to get rid of all the listed consequences of using such original hinges, but it is possible to minimize their impact on ease of use. Among the most important tasks that craftsmen solve during the installation of butterfly hinges is ensuring uniformity when the cards converge. Typically, inconsistencies are eliminated by creating linings. For this, cardboard, thin wood chips, paper and similar material are used - it must be placed in the part opposite to the side that is not overlapped.
In addition, hinges for butterfly doors, due to their design features, do not provide a high degree of reliability. Of course, it all depends on the product, but they are significantly inferior to mortise-type hinges. Therefore, it is important to perform the fixation with screws as efficiently as possible - the absence of protruding heads and tilts during insertion will be reflected in reliability.
Another questionable feature is the location of the screws on the map. On one side they are located closely, and on the other - at a distance from each other. The configuration cannot be corrected, but the possibility of damage to the door on which you plan to install butterfly hinges can be eliminated. Installation is carried out on solid and reliable areas - that is, suitable for tightening.
What doors are they suitable for?
You can determine the segment of doors that are optimally suitable for the butterfly hinge design based on the strength of the fastening. This nuance has already been discussed, and it is quite natural that it is undesirable to supplement heavy models with such systems. Still, the operation of insertion into the array adds reliability to the fastening, while external fixation without insurance seems very risky when installing a 40-kilogram sheet.
In contrast, butterfly door hinges, which install as smoothly and cleanly as possible, are ideal for lightweight doors that require little effort to install. In particular, representatives of the veneered category are combined with “butterflies” not only technically, but also visually. Models made from solid wood are recommended to be equipped with mortise fittings - the complexity of installation is compensated by their reliability.
Decorative effect
The overhead butterfly hinge fastening system is also due to aesthetic considerations. No matter how neat the inset is, the master will not be able to preserve the integrity and decorative completeness of the door to the same extent. By bypassing all the difficulties of installing such hinges, you can achieve an unsurpassed result. Since there is no need to interfere with the capricious laminated surface, doors with butterfly hinges should be considered as the best option for living rooms, bedrooms, offices and other rooms where stylistic harmony is important.
Bottom line
Overhead hinges can hardly be called the best choice for amateurs and beginners who can count on simple installation without creating a tie-in. Some risks are eliminated, but others arise. Nevertheless, subject to strict markings and verified alignment of the cards, butterfly hinges will provide the result in the form of aesthetic interior doors with an original fastening configuration.
Finally, it’s worth turning to mortise models, which still remain the most popular solution for fixing doors. This choice is worth making if you need a durable and reliable design, although you will have to sacrifice decorativeness. Nevertheless, the clumsy principle of introducing such loops is incomparable with delicate overlay without damaging the wood.
fb.ru