An apartment renovation can be considered complete only after there is not a single corner left that the repairman has not touched. One of these “nooks” that is often left “for later”, bashfully hidden behind thick curtains, is a balcony or loggia. And in vain, because you can bring the balcony into proper shape on your own, without making excessive efforts.
There are many options for finishing a balcony. For this purpose, there are various technologies, different materials are used, but recently both professionals and home craftsmen are increasingly turning to plastic panels, also known as PVC panels for balconies. Finishing a balcony with plastic panels is a labor-intensive process, but if you have the appropriate materials, tools and some skills in handling them, anyone can decorate a balcony.
Selecting the type of plastic panels
First of all, you should become familiar with the material used. What are plastic panels for balconies? These are volumetric strips made of polyvinyl chloride. They are hollow; inside there are several rows of jumpers - stiffening ribs.
They are classified according to a number of characteristics. According to the type of surface they create: seam and seamless panels. The choice of one type or another determines whether the finishing will result in a continuous smooth surface or whether the seams—the places where the planks meet—will stand out. Joints can favorably emphasize the style of the interior and also visually add height to the room. Most often, seamless panels are used for ceilings, and seam panels are used to create relief walls.
The sizes of PVC panels for balconies are very varied. The choice of their geometric parameters depends on the dimensions of the room and the wishes of the owner. As a rule, planks with a width of 25-40 cm are used.
Surface finishing. In addition to cheap white plastic, materials of various colors and textures are available for sale. If desired, you can choose a panel that imitates precious wood, marble, or granite. There are also panels with photographic images. Such plastic panels for finishing the balcony will allow you to create a truly unique interior.
Types of plastic panels
They also differ in the manufacturing method. In addition to the usual ones made of pressed plastic, there are sandwich panels. The use of the latter is preferable, since they consist of two layers of plastic, between which insulation is placed.
READ MORE: Painting brick walls on the balcony
Siding and decorative plaster as finishing options
It is also worth paying attention to such finishing materials as siding and decorative plaster:
- Siding. Despite the fact that this material is often used for external cladding, it can also be used to cover the inside of a balcony. Vinyl material allows you to give the walls a “breathing” effect, and the absence of flammable elements in the composition guarantees compliance with fire safety standards. The heat resistance and thermal conductivity of the material are at the highest level, which ensures the preservation of comfort in all weather conditions. The durability of this type of cladding is also due to the fact that damaged panels are easily replaced. In addition to self-tapping screws, installation will require special profiles with a finishing strip.
Siding is most often used for external cladding, but can also be used inside a balcony. - Decorative plaster. Since decorative stone is a fairly expensive material, lime plaster is used to imitate it. More environmentally friendly options involve the use of vinyl or acrylic material. Decorative plaster is characterized by good performance characteristics and the ability to create a good microclimate. On the market you can find both a simple structural and a more expensive Venetian variety. The latter is rarely used on a balcony, but its aesthetic properties attract many people. Preparing the surface before installation work involves using a primer and sealing all metal elements with putty.
These are not all the materials that are used for cladding a balcony (for example, there is also not very reliable plasterboard, natural stone, etc.), but they are the ones that are most in demand among apartment owners.
When decorating a balcony you need to approach it wisely and with knowledge of the properties of the selected materials. Further comfort will directly depend on their quality. Before installing this or that type of cladding, the balcony will most likely need to install sheathing. The latter acts well as a base and allows the facing material to last as long as possible.
Placing a balcony with plastic, pros and cons
Plastic is simply a universal material. It is used in all sectors of human life. It is not surprising that he has found his niche in construction.
Covering a balcony with plastic panels with your own hands has a number of positive aspects. In particular:
- the plastic used for the manufacture of cladding panels is an environmentally friendly material;
- it is moisture resistant;
- it is easy to install, it can easily be placed on any surface;
- does not require special care, easy to clean;
- thanks to the hollow structure, lightweight;
- has a low price, with a large selection of colors and textures.
It is worth noting that, like other materials, plastic is by no means perfect. There are also negative aspects to its use:
- it is extremely susceptible to mechanical stress;
- may emit unpleasant odors when heated;
- cannot tolerate sudden changes in temperature.
Advice: if the balcony faces the sunny side, do not cover it with white panels. They will quickly turn yellow. It's better to spend money and buy more expensive material.
What types of panels should I choose?
The industry produces polyvinyl chloride profiles, which differ in parameters such as shape, configuration, thickness, color and texture.
The length of the slats is:
- 200 cm;
- 300 cm;
- 600 cm;
- 1200 cm.
The thickness of the products is:
- 6 mm;
- 8 mm;
- 10 mm;
- 12 mm.
Standard lamella width:
- 10 cm;
- 12 cm;
- 25 cm;
- 36 cm:
- 45 cm;
- 60 cm;
- 72 cm;
- 90 cm.
There are the following forms of PVC for the ceiling on the balcony:
- Longitudinal , resembling a thin board. They are joined into a lock using the tongue-and-groove system. They are secured to the frame with bolts, nails and screws. Less commonly used is the method of gluing directly onto a hard surface.
- Tile . It is produced in square and rectangular form with sides from 10 cm to 80 cm, has smooth solid edges, fastening is carried out with glue.
- Leafy . They are large fragments with sides ranging from 20 cm to 300 cm. Depending on the area of the room, the method of fastening with glue or hardware is selected.
Thanks to the variety of products available on the construction market, you can assemble such a ceiling on a balcony from plastic panels:
- Glossy. The surface has an excellent reflective effect. Creates beautiful highlights and color tints.
- Matte. Used for finishing loggias facing south and west. The matte surface does not reflect rays, slightly muffling natural light.
- Embossed. The extruder creates three-dimensional patterns, ornaments and figures on the front plates. The volume is emphasized by color, making the surfaces have a presentable appearance.
Products are painted in the following ways:
- plain;
- multi-colored;
- with images (prefabricated).
The most common color for finishing loggias is white gloss.
Tools and materials needed for work
Before covering the balcony with plastic panels, you should prepare the appropriate tools. The list given is not final, but in any case you will need:
- a good measuring tool: tape measure, ruler, construction square;
- a screwdriver with attachments and always a Phillips screwdriver (it’s not convenient to work with a screwdriver everywhere!);
- an electric drill with a set of drills (you will definitely need Pobedit drills for making holes in the walls);
- building level and plumb line;
- metal scissors for the profile, a sharp knife and a hacksaw for cutting panels, a hand-held circular saw if you plan to use wooden sheathing.
It is also necessary to prepare the material:
- profile or bars for sheathing;
- starting and ending plastic profiles of various configurations;
- plinth (regular for the floor and special for forming the junction of the walls and the ceiling);
- insulation (sheet foam or mineral wool);
- fasteners: dowels and screws;
- PVC panels for finishing the balcony.
The number of plastic panels that is needed to cover a balcony with plastic can be easily calculated, knowing their width and the dimensions of the room. To do this, you can use one of the many calculators available online that allow you to accurately calculate the amount of material.
PVC panels for finishing balconies - assortment
PVC panels have a wide range of colors to suit every taste. These can be either body-painted panels or laminated panels. Laminated panels are PVC panels covered with a special film. The plank can have a different texture and, for example, repeat the texture of wood to the touch.
Multi-colored plastic panels
There are many panel colors available. Most often, lining of soft and not bright colors is used.
Assortment
Used for finishing interior walls, sanitary facilities, as well as balconies and loggias
Covering walls and ceiling with white clapboard
Warm Rehau metal-plastic windows were installed, the lower part is glass with a white fence
Panel ceiling
A white ceiling visually enlarges your balcony. For this reason, we suggest using white panels on the ceiling when finishing.
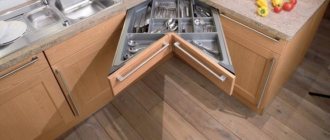
Sliding cabinet on the loggia
Aluminum cabinet for a loggia with opening in both directions
Turnkey finishing
The idea of decorating a loggia in St. Petersburg and the Leningrad region
Stages of sheathing with plastic panels
Having prepared the tools, materials and being patient, you can begin covering the balcony with plastic panels. This can be done using step-by-step instructions.
READ MORE: Finishing the balcony with laminate
First stage. Preparatory
The interior finishing of the balcony with PVC panels should begin after the balcony has been sewn up from the outside, glazed and insulated. Before starting work, you should carefully inspect the proposed area of work, carefully seal any possible cracks using polyurethane foam and sealant.
The first step is to install waterproofing on the street side. The choice of roll materials for these purposes is very wide. It is necessary to pay attention to the wall of the house. Its preparation consists of cleaning the surface from possible delaminations. Remove old coating, if any, and level if necessary.
Of course, you can finish the loggia with plastic panels in exactly the same way.
Second phase. Formation of sheathing
Having completed the preparatory work, you can move on to the next stage - creating a frame to which the plastic panels will be attached.
The material for the sheathing is chosen based on the condition of the house, the balcony itself, and climatic conditions. There are options for using wooden beams and galvanized metal profiles. It is worth noting that the use of timber facilitates the task of attaching the panels, but we must not forget that wood is afraid of moisture.
The work is carried out in the following order:
- Using a level and plumb line, mark the position of the profiles (the distance is chosen based on the width of the panels used).
- Using dowels or self-tapping screws, the profile or strips are strengthened.
- The space between the crossbars is filled with insulating material, and polyurethane foam is used if necessary.
You should start work from the ceiling. The first step is to secure the profiles around the perimeter of the balcony. To do this, holes are punched in pre-marked places using a hammer drill (a drill with a hammer drill function). Dowels are inserted into them and the profiles are screwed to the ceiling using a screwdriver or screwdriver. The next one will be the ceiling profile, running along the entire balcony exactly in the middle. It is attached using metal hangers. At this stage, the plane of the structure should be constantly monitored. The same applies to the process of attaching profiles to the wall.
Important: if the width of the balcony exceeds 1.2 meters, two, and if necessary, three central profiles should be used.
Methods of fastening to the lathing
Finishing a balcony with plastic requires certain knowledge. Before you start covering the balcony with PVC panels, you should understand the methods of their fastening:
- Gluing. For this purpose, adhesive compositions such as “liquid nails” are used. Using this method, you can even attach panels to walls, bypassing the stage of forming the sheathing. Of course, for this the walls must be perfectly smooth.
- Using a construction stapler. The method is excellent when using wooden beams for sheathing.
- Fastening with plastic mounting strips. This is a rather labor-intensive process; the main difficulty is that the planks must be precisely aligned.
READ MORE: Balcony paneling