Ceramic tiles are such a popular cladding option that they are used almost everywhere. Cladding of facades, staircases on the street, as well as walls and floors in domestic premises. Here are just some of the applications of ceramics.
Let's say you decide to tile the walls and floor in the toilet. Where do you start laying tiles in the toilet if you do everything yourself? What points need to be taken into account?
Preparatory work
It's rare that you can design a future toilet from scratch. Most often you have to deal with old coverings, various old wallpapers, Soviet tiles and rusty metal pipes.
Laying tiles in the toilet begins with preparatory work, which includes:
- Removal of any old cladding. If we are talking about walls, you also need to knock down old plaster that does not hold well. When dismantling the floor covering, remove everything up to the screed. At the stage of dismantling work, a hammer drill with an attachment in the form of a flat chisel will help you. Don't forget about safety: wear gloves, a respirator and goggles. Remove the old cladding from top to bottom.
- Afterwards, evaluate the floor screed and the condition of the walls. If there are irregularities, a new screed or plastering will be required.
noteSmall differences and potholes in the screed can be corrected using self-leveling mixtures. If there is a difference of a few centimeters, you will need to top up the screed or make a new floor. It all depends on the level you want to reach in the end.
- Screed, and then let the new base settle for 24 hours. After this, open the surface with a primer to remove dust and increase the adhesion of the base.
And now tiling the bathroom
laying tiles in the bathroom
After successful completion of the preparatory work, we can say that half the way has already been passed and the further process should not be a problem.
Decide on the tile laying option:
- Lay the tiles along the wall in one row.
- Calculate the number of solid tiles for one row; one tile may have to be trimmed.
- Choose a corner where the cut tile will be more discreet, usually behind a cabinet or shower stall.
- The easiest way to start laying is with a cut piece of tile.
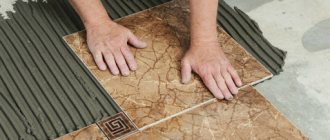
Progress:
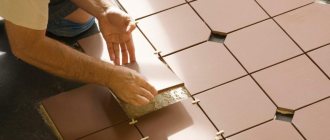
- Laying should begin by measuring one row from the floor and placing a control bar at its edges, which will serve as a marking of the tile edges along the horizontal row. This procedure must be done around the entire perimeter of the room.
- Alignment of the vertical row is done using a marker, plumb line and ruler. The required boundaries are marked with marks for more convenient and even installation of ceramics.
- It is best to lay tiles in small areas, starting from half a square meter. This makes it more convenient to vary the amount and consumption of the applied solution; this will help save materials and effort.
- During the laying process, you should monitor the neatness of the seams; crosses must be used to align them. If there are minor defects in the seams, you can apply mastic, and any glue that gets on the tiles should be removed quickly before it dries.
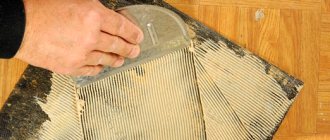
- When attaching tiles to the wall, you need to press them firmly against the surface, but without excessive force, otherwise you can squeeze out all the glue through the seams. The glue is applied with a special spatula and the excess amount is necessarily removed from the seams.
- The spatula should be held at a slight angle. The glue is distributed using the serrated side of the tool. For easy work, it is advisable to purchase high-quality tools; also, ceramic tiles for the bathroom must be made conscientiously, otherwise chips on its surface will soon be inevitable.
- After tiling the room, you need to give time for the glue to dry and for the tile to finally adhere to the surface.
Bathroom tiles - photo.
Thermal and waterproofing
Separately, I would like to highlight the issue regarding the heat and waterproofing of the floor in the toilet. Once you have removed the old covering and old screed, lay down a layer of thin foam. We are talking about durable extruded foam or other modern insulation.
What professionals say about waterproofing a bathroom - video
To avoid emergency leaks, take care of waterproofing. The rough base of the floor, even before installing the insulation, is covered with bitumen mastic. Apply two layers, maintaining a temporary pause of at least a day. Then foam plastic is installed, and the joints are again covered with mastic.
Bituminous mastic should extend onto the walls to a height of 5-10 cm. Only in this case can you be sure of the quality of waterproofing. After laying the insulation, a thick cellophane film is laid over the walls. If it is not possible to lay a single piece, an overlap is made.
Installing a frame for beautiful pipe finishing
If the toilet has a riser and the pipes are not hidden, this complicates the task. You need to make a frame, and then cover it with moisture-resistant plasterboard. The frame is mounted using guides and riser profiles, and drywall is screwed to it.
Please note that it will not be possible to attach heavy tiles to drywall, so this point must be taken into account when choosing a future finish.
How to choose a tile?
To begin installation, you need to make sure that you have all the necessary tools and building materials. What type of toilet tiles should be used? The flooring and walls should be safe and non-slippery, which will help avoid falls and injuries.
Since this is a sanitary area, more aggressive detergents will be required for cleaning and cleaning, the surface must withstand such exposure.
All requirements can be reduced to the following:
- Resistant to chemicals and aggressive agents. The packaging must bear the designations A or AA.
- The degree of wear resistance is not lower than PEI-II, PEI-III, PEI-IV.
- The floor covering should not be slippery, so the glazed coating will come off immediately. A friction coefficient of 0.4-0.74 is an average sliding level suitable for a toilet.
- Water absorption is no more than 3%, which is due to high humidity in the room, especially if the toilet and bath are combined.
Don't forget about flower culture. If the toilet is small, light colors and a small format will help visually expand the space and make it lighter.
A combination of light and dark tiles of the same color looks beautiful. The materials must belong to the same collection; decorative inserts are possible that will help zoning the room.
When you buy tiles, make sure that the product has no defects and that the tiles do not differ in color or size.
Advantages and disadvantages
Before you go to a hardware store for a finishing material, it is important to know what advantages it has and why it remains a top seller. The main advantages of ceramic tiles:
- High strength.
- Resistant to chemicals found in cleaning products and detergents.
- Easy to care for.
- Resistant to mold and mildew.
- Waterproof.
- Practicality.
- Attractive appearance.
- Affordable price.
- Wide range of shapes, colors and textures.
However, there are some drawbacks; ceramic tiles have the following:
- Fragility. It would seem that we have just argued that this material is strong and reliable, but at the same time fragile. The thing is that ceramics easily break when laid on an uneven surface, as a result of which uneven loads are placed on the tiles.
- The tiles do not hold heat well and are unpleasant to walk on barefoot. This can be corrected by connecting a heated floor system.
How to calculate how many tiles you need?
- Measure all the dimensions of the toilet, and also take into account the doorway and possible inspection doors and the like.
- By multiplying the resulting numbers, you will get the area of the room in square meters. This way you will know how many square meters of tiles you need.
- Always buy more material, with a small reserve for fighting and trimming. If you lay the tiles straight, you need 10% more, and if you lay the tiles diagonally, then 15%; in this case, more trimming will be required.
If the toilet is small, you can count the number of tiles individually. This will be a more accurate calculation option.
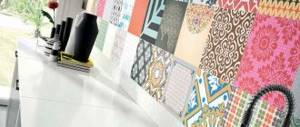
Tile selection
For both the bathroom and the toilet, there is no better finishing material than ceramic tiles. The advantage of this material is that it can be used to decorate not only the floor, but also the walls. But which tile to choose for the bathroom so that it can last as long as possible? And here the question is not in the color of its cladding, but in the structure of the material itself. Therefore, before purchasing tiles, you first need to obtain at least a little information about how you can distinguish such floor cladding material from wall cladding.
First of all, you should understand the markings and technical characteristics of ceramics. All tiles come in a package and if a hand is depicted on it, then this ceramics is intended for wall cladding. And the bathroom floor tiles have an image of a foot on their packaging. But if the image of a leg is present on a shaded background, this means that this ceramic is more wear-resistant.
But not all packages may have such markings. In this case, floor tiles can be distinguished from wall tiles by their shape: floor tiles are always thicker. Some people believe that wall ceramics should be smaller. This is a wrong opinion, since wall tiles can be large in size, but in any case they will be thinner than floor tiles. If you look at a photo of bathroom tiles, it will be more clear what shape the floor ceramics have and what shape the wall ceramics have. From this photo you can see the design options.
What tools are needed?
Learn more about what tools a professional uses in his work in this video.
To quickly and efficiently lay tiles in the bathroom, you will need the following tools:
- Tile adhesive and the tile itself.
- Plastic crosses that allow you to adjust the thickness of the seams.
- Tile cutter or grinder for trimming. To cut ceramics under a pipe or remove a strip less than 2 cm wide, you need a grinder. In other cases, when you need to cut wider strips, a tile cutter can handle it.
- Pencil or marker for making marks on ceramics.
- Building level.
- A spatula, including a serrated one, which is called a comb. A notched trowel will allow you to apply even layers of adhesive to the tile and surface.
- Rubber mallet for tapping tiles level.
- Grout for seams.
Gypsum brick tiles: characteristics
The possibilities of using gypsum tiles under brick are amazing. Designers will always find a lot of options for using this material in your interior. Moreover, this tile can be found not only in a country house or apartment, but also in a restaurant, exhibition hall, office and shopping center.
Using brick-like gypsum tiles in the interior will add charm and personality to the room
With gypsum tiles you can easily decorate fireplaces, niches, columns, smooth walls and arches. Thanks to this decoration, your room will acquire a certain charm and presentability.
Since the material is durable, you can forget about major repairs for a long time.
Brick-like gypsum tiles in niches, which can often be found in living rooms or hallways, will look original. And if you decide to decorate a ventilation box with this material, it will become a pleasant decorative element and addition to the overall interior.
When you choose a color, pay attention to the fact that light colors can visually make the space larger, while dark colors, on the contrary, will narrow it. Therefore, if your room is small, it is better to purchase white slabs and suitable materials for the job. Only in this case you will get a bright and spacious room. This is especially true for bathrooms and toilets, where space is always limited.
The material is made exclusively from high-quality components and using innovative technologies, so your tile will serve you for many years and will not lose its attractiveness and presentability. False brick for interior decoration of the bathroom
Before you start decorating your bathroom, you need to carefully prepare for the work process. First of all, take care of the evenness of the base. The wall needs to be put in order, cleaned and leveled. After the leveling solution has dried, treat the wall with an antiseptic solution, which will provide increased adhesion and protect the base from mold. Only after this is done can installation work begin.
The basic installation rule is that the tiles must be glued in rows. Start work with a solid tile, the next row should be half or a quarter of a brick.
Reducing the size of the brick is due to the desire to change the location of the seams and not get solid lines everywhere. The solution must be leveled immediately, since if it dries, this will be impossible to do. Leveling is done with a brush dipped in water.
An undoubted advantage of false bricks is that you do not need to purchase a grout mixture to install it. Another feature of installation is that before starting work, all the material must be mixed together. This will make it possible to obtain an even layer of shades over the entire surface of the wall.
Let's start laying: flooring
How to lay tiles in a toilet with your own hands if the process has been little studied? Let's figure it out. When you calculated how many tiles you needed, you already took measurements. Laying tiles begins with the same procedure.
Before you start work, watch the video - the most common mistakes when laying tiles in the bathroom and toilet
Measure the toilet and lay out all the fragments of the future lining as they should be. Draw a diagram on paper and number the tiles. And only in this case, you will see in what order to install the cladding and how much material you have available.
Let's start laying it on the wall, recommendations from professionals - video
We wrote above that there are different installation methods, but we have not yet considered how to lay tiles in a toilet in a straight line or diagonally. So what is the difference between the two styling methods.
Straight installation is recommended to create a beautiful and correct geometry. This option involves less trimming; the greatest effect is achieved in the case of smooth walls and 90-degree angles.
Features of laying on the bathroom floor - video
But sometimes the walls are uneven, so the correct geometry will not be easy to achieve. Tiling a bathroom diagonally is somewhat more complicated, but it looks beautiful and original.
Where does straight laying begin?
Here are the detailed instructions:
- We are marking the toilet; we need to find the center of the room. Find the middle of one wall and from this point draw a line at right angles to the opposite wall. Then do the procedure with the other two walls. The intersection of the lines will be the center of the toilet.
- We begin laying the cladding from the center. Glue is applied to the first tile, and the thickness of the layer is controlled with a notched trowel.
- Place the first tile along the lines, nail the tile with a mallet. You can drive away from it in all directions. Thus, the trim will be in the corners, where it will be hidden by the baseboard or corners.
- First, lay the whole tile, controlling the width of the joints with plastic crosses.
- Mark what trimming needs to be done.
note
The material is trimmed using a tile cutter or grinder. When working with an angle grinder, do not forget about safety: use safety glasses. Ceramic particles may get into your eyes.
Laying on the floor diagonally
- The starting point will be the center of the threshold of the room.
- Cut one tile in half diagonally. Perform a similar operation with a tile cutter or grinder.
- Place the resulting triangle with its end facing the threshold and its acute angle towards the room.
- The first tile will be the starting point for laying all the others.
- First, whole fragments are laid, and then the necessary trimming is carried out.
This option requires preliminary layout. Make sure diagonal mounting makes sense in your case.
Toilet renovation - design and tiling
Tile and decorative plaster are the only normal ways to decorate walls in a toilet.
There is a cheap way - repairing the toilet with plastic panels. But the design is absolutely terrible. It’s better to find the cheapest tiles in a neutral color somewhere on sale. This will be a completely different level.
Another opportunity to reduce the cost is wallpaper. Theoretically, they are possible in classical styles, where the wall is divided horizontally. The bottom half is tile, then the border and wallpaper up to the ceiling. But this is where the adequate possibilities for using wallpaper in the toilet end.
The paint doesn't make sense because... The price is close to tiles, but for the toilet it is still worse.
Toilet tile design
Rectangular tiles look best in a toilet. The walls and floor are so small that the square one is bound to have some unsightly undercuts. Another feature: no water gets on the walls and floor, which means you don’t have to worry about salt stains. This means that medium and dark-colored tiles do not necessarily have a contrasting texture.
Otherwise, you should choose tiles of modern design, just like for the bathroom. Great for the toilet:
- Porcelain tiles with imitation wood. Especially with deep texture and backlighting.
- Light gray for stone and concrete.
- Monochrome patchwork (black and white with small patterns).
- With interesting geometry: five and hexagonal, with a broken pattern.
- White boar. Yes, this ubiquitous tile is relevant even in the toilet, although it has already become boring.
Mosaic is also well suited, especially in Khrushchev. In addition to its small size, the toilet in the Khrushchev building also has corners that are not corners - they are rounded. If you fix this with plaster along the beacons, it will eat up the already small space. The only way to properly finish such round corners is with mosaics. That’s why it can be seen so often in high-quality repairs of toilets in Khrushchev-era buildings, although it is not humane in terms of money.
The tiles should imitate natural materials.
If the tile has a bright unnatural color and does not look like anything natural, then this is a bad option. It’s impossible to come up with anything more modern and at the same time long-lasting than wood and stone.
Keep it simple. The design of the toilet should be simple.
2 ideal combination options: 2 types of light tiles on all walls, or light on the side walls and medium in brightness (beige, gray) on the central wall with the toilet. The latter is the most popular option. Visually it expands the space a little. But you shouldn’t use a completely dark one either - the contrast is too strong with the white color of the toilet.
Installation of wall cladding
Now that we've figured out how to lay tiles on the floor in a toilet, let's move on to the walls. Professionals begin gluing tiles from the second row. The fact is that there is not always a level base from which to build.
In addition, you need to calculate that the trimming is at the bottom, and not at the ceiling, where it will attract attention. First, lay out the tiles to see how your rows will line up.
To achieve beautiful geometry, you can make the same trim on both corners, rather than a ridiculous one on one corner. For example, if the last tile needs to be trimmed by 10 cm, then start the row with a 5 cm trim and you will end up with a symmetrical 5 cm trim.
The initial row is the second from the bottom; to support it, a metal profile or rail is attached to the wall, which can then be removed. If you need to make a hole for a socket, there are special attachments - crowns of different diameters.
To finish the corners, plastic tile corners are used, which come in different colors and thicknesses.
Types of tiles for the toilet (video)
It is important to remember that it is not enough to select tiles for the floor or walls solely according to the area of the room, since you need to remember about the layout scheme and determine the most optimal finishing option in terms of color, shape and accessories. The choice of tiles can be influenced by the presence of a window in the room, since additional light allows you to decorate the room in darker colors or, conversely, its complete absence. There may be many criteria, but in everything you should rely on your own intuition when decorating your own toilet.
Grouting joints
Grouting joints on both the floor covering and the wall is carried out using a similar method. Choose high-quality grout for the toilet - options that are resistant to moisture and the appearance of fungus. The flooring does not require wide joints; minimize the distance between the tiles, which will reduce water absorption.
Rub the seams with a rubber spatula so as not to damage the surface of the cladding. Soon after application, gently wash the seams with fiberglass to give the seams a uniform appearance. Remove grout residue from the tiles immediately, otherwise it will be difficult to do.
And the final touch, when the floor is ready: how to glue the toilet? The toilet is attached to anchors, so you will need to drill holes in the tiles. If this cannot be done, use silicone caulk to seal the toilet to the tile, but this is a less reliable solution.
Bottom line: Installing tiles on the floor in a toilet with your own hands is not an easy process, but you can do it yourself. Apply all the tips from the article, and the result will exceed your expectations.
Subtleties of design
When renovating a bathroom, you want to end up with a beautifully decorated room. To do this, you need to choose wall and floor tiles that will go well together. Traditional design is the choice of dark colors for the floors and light colors for the walls. To differentiate tones in an original way, you can use special borders or decorative tiles.
Both wall and floor tiles, in addition to standard options, can be laid in a herringbone pattern. This method applies to the parquet installation option, and can be used with rectangular tiles. Flooring is often installed in a modular manner. In this case, material of different sizes or colors is used. The result is an original appearance of the floor.
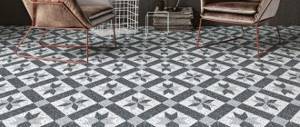
Laying mosaics on the floor in the toilet will help visually make the area of a small room wider. This is especially true for apartments where toilets are very small. In such rooms it is better to avoid dark colors and stick to soft tones, such as pink, silver or blue.
It is not recommended to choose very bright colors, as they become boring quite quickly. Due to the colorful geometric pattern, the floor in the toilet room may seem uneven, so it is also not recommended to use it.
Modern paints allow you to paint ceramic floor tiles if you need to update their appearance or simply change the colors in the interior. In this case, as a rule, oil-based or latex-based paint is used. You can also use stencil designs to get original designs.