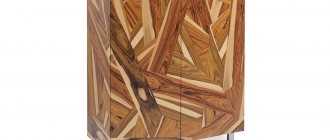
Mosaic canvas
Mosaics have a centuries-old practice ranging from hand-made to mass-produced in a large variety using different techniques and effects.
Mosaics are small squares with a side of 10x10 mm, 20x20 mm, 50x50 mm, which are laid in dense rows, one next to the other, and create real works of art on the walls.
Advantages of finishing material “mosaic”
Mosaic tiles in the interior are readily used by both designers and builders, as they have a number of excellent qualities that meet the criteria for surface finishing:
- First of all, the material allows you to create interesting, original compositions on the wall, highlight the advantages of the room, and create a luxurious, cozy atmosphere;
- Environmentally friendly finishing material. In production, only natural ingredients are used that are odorless and do not emit toxic substances. Successfully used in kitchens, bathrooms, and living spaces;
- Moisture resistance. The ceramics are covered with a glaze that prevents the seepage and absorption of moisture, which allows the mosaic to be used in rooms with high humidity and places that require frequent cleaning to remove scale, gnawing, and splashes;
- Clay undergoes a hardening process at the production stage, as a result, ceramic tiles can withstand temperature changes and are resistant to low and high temperatures. Finishing in baths, saunas, swimming pools is allowed;
- Fire resistance, heat resistance;
- The small size of the material makes it possible to cover surfaces of any curves and shapes, including finishing columns, curved lines of bathtubs, bar counters and cabinets;
- The ability to decorate rooms in accordance with the design, organically combining various materials and creating an interesting, individual interior;
- Simplicity and ease of installation. The material is attached to any surface, plastered, wooden, metal, pre-prepared. Combines well with other decorative and finishing materials;
- The mosaic tile catalog presents a huge selection of colors, textures and shapes for surface design.
Manufacturing
Making a mosaic with your own hands begins with preparing the elements of the set. Most often these are squares from 1x1 cm to 5x5 cm. They can and should be prepared for future use, so that later you will not be distracted from creative work.
Here the problem arises: how to cut pieces of the same size? Advice to use pliers, side cutters, and a glass cutter probably comes from people who have not tried it themselves - but what will happen?
The “pixels” of the mosaic need to be chipped like smalt. For this purpose, a special device is used - a barber, see fig. By the way, it is clear that this is not at all a hand tool, a hammer, which is used by sculptors. There is no need to buy expensive smalt: the tile is also very viscous and chips just as well. In a construction company or store, broken tiles will be sold for pennies or given away for nothing, but at the fence you can chop pieces into a mosaic of tiles that is not inferior to the Byzantine ones, if only it were tasteful.
Cutting tiles and smalt for mosaics
Note: porcelain stoneware is the most accurate and easiest to chip. Considering its high resistance and durability, it is better to start mastering “real” mosaics with porcelain stoneware, and choose a pattern according to the color scheme of the material.
They work with a prisoner like this:
- A particle is chipped off from an irregular piece to create a straight edge.
- The movable stop is set to the desired size.
- Prick strips of the same width.
- Pieces are cut from the strips.
It may seem simple at first glance, but there are subtleties. Firstly, you need to hit not exactly against the tip of the wedge, but with a shift towards the stop by about half the thickness of the material, which should work during impact not in compression, but in shear, only then the fracture will be even and smooth. Secondly, if a glass mosaic is being made (you can cut mirror glass on a backsplash), you need to take into account the refraction in it, as shown in the inset at the top right, otherwise the glass will crack and crumble rather than break.
Thirdly, wedge. Its edge must be sharp; if it gets washed out (glass and ceramics are harder than metal), cracks and crumbs will appear again. In the old days, the pinning wedge was made from heavily carburized tool steel (can be made from a file), it soon chipped and had to be replaced. Now a piece of a guillotine shears blade tipped with Pobedit or other carbide will work well for a wedge; such a wedge is practically eternal.
About mosaic tiles: factory-made and homemade
There are special mosaic tiles on sale. This is the same tile, only small in size, from 1 to 5 cm. It costs much more than usual per square. If you don’t mind the money, you can buy it and not develop the stabbing skills yourself. However, the elements of the set, made on a fence, are in no way inferior to factory-made mosaic tiles. The size is even more accurate, because... There is no firing in the mold and the tiles do not heat up. And the corners are very sharp, which allows you to create a seamless pattern. By tilting the stop, you can get oblique pieces suitable for setting curved lines.
Note: the seamless set is strong enough only on silicone. When laying on a mineral binder or other tile adhesive, joints must be at least 1 mm wide. There are almost no ready-made crosses for corners of this size on sale, so you will have to lay them out in rows, using a homemade ruler from the lid of a PVC box and liners from it. But then you need to forget about Byzantine technology.
Binder
Ancient mosaic panels were laid out on a lime-clay mortar with a modifier:
- Lime dough – 1 part.
- Fatty clay – 0.3 parts.
- Quarry or mountain pure white sand, washed and calcined - 3 parts.
- Broken eggs with shell – 3-6 pcs. onto a bucket of solution.
The sand was sifted through a 1/100-inch sieve, approx. 0.25 mm. After adding the eggs, the solution was mixed until completely homogeneous; no shell particles should be visible; the shell served as a kind of indicator of homogeneity. The eggs in the mixture were not rotten at all, as the ignorant think. The organics interacted with the silicates of the clay, forming a very strong and waterproof impregnation of the entire conglomerate. Putrefactive and any other bacteria were not allowed to develop by lime.
The lime-clay mortar on the egg gained full strength after several years. Nowadays, there is no need to waste a valuable food product and protect the fruit of hard work from accidental influences for a long time. Cement-based tile adhesive has not yet been proven for centuries, but mosaic tiles laid with it will last outdoors for at least several decades.
Huichol Mosaic
As for glass mosaics, they need to be laid on glue without cement. The cheapest option is PVA for glass and stone. It can be used to assemble mosaics in residential areas. For exterior applications, ethylene vinyl acetate (EVA) adhesive in the form of a melt of copolymers is more suitable; it is somewhat more expensive. And finally, for kitchens, bathrooms and other rooms where, in addition to resistance to sudden changes in temperature and moisture, complete waterproofness is required - silicone construction adhesive. The aquarium one is even better, but its 10 ml tube costs about 20 rubles.
A mosaic made of beads or plastic can be laid on the same PVA, but it is better to use nitro adhesives: mounting, “Moment”, 88th. By the way, the famous masters of modern beaded mosaics are the Huichol Indians; see one of their products in Fig. - They have long given up gluing with wood gum and are using silicone and nitro adhesives with all their might.
Video: making and laying out mosaics
Glossy
It is distinguished by a shiny surface covered with a transparent glaze; it is used mainly for wall decoration, as it creates a strong sliding effect on the floor. Cleans well and can be wet cleaned.
Glass, smalt
Pieces of painted glass or ordinary transparent glass, applied in a drop on a textured base. The manufacturing process is reminiscent of the production of high-quality Venetian glass and bears the same name. Smalt in the interior creates a beautiful visual pattern and glare of light on surfaces.
Made in different colors, it allows you to create a variety of images, including photographs and artistic paintings. Used as mosaic tiles for the kitchen.
Varieties of mosaics
Mosaic tiles are mainly divided into glass and ceramic products. Ceramic products are created according to the same principles as classic tiles, so this mosaic retains all the properties of the usual finishing material. Each element is covered with glaze, which provides the resulting painting with shine and three-dimensionality of the image.
Glass mosaic is considered more durable. This was achieved by including smalt particles in the composition - a special opaque glass with increased strength indicators. Smalt can have different shades, which allows you to create the most intricate designs with its help. The composition of this material also includes sand, but the main properties are provided by metal oxides.
In addition to the most common materials for the manufacture of parts, marble, granite and polymers are also used.
The size of the selected mosaic depends on the purpose for which it is purchased. Pieces can vary from 10 to 50 mm. This range is the most popular and convenient to use. Most often, the pieces are sold pre-glued to a backing. The sizes of the resulting elements also vary.
The coloring of such facing material gives the designer a lot of room for imagination. Mosaic elements can be bright rich colors or calm bed shades. Unusual varieties include transparent, mother-of-pearl or even mirror details.
In addition to the color, the mosaic differs in the texture of the top layer. Smooth elements can be combined with embossed ones, glossy ones can be easily combined with matte ones. The most versatile option is a smooth glossy mosaic. It is perfect for walls, countertops and any surface decoration. More textured varieties are not recommended for use in areas exposed to contamination, since it will be difficult to wash out food and fat particles from the recesses on the parts. The porous structure of stone or unglazed tiles facilitates the absorption of dirt.
Using a Grid
Mesh. The parts are attached to a construction mesh that has a flexible structure. Working with such a canvas is convenient and quick, as it resembles the standard sizes of regular and large tiles.
Note!
Wood-look tiles: see here the most successful solutions for using wood-look tiles in different interiors- Tile design - exclusive options and ideas | See the latest and most fashionable solutions here!
White tiles | The best interior solutions in real interiors and beautiful projects using white tiles
Ceramic tiles "mosaic"
To facilitate the installation process, mosaic tiles are used. This is an ordinary tile of regular sizes, divided into small squares of the appropriate shape. Such tiles have all the properties of ceramics: fire resistance, wear resistance, hygiene, durability, a wide range and scope of application.
Finishing with mosaic tiles allows you to decorate large flat surfaces, reduce the cost of purchasing material, and protect the surface from dirt, plaque, mold and fungi.
Practical mosaic in the kitchen interior
The kitchen interior can be very boring; the use of mosaics will enliven the space and add originality to the room. The pattern can be chosen individually and create a unique image that will no longer be found in another apartment. Classic interior solutions are also made using mosaics. Using different types of mosaics is very practical for the kitchen.
It is prohibited to use wooden or plastic tiles in decoration.
Mosaic tiles in the kitchen go well with porcelain stoneware countertops
Related article: The importance of a façade passport
Using mosaic for small areas saves money. Cladding with mosaics in the kitchen will help protect the walls in the sink area and the stove from grease splashes and the formation of various stains. This type of finish tolerates cleaning well even with aggressive cleaning agents, and the tiles near the stove will not deform from heating.
Using a mirror mosaic will visually expand the space, but you must constantly monitor the cleanliness of the surface, since dirt on it is more visible than on other surfaces. When choosing a mosaic finish for your countertop, you can save money, since ready-made countertops are quite expensive. The mosaic will perform a protective function for the surface.
The following types are used for this surface:
- Ceramic;
- Plastic;
- Stone;
- Mosaics made of broken glass.
Diamond mosaic panels with images of kitchen utensils and still lifes look appropriate in the kitchen. A large image is suitable for large kitchens; a small panel is suitable for small rooms. The main thing for areas that are used more often is to choose a material that is more durable and wear-resistant.
Features of purchasing material
When choosing a mosaic, follow the advice of our experts and the purchase will only bring you pleasure:
- Do not buy ceramic mosaic tiles based on photos from catalogs. Be sure to hold the material in your hands, check the quality of the glaze and the evenness of the joints and seams;
- Construction work begins with the creation of a project, which indicates the amount of material. Tiles should be purchased 10-15% more, since it is not always possible to purchase exactly the same tile;
- The material is chosen based on the overall style of the room, taking into account the color of furniture and accessories;
- It is necessary to determine the area of the surface to be decorated and its bends. Depending on this, choose the size of the mosaic and the appropriate base;
- It is better to entrust installation work to experienced specialists who will provide guarantees for the work performed. And the decor will last for more than one year.
Laying tiles on the floor
The floor option is carried out in the same way. So:
- Putty is used after plastering and allows you to get a perfectly flat surface; the amount of material is calculated based on the leveling area.
- The primer is used to improve the quality of adhesion of the glue to the base.
- Buy material with a reserve, add at least 5% to the total quantity. The correct calculation can be made from the seller - the layout also helps.
- The price for Italian material will be higher than for Chinese material, but the appearance will definitely please you.
- Mark where the mosaic strip will be and whether stretching will be required. The location of the cut tiles should be in the corners of the floor.
Laying mosaic tiles on the floor
- At a time, you should capture a square no larger than a meter in size.
- The installation solution should not be liquid, otherwise the mosaic will slide down.
- Gluing the tiles is not difficult, but maintaining the distance between the elements is not easy. Therefore, for beginners, it would be more correct to fix the mosaic in a checkerboard pattern. All flaws will become less noticeable.
- The flexible sheet with mosaic cannot be removed from the wall - adjustments are allowed on site. If the sheet is paper, then when removed it is prepared for gluing again.
- Grouting is done at least twice and takes quite a lot of time.
Important! You can cheaply decorate a shower using a PVC panel, but the idea with a mosaic will not only take time, but will also hit the pockets of those who use only the best tile options.
The grout material comes out slightly from the outside of the seam, and it is removed after drying with a damp cloth. When the base is completely dry, gaps can be detected - they overlap a second time. If a round object is being rubbed, then more mixture is used. If you follow all the recommendations and advice, the mosaic laid by a beginner will not differ from the work done by professionals. How impressive the bathroom will look depends only on your desire.
How to lay tiles correctly
Before installation work, it is necessary to carefully check the surface and prepare tools and materials:
Note!
Stone-look tiles: examples of the perfect combination in the interior. Review of new designs using stone-look tiles (120 photos of new products)How many tiles are in a package: typical sizes and standard quantities of tiles from different manufacturers
Tile from A to Z: how to choose and use for tiling different rooms (180 photos of ideas and options)
- Step 1. Surface preparation. The walls are leveled, puttied, and small cracks are covered. If you make a screed on the floor, then give it time to stand and dry completely (5-7 days).
- Step 2. Prepare the required amount of tiles, glue, spatula. Markings are made on the surface to maintain even laying and avoid distortions. Cover the surface with a thin layer of tile adhesive and apply the relief with a notched trowel. The surface under several slabs is coated with glue to avoid drying out.
- Step 3. Carefully lay out the mosaic on the prepared surface, following the markings. Carefully level, excess mixture is removed.
- Step 4. After installation, the seams are rubbed down. The grout is chosen to match the color of the tile or contrasting tones. The dried surface is washed and polished with a rag. The installation is allowed to dry thoroughly; for swimming pools and bathrooms this period is 1-2 weeks.