Brick beds: features
Fencing flower beds and beds with bricks is considered a rather beautiful and durable solution for landscape design, whether in the countryside or in a suburban area. But you should know that in order to build such structures, you need to take into account the interesting features of stone structures.
It is believed that brick fences, especially high ones, are immovable, so they are erected as a permanent structure. Although if it is really necessary to move the structure, then such a structure will need to be disassembled entirely.
Such a structure consists of brick walls, reaching a height in some cases of up to 100 centimeters. In order for the structure to be quite stable, it is necessary to carry out the technology of constructing a brick wall, and under its base a solid foundation is made, in this case a strip foundation.
An important feature of brick fencing is the huge number of different shapes. They have the shape of a square, circle, rectangular, and also more complex, with a combination of different heights and any geometry. Such designs are perfect for any perfect plot of land and therefore have recently gained great popularity among gardeners and farmers.
Layers of raised beds
Framing is only a small part of the job. The resulting box still needs to be filled. It must be said right away that the thickness of the layers depends on the height of the bed that you have chosen, so if any values are given, then they are purely approximate. In addition to the size of the bed, the thickness of the layer, for example, fertile, is influenced by the choice of plants: for some, 5 cm is enough, but for others, much more is needed.
Approximate layers for a raised bed
So, what to pour into a high bed - layers from bottom to top:
- A metal mesh with a fine mesh or a layer of geotextile is laid at the bottom. You can put cardboard. Mesh and geotextiles - protection against rodents and moles. Cardboard plays approximately the same role, but it is less effective.
- Large woody debris: thick branches, twigs, even logs and bars. This layer serves, firstly, for drainage, and secondly, moisture accumulates in the wood. The drier the climate in your region, the more wood you need. Moreover, the following wood layers too.
- Chopped small branches, bark. Other coarse plant debris will work: corn stalks, straw. Their task is also twofold. They store water and, when decomposed, release heat and nutrients. But when using corn trunks and straw, keep in mind that the bed will soon sink: these remains will rot quickly, but the yield will be high, and you can sprinkle fertile soil on top.
- Paper, thin cardboard. It is usually lined with a thin layer. Packaging cardboard is used more often, because glossy paper is not suitable, just like newspapers: lead paint is not at all what you need to fertilize plants with. If you have old unnecessary burlap (natural), you can lay it down.
- Layer of plant residues: foliage, grass, semi-decomposed sawdust. Be careful with sawdust: they strongly acidify the soil. So sprinkle them under plants that like acidic soil, or neutralize the acidity by covering them with a good layer of ash.
- Fertile land.
You can add a good portion of mature compost to the last two layers, as well as sprinkle it into the deeper layers. This will speed up the “readiness” of the raised bed for planting.
Read about how to make a pond at your dacha with your own hands here, and this article describes how to turn it into a fountain.
What is the function of a fence for beds made of bricks?
Such a brick fence, as a rule, performs two main functions - practical and decorative. Brick beds are:
- Design solution for a personal plot. Brick beds very effectively and beautifully decorate absolutely all the plants on the plot of land. They are erected as a separate element, or as part of a general architectural and design solution.
- Performing protective functions of plants. Quite tall brick structures help protect cultivated crops from various pests, rodents and weeds. Also, thanks to them, the flowering period of plants noticeably increases, as well as their growth and fruiting.
- Functions of the territory separator, as well as its designation. Thanks to such structures, it is possible to divide the entire total area of the site into separate zones for planting berries, vegetables and ornamental crops. They also determine the location of various plantings and paths passing between them.
When is the best time to do it and what to plant?
It is better to fill a high bed in the fall. During this period, there will be enough “material” and over the winter the processes inside will gain momentum. In this case, you can plant plants in the spring and hope for a high harvest. It can be done in the spring, but there are unlikely to be any significant differences in yield: the processes have just begun and will not have a noticeable effect on the fertility of the backfill. Although you will definitely feel the difference in the amount of water for irrigation: much less water is required.
One of the options for a high bed: metal mesh and reinforced polyethylene film
Plant rotation
In the year a high bed is installed, plants that require high fertility can be planted on it: cucumbers, zucchini, zucchini, pumpkin, any type of cabbage, eggplant, tomatoes, sweet peppers. The next year you can plant greens - spicy-aromatic and leafy. Root vegetables feel good in the second year.
After the second harvest, fertility must be restored. If the contents of the bed have sagged, in the fall they add good soil mixed with mature compost. If there is nowhere to add more, remove part of the top layer (to a compost heap or into another box as part of the backfill) and replace it with fresh soil with fertilizers.
High bed for strawberries
It differs only in that covering material is spread over the finished “pie”. Holes are made in it into which plants are planted. This option leads to the fact that moisture evaporates in minimal quantities, and weeds do not grow in the aisles. The second option - mulching the soil also works well, but evaporation is more intense.
Strawberries are doing well
The peculiarity of strawberries is that their roots are located mainly on the surface. Therefore, the fertile layer may be small. But this same feature leads to the fact that in severe frosts it can die. Although a decomposition process is taking place inside the high bed, warming the soil, if the bed is without snow and not covered for the winter, the root system may freeze.
Related article: Technology for gluing drywall to a wall
High bed for cucumbers and tomatoes
In terms of its structure, it is no different. Is it just because poles and crossbars or stretched wire are needed at the edges so that you can tie up tomato bushes or cucumber vines.
For cucumbers and tomatoes, you need to take care of the garter
You can read about organizing automatic watering for your garden or plot here.
What are the advantages and disadvantages of DIY brick beds?
Brick beds have their own personal advantages and disadvantages. And before you make such a structure on your site, be sure to familiarize yourself with them first so that there are no all kinds of unpleasant situations.
Here are the most important and well-known advantages of such structures:
- Quite neat, pleasant and aesthetic appearance.
- High level of durability and strength of this structure.
- Fairly rapid warming of the soil in spring.
- Quite easy to care for.
- Provides good protection of ornamental and vegetable crops from various pests and weeds.
- Significant increase in the fruiting period.
Such fences also have some disadvantages :
- The process of constructing a brick structure is quite complex.
- Impossibility of moving the structure.
- The soil dries out fairly quickly.
- Such fences are very attractive to cats.
Remember that a tall brick structure is considered a fairly solid structure that cannot be moved or altered. Therefore, before creating such a structure, pay special attention to its future location, shape, and size.
From boards and bars
In a few hours, you can put together a strong frame for beds of any height from thick boards and bars. This design is accessible, practical and low cost. The only downside is the service life. The walls of high beds made of natural wood will last no more than 5 years. To increase the shelf life, the wood can be impregnated with stain, in which case the beds will last up to 10 years.
To create the structure, you will need only the simplest plumbing tools that any owner has. You don’t need any special skills or experience working with wood either.
How to make a bed out of brick - technology
There are two options for the technology of constructing such beds with your own hands - these are beds with high sides made of bricks and low fences of one or two bricks.
Any brick can be used for this. Either old, left over from renovation or construction, or new, specially purchased for these purposes.
Such structures differ mainly in their height and implementation methods. If you want to build a brick structure that is tall in size, then you should make a strip foundation. In addition, to install such beds you need to know the technology of building brick walls.
But the construction of fairly low beds made of brick is not a difficult process at all, which even a beginner can handle.
If you still decide to construct raised beds made of brick, then you may need the following items:
- Crushed stone, cement, sand.
- Bricks.
- Lumber to make formwork.
- Knitting wire, steel reinforcement.
- Construction level, tape measure, trowel, string, shovel, bayonet shovel. And also a bucket for mixing cement mortar.
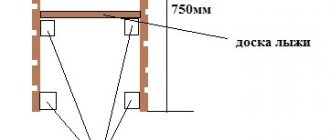
Action plan for building a tall brick structure with your own hands:
- On a personal plot, the desired location is selected in advance and then pegs are driven in over the entire area of the future brick bed. A cord is stretched between these pegs. Thanks to this, the place for the future foundation becomes clear. And at the place where the cord is tensioned, you should dig a trench, at least 30 centimeters deep and about 20 centimeters wide, for such a design.
- After digging a trench, sand should be poured onto its bottom. Approximately the layer of sand should be 12-15 centimeters. This sand needs to be compacted and watered.
- Next, reinforcement is laid in two rows across the entire area of the trench, and formwork is made from old edged boards. At a height of about 10-15 centimeters from the soil level, the foundation is poured with concrete. After pouring, it must dry, so it is left to stand for about 2.5 weeks. And after the foundation has completely dried, the laying of bricks begins, and this is done from the corners.
- Such a brick structure can be of any height, from 30 centimeters to one meter. The top row of bricks can be covered with a plastic or wooden panel, as well as galvanized sheets.
If you follow this sequence of actions correctly, you can erect brick structures quite professionally. Well, after the brickwork has completely dried, they begin to fill it with certain layers in the following sequence:
- Protective layer (metal mesh),
- Active layer (wooden logs, plant bark with branches, paper scraps),
- Nutrient layer (cut grass with fallen leaves) and fertile soil.
Another way to make a bed out of brick is to simply line it with brick. This process is much easier than constructing a raised bed, as this method does not require pouring a foundation. And this also means that the ridge may well be moved to another site.
This fencing is made from bricks in the following ways:
- Place bricks on top of each other diagonally.
- Edging the ridge in one or a double row of bricks, without deepening.
- Lay the brick fence in one row with the recess.
The brick fence, which is laid out diagonally, has a jagged appearance and looks quite beautiful. A shallow trench is dug; its bottom is filled with sand, which should be compacted. Then such a structure can be completed in two ways: using liquid cement mortar, or not doing it.
The ridges that have a border with one row of bricks . And if the row-spacing is also lined with garden slabs, expanded clay or crushed stone, then this creates a truly beautiful look. In addition, the position of the brick can be completely different, and the structure can also be made in different shapes.
To erect such a structure, first outline the place where it will be located and its shape. Then they begin to dig a trench, this is if the brick is laid out high and buried halfway into the soil.
Although it can be laid directly on the soil. True, in this option it is necessary to make the masonry wider, flat. This will allow the border to be stronger, stronger and wider, so that it will not be able to move during agricultural work.
Why do you need a raised vegetable garden?
The main question that arises for gardeners who are not previously familiar with raised beds when they see photos of such structures is what they are needed for, is there a difference between them and ordinary plantings, and what are the pros and cons of raised beds. And those who have already seen this method of growing vegetables and berries in action will definitely begin to persuade the first to do the same.
What are the advantages of raised beds:
- You can grow any crops, regardless of the quality of the soil in your garden. To do this, each bed is filled with the soil composition that is suitable for a particular plant;
- It is possible to arrange a vegetable garden in this way even on the most uneven areas;
- At higher elevations, the soil warms up better, making it possible to start sowing in early spring, increasing the yield several times;
- High planting will help avoid plant death due to temperature changes;
- This design ensures good drainage: excess moisture during watering or rain will not linger on the beds, and the roots will not be damaged due to high groundwater;
- Economical water consumption - not the entire area is watered, but only specific ridges;
- The edges of the planting containers will protect the fertile layer of soil from being washed away and blown away by the wind;
- Thanks to the convenient location, it is convenient for older people to tinker with plants (fertilize the soil, process leaves, harvest, etc.), since they do not need to bend low;
- It is possible to place and decorate raised beds with your own hands so that they will become an effective addition to the landscape design of the site.
But besides the obvious advantages, such designs also have some disadvantages. They are connected primarily with the fact that plants in closed spaces need fertilizing more often than in open ground. There is also a possibility of the proliferation of various microorganisms and insects harmful to crops, but if you approach planting with all responsibility, this problem can be easily avoided.
Another nuance that is worth thinking about in advance is what type of bed, arrangement method and fencing material will be suitable in each specific case. There are budget options, when all the materials are collected on your own, and there are also more aesthetic and expensive ones with specially purchased devices for this purpose.
Brick beds in a greenhouse
In a greenhouse, fences can be made of completely different materials, but as for the sides made of brick, this is undoubtedly the most reliable and durable material. With a certain structure, it will be quite possible to sit on them, or use them as small tables for a variety of purposes.
To make such beds in greenhouses, use red, white bricks or paving stones. Such brick structures look great when the floor is laid with tiles, paving stones or large fractional expanded clay.
In a greenhouse, brick structures can have different heights. They also perform the function of a “warm bed” quite well and can tolerate high humidity remarkably well. Plus, their period of operation has an unlimited amount of time.
Such structures are made in a greenhouse according to the same scheme as in an open space. A foundation is provided for high brick beds even at the time of pouring the general foundation of the greenhouse itself. And low structures without a foundation are built after the entire installation and installation of the greenhouse, directly on site.
Dimensions
There are no strict recommendations on this matter, and there cannot be: the conditions in the country are very different, and so are the people. There are sizes that many consider optimal.
On one site there are very high beds and not very...
So, the dimensions of the raised beds are:
- Height - from 20 cm to 50-60 cm. Look here what a difficult task it turns out to be. The higher the bed is raised, the easier it is to process - less bending. But more land and all the other “fillings” will be required. One more point: if a small bed may be covered with snow and will be covered from severe frosts, then a tall one will freeze through: the sides will also be open. For those beds where annuals are sown, this does not play any role, but for perennial strawberries, let’s say, this is a problem. Therefore, the height is chosen based on these considerations. According to the experience of many summer residents, the optimal height for strawberries is 20 cm. Then you can hope that it will not freeze.
- Width - from 60 cm to 1.2 m. Choose a distance so that it is convenient for you to cultivate the bed. A distance of 60-70 cm is chosen if the approach to the bed is only from one side. If you can reach it from both sides, you can make it a meter or more. It is important that the middle is processed without much stress.
- Length. Here everyone chooses based on the configuration of the site or their desire. There are no recommendations at all.
Related article: Installing a washbasin in the bathroom
To prevent the bed from being too high, part of it can be buried: bury it 20-30 cm, and then put walls on top. The removed soil will be used for backfilling (there is often simply not enough soil), and the substrate from the lower coarse layers can be made thicker. And to minimize the cost of maintaining such a bed, you can use drip irrigation.