The owner of this chest of drawers once saved it when neighbors were taking it to the trash heap, and she saw such disgrace in time, and since she adores all sorts of old things, she asked to give it away for a couple of bottles.
It looked terrible; it had probably been painted with floor paint all its long life. Ugh! She came up with the idea of restoring it and bringing it back to life from a closet into a spacious lounge where the hostess was going to receive her guests. Then she turned to me. I, in turn, could not refuse such a gift! All my life I dreamed of transforming old furniture.
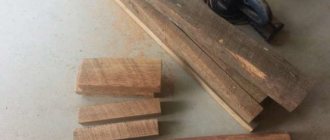
There is no photo of the initial one, but here are the first works on it - a little sanded, but in some places there is this terrible floor paint.
After we removed a huge layer of old paint, a surprise awaited us! Almost the entire chest of drawers was eaten away by the bark beetle... The photo shows how much the beetle has eaten away the wood.
It's sad... It was decided to replace everything that was possible. The legs, for example, generally crumbled into dust and were held together for many years only by paint. Then we sanded it very carefully, probably for 4 days, to remove all signs of paint from the wood. The photo shows how severe the lesions were.
After everything was thoroughly sanded, using all possible materials - from a sanding machine to small hand-made sandpapers.
Oh yeah! I almost forgot - we make sure to treat the entire chest of drawers, both outside and inside, with some kind of “bug-killer”, because we don’t want such a beautiful chest of drawers to be further destroyed!
Since the damage was almost everywhere, we decided not to preserve the wood texture. Then you could easily putty the entire chest of drawers.
In this photo, the cabinets are being puttied; we do the same with the chest of drawers itself.
The photo shows the rough putty and the sills and legs have been replaced. Then we dry it, sand it, putty it again, dry it again. Until we were satisfied with the result and the smooth surface, we puttyed and sanded three times.
Here is a photo of the chest of drawers in the process of sanding. The ends of the chest of drawers were made of plywood, it was decided not to change them, it was already a couple of kg heavier. but it would not be liftable at all. The most difficult and time-consuming part is the patterned columns along the edges of the chest of drawers! The main thing is not to be lazy and do everything carefully, otherwise all the imperfections will definitely come out during painting!!!
More sanding of cabinets. Now we are happy with the result and we start painting. But what about without adventures! We bought the paint, it said “dark brown” in black and white on the lid, but when we opened the jar we saw something incomprehensible and very similar to the floor paint that we had so carefully cleaned off... We thought that it was so damp and would darken after painting. But it was not there!
But we are artists and we cannot despair! I took the usual color scheme and mixed the color that the chest of drawers should be painted.
We apply layers until there are no gaps left! In total I got three layers. Now the decor, the most difficult and interesting part! Of course, it would be easier to unhook all the parts that we are going to paint light, but we were going to experiment with shabby chic and therefore a lot of jewelry work appeared in the future! But we are not looking for easy ways!!!
It looks like it's not neat, but it doesn't matter! Acrylic dries quickly and after drying it is easy to touch up with a dark color that was accidentally touched with light paint; for this purpose, of course, we use a thin brush (no more than 4 numbers.)
I mixed the shade myself (white acrylic and tint). I was looking for a color close to pistachio, but warmer, this is what I got (if, of course, the photo conveys everything...)
Where necessary they waxed with a candle (protrusions, corners, etc. just don’t overdo it, everything is very light and just a little :)), and then a layer of light paint was applied - again, at least three layers. The photo shows protruding wax - in this place we overdid it a little and then a lot of paint came off, but we were not upset - that’s how it was intended
The idea was to paint the boxes, which also took more than one day; there are no step-by-step photos, but there is a result.
Now we dry everything overnight, and in the morning we coat it with varnish - it can be anything, depending on what goals are being pursued. We needed lacquered and shiny, but there are those who don’t like such furniture. Then it is possible to apply matte acrylic varnish. You also need three layers of varnish - just to be sure!
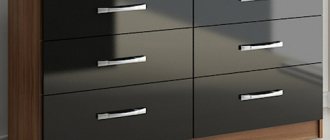
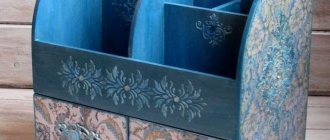
Here is the result - a handsome man with screwed-on handles, and at the owner’s request, we attached runners to the drawers like in modern chests of drawers, so it’s not only beautiful, but also functional!
About new life for old things? Today we will talk about how to give grandma’s old chest of drawers a new life and make it a very remarkable part of the interior of your apartment. It’s safe to say that many people have furniture that doesn’t look very neat in appearance. There are a large number of abrasions, chips, scratches, and sometimes you just want to update the interior. These types of furniture often include chests of drawers in which various clothes are stored. Everyone wants to throw away such a chest of drawers, but either they don’t get around to it, or it’s a wedding gift from relatives and it’s a pity to get rid of it. But don’t rush into the decision to dispose of it, because the chest of drawers can be a good item for a small update. Any chest of drawers can be changed beyond recognition, and this article will discuss the possible options.
Covering an old chest of drawers with newspapers
Extravagance and creativity using simple and inexpensive means. All you need for the job is abrasive sponges, glue, flat brushes, a sharp knife, black and white newspaper, white spray paint and clear acrylic varnish. Now you need to clean all surfaces of the chest of drawers using an abrasive sponge, and then wipe it with a damp cloth to remove dust and other contaminants. The next step is to apply glue to the treated surfaces using prepared brushes. Distribute the glue in an even and thin layer. Then we begin to glue sheets of newspapers in any way. There is no need to be shy about your imagination. After the pasted newspapers have dried, it is better to cover them with acrylic varnish for longer service and, of course, beauty. And paint the dresser handles white. This is how you get a beautiful chest of drawers in black and white.
Dresser decor options
There are many options for decoration: using fabric, acrylic or oil paints, leftover wallpaper, paper, three-dimensional decor. Even if you just change such a small thing as fittings - buy interesting metal or wooden handles, metal locks with keys at a furniture store, and replace these small parts - this can completely change the look of your furniture.
Is it possible to get pregnant using contraception during menstruation?
23.08.2020
Benefits of breastfeeding for mothers Benefits of breastfeeding for baby
23.08.2020
How to take a bath with sea salt and is such water procedures allowed for everyone?
18.08.2020
What about textured wallpaper?
In modern times, the furniture market pleases with its diversity. You can buy absolutely any piece of furniture, referring to your taste. But what about old furniture? Will it really no longer be of any use? Many people are still looking for and buying antiques in order to breathe new life into them, carry out restoration and give their homes elements of antiquity. It’s very easy to restore even the most ordinary old chest of drawers with your own hands using a master class, and it will become the finishing touch to the interior.
- Sanding machine;
- Sandpaper;
- Jigsaw;
- Hammer;
- Hacksaw;
- File;
- Putty knife;
- Ruler and pencil;
- Roller and several brushes for painting;
- MDF tiles;
- Nails;
- Wood paints;
- Self-tapping screws.
As soon as all the tools are prepared, the restoration of the chest of drawers itself begins, which is carried out according to a specific plan.
Step-by-step master class for beginners on updating an old chest of drawers at home
Step 1. Prepare the work area and the chest of drawers for restoration. All the drawers are taken out and the handles are unscrewed. Using sandpaper, the old coating is removed from the chest of drawers - this can be paint and varnish. The surface of the chest of drawers is sanded very carefully.
The chest of drawers is checked for the strength of the connection of the parts. Poorly screwed screws are removed, and if the parts of the chest of drawers were attached with glue, then it is carefully removed, again using sandpaper and a sanding machine. In order for the glue to separate well from the surface of the furniture, it must be heated. This can be done using the famous folk method: boil the kettle until steam comes out of the spout, and the spout of the kettle itself is directed to the junction with the glue. The steam softens the glue and, accordingly, it will be easier to remove.
All joints of the old chest of drawers are coated with a new layer of PVA and tightened using self-tapping screws. For greater strength, you can use metal corners.
At this stage, the chest of drawers is inspected for scratches or defects. If there are any, then they need to be puttied.
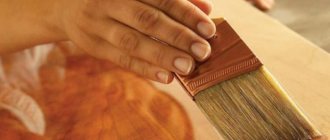
After the putty has dried, a layer of paint (the color that was originally chosen) must be applied to the surface of the chest of drawers. After the paint has dried, you can think about how to decorate the resulting new chest of drawers.
As you can see, restoring an old chest of drawers with your own hands using this master class is very simple. But to achieve the perfect result, watch the video:
A chest of drawers is a convenient and functional piece of furniture. Of course, the shortage of furniture is a thing of the distant past, and today you can purchase almost any furniture in stores. However, sometimes it is not advisable to throw away old things. Often, restoring a chest of drawers gives an excellent result, much better than purchasing a new item. It also happens that the need to restore old furniture is dictated by the canons of the style in which the interior is designed. This applies to such style solutions as Country, Provence or Scandinavian direction. Or maybe you just want to realize your artistic abilities by making a beautiful and functional thing yourself? In any case, the tips from this article will help you restore the appearance of your chest of drawers, spending a minimum of effort and money.
How to restore a chest of drawers using decoupage?
Before you start decoupaging a chest of drawers, you need to decide what you want it to look like in the end, and also choose a coating technique. One of the simplest techniques is decorating with paper.
This DIY chest of drawers restoration is suitable for those who do not have much experience in furniture finishing, because... it is quite simple, but at the same time it looks attractive and original.
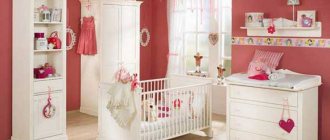
The design of the chest of drawers depends on its location and the overall interior, for example, with a strict monochromatic design of the office, the chest of drawers can be decorated using ordinary newspapers, but for a children's room it is better to choose something more interesting and bright.
If the room is decorated in a certain style, for example, Provence, then it makes sense to make the chest of drawers in a similar style so that it does not stand out from the general style.
Before you start, watch the mini-master class. Decoupage occurs in several stages.
Video:
The first step is to wash and dry the surface of the furniture and remove the drawers and shelves that are inside. If the chest of drawers is uneven, you can sand it with sandpaper.
Now you can start painting. You can paint the chest of drawers completely or partially, depending on your idea.
Then, after drying, the painted parts are treated with sandpaper and the next coat of paint.
Now comes the decoupage itself. Take the mini-blanks you made (newspapers, magazines, etc.) and cut out the images, and then place them on a surface pre-greased with glue.
The paper can be smoothed with a roller or simply with your hands. Then you can apply paint along the outline of the design; if you want, you can varnish the chest of drawers.
Wait a while and you can assemble the chest of drawers.
Points for and against"
Many people make the mistake of considering furniture repair and restoration to be synonymous. This is not true:
- Repair involves removing peeling paint, sanding, applying a new layer of paint, and securing loose elements.
- Restoring an old chest of drawers is a much deeper concept than cosmetic repairs. Moreover, with skillfully carried out restoration, an updated chest of drawers can become a truly unique, exclusive product, and therefore more valuable.
Important! Before you carry out restoration yourself, carefully inspect the item. It is quite possible that you are the owner of truly valuable antique furniture. In this case, an unprofessional approach can only do harm. You can invite a specialist who will evaluate the product. You should not do any repairs or restoration on your own until a professional opinion is given.
The process of restoring a chest of drawers with your own hands
So, you decided to restore the item yourself. The work is not easy, painstaking, almost jewelry-like, requiring significant time investment. Each stage is very important, so nothing should be missed. Here is a detailed master class on how to restore an old chest of drawers with your own hands.
The following tools will be useful to you:
- Hammer.
- Rubber mallet.
- Set of brushes.
Don't forget to prepare the following materials:
- Wood adhesive.
- Wood putty.
- A set of sandpaper with different grits.
- Toothpicks.
- Old toothbrush.
- Tooth powder or special cleaning agent for fittings.
- Dye.
Furniture cleaning
This is a very important stage. Cleaning must be done in such a way as not to damage the surface of the product and decor:
- First, wash the product with a soft sponge and a solution of laundry soap.
- If the chest of drawers is decorated with antique carvings, then you can clean small parts with a toothbrush.
- Remove the fittings and clean with tooth powder or a special cleaning compound.
- A toothpick or thin awl is suitable for cleaning hard-to-reach places, such as crevices and corners.
- Sandpaper will help get rid of stubborn dirt. At the same time, you can’t put too much pressure on it.
Important! The surface must be thoroughly sanded before painting again.
Preliminary preparation
Once the dresser has been cleaned of dirt and dried, it is time to replace the damaged parts. It's quite difficult. You can try to find them in an antique store or contact a carpentry shop with an order.
Professional craftsmen, by the way, can help by attaching decor to furniture.
Check that the bolts and screws are securely fastened and that there are no cracks in the wood. Remove loose or rusted bolts. They will have to be replaced with new ones. Small cracks can be sealed with adhesive, and larger cracks with wood putty.
Important! It is necessary that the tone of the putty matches the shade of the wood exactly. If wood is to be treated with stain, a special type of putty must be used.
Coloring
Of course, the texture of natural wood is incredibly beautiful, but sometimes, in order to organically fit furniture of an old design into a modern interior, it needs to be painted. The easiest way is to paint in one tone, for example, white:
- Remove any remaining old coating from the surface of the chest of drawers. Be careful when doing this. Firstly, there is a risk of damaging the decor. Secondly, it is impossible for coating particles to accumulate in hard-to-reach crevices and corners.
- To level the surface, sand it thoroughly, then fill any unnecessary holes with putty.
- After the putty has dried, rub it with sandpaper.
- Use for coloring.
Important! Applying varnish over paint makes the surface glossy.
Replacing parts
First of all, we are talking about handles. Of course, antique handles are wonderful, but with updated furniture they look alien. Therefore, it is advisable to purchase new fittings that match the style and equip the updated chest of drawers.
Stylish DIY furniture
Long-term use of wooden furniture leads to damage to the paintwork and weakening of adhesive and metal fasteners. The influence of moisture and wood bugs disrupts the integrity of the structure. Some parts, especially the legs, may rot and delaminate.
Restoring an antique chest of drawers can cope with even the most severe damage. There is an option to turn to specialists and fully rely on their professionalism. However, carrying out repair work with your own hands will not only save a lot of money, but also decorate the interior as a source of pride for the owner.
The repair process is not easy. It requires a number of skills, patience and knowledge on how to restore an old chest of drawers, with a clear sequence of actions - from cleaning the surface to decorating and varnishing.
The importance of each stage cannot be overestimated. Especially if you are restoring Soviet furniture with carved elements and inserts, specific fittings and many component parts.
Another restoration option
This option is for the restoration of an old chest of drawers with drawers: three large and two small.
From tools and materials you will need:
- Composition for removing a layer of old paint.
- Chisel.
- Sandpaper set.
- Self-tapping screws.
- PVA glue.
- Matt putty.
- Decorative moldings made of polyurethane foam.
- Paraffin.
- Wallpaper.
- Acrylic dye on water.
- Transparent varnish on water.
- Decorative handles.
Preparatory stage:
- Unscrew the old knobs on the chest of drawers.
- Next, using a special composition, free the surface from the layer of old dye.
Important! If the paint layer is thick, you can also use a chisel.
- Sand the furniture thoroughly until the grain of the wood becomes visible.
- In places where the surface is uneven, apply putty and level it. After drying, sand the surface with sandpaper.
Important! Avoid applying strong pressure to avoid damaging the mastic layer. The result should be a perfectly flat surface.
- To ensure the new handles fit into place, fill the old holes and then use a drill to drill new ones.
Important! It is very convenient if you have to attach fittings to special screws. There is no need to drill holes for them.
- Dilute PVA glue with water and treat the surface of the product. You can use any primer instead of PVA.
- After the adhesive solution has dried, you can begin decorating the chest of drawers with your own hands.
Decoration:
- First of all, install the frames for the drawers and sides. Frames can be made from polymer moldings. The main thing is to carefully and accurately take measurements so that the frame looks neat.
- Secure the frames with screws and cover the caps with mastic.
- After this, carefully paint the frames with acrylic composition. For example, coffee, white or beige colors look beautiful.
- Cover the surface inside the frame with wallpaper to match.
- The last step is to cover the entire structure with several layers of varnish.
After you have restored your chest of drawers, we recommend that you familiarize yourself with other options for updating furniture.
No home, like no bedroom, is complete without a good, beloved chest of drawers for storing things, bed linen, towels and other useful and necessary things. For example, we often store small things in it, such as corkscrews for wine, champagne, can openers or hair clips, etc. This could be a good wedding gift, joint property of a married couple, or simply an individual choice. Therefore, you should approach its purchase carefully, taking into account a whole set of factors and characteristics, the interior of the room, the price/quality ratio, and other criteria.
To avoid problems with convenience, ergonomics, the right choice of materials for manufacturing and appearance, we recommend buying a chest of drawers from the manufacturer https://usadba-mebel.ru/products/category/komody-iz-dereva. By purchasing a product from a trusted store, you automatically receive high quality control criteria for products, market-competitive prices, and good quality of service and delivery of goods.
Dresser design technology using stencil and paint
To apply the drawing you will need the following set of devices and materials:
- stencil;
- sponge, roller or soft brush;
- dye.
On a note! Choose a stencil with patterns, floral motifs, abstract designs or an interesting plot. If desired, cut out the model yourself from thick cardboard, roofing felt or film.
Sequence of work:
- Place the stencil on the chest of drawers, carefully gluing it with tape around the perimeter.
- Apply the paint with a roller or brush using gentle movements, without sharp strokes, so as not to drive the composition under the stencil. The brush should be held perpendicular to the surface.
- If you use a sponge, keep in mind that it must be almost dry, otherwise the design will flow.
- The stencil is removed only after the coloring composition has set. If desired, apply a finishing coat of clear varnish.
- After the coating has completely dried, screw in the updated furniture fittings.
On a note! Aerosol paints are often used to work with stencils. Before application, shake the can vigorously and spray the dye over the stencil.
The technology of decorating with stencils is simple and does not require special skills. However, it is worth practicing on a piece of plywood or cardboard in order to grasp the peculiarities of applying the selected pattern.
Second life for an old chest of drawers (1 video)
How to restore a wooden chest of drawers at home
Many people nowadays have antique wooden furniture, which was either inherited from grandparents or earlier generations. And some people buy such furniture at antique auctions. It is worth considering, however, that we are not only talking about antiques, they can be from Soviet times, but made from natural wood of different species, for example oak, ash, beech, pine, etc.
Let's consider several recovery methods:
1. Sanding and varnishing
2. Veneer covering
3. Covering with finishing film with a wood texture
The initial state could be like this:
Sanding and varnishing
To sand the chest of drawers, it is better to use cloth-based sandpaper. For example, in Kharkov, for such purposes, I more often used Zaporozhye-made sandpaper with a grain size of P60-P80 to remove the old paintwork, and then P180-P320 for final sanding of the surface. Paper-based sandpaper wears out faster and is ineffective.
First, you need to wash and dry the wood using some kind of cleaning agent with a soft sponge to remove dirt. Then remove the varnish layer using sandpaper with P60-P80 grit, it is also worth going over the places where the coating has worn out to restore the color of the wood. You can use the manual method - attach sandpaper to a wooden board 10 cm by 15 cm or use a sanding machine. It can be either belt or vibration.
Next, you need to sand the entire surface with sandpaper with grit P180-P320. If there are small dents on the surface that could not be removed by sanding, you can use wood putty, or you can do it differently - mix the remains of small sawdust with varnish and cover them with a regular spatula. This way you will be able to preserve a fairly accurate shade of the original wood, and in case of small damages, preserve the texture.
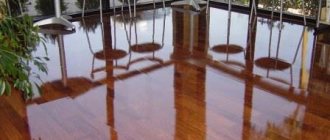
Next, apply a layer of wood primer, and after it dries, 2-3 layers of paint and varnish. There are many options, but it’s worth considering that alkyd or epoxy varnishes will be the most durable. You can also use the first layer of varnish as a primer, but after that you need to sand the surface lightly with fine sandpaper to knock down any raised wood lint. And then apply 1-2 finishing coats of varnish. An example of a lacquered chest of drawers can be seen below:
You can also use wood paints; it is also better to buy them on an alkyd or epoxy base. The fact is that when restoring old furniture, it is better to take care of the durability of the coating. And then your furniture will serve you faithfully for many more decades, and abrasion of the coating is possible 5-7 years after its application.
Veneer covering
To restore a wooden chest of drawers with your own hands, you can use a method such as veneering. To do this, it is better to buy natural (planed) material and glue it to a surface sanded with coarse (P60-P80) sandpaper using contact glue, for example Bindan-S, Moment, etc. For thin materials, PVA construction glue is also suitable.
Also, do not forget that before coating, the surface must be cleaned and hidden with one layer of wood primer, waiting for it to dry completely. Also, the material should be chosen with a moderate thickness, approximately 1.5-2 mm. You can choose the texture at your discretion, taking into account the interior of the room and the cost.
It is better to glue the veneer with small tolerances along the edges, and then cut it off using a jigsaw or plunge-cut saw. Because the edges of old furniture are not always smooth. You can, of course, use a utility knife and a plywood strip as a cutting guide. There are many options.
However, I note that veneer made from softer types of wood (pine, maple, spruce, etc.) or red wood, and a small thickness - 1.5-2 mm, is more or less amenable to processing at home. If you take thicker wood, it will be stronger, but this strength is not determined by anything. 1.5 - 2 mm is enough. It can be cut off with a regular stationery knife in several passes.
Veneering is a more complex restoration option than painting and sanding. It should be used when the surface of old wood is riddled with pits and other grooves from careless use of furniture. Or if you are not satisfied with the appearance of the wood. Because for a good result it is necessary to accurately mark and cut the strips, clean the base well, and use high-quality glue. An example of a chest of drawers restored by veneering can be seen below:
Furniture varnishing
If the chest of drawers was made of solid wood, then its surface can be varnished in several layers. You should choose the coating responsibly; the result of the work will depend on it.
There are special varnishes designed for working with furniture. You should not take shiplap varnish or the one intended for the floor. These compounds can ruin the appearance of a piece of furniture.
There are two types of varnishes: water-based and solvent-based. It is better to choose the first option, as it does not have an unpleasant odor. This makes it possible to work without personal protective equipment. In addition, these compounds dry quickly.
Covering with finishing film with wood texture
This is a cheaper and simpler method than the previous two, but it is worth using if you understand that such a film is not natural wood. And if in previous cases natural materials were used, then this film is an artificial material, and not as durable as wood itself. However, in appearance, you can find a film with a texture very close to the real thing. It looks something like this:
First, as in previous cases, you should completely wash and clean the chest of drawers with coarse sandpaper. And then prime the wood and stick the film on. This film is self-adhesive; it just needs to be smoothed out well. However, the film will not hide surface unevenness. Therefore, uneven surfaces must be filled with wood putty, or sawdust from sanding and PVA glue must be mixed.
After gluing, it is better to hide the film with alkyd or epoxy varnish. Because by itself it is not very resistant to abrasion.
That's all, we looked at several ways to restore an old wooden chest of drawers with your own hands. Of course, these are not all methods, but they allow you to achieve excellent results with relatively small financial investments.