How to treat a corner of a bedspread | DIY CURTAINS
This is the simplest processing method with which I process those corners that are located in the upper part of the bedspread - at the head, that is, where they are practically invisible.
I usually make a hem allowance of 10 cm for the blanket. I hem the blanket on four sides with a closed hem seam. Hem width 6-8 cm.
Before hemming the side sections, we fold the headboard allowance onto the wrong side of the bedspread and mark the width of our future hem.
At this mark, we turn the fabric once on the wrong side, and after that we wrap the side allowance of the bedspread, pin it along the fold and again mark the width of the hem.
Fold the seam allowance over a second time, secure it with pins and stitch to the edge of the hem.
Now we hem the second side of the corner. We wrap the seam allowance in the same way, pin along the fold and mark the width of the hem.
Once again we fold the seam allowance along the chalk line and pin it.
All we have to do is add a stitch along the hem.
Front view.
The angle is neat, there are no open sections of fabric peeking out anywhere.
If something is not clear, ask in the comments, I will answer all your questions.
Did you like the master class? I would be very grateful if you share this article with your friends on social networks by clicking on any button below.
If you would like to share your experience with the readers of the site or simply show your work, write and send a photo to me by email.
Best regards, Oksana Fadeeva.
Use of site materials only if there is an active link https://moishtori.ru
moishtori.ru
How to make a border around the edges of a bedspread » Useful homemade products
Materials: yarn (cotton).
Tools: sewing supplies.
The procedure for edging the bedspread
1. Align the edge.
Cut the threads along the edge of the fabric. We turn it inside out twice. From the wrong side, insert a needle with a long thread into the fold close to the edge and bring it out to the front side. We stretch the thread. We step back one and a half centimeters and insert the needle from the front side directly under the fold of the edge, but without grabbing it. Throw a loop onto the needle and pull the thread through. The result is a clove secured to the top with a knot. From the wrong side we bring the thread to the front side at its insertion point.
2. We edge the edge with cloves.
Each time retreating one and a half centimeters, we repeat the execution of the cloves. On the wrong side we get a path of inclined double strokes.
3. Fasten the thread. Having hemmed the edge completely, tighten a knot on the working thread and hide its end inside the fold from the wrong side.
4. We edge the second edge.
The serrated seam is made from right to left. That is, you will now have to start it from the other side. In the same way we hem the second edge of the product.
5. Options for more complex finishing.
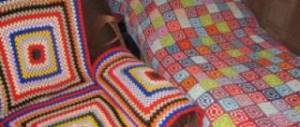
If painstaking work does not seem too tedious to you, and time allows, then you can decorate the edges of your bedspread, for example, with knitted canvas. To do this, you will first have to tuck them in and overcast them with any suitable seam, and then knit a canvas of your choice, inserting a hook under the upper crossbars of the stitches. Such an openwork “frill” is labor-intensive work, but the result will please you!
Elena Romanova, Bryansk
Especially for the site:
www.freeseller.ru
How to make a fur blanket with your own hands?
It may not be politically correct to wear a fur coat that your grandmother left you as an inheritance, but you certainly don't want to just throw away or give a family heirloom to a thrift store. Instead, turn your coat into a blanket. This is a good way for your family to use a product that can be passed down from generation to generation in the future. Even damaged fur can find new life as a blanket. Today we will talk about how to sew a fur blanket from an old fur coat.
How to properly round a corner on a bedspread
If the blanket hangs on three sides, the corner is usually rounded so that it does not lie on the floor. To properly round, measure the height of the overhang on each side of the corner on a stitch and mark the point of intersection of these heights. Then from this point we draw an arc with a radius equal to the height of the overhang of the bedspread. We cut off the excess.
We also cut off the hem allowance, starting and ending at the start of the fillet.
Leave a seam allowance of 1-1.5 cm.
We perform this operation with a different angle. We will use the resulting lunges as a facing, only they need to be swapped (we sew the lunge from the left corner to the right corner and vice versa), this is done so that the direction of the threads of the facing and the bedspread itself coincide.
We fold the facing with the blanket right sides together as shown in the photo, and pin along the edge of the stitch.
We lay a stitch along the very edge of the stitch, starting and ending it at a distance of 1 cm from the cut corner (marked with arrows in the photo) and cut off the excess fabric.
We also cut off the excess facing fabric, leaving 1 cm for the seam.
We fold the side edge of the facing and pin it with a hem allowance as shown in the photo below.
We sew the seam along the facing at a distance of 1 mm along the entire curve.
At the end, we again turn in the side seam allowance and adjust it to the seam allowance.
We turn the corner out, pin it so that the seam is not visible from the front side, and mark the width of the hem.
We cut off the excess fabric along the curve and make cuts, not reaching the hem line 2-3 mm.
We fold the seam allowance and pin it around the perimeter of the blanket.
All that remains is to stitch the hem at a distance of 1 mm.
Front side.
If something is not clear, ask in the comments, I will answer all your questions.
Did you like the master class? I would be very grateful if you share this article with your friends on social networks by clicking on any button below.
If you would like to share your experience with the readers of the site or simply show your work, write and send a photo to me by email.
Best regards, Oksana Fadeeva.
Use of site materials only if there is an active link https://moishtori.ru
moishtori.ru
How to sew a frill into a ruffle on a bedspread
There is nothing complicated about sewing such a frill.
First you need to prepare the base of the bedspread, adjust it to size, not forgetting to make a seam allowance of 1 cm along the sections where the frills will be sewn. Then overlock these sections with an overlocker.
Now you can start sewing on the prepared frill. The frill piece is placed wrong side up. The blanket is placed on top with the front side up. We place folds on the frill with or without the help of a device, as is convenient for you.
We control the width of the ruffle using the same device or a ruler and sew a stitch to the width of the overcasting seam.
When the frill is sewn, we wrap the upper part of it over the “face” of the bedspread. Straightening the folds, we lay a second line, taking into account that the cut of the bedspread is completely sewn between these two lines.
I’ll make a reservation right away: if the fabric from which the bedspread is sewn is very frayed, then this method of sewing will not work, as threads may come out of the stitching seam.
The seam on the back side of the bedspread is very neat.
And this is how it looks on the bed.
How to make such a decorative insert on a bedspread, see here.
If something is not clear, ask in the comments, I will answer all your questions.
Did you like the master class? I would be very grateful if you share this article with your friends on social networks by clicking on any button below.
If you would like to share your experience with the readers of the site or simply show your work, write and send a photo to me by email.
Best regards, Oksana Fadeeva.
Use of site materials only if there is an active link https://moishtori.ru
moishtori.ru
LiveInternetLiveInternet
woman-happy.ru/419-loskutno…ganzy.html
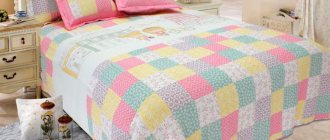
From the materials of the site Happy Women's Club (I saw it here on someone's blog, I really liked the idea, but I couldn't find it, and I found it through Google)) 4. Every thrifty housewife never throws away fabric scraps in the hope of using patchwork. A bedspread made from shreds turns out no worse than a store-bought one. But let's start, as they say, in order. There are always a lot of scraps and scraps in the handicraft stashes of housewives. If we add to this those things that are lying in the closet as unnecessary (they are no longer worn, but it would be a shame to throw them away), you will get an impressive collection of multi-colored pieces. Our patchwork master class will teach you how to sew an original bedspread that can be completed by any beginning seamstress. This is not knitting in Tenerife or cross-stitching. Patchwork needlework attracts with its simplicity and originality. I’ll be honest, I spied the very idea of patchwork – a bedspread and a handbag. But the idea itself is so brilliant (literally and figuratively) that I couldn’t resist sharing it with you, my readers. For a patchwork bed update you will need: scraps, organza and lining fabric. The technology for sewing a patchwork bedspread is very simple: Patchwork - organza bedspread 1. Gather together all the colorful scraps that have accumulated in your apartment. You can borrow pieces from friends or from your mother’s closet, or cut them from old unnecessary things. 2. Place the scraps in any order (note, not in a mess, but in any order - it sounds more interesting) on the area that we will cover. In our first case, this is a bedspread. This means we lay out the shreds right on the bed. 1.
3. We chop and baste all our multi-colored wealth to make a canvas of the required size. Patchwork - organza bedspread 4. Place the organza on top of the patchwork, sew along the contour and quilt inside. 2. 5. Place the patchwork blanket on the lining base. 6. Sew ruffles on both sides of the bedspread. 3. Patchwork - organza bedspread And now look how beautiful we have turned out - everything glows with multi-colored lights and shimmers!!!! 4. If the sun or the light of an electric bulb falls on such a blanket, then it is simply impossible to take your eyes off it - it’s very beautiful. Simply brilliant!!! Patchwork - organza bedspread If you want to continue your creativity, you can decorate pillows or even a bag in a similar way. Believe me, the result will not disappoint you!!! Patchwork - a bedspread or rug is always in fashion! [MORE/]
Series of messages “Interior”:
Part 1 - Colonial and exotic South Africa: a trip to two houses from the suburbs of Cape Town Part 2 - Fairy of the Pink Country: a project for a women's apartment in an elegant Parisian style... Part 4 - And more interior options - such a delight.. Part 5 - Ohhh.. Spain... Part 6 - Patchwork - organza bedspread Part 7 - From a barrel - Decor??!!!)))) Part 8 - Wonderful hangers)) ... Part 11 - New Year's interior decorations 2 Part 12 - The best curtains for your favorite kitchen Part 13 - beautiful
DIY bedspread
Article navigation
It is not difficult to sew a bedspread with your own hands if it is in the form of a cover for a sofa or a bed made of tapestry fabric. It is much more difficult to sew a quilted bedspread with padding made of padding polyester, and also with frills at the bottom of the bed.
In order for the bedspread to become the main decoration of the bedroom, we recommend that you take your time and first understand the technology of sewing quilted products. This especially applies to those starting to learn to sew. because tailoring requires not only certain knowledge, but also experience. It is quite difficult to make a quilted pattern so that it is perfectly even without puffs, gathers and seating of the fabric at the intersection of the seams.
If you have never sewn a blanket, try sewing a small size baby blanket and quilting it first. The main thing is to learn how to quilt diamonds or stripes evenly, without seating the top fabric. Then you will cope with a more complex task and will definitely be able to sew a beautiful bedspread for a bed or sofa with your own hands.
Calculate the size of the bedspread according to the measurements of the bed
First, it goes without saying that you need to take the correct measurements from the bed or sofa. You need to measure the width, length and height; the bedspread will definitely have a long frill. A pleated frill gives the bedspread a finished look and from time to time it becomes the main decorative element of a bed or sofa.
The first three measurements are not difficult to take, the main thing is not to make them too correct, adding 1 - 1.5 cm will not hurt. It is a little more difficult to take into account the angle of the mattress when cutting the fabric, since modern beds, in most cases, have mattresses with rounded corners. But this is also quite easy to do; you need to draw a corner of the bed on paper and, when finished, cut it out with scissors.
Now you have all the measurements to calculate how much you will need for the bedspread and fabric frills, padding polyester and lining. But don't rush to count. Let's first understand the technology of sewing a bedspread, and then you will determine that it is possible to significantly reduce fabric consumption for frills.
The only thing that can be said in advance is that if you start sewing a bedspread with a frill, calculate its height so that it does not lie on the floor. Even if it’s only a couple of centimeters, there must be clearance to the floor, otherwise the edges will become dirty, and in addition, visually the clearance between the bedspread and the floor makes the bed higher.
The dimensions of the bedspread may decrease after finishing the stitching.
The main difficulty in sewing a bedspread lies in the fact that the sewing lines can be about 2 meters or more. And it is rare that a sewing machine will not fit the top fabric with such a length of continuous line. As a result, if you start stitching in the form of squares or diamonds, at the intersection of the seams you will have sagging of the upper fabric. And the finished size of the bedspread itself may decrease as a result.
In addition, you only need to stitch once; unraveling the wrong seams is undesirable. Many fabrics, especially satin and silk, leave marks from needle punctures. It is precisely on this basis that I do not recommend immediately sewing a bedspread from expensive satin fabric, but trying to make a bedspread first is not difficult.
When sewing stitches on a household sewing machine, the top fabric will still shrink no matter how hard you pull or try. Your efforts will help the sewing machine, but you should not drag the fabric, but stretch it with both hands in both directions, so that the needle is constantly between your hands, approximately this is how curtain tape is adjusted. You should never pull the fabric in one direction, otherwise the needle may break. Please note that the result will be worse the smaller the diamonds are, so it is better to immediately abandon the small pattern. Large checkered or diamond shapes look just as good on a bedspread, and there will be less pain.
How to make a bedspread pattern
Don't cut the fabric exactly to fit the bed, leaving only the seam allowances. Add another 3-5cm in width and length. If they turn out to be superfluous, it will be possible to cut them off, but it is unlikely that they will be superfluous, because the stitches will still shrink, and at the same time the fabric. The same applies to padding polyester and lining. It is possible to mark the required size (P2) of the bedspread already assembled and quilted. And to be on the safe side, before cutting off the excess, follow this line with a securing stitch on your sewing machine and measure the blanket again.
Which quilted pattern to choose and how to make it
It is extremely important to make an accurate calculation of the placement of the pattern figures on the bedspread. They should be evenly distributed over the entire surface of the bedspread, without moving to any side. It may be necessary to reduce or increase their sizes, but the figures should begin and end strictly from the edge.
It is better to first perform such a calculation on a sheet of paper in a reduced form, for example, on an unfolded piece of paper from a notebook in a box, and then make a life-size model of a rhombus or square and check how it will lay out on the back side of the fabric, having previously outlined the contours of the future dimensions with chalk bedspreads
But this is not the most difficult thing. The most difficult part to mark is the stitch on the right side of the fabric. Since you can’t mark with chalk or with a pencil, there is only one method left - manually using contrasting threads to stitch the lines along which the stitching will be done on a machine.
The most advanced method of applying markings to a bedspread is to purchase special paper that sticks to the fabric and, when wet, can be easily removed without leaving any traces of glue. It is possible to use various types of washable markers, but sweeping is still much cleaner and more reliable. Moreover, by basting you will prevent the top fabric of the bedspread from shrinking as much as possible, and at the same time fix the padding polyester and lining with the top.
It’s best to make a line of the quilted pattern along the wrong side of the bedspread, in other words, along the lining. Then the entire fit will go to the lining, and the front side will be smooth without sags of fabric at the intersection of the line. But in order to stitch a bedspread using this method, you need a good eye and experience, so I do not recommend this method. By the way, when performing stitches, you must try to tighten them; in addition, it is more correct to tighten all layers of the bedspread, but not so much that the needles on the machine break. Don’t make the cage or diamonds too small. The larger they are, the easier it will be to sew the bedspread carefully and evenly, and most importantly, it will be easier to cope with the fit of the fabric at the joints.
How to finish the edge of a bedspread without a frill
If the bedspread does not have a gather or frill, then the simplest method of processing the cut edge is demonstrated in this photo.
How to make a frill for a bedspread or bed
If you have finally finished quilting the bedspread, the shapes of the patterns and long lines are perfectly even, there are no sagging at the joints and the dimensions of the bedspread are almost the same as they were at first, then consider yourself a pro and sewing a frill along the edges of the bedspread is no longer a problem for you.
The frill for the bedspread can also be sewn separately, in the form of a bed skirt. But more often the frill is sewn to the bedspread and becomes its permanent part, which is largely justified. The non-removable frill makes it easier to process the edges of the bedspread. In addition, even, neat folds of the frill can hide stitch imperfections if your diamonds are far from geometric symmetry.
For the frill, you will again have to do a little calculation, in particular how to position it and how much fabric will be needed for sewing, taking into account the number and size of the folds.
Taking an additional piece of fabric 5 meters long for a frill is unlikely to make sense. It can be assembled by building up the pieces left over from cutting the bedspread. The main task is to ensure that the strips to be ground are cut in one direction without fail. Otherwise, any section of the frill of the bedspread will have its own shade and such a small detail can break the whole type of bedspread. And also, the connecting seams of the frill strips should be hidden in folds, then they will not be visible.
The fold for the frill of the bedspread must be made wide; you should not skimp on this. A width of 10 cm is fully suitable, but you have the opportunity to experiment, lay the folds narrower or wider, change the course between the folds, the direction of the folds (counter), etc. How to sew a frill? There are quite a few ways, including sewing a frill with a double stitch, as demonstrated in this photo.
Pillows on the sofa, baby blanket
From the remnants of the fabric from the cut of the bedspread, it is possible to instantly sew decorative pillows on a sofa or bed, or a children's bedspread. Those who sew a lot certainly accumulate a lot of leftover pieces of fabric of various colors. It is possible to sew a bedspread or blanket from a variety of colored pieces. The shape of the flaps is also perhaps the most varied; it is not necessary to cut out the correct shapes. If you don't have enough leftover fabric, you can make a patchwork quilt.
It is not necessary to quilt a children's blanket; it is much more important to make it fun and colorful. The fabric can be diluted with another fabric, with designs of your favorite characters from cartoons or animals, in catchy and warm colors. Such a blanket will add warmth and energy to the children's room, bringing a certain mood and positive feelings into the nursery.
No matter how much you like the practicality of black shades, do not take dark, purple or gray bedding for children and do not use these colors when decorating a child’s bedroom, or for bedspreads. Such colors have a depressing effect on the children's nervous system.
Volumetric, soft pillow letters are a stylish and unique decoration for your bedroom, especially if the textile letters completely repeat your name. Such unique decorative ornaments are easy to make with your own hands. In addition, sewing just one voluminous initial letter of your name does not require a large amount of fabric and other materials. For more details, see the article on the site Sewing Master Do-it-yourself pillow letters.
Chair covers, such as in this photo, are a good solution to refresh the appearance of furniture, and from time to time it is also an easy way to change the design of the kitchen.
Processing organza curtains is a simple model for a window in the kitchen and is actually accessible to many who have a little experience and a sewing machine. But sewing curtains for a living room or a hall with a lambrequin is the job of specialists who have not only knowledge, but also experience.
Fitted sheets have become very popular. This is primarily due to the fact that a large number of Euro-sized beds have appeared using high spring mattresses, which are simply unrealistic to fill with a simple sheet from a standard set of bed linen; they are too narrow and therefore invariably get confused during sleep.
Good quality bed linen made of pure cotton without synthetic additives is quite expensive and in order not to make a mistake and not ruin the impression of the purchase, you must learn how to choose it correctly.
In order to sew bed linen or a bedspread, it is necessary to determine the technological highlights of sewing. By the way, it is necessary to use cotton fabric for the lining of the bedspread, then the bedspread will not move around the bed. Just before cutting, be sure to wash the calico or chintz in warm water.
How to sew a pillowcase for a pillow or sofa cushions with your own hands? The question is quite difficult for those who have never sewed pillowcases themselves. It is necessary to accurately line up the pattern, calculate the consumption of calico or satin, and sew the main thing correctly so that the seams are even and strong, and the pillowcase matches the size of the pillow.
How to mend a hole in jeans and make other repairs to your jeans, you will determine in detail in this article.
Before hemming your jeans, you need to accurately measure the shortening line and hem width. A large number of folk methods for this have been invented, as well as a unique one, like standing on a chair, although why not, if it’s more ergonomic for you.
tpk-eti.ru
How to sew a bedspread for the bedroom with your own hands
Combination of black and gray bedspread and curtains in the bedroom.
Sewing a beautiful bedspread yourself is not at all difficult. First, you need to decide on the design of the bedspread, measure the bed, and make the necessary calculations for fabric consumption.
An original bedspread can decorate a bedroom, make the interior unique, inimitable, and a creative approach and minimal sewing skills will help realize the idea.
A plain bedspread will suit almost any bedroom.
To sew a bedspread yourself, you need to purchase the following materials:
- The main fabric of the bedspread, the color and pattern of which can be chosen according to your wishes to match the interior;
- Additional fabric, contrasting shade (if additional decorative details are needed);
- The lining fabric for the bedspread (can be viscose, cotton or the cheapest nylon) must match the main fabric;
- Sintepon (serves as a filler for a bedspread in the bedroom) if you want a fluffy bedspread, you should buy double the amount;
- Decorative elements of the bedspread (satin ribbon, lace, fringe, tassels or textile flowers) as needed;
- Tools: measuring tape, tailor's chalk, thread, scissors, sewing machine;
A bedspread with a shiny surface matches the wallpaper.
The bedspread can be quilted, then you will need to apply a pattern and sew it on a machine, connecting the main fabric, insulation and lining with one line. For the Provence style, you can sew a patchwork bedspread with your own hands, for which it is enough to use stocks of various scraps. The patchwork technique has recently become increasingly popular, and each bedspread is a unique, inimitable work of handicraft.
When planning to sew a bedspread yourself, make a preliminary sketch on which indicate the dimensions of the desired product. Thus, in a fabric store it will be much easier to select the necessary materials for sewing a bedspread.
Black and white pattern on the bedspread.
The bedspread for the bedroom must be chosen according to your own taste and purpose of the room. A children's bedroom or for parents will require a completely different choice of colors, materials themselves in terms of quality, fiber composition, and cost. By looking at photos of finished interiors, you can make the right choice of bedspread for the bedroom.
Beige bedspread in the bedroom.
How to sew a throw blanket
The original purpose of the bedspread is to decorate the bed when people are not sleeping on it. Like a bed cover, a throw-on cover allows you to clean your bed quickly and without much hassle. This everyday blanket can be made from thick fabric and can even be used as an additional blanket. Bedspreads in another style are sewn to the shape of the mattress and fit around it, giving the bed a neat appearance. Such bedspreads allow you to use the bed as a sofa for daytime relaxation. In addition, you can sew bedspreads with a straight “skirt” with counter pleats at the corners, as well as with a gathered valance and contrasting edging, which are very cozy in appearance.
Steps for sewing a double-sided throw blanket
To make a double-sided bedspread, you can use fabric that is harmonizing or contrasting in color for the top part and lining. If you want to insulate the bedspread, quilt it or choose a thick fabric. The size of the bedspread depends on your taste. Select the fabric for the edging and prepare your sewing tools.
- Taking measurements for the bedspread. Measure the length (A) and width (B) of the bed covered with bedding. Decide how low the blanket will hang (C). Add C to length A; if you want the bedspread to cover the pillow, add another 15 cm. To width B, add two lengths C. Using these measurements, cut out the top piece and the lining; If necessary, provide allowances for seams and for pattern adjustment.
- Processing the corners of the bedspread. Round the 4 corners along the wrong side of both pieces, draw arcs using a round template and cut the fabric along these lines. Fold the top and bottom pieces in half and check that all corners are cut equally.
- Connecting parts. Place the top and bottom panels right sides together. Pin both parts around the perimeter and sweep, leaving 1 cm from the edge.
- Cutting out the edging. Measure the perimeter of the blanket along the basting line. Cut out a strip of fabric for the edging, equal to the perimeter plus 10 cm for the joints. Determine the width of the binding as you wish, but add 2 cm for the hems.
- Attaching the edging to the bedspread. Place the edges of the blanket and the borders right sides together. Pin, baste and machine sew one edge of the edging to the top piece of the bedspread 1.5 cm from the edge, along the fold line of the binding. Trim the seam allowance to 1cm or half the final border width.
- Completing the edging. Turn the blanket over to the other side. Fold the binding over the edge, pin, baste and sew with blind stitches to the lining 1.5 cm from the edge.
- Finishing stitch for the bedspread. If you wish, you can sew on the edging using a finishing stitch. True, these stitches will be clearly visible. Iron the finished bedspread and place it on the bed.