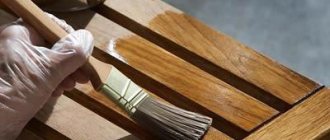
Preparing for work
- The first is choosing a curtain model and correlating it with the shape and proportions of the window.
- The second is creating a pattern and transferring it to paper in full size.
- Third is the choice of fabric and calculation of its consumption.
- Fourth - preparing tools and materials for sewing and finishing: drapery tape, bias tape, fringe, thread, lining fabric, etc.
It is advisable for novice dressmakers to use ready-made patterns for lambrequins, which can be found in magazines, freely available on the Internet, or ordered from specialists. If you want to make patterns with your own hands, then it is better to start with simple models. After all, once the sewing is finished, nothing can be corrected.
Determination of fabric consumption
The most common detail of lambrequins is the swag - a hanging semicircle with folds. It is also the most difficult to sew. Swags are divided into two parts – the smooth middle and the shoulders (folded parts).
To determine the consumption of fabric that will be used to sew curtains, group the paper patterns by color and lay them out on a piece of fabric of a suitable size (for example, on a sheet). Don't forget to leave seam allowances (1.5-3 cm). Assume that the standard width of curtains and curtains is 1.5, 2.8 or 3 m.
Advice
To create beautiful folds on the lambrequins, you need to cut the swags obliquely, that is, at an angle of 45-50° to the grain thread.
Measure the length of the section of material that the patterns cover and add another 20% to it. This will be the optimal amount of fabric for sewing curtains with your own hands.
How to cut a lambrequin correctly?
Depending on how long your cornice is, the lambrequin may have one part or several. Their length is also related to the characteristics of the cornice. But most often, each part of the lambrequin has on its surface both smooth areas and those assembled in the likeness of a shuttlecock. The middle smooth part makes up one third of the entire part.
Related article: How to sew braid for Roman blinds: recommendations from experts (2500)
First of all, you need to decide on the width of the lambrequin. If you have a lambrequin consisting of one part, then everything is very simple; its width will correspond to the length of the curtain rod fastening. If there are two parts, one of which will cover the other by one third of the width, the calculation is made in accordance with the example below.
Let's take as a basis that each of the parts is equal to 3/3, which means the total width is 6/3. From this number you subtract 1/3 (the size of the overlapping width), you get 5/3.
Next, measure the size of the cornice and divide it by the number 5. As a result, you get 1/3 of the width of one of the parts. You multiply this value again by the number 3, as a result you get the width of one part of the lambrequin. We calculate the width of parts of a lambrequin, consisting of a larger number of elements, according to the same scheme.
Direct cutting of the lambrequin is carried out, as has already been announced, maintaining an angle of 45°. All three parts can be made from one pattern, just do not forget to allow an allowance of 2 cm. The rounded edge of each section is processed using a double hem, the size of which is 1 cm.
It’s good if you insert a special flexible tape made of metal into it. The ends need to be well secured. Next, all three parts are laid out inside out, with the middle part located under the side parts. Next, we sew a line along the top edge, making a seam allowance of about 1 cm. The resulting element, or rather its upper part, must be carefully ironed, turning it inside out. Its width will be 2 cm.
Now you can start attaching the curtain tape (braid) along the top edge. It is necessary to deviate from the cut no more than 1 cm. Tension the threads of the tape in such a way that the assembly falls on only one third of the width of each of the side parts. The middle piece should remain smooth.
The lambrequin is placed on the cornice using clamps evenly along its entire length.
Cutting and processing of lambrequin parts
The technology for cutting a symmetrical swag from a finished pattern involves sequentially performing the following stages.
- Fold the fabric diagonally (scarf) so that the wrong side is at the top.
- Place the swag pattern on top, matching the fold lines.
- We trace the pattern with tailor's chalk or soap, leaving a seam allowance of about 2 cm.
- We mark the places where the folds are formed (usually indicated on the pattern).
- We cut out the piece from the fabric and hem the sections with bias tape, fringe or ribbon.
- We make folds: we connect the indicated points of the pattern with our hands and pin the folds with pins on one side and the other.
- We repeat the operation until all the folds are laid.
- After this, the swag’s shoulders need to be sewn together - secured with a single or double stitch.
Asymmetrical swags are cut out and processed in the same way, except that the fabric does not need to be folded in half when cutting.
The technology for cutting elements with vertical folds - molds (symmetrical parts with folds converging towards the center), de-jabot (the sides of lambrequins, usually with an oblique cut), bells (elements with a single conical fold) - corresponds to the usual sewing rules: direction of the lobe threads - along the length of the part.
How to sew a rigid lambrequin?
Table for calculating the number and width of curtain folds.
In order to sew a rigid lambrequin, you will need the following equipment:
- bandeau base;
- adhesive fabric;
- thick fabric for the top of the decorative element;
- a pair of scissors;
- iron;
- sewing machine;
- Velcro-type adhesive tape;
- finishing for decoration.
First, create a pattern and cut out the base of the bandeau, using a warm iron, smooth the fabric and glue it onto the bandeau using the same iron. The excess fabric should be trimmed, leaving about 5 cm at the edges. Next, place the fabric on the lining and pierce three sides with pins, excluding the top. Sew with a distance of 1 cm from the bandeau, trim off the excess fabric. The front side needs to be turned out. Then you need to turn the top edge towards yourself, pull it tight and pierce it with pins. Attach the Velcro with the soft side and the hard side on the cornice. Next, secure the Velcro with a stitch and cut the fabric flush with it. Turn the tape inside out and pierce it with pins.
Return to contents
Combining lambrequin parts
After you have processed the swags and other elements with your own hands, they need to be sewn together. It is more convenient to start from the middle. If it consists only of swags, pin the side edge of the upper one to the lower one with an overlap of 15-20 cm. The overlap of the swag on the mold usually reaches the middle of the latter. The side parts - de-jabot - are added last. Swag, as a rule, covers the de-jabot entirely.
Advice
The maximum overlap of swags on each other should not exceed the width of their shoulder - lambrequins, where this rule is not followed, look ugly.
Before sewing the parts together, measure the length of the combined part of the lambrequin and, if necessary, adjust it. It is important that there remains a small margin relative to the length of the cornice - approximately 3-5 cm, otherwise the product will turn out narrow. These extra centimeters will be “eaten up” by sewing on the strip - another part of the lambrequin pattern, which is attached to the cornice.
Having combined the elements into one whole, we sew the bar. The length of the bar should be at least 5 cm longer than the main part.
- First of all, you need to align the middle of the strip and the main part of the future lambrequin, folding them with their front sides facing each other.
- The next task is to sew these pieces together with one straight stitch and press the seam.
- Next, we sew on the drapery tape - fold the raw seam up, apply the tape to the wrong side of the placket and sew. We first fold the side edges of the tape and strips inward - flush with the main part of the product. The upper edge of the bar remains free for now.
- We bend the top edge of the strip with our hands so that it wraps around the drapery braid, and iron the fold. We cut off the part of the strip that extends beyond the lower edge of the braid.
- Then you need to tuck the strip under the braid and sew their upper edges.
Advice To ensure that the strip holds its shape better, especially when it is made of transparent material, before you start sewing, glue it with non-woven material.
This completes the sewing of the lambrequin. The edges of curtains and curtains are processed in the same way: the free edges are treated with bias tape, decorative ribbon or fringe, and drapery braid is sewn to the top edge. Next, you need to iron or steam the finished product - and you can hang it on the window.
Types of lambrequins
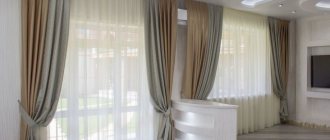
The following varieties are distinguished: Soft Such lambrequins are an airy structure made of one or several strips of light fabric. They are the most popular at present. Curtains with a soft lambrequin will definitely highlight the beauty of any window. There are 2 types of such decor:
- simple, consisting of one piece of fabric through which a braid is threaded (this type is easy to make with your own hands);
- complex, consisting of many types of fabrics and other elements, the interaction of which creates an overall composition; can be combined with a solid lambrequin.
Rigid lambrequin made of several types of fabric
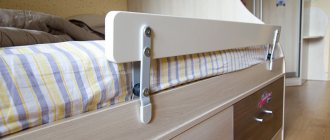
Hard Previously, this type was made of wood. Currently, a solid non-woven fabric called “bandeau” is used to sew it. Sometimes the fabric is additionally strengthened with some kind of seal, with which the drapery can be easily fixed in the desired position. Rigid models can have a wide variety of shapes - from simple geometric ones to animal figures. They are most often attached using Velcro tape or eyelets - metal or plastic rings. This type of lambrequin goes well with blinds, Roman or London blinds and is ideal for use in an office, library, or study. To add solemnity to a rigid product, you can update the curtains with it yourself by choosing embroidery or other decorations.
Combined design option
Combined These lambrequins are a combination of a rigid base and light fabrics. They are indispensable when you want to add elegance and splendor to your curtains. Most often, combined models are used to decorate large windows in rooms with high ceilings. When creating such draperies, many decorative elements are used. The main ones:
- swag - semicircular fabric draped with folds;
- perekid – sagging swag;
- frill - an element located on the side, covered with folds of fabric and having a beveled or stepped lower edge;
- mold - a symmetrical frill, otherwise “skirt”;
- tie - a lambrequin element located in the center, filled with folds located one above the other;
- puffs - gathers, folds located vertically.
Modification of an Austrian type lambrequin
Conclusion
As you can see, sewing curtains with lambrequins with your own hands is not so difficult. The technology for sewing different models of curtains has a lot in common, therefore, having learned the simple ones, you will soon be able to sew curtains yourself according to any sketches, as well as engage in their design and modeling.
Nothing decorates a home better than elegant, timeless curtains. And especially - hand-sewn ones. Sewing yourself also helps you save money: it costs 20-30% less than buying ready-made products. And, of course, this is an opportunity to turn creative fantasies into reality without outside help. Go for it, and everything will certainly work out.
How to properly attach eyelets for curtains?
How to sew curtain tape and get a beautiful drapery?
How to make wooden blinds with your own hands?
Curtains with lambrequins for the living room with photos
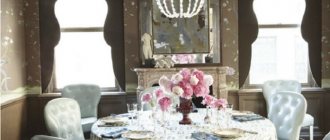
As you can see in the photo, a window decorated with curtains may well serve as the main element of the interior in the hall, but only if used in conjunction with lambrequins. It should be taken into account that the texture of the lambrequin fabric must match the fabric texture of the curtains themselves, and the color scheme must be correct - there are incompatible colors in the design. In addition, we should not forget about the proportionality and symmetry of the lambrequins in relation to the curtains themselves.
Lambrequin can serve as the main element of the interior in the hall
The fact that the window design should be combined with the color scheme of the furniture and ceiling, as well as the floor covering, is quite obvious. But the geometric dimensions of the lambrequin, and first of all the length, are selected in accordance with the design features of the opening being decorated.
A fairly traditional version of the ratio of the heights of the lambrequin and curtains is 1:6, however, the size of the room being decorated also plays a role in choosing proportions. The larger the room, the more “massive” the lambrequins should look; for small rooms, the lambrequin essentially plays the role of a wide window cornice. The pattern of the folds also matters - the more “lush” it is, the more harmonious it will be for a larger room.
Curtains in the hall with lambrequins should be in harmony with the size of the room