Assembly of sliding doors
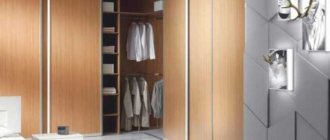
Below is a simple way to assemble sliding doors for a built-in wardrobe in an apartment.
All parts of aluminum profile sliding doors must be pre-fabricated.
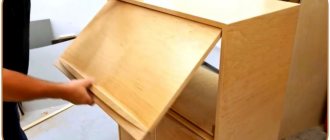
The door assembly sequence is shown in the animation.
- Take a fill sheet made of 10 mm laminated chipboard
- We put the top profile on the filling sheet
- We put on the lower profile
- We put on the side profile on one side
- We connect the vertical and lower profile with a self-tapping screw
- Install the lower roller with the adjusting screw
- We screw the self-tapping screw halfway into the upper part of the door frame
- Insert the upper rollers on one side and tighten the self-tapping screw
- We put on the side profile on the other side
- We connect the vertical and lower profile with a self-tapping screw
- Install the lower roller with the adjusting screw
- We screw the self-tapping screw halfway into the upper part of the door frame
- We insert the upper rollers on the other side, tighten the self-tapping screw
Now about each stage in more detail.
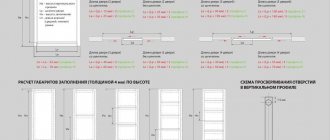
We install the top 2 and bottom 3 profiles on the door infill sheet made of 10 mm laminated chipboard 1, having previously marked the infill sheet at the top and bottom so that the profiles fit exactly in the center. The top and bottom profiles should be shorter than the fill sheet at the top and bottom - this is shown in the animation.
If you can’t immediately place a profile on a sheet of chipboard, you can see how to overcome this here.
We place the laminated chipboard filling sheet with the upper and lower profiles installed on it on the floor - on its side. We put a vertical profile 4 on top of the laminated chipboard sheet.
Screw self-tapping screw 5 into the lower profile of the frame.
Install the lower roller 6. The roller must be located like a leaf spring inside the frame and “look” inside the door, otherwise it cannot be installed.
We screw the adjusting screw into the lower roller housing through the side profile.
We set the adjusting screw to the “middle” position - this will further simplify the height adjustment of the installed doors.
We screw self-tapping screw 7 into the upper part of the frame until its head is inside the profile approximately in the middle between the outer wall of the side profile and the jumper (see photo).
Install the upper roller 8. The roller should “look” towards the outer part of the door, do not confuse it.
We tighten the self-tapping screw until it stops until its head presses the upper roller bracket to the jumper.
We turn the laminated chipboard sheet over to the other side and put a second vertical profile on it. We fasten the profile and rollers 9 – 13 on the other side of the frame as described above.
We assemble the second door in the same sequence.
Now you can stick a brush seal (schlegel) on the door.
Seals for facade filler
Facade seals are designed to fix glass or mirrors, chipboard or other material into a groove. They eliminate backlash, knocking, and prevent destruction of the façade filler and base from impact when closing the door.
Most façade seals for cabinet furniture are made of silicone. A high-quality silicone seal is durable and resistant to household chemicals, does not dry out and retains its elasticity throughout the entire life of the wardrobe.
How to glue a brush seal to a closet door
Gluing the brush seal (schlegel)
For my doors I used schlegel with a pile height of 6 mm. This is a recommendation from the company where I purchased the profile.
Schlegel is a strip about 9 mm wide with a fairly rigid, inelastic plastic base, covered on one side with a thin pile.
An adhesive composition protected by film is applied to the other side of the base.
Schlegel is sold by the meter - how much Schlegel you order, that much will be unwound from the roll and cut for you.
How to stick the Schlegel can be seen in the photo. Schlegel is glued in a whole strip along the entire length of the vertical profile - without indents, and does not hang over the edge, that is, exactly the same length as the vertical profile.
Before sticking, you don’t need to cut a piece of the estimated length from a whole skein of Schlegel, because you can easily make a mistake.
Therefore, it is better to stick the schlegel by gradually unwinding the entire skein, cutting off the excess after the schlegel is completely glued to the vertical profile (see photo).
We start gluing the Schlegel from either end of the vertical profile, add it to the other end, and cut off the Schlegel along the cut of the profile.
In order for the Schlegel to stick evenly, it is better to stick it gradually, centimeter by centimeter. Then it will turn out beautiful.
After sticking, the Schlegel will begin to peel off at the edges. This is normal and occurs due to the fact that the base of the schlegel is rigid, and before the sticker the schlegel was rolled up with the base facing out.
Another reason for peeling off is the presence of holes on the edges of the vertical profile for self-tapping screws and adjusting screws of the lower rollers. For example, in the photo you can see how in my wardrobe the schlegel partially came off at the top of the installed door within 24 hours.
Peeling off of the Schlegel can be eliminated. In the upper part of the door, approximately 8-10 cm of Schlegel can be immediately “added” to the profile with “Moment” glue (preferably transparent).
At the bottom of the door, the schlegel can be secured to the vertical profile with special clamps, but it is better to install the clamps after the doors have been installed and adjusted.
If you can’t purchase special Schlegel clips, try using paper clips instead. They will be invisible in the pile.
Now you can proceed to installing the doors.
Offered range
Finding brush seals in Moscow, St. Petersburg, Krasnoyarsk and any other city where there are furniture fittings stores, such as Leroy Merlin, will not be difficult. But it’s worth knowing what they are and how they differ from each other.
The following main varieties are distinguished:
- Brush seals on the pile. The height of the latter is 6 mm, there is a self-adhesive base, the width of which is 7 mm. Usually done in black, white, milky, beige and bronze;
- Pile schlegels. Here the pile has a height of 12 mm. Self-adhesive is available with a width of 6 mm. Products are most often gray, white, beige and bronze;
- Felt-based brush seals. Height varies from 9 to 15 mm. There is no adhesive base, the width of the tape is 5 mm. Color black or gray;
- Double pile schlegel. The height is only 4 mm, there is self-adhesive, and the width of the tape is 11 mm. Usually these are black, brown and beige products.
These are just indicative parameters. Each manufacturer may use a different color. Seals are sold in the form of rolls. Buyers are supplied with tapes in the quantity required to seal a specific sliding wardrobe.
The price directly depends on the height of the brush layer and bristles. The larger they are, the more expensive the Schlegel seal will be.
Rubber
Rubber is the most resistant material that is not afraid of temperature changes, exposure to acids and aggressive substances - oils, gasoline.
Creates a durable seal for entrance door frames that are at the interface of warm and cold air.
Can be used in the most unfavorable environmental conditions.
Rubber door seal is a reliable solution , as it is made of a soft material that changes shape and does not crack due to its thickness of 2 mm.
A soft rubber band is necessary if the surfaces are uneven. A stiffer material will not tightly close the cracks, as it is less susceptible to deformation.
The profile has different shapes, which makes it possible to choose the optimal model for entrance doors. The width should be selected based on the size of the gap.
Prices for seals for doors made of different materials
Function and Advantages
Many people not involved in the repair industry are wondering what the sealant is used for. Basically, the main task of these elements is to protect the door structure from external phenomena. In addition, the presence of a seal softens the impact when closing. Thanks to such elements, you don’t have to worry about drafts or wind entering the room.
Often, seals are used to protect housing from dust and moisture. People suffering from allergies know firsthand that these elements at the base of the door structure do not allow plant pollen into the room.
In addition, the self-adhesive sealing tape has the following functional qualities:
- with the help of these parts the door closes as tightly as possible;
- seals retain heat in the room;
- a stable temperature is maintained in the room;
- it protects against drafts and noise coming from the street.
It is worth noting that the use of these elements allows you to achieve maximum tightness even if the installation is not difficult.
The advantage of seals is their practicality. They can be attached to any material, which is what many customers like. They adhere perfectly to wood, metal and plastic. Due to their small size, the products are invisible on structures. In addition, the seals do not in any way affect the appearance of the door. If you want to remove the tape from the surface, this will be quite simple. In addition, there will be no traces left on it.
Many experts claim that modern seals do not have the ability to absorb moisture and unpleasant odors into the base. During use, the products do not oxidize or deform under the influence of external factors. Seals can be used even at high and low temperatures. This impact does not affect the performance of the elements
Which material is better
You need to select insulation for the front door based on your goals: to ensure tightness, temporary insulation, long-term use.
For example, if you plan to replace wooden structures with metal-plastic ones, then you can use inexpensive foam rubber insulation, the service life of which is 1 year. Further, under the influence of temperature changes and dust, the foam rubber loses its properties and crumbles. Such insulation will be inexpensive, but will not last long, especially in outdoor conditions.
For heavy metal doors, it is necessary to glue durable rubber. Its shelf life is up to 15 years. A correctly installed product does not stretch, shrink or peel off during use. Rubber, which is used for entrance iron structures, is usually porous, which makes it possible to retain heat in the room . You can determine the end of the product’s service life by the appearance of the rubber layer: it will begin to peel off in some places.
For internal structures, silicone or rubber linings are the best. They have the same properties and last a long time. For small gaps, you can buy thin rubber or silicone. At the beginning of the process, you need to measure the width of the gap and select a specific brand of product in the store.
A budget option for self-adhesives is foam rubber. Their service life is up to 2 years in an apartment.
To seal the wardrobe, fleecy tape is used.
It is needed to prevent dust and odors from getting on clothes.
This solution is especially relevant when the apartment layout is made according to the studio principle: there are no interior walls, the kitchen and closet are located in the same room.
Pile tape is a thin sealant that has an adhesive surface on one side and long-pile fabric on the other. This self-adhesive does not reduce noise (and this is not necessary), but it prevents the penetration of dust due to the tight fit of the sashes .
What is it used for?
Most designs of sliding plastic doors (windows), with rare exceptions (lift-and-slide doors - like in buses), do not ensure an absolutely tight fit of the panel to the door (window) frame, there is a need to partially eliminate this drawback.
The use of traditional rubber (silicone) seals is impossible due to the high coefficient of friction of these materials and rapid failure, difficulty in opening doors, and damage to the floor covering. A completely different matter is a soft, dense, multi-row brush that easily glides over any surface, bridging the gap that forms.
But the brush does not guarantee insulation, elimination of odors if the structure is installed in the kitchen, or from frost and drafts if the French window leading to the terrace is equipped with such a covering. But the cover reliably protects the room from the penetration of dust, insects, and raindrops knocking on the window.
Depending on whether brush seals are used on plastic or wooden sliding doors - external, leading to the street or internal - interior, the structure, height, thickness of the material from which they are made differs.
For external street brush seals used for insulation, porous rubber is used, which has a very low thermal conductivity coefficient. Thanks to the large width of the strip, several rows of bristles, and their close fit to each other, fairly effective protection against heat loss in the room and insulation are provided.
When brush strips are used in interior sliding wooden structures, or for wardrobes, where the main purpose of use is not insulation, but to prevent dust from entering (flaps). They do not have such a dense structure (2-3 rows of bristle tufts).
Brush strips differ in design. For wooden and metal sliding doors, they are often made on an adhesive base, which allows for quick installation and, if necessary, quick replacement.
For plastic sliding windows, the bristles are mounted on a metal frame with a profile section, which is simply inserted into the corresponding groove of the plastic products. For each door (window) manufacturer, only its “branded” profile is used. Such products are not interchangeable.
For glass sashes, silicone (transparent) brush seals are used, which have a U-shaped profile, placed on the end of the glass, previously degreased and moistened with water.
When dry, they are firmly fixed.
Gluing rules
How to glue a seal to a door. Installing self-adhesive elements is not difficult, but there are several nuances that need to be learned before starting work so as not to damage the product.
The seal for wooden doors should be installed as follows:
- The first step is to remove the old stickers from the tree, if there were any there.
- Measure the width of the gaps and select the size of the insulation, as well as the total length of the perimeter with a margin of 50 cm.
- Clean with sandpaper to ensure that old dust and debris do not interfere with installation.
- The area must be wiped with a cloth soaked in alcohol, acetone or gasoline.
- Measure the length of the sides with a tape measure and measure on the prepared material.
- Remove the protective strip from the seal and stick it first on the top side, then on the bottom, then on the sides.
To make the joints at the corners look neat, cut the strips at an angle of 45 degrees. The product will completely stick in 2 – 3 hours. After this, the door can be opened and closed.
The self-adhesive seal for metal doors is mounted in a similar way . The doorway is cleaned with sandpaper and wiped with white spirit or gasoline.
Next, the protective tape is removed and the box is sealed. To completely seal the entrance, you need to glue the door itself at the junction.
In this case, the sealing material should be selected taking into account the double lining, otherwise the entrance structure will be difficult to close.
Thin self-adhesive overlays are suitable for plastic windows. Before installation, wash the plastic and dry it. Next, moisten the cloth in a degreasing composition and wipe the windows in the place where the self-adhesive is to be installed.
The surface of the plastic is smooth, so this procedure will be easier. You will need to remove the protective tape and glue the cover. Then carefully trim the corners.
With the help of various modifications of seals, you can inexpensively solve several problems at once - reduce noise levels, save on coolants, eliminate furniture defects. Depending on the budget, it is possible to insulate the room for a period of 1 to 15 years.
Door seals
Door seals for sliding wardrobes perform the following functions:
- softening the impact when the door touches the side wall when closing;
- sealing cracks.
Thanks to the seal, dust and dirt do not penetrate into the cabinet. Working as a damper, it significantly reduces noise and extends the life of furniture.
There are two seals that are fundamentally different in design - brush and polyurethane.
The brush seal, often also called “schlegel”, is a plastic base with pile. The main characteristics of Schlegel are the density and height of the pile, color. The pile height of brush seals is from 6 mm to 12 mm, so it is possible to seal cracks of different sizes. Schlegel is available in a wide range of colors. The customer always has the opportunity to choose fittings that best suit the cabinet design. Monocolor looks good - schlegel in which the color of the pile and the base are the same.
Q-lon seals are made of polyurethane foam. Their functions are similar to Schlegel, but they look much more aesthetically pleasing, are more resistant to deformation, and are easy to clean. The price of Q-lon is higher than that of brush buffer tape.
How to glue a seal to a wardrobe door? It is mounted by gluing to the side of the door. Tapes are available with or without an adhesive layer. The former have gained great popularity, as it is much more convenient to work with them. To prevent the seal from falling off near the edge, it is fixed with a special clothespin.
Another type of door brush seal is the “boot seal.” This is a buffer tape with a pile height of 12 mm. The boot is attached to the aluminum door profile on the inside of the cabinet and seals the gap between the doors.
BRUSH SEAL
Brush seal – used for sliding wardrobes and sliding interior doors. The brush seal is a special pile sewn into the tape with a self-adhesive base. The brush seal has several functions: it closes cracks, softens the impact of the door, and prevents the penetration of dust. The height of the brush seal pile is presented in 2 variations - 6 mm and 12 mm with a self-adhesive base and 9 mm, 12 mm and 15 mm with a base without adhesive base, such a seal
called plug-in.
We supply 10 colors of brush seal .
snow-white, milky, beige, gold, beige, bronze, brown, silver, gray, dark. We sell brush seal both retail and wholesale. 1. Brush seal (SCHLEGEL) with a pile height of 6 mm, self-adhesive
Retail price 35 rubles per meter
2. Brush seal (SCHLEGEL) with a pile height of 12 mm, self-adhesive
Retail price 40 rubles per meter
3. Brush seal (FETR) with a pile height of 9-15 mm without an adhesive base
Retail price 50 rubles per meter
4. Brush seal with a pile height of 4 mm, self-adhesive
Retail price 50 rubles per meter
BRUSH SEAL COLOR PALETTE:
purchase a brush compactor at retail in multiples of 20 meters. So, for example, brush
a seal with a self-adhesive base with a pile height of 6 mm - costs 700 rubles, with a pile height of 12 mm - 800 mm.
You can order a brush seal for delivery or pickup.
If you are interested in wholesale purchases of sealants, please contact the sales department. COLORS CORRESPONDENCE OF BRUSH SEAL AND DURAL PROFILE:
INSTALLING THE BRUSH SEAL:
To install the brush seal, you need to degrease the surface using special water, for example, alcohol, then carefully glue the brush seal (removing the protective layer, as shown in the picture), paying special attention to the ends of the seal. For added confidence, you can additionally glue them.
Features and functions of furniture brush sealer
03/14/2013 Sliding wardrobes are gaining more and more popularity. And all because they are an ideal solution for small-sized apartments, because they don’t take up much space and they can visually expand the space if you use the appropriate material for decoration. But few people know that components for sliding wardrobes include such an element as schlegel. In other words, it is a brush seal, also called a buffer tape. The seal is installed on the ends of the doors.
So, let's look at what functions a brush seal for furniture performs. Of course, its main purpose is to ensure a tight fit of the wardrobe doors to the side panels. That is, it is designed to fill the existing space between two elements of the wardrobe
The next function of a brush seal is a great way to trap dust. Thus, thanks to the Schlegel, the objects inside the cabinet do not become dusty, which makes the owners of this piece of furniture very happy. It is also worth noting that the material from which Schlegel is made is moisture resistant, which eliminates the possibility of the growth of fungi and harmful bacteria.
Another advantage of the brush seal is that, thanks to it, the doors of the sliding wardrobes close absolutely silently, even if you make a sudden movement. That is why this type of component is used both for furniture intended for hallways and for that installed in children's rooms. Let us emphasize that this is a very important plus, because who among us has not slammed, even accidentally, cabinet doors when getting ready for work, but this can greatly disturb our loved ones, especially if they are sleeping.
And finally, perhaps the most unexpected function of the brush seal is cleaning. It turns out that the fleecy surface of the Schlegel, being on one door of the wardrobe, helps clean the other door, and vice versa. And now a little about what exactly a brush seal is from a technical point of view. So, it has a woven base, which is coated with a special layer of polypropylene, due to which the product becomes rigid and lasts much longer. It is also covered with a layer of pile, the length of which can vary from 4 to 16 mm. Each of the fibers is coated with silicone, due to which the fiber has water-repellent properties and is also resistant to ultraviolet rays. And thanks to texturing technology and special heat treatment, the brush seal acquires high strength and the ability to recover after deformation.
Note: Apartment renovation prices worry many people when they are going to start renovations in their house or apartment. Of course, a lot here depends on the professionalism of the craftsmen who will carry out the repairs.
Other news on the topic:
- Door seals
23.08.2014
Like windows, doors also play an important role in human life and in creating a comfortable indoor climate. Almost any door has a gap between the door...
- Replacing the seal in a metal-plastic window
01.04.2015
One of the most common types of rubber products in construction is sealant. In a metal-plastic window or door, it is necessary for sealing and preventing…
- What is the purpose of window seals?
14.03.2013
Surely, many adhere to the rule that information is never superfluous. This is especially true these days. After all, the more we know, the easier it is for us to navigate, and...
- Types and choice of sealant
30.07.2014
The window seal is a small, inconspicuous element of the window, but it plays a huge role in the functionality of the windows of the room. It is the seal that provides noise and sound insulation,…
- How to replace the seal on a plastic window?
22.06.2013
Plastic windows are extremely popular these days. They are installed both in apartments, private houses, dachas, and in administrative premises and even in warehouses...
Relevant Features of Brush Door Seal
Sliding interior structures have only one drawback compared to their swing counterparts. This is the impossibility of ensuring a reliable and tight fit of both canvases to each other. This way, small gaps are formed through which dust, dirt, cool air masses and even small insects get from one room to another. To ensure that this narrow space is covered, a self-adhesive brush seal for the interior door is used. It is often also called a stripe.
Later in the article we will look at options for the expedient implementation of such products. The products are installed to seal not only door structures, but also window structures.
Decorative sealing brushes
Door brushes
Stribos are attached to the lower part of the door leaf using screws and adhesive tape.
How to stick a fallen brush on a wardrobe yourself
How to stick a brush on a door
wardrobe, if it has come off at the edges.
What are brush seals made of?
The product is presented in the form of a regular brush, the bristles of which are made of various materials. It all depends largely on the installation location of the strip. It will be a window or a door, a garage door or another place. For what purpose is the sealing element used?
Such seals are made of nylon, polyethylene, silicone, rubber, made from natural bristles or iron wire.
Most often, such a device is installed at the bottom of sliding interior doors and windows to bridge the gaps that arise at the bottom of the structure if the rollers are located at the top. When it is necessary to seal French windows, it is recommended to use a self-adhesive brush seal made of silicone. It is transparent and is installed around the entire perimeter of the structure to perform its assigned tasks.
What are they made of?
A brush seal (flashing) is an ordinary brush, the bristles of which are made from a variety of materials, depending on the floor covering, window sill material, and operating conditions.
Most often, synthetic fibers are used to make brush seals: nylon, polyethylene, silicone, synthetic rubber, natural bristles or metal wire.
The basis for its production can be polymer woven materials, rigid bases - plastic, rubber, metal.
Typically, the accessory is mounted at the bottom of sliding plastic doors (windows), covering the gap formed at the bottom of the door when the rollers are located at the top, along which the door leaf slides. When it is used for “French” windows that do not have a plastic frame, it can be located around the entire perimeter of the glass, being transparent (silicone) and acting as a strip.