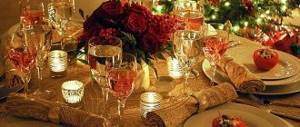
Imagine setting a table without paper napkins. This is just a disaster! Confused guests no longer care about culinary delights. Each of them has only one question in their head: where are the paper napkins?
The meal will be completely different if the table is decorated with original paper napkins, which are used not only as a hygiene product, but also as a stylish table decoration. Charming products made in the shape of flowers and birds set the mood for the dinner and give the participants the necessary comfort.
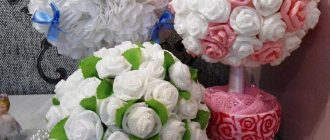
“Beautiful Rose” - spectacular and beautiful
The main purpose of this method is to fold a rose from multi-layer paper napkins. Before you beautifully fold paper napkins, you need to place each one so that the closed sides are on the left and top, and the open sides are on the bottom and right. Then cut a thin strip from the left side and set it aside. Next, lay it out and make an accordion out of it, highlight the middle and tie it with a cut strip.
Place the resulting figure on the table and carefully gradually finish the top layers. This procedure is repeated until all layers are straightened. The result should be a composition reminiscent of a rose.
"Candle"
This option is useful for decorating not only a bright holiday table, but also a calm romantic date. To do this, paper napkins should not be of a standard size, but large and dense, plain.
One is unfolded, placed face down on a flat surface, then shifted diagonally. The central corner is folded so that it touches the top edge, the bottom is folded 1.5-2 cm up, after that the two edges are connected, one of them turns away a little, you can start twisting it into a tube. The corner that remains from twisting is carefully tucked inside so that it is not visible.
The candle wick can be made in a different color. To do this, before twisting, another one, but of a smaller size, is added to the main napkin.
Refined spring vase
Crafts made from napkins are not limited to just flowers. From this wonderful material you can make or decorate almost anything, for example, a decorative flower vase. To make an unusual vase, you will need to stock up on the following materials:
- Napkins with elegant plant or animal patterns;
- Can – tin for coffee or juice;
- Acrylic white paint and putty;
- PVA glue;
- Stack;
- Brushes.
detailed instructions
- The jar is coated with paint on both sides, and then dried in a well-ventilated area.
- The top thin layer, where the pattern is located, is carefully peeled off the napkin. The fragments of the picture needed for the composition are cut off with your fingers. It is not advisable to cut them with scissors, as in this case the edge will be too smooth.
- The next one-color layer is glued to the outside of the prepared jar, tearing off small pieces according to the papier-mâché principle.
- Acrylic putty is applied in uneven strokes along the upper cut of the can, masking it.
- Next, on one side of the future vase, from top to bottom, a trunk and branches are formed using putty using a stack.
- The adhesive composition is diluted from one and a half parts PVA glue and one part water. Fragments with leaves, birds, butterflies, forest animals are placed on the surface of the jar in accordance with the compositional design and are carefully coated on top with a brush with an adhesive solution. During gluing, it is important to apply movements from the center of the fragment to the edges, carefully but carefully smoothing it, trying not to tear it.
- Having covered the entire surface of the vase, paint the neck to match the main background. To paint the branches and trunk, use brown paint to fill in all the irregularities.
- After the trunk has dried, decorative protrusions are highlighted with golden paint using a sponge. To do this, the sponge is lightly pressed against the desired area of the improvised trunk without indentation. A slight golden effect can be created over the entire surface of the vase.
A DIY vase is a beautiful and affordable accessory that allows you to transform your interior.
To secure the decor, the dried surface is coated with colorless varnish. Bouquets of wild and garden flowers will look great in such a vase.
How to beautifully place napkins in a napkin holder?
Napkins on the table are often not on plates or in glasses, as some ideas require, but in napkin holders. How to beautifully fold paper napkins into a napkin holder so that they become a real decoration for the holiday table? This, first of all, depends on the shape of the item and only then on the napkins themselves.
Methods for round shape
If the napkin holder is made in the shape of a vase or glass, then it is better to give preference to larger napkins than standard ones. For the first method, each one needs to be unfolded and then folded again in the form of a triangle. Then fold the resulting shape into a tube, find the middle and bend it in half, and insert it in this form into the napkin holder.
For beautiful placement using the second method, you will also need to fully unfold them and then fold them into an accordion. The width of one fold can vary from 1 to 2 cm. The resulting accordion needs to be bent in the middle and inserted into a napkin holder. The more such napkins it contains, the more magnificent and brighter the composition will look.
Methods for a flat standard napkin holder
For this shape, the easiest and most effective way is to lay out a large amount so that only the corner of each one shows. The displacement of one relative to the other should not exceed one centimeter. The main thing to remember here is that for such a composition, plain napkins of different colors or two contrasting ones, for example, red and green or yellow and red, etc., are suitable. Another great option is to choose different shades of the same color scheme.
We create unique things: how to make a bouquet of sweets with your own hands. DIY box made of cardboard: creative and beautiful. You will find instructions for various options in our article.
Master class for children from one year old
- Prepare white and blue cardboard and white napkins.
- Cut three circles of different sizes from white cardstock and glue onto blue cardstock to create a snowman.
- Together with your baby, tear the white napkins into small pieces.
- Spread the entire surface of the snowman generously with PVA glue.
- Throw white napkins randomly over your work.
- After drying, brush off excess pieces of napkin and use a marker to draw eyes, a nose and a bucket for the snowman.
- The work is ready.
Children's crafts
Ideas for children can also be very different, the only point is that they must correspond to the child’s skills. You need to start with simple crafts (appliqués, origami), gradually moving on to more complex figures. Young children are most attracted to “cartoon” characters. For example, the photo shows Smeshariki, loved by kids. Smesharika Krosh can be made in this order:
- You should crumple a ball from a sheet of newspaper.
- Many small balls are made from napkins and pasted over a newspaper base.
- Ears, eyes and paws are cut out of colored paper.
- The nose and teeth are made from napkins.
- Paper paws are covered with small-diameter napkin lumps.
- The paws are attached to the ball (torso).
- Hands are made from 2 napkin balls.
- Characteristic elements are glued on - ears, nose, mouth and eyes.
Sources
- https://kaksdelat.guru/podelki-iz-salfetok/
- https://domnomore.com/podelki-iz-salfetok-poshagovyj-master-klass-svoimi-rukami-foto/
- https://podelki.pro/podelka-iz-salfetok/
- https://CozyBlog.ru/dekor/podelki-iz-salfetok.html
- https://berkem.ru/drugoe/kak-sdelat-origami-iz-bumazhnyx-salfetok-svoimi-rukami/
- https://svoimirukamy.com/podelki-iz-salfetok.html
- https://podelki.guru/podelki-iz-salfetok
- https://www.hobobo.ru/podelki/podelki-iz-bumazhnyh-salfetok-svoimi-rukami/
The most unusual design of napkins
To surprise your loved ones and guests with an unusual table decoration, you should also pay attention to napkins. There are several unusual ways; in especially difficult cases, a video will tell you how to beautifully fold paper napkins. You can choose from the following options:
- "Lily". To do this, you will need bright plain napkins, since the flower should turn out to be a rich color. Colorful and light options will not be able to emphasize the shape. One napkin is carefully folded diagonally, then the left and right corners are connected, the right one is inserted into the left. The resulting figure needs to be turned the other side and the upper outer parts pulled and straightened to the sides.
- "Magic shoes." This method is suitable for both adult and children's parties. You can use plain or multi-colored options, but it is better that they match the tablecloth and dishes. Size - no less than 40x40. First, we bring the left and right edges together in the center, fold them in half, turn them over with the closed side facing us, then bend the resulting sides, leaving a gap of 1 cm, it is important that one edge is slightly longer than the other. The resulting figure is folded again and the result is a pocket, after which the napkin cannot be turned over. Place the free end in the pocket, then bend the resulting boot top and carefully straighten the resulting boot.
Paper napkins on the holiday table should not only serve to maintain cleanliness, but also be a decoration. Each housewife chooses for herself whether they will be folded in a simple way or whether it is better to spend time and create an effective composition.
Crafts techniques
How often do we not think about how many beautiful works of art and crafts can be made from ordinary things. Panels made of shells, covers made of leather from boots and even a whole fence made of plastic bottles are only the smallest part of the “do-it-yourself” creativity.
Trimming
In the photo of crafts made from napkins using the cutting method, it is not immediately clear how the work was done. Fluffy three-dimensional drawings fascinate with their beauty.
The trimming method involves gluing twisted balls or tubes with glue or plasticine to a surface. The output is an airy composition.
This method can be combined with other types of applique or patterns, as well as trimming three-dimensional objects.
Appliqué (tearing into small pieces)
Such work is usually done with children, who cannot yet be given scissors in their hands. Children's crafts made from napkins are distinguished by their simplicity and safe materials for use.
Multi-colored pieces are glued onto a pre-prepared outline, pattern, image, or a pattern is modeled from napkins by eye.
Creating figures using papier-mâché technique
The shape (for example, a ball) is completely covered with napkins in 8-10 layers, dried, then the base is removed, and the resulting figure is painted and decorated.
As an idea for crafting from napkins using the papier-mâché method for children, you can take any dish or balloon, and adults can create a “Venetian mask.”
Modeling jewelry from napkins
There are a huge number of subspecies of this division, including modeling fluffy balls, twisting flowers, and decorating objects.
It’s not uncommon to decorate holidays with such works or give them as gifts for birthdays. An excellent gift for grandma on March 8 would be a craft made from napkins rolled into roses and glued to a background or ball shape.