Share on social media networks:
DIY crafts from napkins are not only a wonderful way to have a good time, but also an opportunity to decorate a room in an original way for a particular holiday. And if you make them with your children, you will teach them how to create beautiful things on their own. In addition, such creativity helps to relax, relieve nervous tension and calm down. Many child psychologists and teachers believe that making crafts from napkins is an excellent way to develop perseverance and hand motor skills. Let's look at several options for what can be made from napkins.
Napkin flower
A beautiful lotus made from napkins with your own hands will be a wonderful decoration for the festive table. This flower can be not only a decoration, but also a napkin holder.
To make this decoration you will need the following:
- Red napkins - 40 pieces.
- Red napkins - 4 pieces.
- Thin wire - 10 cm.
Manufacturing sequence:
- First, make some preparations. Take a green napkin and open it so that only one fold remains. Fold the resulting rectangle lengthwise and open it again.
- You should end up with a rectangle with a fold in the middle. Fold the corners of all four sides towards the center.
- Fold the sides also towards the center and in half again. This way you should end up with a narrow rectangle with corners on the sides.
- Do the same with the remaining green napkins.
- Take a red napkin and, without opening it, fold it in half to form a triangle.
- Place it with the top facing away from you, fold the side corners to the center with the sides. And bend the corners protruding at the bottom on the reverse side. Follow the same steps with all other red napkins.
- Start forming the base of the lotus. Take the green napkins and fold them together. Now, to mark the middle, fold their total mass in half, but without putting too much pressure on the fold - we only need it as a guide.
- Now secure the napkins with wire in the center and place them on the table with the long side of the corners facing up - these will be the leaves of the flower. Spread them out so that they lie evenly in a circle.
- Start collecting petals. Take a red napkin and fold it in half with the curved corners facing inward. Insert the resulting triangle into the green leaves of the water lily, and straighten the upper part so that you get a voluminous petal - it will be easier to insert subsequent ones from above.
Important! Insert the corners of the petal so that one is in one sheet and the other is in the other. This way the composition will hold better and there will be no gaps. So do the first row.
- Complete the next four rows in the same way. You should get a beautiful and lush lotus.
Spring dandelion from napkins
To make the dandelion really lush, you need to prepare three-layer yellow napkins, a stapler and scissors. Fold the yellow napkin several times and cut it into squares. Next, we stack them on top of each other and secure them in the center with a bracket. The corners of the resulting pyramid must be cut so as to form a circle.
Using scissors, carefully make a fringe around the edges. We lift each circle up and fluff it up - you get a lush dandelion. Since the back side of the product will be completely flat, such flowers can be used to make children's appliques, luxurious panels or decorations.
Sweet heart
You can make a DIY paper napkin craft in the shape of a heart together with your child. This will provide an opportunity to develop patience, perseverance, imagination and accuracy in the baby.
To work you will need:
- White and pink napkins.
- Red cardboard.
- Scissors.
- A simple pencil.
- PVA glue.
- Pre-cut paper palm.
Sequencing:
- To carefully cut out a heart from cardboard, use a template, or draw it yourself. On the back side, trace a palm out of paper.
- Take some napkins and cut them into 4 strips, and then each strip into 3 more pieces. As a result, you should end up with small pink and white squares - make lumps out of them.
- Now start forming the composition itself. Make a palm from white lumps, filling its inner area with them - use PVA for these purposes. Using the same principle, fill all the remaining space on the heart with pink lumps.
Important! The lumps should fit tightly to each other so that there are no gaps.
- If you want to hang the craft on the wall, then attach a loop of silk or satin ribbon on the back side.
DIY rose from napkins
You can make a beautiful rose from an ordinary paper napkin and decorate the table with it, as well as do something nice for your loved ones.
The pattern is not very complicated, which means anyone can make a rose. Here you can find both photo instructions and a video tutorial.
* Lay the napkin on a flat surface and begin to roll it into a tube. To make this easier, grab one end of the napkin with your index and middle fingers.
* One end of the tube needs to be bent.
* Holding one part of the tube, start twisting the other (larger) part. You don't need to twist until the very end - stop a little below the middle.
* Gently lift the lower, untwisted part up to make rose leaves out of it.
* Press down your rose leaf in some places so that it remains in the desired position.
* You can also twist the very bottom part of the flower.
*Tweak the top of your flower to make the rose more realistic.
If you don't succeed the first time, don't despair - everything comes with practice. Practice and you will succeed.
Charming roses
Various flowers can be made from napkins. In this master class we will tell you how to make a beautiful rose. This craft can serve as a nice gift or an interesting decoration for any room.
To work you will need the following:
- Red napkins.
- Green corrugated paper.
- Scotch.
- Pencil.
- Scissors.
- Skewers.
Manufacturing sequence:
- Take a napkin and cut its sides so that you get separate squares.
- Place the square on the table, roll it into a tube using a pencil, but not all the way, but so that there is a free part of 2 cm left.
- Collect the resulting bead on the pencil from the edges to the center and remove it from the pencil. This way you will get a fixed petal with a corrugated roller. So make about 7 petals.
- Now begin to form a bud by rolling the petals into a spiral and placing several layers on top of each other.
- Insert a skewer into the bottom of the flower and secure with tape.
- Cut the top piece of approximately 1 cm wide from a roll of corrugated paper - you will get a ribbon. Wrap this ribbon around the skewer, including closing and tape.
- Secure the tip with tape too. So you should get a beautiful and original rose.
Napkins. Crafts from napkins
Three-dimensional paintings and applications, wonderful flowers, birds, dolls, sheep, snowmen, Christmas angels, bunnies, New Year trees and other wonderful transformations of paper napkins are collected in this section.
Each of the transformations is provided with step-by-step instructions and photo illustrations. Also pay attention to various crafts made from viscose napkins, which can be a good help for making attributes for role-playing games.
Affordable and interesting options for using napkins in creativity.
Showing publications 1-10 of 1138. All sections | Napkins. Crafts from napkins
Summary of a lesson on appliqué from napkins using the “Chicken” cutting technique
Goal: development of creative abilities in mastering the technique of cutting lumps of disposable
napkins onto cardboard to obtain a three-dimensional applique.
Objectives: Educational: teach techniques for working with paper - 3D appliqué, follow the correct sequence of work. Master class on application of napkins “New Year’s balls” for older children
Master class for the senior group.
Application from napkins “New Year's balls”
.
Goal: To introduce older children to the non-traditional technique of appliqué using colored napkins . Objectives: To develop children's imagination, thinking - to assemble a whole from pieces, fine motor skills.
Topiary
To decorate the interior of a room, a topiary made from napkins would be a very interesting option.
To make a va you will need the following:
- Multi-colored napkins.
- Stapler.
- Newspaper.
- Scissors.
- Glue.
- Flowerpot.
Manufacturing sequence:
- Take a napkin and fold it 4 times, and then staple it in the middle. Now cut a circle out of a napkin and start forming a flower.
Important! Please note that you should fold each layer of the napkin separately, otherwise you won’t get a beautiful flower.
- Make a lot of these flowers. They can be made from different colors or from one - as you like.
- After the decorative elements are ready, proceed to forming the base. To do this, take a newspaper, crumple it as tightly as possible so that the result is a ball, tie it with thread. Try it on the flowerpot.
Important! It is necessary that it is not too small or too large, otherwise your composition will look ugly.
- Cover the resulting ball with napkins - this is necessary so that the flowers stick to it better.
- When the glue is completely dry, you can begin to cover the ball with pre-prepared flowers.
Important! You can paste over the ball in a certain order, creating a pattern, or chaotically - everything will depend on your imagination.
- Decorate the flowerpot in which the composition will stand with ribbons or bows - this will make the topiary look even better.
Beautiful lotus made from napkins
Skillful hands can turn even the most ordinary white napkin into an elegant floral specimen that will become a worthy decoration for any holiday table. To fold a lotus flower, you need to use the origami technique, which, although it seems intricate at first glance, actually allows even beginners to create wonderful crafts.
So, take a multi-layered white napkin and unfold it completely. Bend all corners to the center and turn over. We repeat the procedure. Next, pressing the center with your finger so that the workpiece does not unfold, carefully pull out one corner, and then the rest. As you can see, the flower is almost ready, but to make it look more magnificent, you can give it additional volume. To do this, remember that there are still four corners left on the back side, directed towards the center - they also need to be carefully pulled out. Now our lotus is completely ready, it can be placed in the center of the plate, and the middle can be filled with a small bud of a living flower.
Video material
You will have a great time creating original crafts from paper napkins with your own hands. And by involving children in this activity, you can develop their imagination and creativity.
DIY flowers from napkins (80 photos)
Napkins have been known to mankind for a long time as a necessary means of hygiene during meals. However, if previously they were simply laid out on the table or rolled into scrolls, today, real craftsmen have learned to fold real masterpieces from napkins, which are sometimes even a pity to use for their intended purpose. In this article we will talk about how you can make gorgeous flowers from ordinary paper napkins. Moreover, such crafts are no longer just an accessory to the feast, but also more significant elements: they are used to form lush bouquets, interior decor, gift wrapping, toys and much more. So let's get started!
Children's party decorations
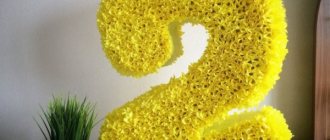
Mothers always want to give their child a big holiday; large letters and numbers will help to decorate the holiday room in a special way. Don’t rush to look for them on sale, because you can make such a miracle yourself.
Cut out the necessary letters and numbers from cardboard; you can glue them together into a three-dimensional hollow number. Take a lot of napkins and cover them with colorful tubes of different colors of napkins. You can also glue flower buds from napkins. It will take more time to create the craft, but it will look gorgeous. Children and adults will not ignore your work.
Related article: Hot stand: weaving pattern using macrame technique


