Hi all! Modern sliding wardrobes have at least one door or movable door with a rail movement, with an upper carrier or with an upper guide. In most cases, roller brackets are used, which can be divided into suspended and support ones. In the case of support ones, the wheels are located at the bottom of the door, while for suspended ones they move along the upper guides.
Sliding mechanisms are much more complex compared to conventional hinges, and therefore the adjustment of wardrobe doors is carried out somewhat more often.
There is a fairly extensive list of potential problems that the owner of a wardrobe may encounter. You actually have two options. This is a master who will constantly come to you and solve problems with the angle of inclination and loose closure. Or you yourself. If the suspension system or supporting structure breaks its original position, the problem can be solved with your own hands.
It’s just important to know what and how to do. Similar troubles can happen with any cabinets, even from Ikea, even from branded stores from the most leading manufacturers.
Do-it-yourself installation of wardrobe doors
When undertaking a major renovation of an apartment, many also think about changing the furniture. Replacing an old cabinet with a new one is the desire of many. When doing this, most people prefer to buy sliding systems. They are comfortable, save space, and fit well into any interior. Such designs gained enormous popularity immediately after their appearance on the furniture market and continue to hold a leading position. You can entrust the assembly of the sliding wardrobe and its repair to a specialist or do it yourself.
Instructions for disassembling doors from Pax wardrobe
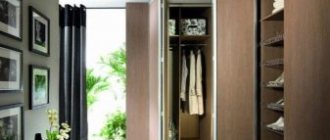
The need to disassemble the doors of a Pax wardrobe usually arises when moving furniture to a new location. The entire system is quite large, it does not fit into the openings of interior doors when assembled, and transportation of all parts must be carried out extremely carefully so as not to damage the elements that make up the wardrobe door.
► How to assemble a Pax wardrobe in a vertical position?
Following our instructions, one person can remove a narrow 70cm door with non-glass filling; for large and heavy doors you need to find help.
We prepare the cabinet for subsequent actions. First, we remove all things from the shelves. We take out the drawers and shelves, remove the rods. The internal filling must be completely removed from the wardrobe body.
We also free up space around the cabinet and cover the floor with a protective coating to accommodate the removed door. Free space for disassembling doors will protect us from “accidents”.
► The main mistakes in assembling the Pax wardrobe!
We disconnect the door closer, a device for smoothly closing the door.
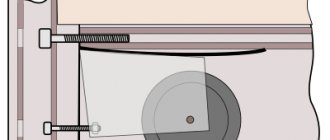
This item may not be included in the package! Using a hex wrench (you can use a flat-head screwdriver that fits your size), on the top rail on both sides of the cabinet, unscrew the bolts in the bumpers, holding the door closer mechanisms from falling. RICE. 1
Next, disconnect the closer brackets on the inside of the doors. On the outer cabinet door in the roller mechanism, unscrew the two top screws and remove the bracket, then screw the screws back in. RICE. 2
On the inner door, unscrew one bottom screw on the roller mechanism, remove the bracket, and put the screw in place. RICE. 3
Unlock the restraints and remove the doors.
Remove the blanking strip from the outer door. Unscrew the four screws and remove the bar. RICE. 4
Below, inside the outer door of the wardrobe, unscrew the screws on the bracket plates moving along the bottom guide. We remove the plates one by one, carefully moving the door. RICE. 5
We move the outer door stops to their original position by pulling the plastic latch towards you. RICE. 6
Updated external door roller mechanism! Lift the lock element and pull it towards you.
Remove the door by carefully lifting it up without touching the inner cabinet door. RICE. 7
Having previously moved the stops to a horizontal position on the second (inner) door, remove it from the guide. Lifting the door up a little, remove the rollers from the upper guide, and then down - remove the lower bracket from the lower guide and remove the door. RICE. 8
Updated roller mechanism for the inner door of the pax cabinet! Press the “appendage” and pull the lock down.
Disconnection of aluminum profiles on doors.
To connect the door parts, screws for a Phillips screwdriver were used, but if the assembly was improper (found when disassembling a Pax wardrobe from Ikea), some of the screws underwent changes when tightened, and it is impossible to unscrew them with a screwdriver.
You can replace the screwdriver with pliers, tightly clamp the edges of the screws and try to turn the screw counterclockwise. At the corners of the door inside the aluminum frame there are connecting corners. The demarcation profile was attached to the door frame with plates using a screw and a hex bolt sleeve. RICE.
9 Step-by-step instructions will help us correctly disconnect all the parts in the doors.
Initially, the door to be disassembled should be in a lying position with the inside facing up. We disconnect the roller mechanism by unscrewing the three screws. Attention! The screws have different heads for additional fastening of the closer brackets - remember for later assembly. RICE. 10
Next, we unscrew the screws on one side of the long door frame and the adjacent corners of the small frames; the hexagon bolt sleeves do not need to be unscrewed - they and the mounting plates will remain on the disconnect profile. RICE. eleven
Carefully remove the frame, evenly distributing the efforts; the internal mounting corners should remain in it. RICE. 12
We unscrew the screws on the opposite frame, take out the small frame on one side, then the door filling part (glass), then the demarcation profile and in order. RICE. 13
Any doubts? Let's do the work for you! RICE. 14
Our company's craftsmen will carefully disassemble or assemble furniture from Ikea, as well as any other manufacturer.
The need to disassemble the doors of a Pax wardrobe usually arises when moving furniture to a new location. 2018-03-11T00:20:49+00:00, Furniture Service Masters
Source: https://ofmebel-sborka.ru/inst_razbor_dver_shkaf_kupe.html
Installation instructions
The most important part of the work is installing the doors. They can only be put in place after the cabinet has been completely assembled. Its doors should be perfectly level. The entire performance of the structure depends on this. Therefore, before installing the sliding system with your own hands, level the floor surface and ceiling.
To install wardrobe doors, you need to perform a certain sequence of actions.
- Installing the top guide.
- Attaching the bottom guide.
- Installation of the clamp.
- Adjustment of canvases.
- Buffer tape sticker.
Installing the top guide yourself
The upper guide is a W-shaped metal profile. It is attached flush with self-tapping screws at a distance of 450-600 millimeters parallel to each other, that is, in each recess of the profile. If this is not done, the profile becomes slightly twisted, which affects the operation of the system. For fastening, first measure the width of the cabinet at the top, subtract 1-2 millimeters and cut off the guide. Using a drill and a drill bit, we make holes for the screws, which are then ground.
Attaching the bottom guide
To attach the bottom rail with your own hands, the width of the cabinet at the bottom is also measured, then holes are made on the profile. The installation has one peculiarity. The profile must be fixed with an offset inside the structure. The recess is 20 +/- 2 millimeters. The exact distance is determined as follows.
Simply place the guide in the cabinet. Then you need to install the sashes. You can't do this without an assistant. The rear panel is placed first, and then the front panel. One person will insert it into the upper profile, and the second into the lower one, while lifting the wheels. By moving the profile, align the door strictly vertically using a level. Having determined the ideal position of the canvases, we fix the guide.
Installing the retainer
The lock is necessary to ensure that the door leaf does not slide, but remains in the closed position, fitting tightly to the side wall of the cabinet. It must be inserted into the bottom groove of the profile before it is screwed to the bottom. The latch is adjusted using a flat screwdriver. It must be placed in such a position that the middle of the stopper is where the middle of the wheel is when the blade is closed. To do this, before installing the stopper, the blade is closed and the location of the middle of the wheel is marked on the profile.
Adjusting the blades
After installing the doors in place, you need to make adjustments so that the door fits evenly to the side and does not form gaps. For this purpose, the lower wheels have adjustment holes. The setting is made with a hex wrench. Turning clockwise raises the blade, counterclockwise lowers it.
Buffer tape sticker
The function of the buffer tape is to protect the contents of the cabinet from dust. Therefore, there is no way to do without it. In addition, it softens the impact of the canvas on the sidewall when opening, increasing the service life of the sliding system.
Buffer tape can have two pile lengths:
- 6 mm – short;
- 12 mm – long.
Long pile tape is not used often, but will provide more comfortable use of the cabinet. Its color matches the color of the entire system. It is easy to glue with your own hands. You need to remove the protective layer from the back side and attach it to the end of the door leaf.
Guides for sliding wardrobes: general information about fittings
Guides, as part of furniture fittings, perform a vital function. Thanks to these elements, the sliding system together with the doors operates easily, freely and quietly. The operating principle of this design is quite simple: the door leaves move along sliding wardrobe rails using rollers or balls.
The Versailles sliding system is equipped with reliable and durable fittings
Versailles is the most common and popular type of sliding system, which is found in compartment-type cabinets. This popularity is due to the presence of durable, reliable and high-quality components, as well as easy-to-use internal filling elements. Sliding systems are additionally equipped with stoppers, seals and rollers for sliding wardrobes. Guides with such a complex design eliminate the possibility of door panels being skewed and closing randomly.
Sliding system components and requirements for guides for sliding doors
The width of the guides for the sliding wardrobe and other parameters of the fittings should be selected taking into account the characteristics of the door leaf. In this case, the weight and dimensions of each sash, as well as the material from which they are made, must be taken into account. Guides for sliding systems usually come with furniture, so there is no need to purchase such elements separately. However, they may be needed if the fittings fail and require complete or partial replacement.
Helpful advice! If you select guides that meet basic quality requirements, then such products can be used for a long time.
If the installation of guides for wardrobe doors is done correctly, then the opening and closing of the door will occur in the same plane. Together with other fittings, this type of product is part of the sliding system. Requirements for guides:
Guides for sliding doors are selected based on the weight and material of the doors
- High level of strength - good strength characteristics ensure a long service life of the sliding system, even if it is used regularly.
- Aesthetics – the guides must match the style of the room where the cabinet is located, as well as the design of the furniture itself.
- Convenience - the sliding system should be so simple and easy to use that any user can open and close the cabinet doors without any problems.
The standard equipment of the sliding system is the same in all compartment designs. But the list of additional accessories may vary depending on the cabinet model and its internal contents.
The sliding system includes the following elements:
- upper and lower guides for the wardrobe, along which the door leaf moves;
- profiles with vertical and horizontal installation types for reliable fixation of all elements of internal filling;
- closers for smooth movement of the sashes;
- silicone seal;
- a system consisting of lower and upper rollers for sliding wardrobe doors, which ensures their free and silent movement;
- screws as fasteners;
- stops for fixing the door leaf in a certain area (they look like spring brackets);
- brushes.
Guides must be strong, durable and easy to use
Types of guide profiles for sliding doors: classification by type of material
When choosing guides for a wardrobe, you must pay attention to the material they are made of. The following raw materials are used for the production of these products:
- plastic;
- aluminum;
- steel.
Plastic guide profiles have the lowest price. Such products do not have a long service life and high reliability. They can be used without problems for 5-7 years. For this reason, many consumers prefer to avoid purchasing furniture with plastic components.
Helpful advice! To extend the service life of the sliding system, it is advisable to use plastic sliding wardrobe guides only in combination with parts made of metal.
Guides for wardrobe doors are made of plastic, aluminum or steel
Steel is used to make fairly strong and reliable products. However, the size of the guides for the wardrobe, including their thickness, must be selected taking into account the parameters of the door leaf. If the fittings are selected correctly, the service life of the sliding system will be long. The price of such profiles is considered affordable for most buyers and, as a rule, it corresponds to the quality level of these products. Sometimes there are options that are not as durable and easy to install as we would like.
The highest quality parts are made from aluminum. These profiles are usually installed in expensive and luxury models. Aluminum slides are designed for cabinets that are 4 m or more in height. Such products are distinguished by an extensive palette of colors and a large selection of decorative design options.
Door repair
After a certain period of time after the start of use, sliding doors may begin to close poorly. This is often due to dust, lint and other debris getting into the working mechanism. Repair in this case consists of lifting the blade up as much as possible and assessing the condition of the roller that sets it in motion. The mechanism is cleaned of accumulated debris, and if necessary, the roller is replaced with a new one.
If the door jams in one of its positions, we can conclude that the profile is deformed. Repair in such a situation comes down to aligning the guides. If this is impossible to do for any reason, then it is replaced.
For more serious damage, such as a cracked mirror or bent frame, replacing the broken element of the system will help. Such repairs can be done with your own hands by purchasing all the necessary parts in advance. To do this, you need to remove the door and disassemble it, after which a replacement is made. After replacing the part with a new one, the door needs to be put back in place.
All about doors
Installing the cabinet does not require special knowledge and can be done without any problems by yourself, without resorting to the services of a specialist. To install the wardrobe doors yourself, you will, of course, have to figure it out. To do this, you need to have installation instructions on hand. By constantly checking your actions with it, you will be able to assemble the cabinet without additional time and material costs that may result from incorrect actions.
The most difficult and scrupulous part of the work is the assembly and installation of sliding wardrobe doors. It is this process that needs to be given special attention. If they are installed incorrectly, this will cause a lot of problems, and the cabinet will break in the near future.
Be sure that after finishing the work you will not doubt for a second that you have chosen the right type of product.
Sliding wardrobes, immediately after the appearance of furniture products on the market, gained enormous popularity and sharply pushed their classic hinged counterparts into the background. For a long time, such products have maintained leadership laurels due to their appearance, ease of use and other useful characteristics. They solve many problems, such as rational use of usable space, silent opening and closing, complementing the overall interior of the room while giving it elegance.
Doors fall out
See also:
Artificial stone sinks: pros and cons, owner reviews
One of the most unpleasant problems for owners of wardrobes is the falling out of doors. The doors can fall out for several reasons.
Moreover, for each reason there are recommendations and instructions for elimination.
- Dust has accumulated. In this case, you need to remove the sash, clean it of debris, apply a layer of paraffin to the guides, lubricate the rollers with motor oil and return everything to its place;
- Excessive force and abrupt closing. It's all about the reverse inertial movement, which is why the doors are literally thrown up, and they fly out accordingly. The problem is easily solved. Curb your ardor;
- Guides or rollers are defective. In general, everything is very clear. You need to buy high-quality fittings and install them instead of the old ones.
Preparing for work
First you need to completely assemble the wardrobe body. You need to make sure that it is perfectly level. If necessary, make the necessary manipulations to achieve the desired result. If this is not done, then there is no point in installing door panels, since the end result will not suit you. They will stand unevenly, on the sides, between the doors and the walls of the cabinet (in the closed position) there will be visible gaps that hurt the eyes. To fix this problem, you will need to dismantle the door panels yourself and do all the work from the very beginning.
To install cabinet doors with your own hands, you must have a set of tools, which includes:
- drill;
- a screwdriver with a set of bits, or a set of screwdrivers;
- metal drills;
- pliers;
- hammer;
- hacksaw for metal;
- building level, plumb line;
- tape measure, construction ruler or square;
- pencil;
- hexagon.
What components should be available:
- guide profiles designed for fastening to the ceiling and floor;
- door panels assembled with fittings;
- clamps (stoppers);
- buffer tape.
Installation
Be sure to follow the installation order to get the desired result. Installation of sliding doors for a sliding wardrobe is carried out in the following sequence:
- Preparation and installation of the upper guide profile.
- Preparing and checking the bottom guide.
- Installing a stopper (clamp) in the lower guide.
- Installing the bottom guide.
- Installation and height adjustment of sashes.
- Adjustment and fixation of the stopper.
- Gluing sealant (buffer tape) to the ends of the door panels.
Design Features
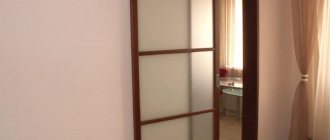
In order to understand how to do this work, it is important to consider the structure of the mechanism. If you study it carefully, you will see that the doors ride on rails. In scientific terms, rails are a guide profile that is installed both above and below the cabinet. There are closed and open type rails. The removal process is the same for both options.
There is also an option when the wardrobe doors are fixed only on the bottom rail or on the top. But a more reliable option is to have two rails.
The main feature of a sliding wardrobe is that when one door closes, it closes access to the second half of the wardrobe. The sliding wardrobe door moves along a certain trajectory, which is set by the installed rail. The rail does not allow the sash to open outward like a regular one. This saves space in the room.
Top guide
The upper guide profile, when viewed from the end, is shaped like the letter “W”. Two of its grooves are designed for sliding wardrobe doors. Canvases are not hung on it. It serves to fix the sashes and prevent them from swinging from side to side and moving from the line of movement.
Wardrobe door assembly diagram
We prepare the profile for installation. To do this, you need to measure the width of the cabinet, namely the distance between the inner sides of its side walls. Subtract 1-2 mm from the obtained value and measure the profile of this length. Designate the cutting location with a pencil. For this we use a construction ruler or square. We cut the profile with a metal hacksaw. It will be easier to cut if you place a chair nearby and use it as a support.
In the workpiece, using a drill and a metal drill, we make holes in increments of 45-60 cm. It is important that the holes are in both grooves of the guide (each pair is on the same line). If this condition is not met, the rail may twist slightly, which will create additional difficulties. The quantity is determined by the length of the profile. We rub the holes with sandpaper to remove metal fragments that were formed as a result of drilling.
We place the upper guide flush with the ends of the side walls and fasten it to the ceiling using screws and a screwdriver.
Installing the Bottom Rail
To install the bottom rail in the cabinet with your own hands, you need to carry out manipulations with measurements and trimming, as well as with the top profile.
The peculiarity of installing the bottom rail is that it must be installed by moving it about 2 cm deep into the cabinet, where it is attached. To determine the mounting location accurately, you need to perform several steps. You will need one assistant, since it will be difficult to do it with your own hands.
So, we place the profile at the intended mounting location. We take the door leaf and insert it into the upper guide. After this, pressing the rollers from below, we place the doors in the groove of the lower guide. Using a building level, we check the verticality of the sash and, if necessary, move the rail. Having adjusted one side, we roll the door leaf to the other and align it strictly vertically. When you are sure that the door is positioned correctly, take a pencil and mark where the track will be attached. Remove the canvas.
Don't forget to drill holes for the screws in the rail. Before final installation, you need to insert stoppers into the grooves. They are needed to fix the valves in the closed position. With their help, the cabinet will not open on its own.
After inserting the stoppers, secure the guide with screws in the previously designated location. Now we put the doors in their rightful place in the closet. Let's check how they move.
If all is well, you need to put the stoppers in place and secure them. To do this, close the cabinet and mark with a pencil where the wheels stopped. It is necessary to mark exactly the middle of the right roller for the right sash, and the left one for the left one. We roll back the doors and use a flat-head screwdriver to move the latches to the designated places. It is important that the middle of the stopper is located exactly where the middle of the roller was. Only in this position will the system work correctly.
Next, you can begin adjusting the sashes in height. For this purpose, they have specially designed holes at the bottom on the side ends. Through them, the rollers are adjusted using a hex key. The sash will rise when the hexagon moves clockwise, and lower when moving in the opposite direction. These manipulations will help align the doors relative to each other, as well as eliminate gaps between them and the side walls when closed, if any. They may exist if the cabinet could not be completely leveled.
Fighting extraneous noise
When the wardrobe is used for a long time and actively, a problem may appear in the form of extraneous sounds, reminiscent of a whistle. The simplest solution to the problem is the use of technical oil to lubricate moving components.
See also:
How to make a folding bed with your own hands: ideas, diagrams and drawings
If after lubrication the sound does not go away, you need to:
- remove the hinged sashes from the guide profile;
- align the rollers at the same overhang relative to each other;
- tighten fastenings;
- return the panels to their place and check the functionality of the door.
Most often, sounds from rollers appear due to prolonged use, damage or manufacturing defects. The easiest and most correct way is to replace the components.
Final work
Now you can begin the final part of the work, namely attaching the buffer tape to the ends of the flaps. It will not allow dust to penetrate into the middle of the cabinet, and will also soften the impact of the doors on the walls each time they close.
The installation of the buffer tape is the final stage. If you do this without first aligning the shutters, then the adjustment will not be possible. You will have to peel off the seal with your own hands, adjust and stick the tape again.
What to do if the wardrobe is broken?
Let's start with the fact that if you carry out the installation correctly with your own hands and hang the doors in the wardrobe in compliance with all recommendations, and use the product carefully, then no breakdowns should occur in the next few years. But still, with the passage of time, some inconveniences may appear.
If the doors begin to move poorly on the rails or close, you must first check the condition of the rollers. Doing this yourself is not at all difficult, especially if you did the installation yourself.
Most often, the cause of this is dust and debris accumulated inside the sliding mechanism. To correct the situation, remove the door leaf, clean it and put it back in place. If the wheels are worn out, replace them. You can also do this yourself without any problems.
Jamming of the valves in the same position indicates deformation of the profile. In this case, you will have to try to level it. If this fails, you need to install a new rail.
More and more serious damage occurs from careless use.
Use your wardrobe correctly and carefully, and then it will last for a very long time.
Subsidence and loose closure
Over time, the doors often sag and do not close as tightly as before. You are unlikely to like the spontaneous opening of doors. And you will not put up with this.
[adv2]
To correct the situation, two components need to be adjusted. Or simply install a lock on the wardrobe. But that’s not about that now.
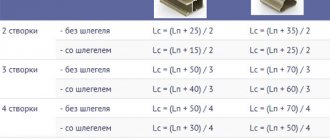
Let's start with setting up the Schlegel. If you have a door with lower types of roller guides, you must:
- remove the sealing material from the end side of the sash;
- peel off literally 30 centimeters of the sealing tape;
- under the tape, find the 2 holes required for adjustment, as well as the bracket;
- using a hexagon, make the adjustment;
- if you turn the bolt clockwise, the blade will rise;
- if you rotate counterclockwise, the blade will lower.
Each time you turn the key, use a level to check the evenness of the sash. Gradually you will be able to get rid of the resulting distortion. Just don't rush.
If you have a wardrobe with top rollers, then the adjustment principle will be much the same. The suspension roller is usually located at the top, and this is where you should look for the adjustment screw. Here, a screwdriver is more often used, with which you need to rotate the lock clockwise or counterclockwise, raising and lowering the angle accordingly. After the adjustment has been made, the locking nut should be tightened tightly.
Loose closure and sagging may also be due to the need to adjust the stopper. If you notice that the door begins to roll back, you will have to resolve the issue with the stopper.
The stopper works based on the fact that when the cabinet door is closed, the wheels fall into a special recess, locking inside it. You won't be able to move the stopper by hand. It is better to take a thin screwdriver or a metal plate. Try to move the stopper to one side literally 1-2 cm, then close the door and check if it has locked.
If the stopper is broken, you can try to fix it with superglue. But it would be more correct to dismantle it and install a new one.
Do-it-yourself wardrobe door installation
Sliding wardrobes have gained popularity all over the world. They are convenient to use and easy to install. They can be mounted either as a separate structure or simply by covering a niche in the wall with a sliding door. In addition to installation in closets, sliding doors are often used in balcony partitions to divide a room into segments, or even separate part of the room for a personal office. Some people, simply separating a section of the room for themselves with such a design, put a table, a chair and a computer in the new resulting “room”, this gives them a feeling of privacy. They also sometimes use a dedicated space for meditation and sports training.
How to move a wardrobe without disassembling it
Situations are different. Good sliding wardrobes last a long time. And repairs in living rooms and offices may be required much earlier, after 2-3 years. How to be in this case?
To hang wallpaper or lay tiles on the walls, or change the floor covering (laminate, linoleum), it is not at all necessary to completely disassemble the wardrobe. It is enough to lighten the structure as much as possible and move it if it is completely cabinet furniture. But if it is built-in, then you will have to take extreme measures - completely dismantle the façade and internal contents. Same as when moving.
The initial sequence of actions on how to disassemble a wardrobe correctly and avoid annoying mistakes is the same in any case.
Step 1. Dismantling and packaging of sliding doors
The most expensive part of any cabinet is the front. It is his replacement that will cost a pretty penny. Therefore, the removal of compartment doors and packaging must be approached very responsibly.
The sliding doors of the compartment are very easy to remove:
- First, additional fittings, if any, should be removed from the doors. These are closers and locks. It is not necessary to remove them from the furniture body.
- Then you need to lift the door a little, holding it by the side profiles and pulling it towards you to remove the wheels from the bottom rail.
- After this manipulation, the doors can be removed from the top rail very easily. This is done with all the doors one by one.
The best packaging material for sliding doors is foam film and cardboard. Carefully wrap the doors with them and secure the packaging with tape.
Step 2. Removing drawers and other storage systems
After removing the doors, the entire interior of the cabinet will become open and convenient for further disassembly.
Features and Benefits
The sliding wardrobe system is convenient because it does not take up much space and saves living space, because the cabinet doors do not need to be opened 90 degrees. Such doors make it possible to create a more interesting interior. In addition, it is very convenient to get all the necessary things from such a closet.
Sliding wardrobes are quite functional, and a variety of design variations allow them to fit into any interior. After all, such a cabinet can be decorated with paintings, hung a mirror, or pasted on a picture of your favorite landscape. The only problem that may arise is the installation of the structure. Some companies offer their services; for such a service they can charge about $50, which, although not significant, takes a toll on your wallet, especially during repairs.
How to remove doors from a sliding wardrobe on different designs?
The sliding wardrobe is a modern type of furniture. It is used in both large and small rooms as it does not take up much space.
If you need to disassemble a cabinet to move it to another place, then the biggest difficulty will be removing the doors, since they have an unusual design.
This article will discuss the question of how to remove sliding doors from a wardrobe.
Advantages
The doors have a complex design just to create maximum comfort for the owner in the house. There are several advantages of using such an interior element:
- Compactness. Due to the fact that the doors do not swing outward, you can open them without taking up space in the room. This advantage is especially important for small spaces.
- Large capacity. In such a closet you can install both shelves and hangers, which can accommodate a lot of things.
- Versatility. This piece of furniture will fit into almost any room interior. Due to the fact that there are many shapes and colors of cabinets, you can choose exactly the one that will harmonize with other furniture.
- Mirror doors. In addition to the fact that you can show off in them all day, a mirror also creates additional visual space in the room.
Cabinet door mechanism
To understand how to remove doors from a wardrobe, you must first become familiar with the principle of their operation. There is a guide part in the upper area. It has a frame fixed on it, along which wheels move along with the door itself. The lower area is arranged in a similar way.
The cabinet doors move in such a way that when one part opens, the other closes and vice versa. It is worth noting that movement is provided only in one plane – horizontal. Therefore, when removing, you need to be very prudent and careful so as not to damage the elements.
Reasons for removing doors
The reasons may be different:
- The door mechanism is broken, causing the door to open spontaneously or move freely.
- Replacing the pattern with a new one that matches the wallpaper. It often happens that the owner purchases a cabinet and only during installation discovers that the design of the doors does not match the interior of the room. You need to pay attention to this when purchasing, or look at photos of wardrobe doors with inserts or drawings.
- Broken glass. As already mentioned, wardrobe doors consist of a mirror, so you need to be extremely careful with them.
- Moving the cabinet. The most common reason is a change in the location of the furniture. And this requires complete disassembly into its component parts.
Removal process
To understand how to remove doors from a wardrobe, you first need to inspect the structure from above and below in order to roughly understand what is where and what will have to be unscrewed.
Removing one door is quite simple: you need to grab the wheel from below and gently lift it. They are designed in such a way that if you need to remove the door, they lift up easily.
Then, keeping the first wheel raised, you need to do a similar procedure with the second. The door must be pulled towards you by the lower part to move the wheels away from the frame.
Then you just need to disconnect the door from the top mounting.
It is recommended to carry out this work with an assistant, since it is not very convenient to hold the lower part with both hands and remove the door completely. There is also a risk of product damage or personal injury. Also, in no case should you use force during the disassembly process, since the doors are quite fragile and can easily be damaged.
There are also wardrobes with beveled doors. The same principle applies here: you need to lift the bottom part and then remove the top.
Removing hinged doors
How to remove doors from a wardrobe without wheels? This design differs from the usual one only in that instead of wheels, rails are used for movement. This mechanism is somewhat inconvenient to use, since the doors are unstable and often wobble.
The withdrawal process is similar. First you need to unscrew the bolts on the door itself, which secure the structure to the rails. Then you need to lift the door, pull it towards you and disconnect it from the upper part by pulling it down. It is also recommended to have a partner to make the process easier.
Assembly
The wardrobe assembly diagram is simple, but in order for the system to work reliably and well, this diagram must be followed. When installing a wardrobe, you will need elements such as guides (bottom and top). There should be one of these guides at the top and bottom for each door. It is necessary to take into account that the lower guides bear the entire main load, so you should not skimp on quality. When choosing rollers, ignore the cheapest offers, as the sliding system can quickly fail. If you want to save on a wardrobe, then save on the weight of the doors, rationally use lightweight door options, and do not hang very heavy mirrors on them.
On the Internet you can find many step-by-step photos and videos that describe detailed assembly instructions; they will make the work much easier.
In principle, the upper guides do not carry a load; they guide the movement of the door, but without them the correct operation of the structure is impossible. Also, a useful part of the overall design is the stopper; it regulates the opening width of the product.
Work procedure
So, you can install a wardrobe with your own hands without outside help, even if you do not have special skills in building and installing doors, all work is done easily and is not considered painstaking.
Please note that the doors must be installed perfectly level, so before installation you need to level the surface of the floor and ceiling, because the curvature of the surface will lead to incorrect installation.
- The first thing you need to decide on is the size. The dimensions must be taken taking into account the overlap of the door, and also without taking into account the width of the wall, if you want the door to rest against it, and taking into account the width of the wall, if the door will extend beyond it. It will still be aesthetically beautiful if the entire structure is flush with the wall, but if the sliding system is not in the wall, but in a wardrobe, then superimposed fasteners are used (that is, attached to the side).
- The height of the doors must be measured taking into account the upper and lower slats, 16 mm each, and taking into account the gaps, 15 mm each. In total, from the total height of the door, for the height of the door leaf you need to subtract 15+15+16+16=62 mm
- Considering that you are installing ready-made doors with your own hands, the next step will be the top slats, they will determine the movement of the door.
- The lower track with the positioners already installed on it must be placed on the floor, but do not screw it in, this will complicate further installation.
- The next step is to install the sashes. It should be noted that the rear door is installed first, because if you install the front doors right away, it will simply be impossible to install the rear doors. After all, the doors overlap one another.
- The next step is to insert the bottom wheels of the door into the groove. To do this, you will need to press the wheels and wind it until it completely fits into the groove.
The movement stopper is very useful; it makes the use of the doors more comfortable and also extends the life of the system. In addition, its installation is done in no time. For the work you will need the stupor itself, a screwdriver and several bolts. All you need to do is screw in the bolts on the guide.
These are the basic instructions for installing doors. All that remains is to try to open and close the doors, if they slide easily, then you did everything right.
Equipment
A sliding wardrobe door consists of a door leaf and a movement system.
- The canvas is assembled from profiles and filling. The profiles differ in height, since moving rollers are installed in the bottom rail, and they are much larger in size. The side profiles are very thick due to the fact that they are shaped like a handle. The grooves in them are designed to hold a sheet of material 10 mm thick. If the filling is thin - glass, mirror, a seal is used.
Related article: DIY carved chairs and stools for the home
- System mechanisms - the kit includes rollers - upper and lower, self-tapping screws, and adjusting screws, thanks to which the position of the canvas is leveled. In addition, during installation, a closer or stoppers are installed to ensure smooth sliding of the wardrobe door and keep it closed. The photo shows the mechanism of the sliding system.
Instructions for dismantling the wardrobe door
The disassembly sequence is quite simple, but includes some features. As a rule, they are associated with the distinctive features of a particular design. If the instructions have been preserved after installing the wardrobe, then most likely the features of the system or model of this category are indicated there. If not, you will have to find out empirically.
- Closer – used in premium products, it ensures smooth operation and protects the sash from excessively sudden movements. Before dismantling, the closer should be unscrewed. It is recommended to remove it from the canvas, but leave it on the box in order to facilitate the assembly process in a new place.
- Stoppers or locks – ensure a tight fit of the door to the wardrobe wall. Usually, when closing, if stoppers are installed, some force is felt. If elements are present, they should be removed before disassembling. To do this, use a screwdriver to unscrew the bolts securing them. Stoppers are installed near the walls, and, regardless of the number of sashes, there are always two elements.
- In some models, the guides are installed on the frame, that is, when closing, the sash does not rest against the side wall, but is stopped by a side stop. In this case, removing the door is quite simple. To do this, you should dismantle the limiters, and simply roll out the canvas itself from the guide rail, as shown in the video presented.
- The lower rollers can be equipped with plastic latches that block attempts to remove the canvas. In this case, at the moment the sash is lifted, the lower rail rises along with it. In order for the door to come out of the rail, you need to turn the flag on the lower roller 90 degrees. The blockage will be removed, and the blade will easily come out of the grooves.
Related article: How to lay a baseboard on linoleum: installation methods
When dismantling, it is recommended to carry out all actions according to the instructions and remember their sequence. The more thoroughly you disassemble the wardrobe, the easier it will be to reassemble it.
- All detected restrictions should be removed: stoppers, closers and any other fasteners.
- The sash closes, lifts on one side, and using a screwdriver lifts the lower roller and removes it from the groove.
- The canvas in a raised state is removed from the lower rail. If the operation is difficult, you should once again make sure that all restrictions are removed and try again. You should proceed with caution, especially if the filler is a mirror or glass.
- The door lowers down until it clears the top track. It is recommended to unscrew the rollers, both upper and lower, in order to ensure their safety during transportation.
- The sashes are removed one by one.
In the video, the process of dismantling the wardrobe door is presented in more detail.
The best posts
- How to disassemble an interior door handle without the help of a technician
- How to properly connect a three-key light switch
- Do-it-yourself jack-tipper for a motorist
- Advantages and disadvantages of infrared heaters
- Near-window strip: in what cases is it possible to install it?
- LED strip for aquarium lighting
- Ceramic heaters: manufacturer's deception, pros and cons
- Calculation of cable length for electrical wiring