Application and processing of wood panels
For the production of flat furniture parts, carpentry, fiber boards, particle boards, plywood, as well as frame panels are used.
Blockboards consist of an inner layer and two outer layers, which are glued together under pressure and temperature.
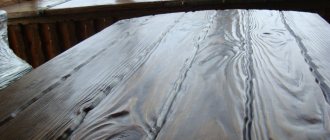
Slat-filled wood panels require a significant amount of valuable raw materials. They have high flexural strength and should be preferred when producing parts that will experience heavy loads. When cutting such slabs, large amounts of waste are obtained, since it is necessary to take into account the direction of the fibers of the facing layer and the lath filling.
Many businesses use waste solid wood from millwork and particleboard for secondary purposes to reduce overall waste. After cutting the slabs, the slats are tied or glued (at individual points) and lined with plywood or fiberboard. The flexural strength of such boards is lower than the flexural strength of commercially produced wood slabs, and their scope of application is limited to products that require lower quality requirements.
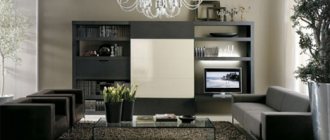
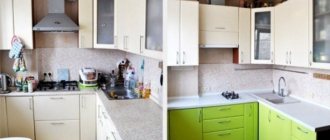
For such kitchen furniture, mainly frame panels with various internal fillings are produced. These shields are manufactured to precise final dimensions. The internal filling consists of corrugated cardboard, strips of fiber boards or plywood glued together to form a lattice, paper impregnated with resin, and boards of rigid polyurethane foam, which are covered on both sides with fiber boards. These designs save wood and are dimensionally stable, but in most cases require significant labor to produce. Such boards are used primarily for the manufacture of doors and furniture walls that are not subject to bending loads.
Flat-pressed particle boards and fiber boards have a high density, which is due to the production technology and their structure. They swell a little and shrink along the length. The consumption of raw wood in their production is lower compared to the wood consumption in the production of joinery and plywood boards and is partially covered by the use of low-grade wood. These advantages and the ability to carry out semi-automatic production underlie the national economic importance of the production of particle boards and fiber boards. Due to the absence of fiber direction in the structure of these boards, it is possible to rationally cut them. Taking into account the structural features is only required conditionally. The surfaces of the slabs can be lined and finished in various ways. It is advisable to process plates with carbide tools due to their high density and synthetic resin content.
While thin fiberboards are mainly used as back walls and drawer bottoms, flat-pressed particleboards and medium-density fiberboards with a thickness of more than 10 mm are intended for the production of flat structural groups such as doors, walls and shelves . Extruded particle boards have limited use in furniture making and must be covered as the flexural strength of these boards is very low.
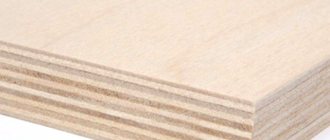
Plywood is mainly used for the manufacture of furniture back walls and drawer bottoms, since it has very high strength and, if the outer layer is of good quality, can only be varnished and sanded. However, during its production and cutting, significant overall waste is generated. Therefore, plywood is increasingly being replaced by solid fibreboards.
DIY high-tech furniture
Wardrobe bed
In modern interiors, multifunctional structures such as a wardrobe bed are often installed. This is a fairly ergonomic product that allows you to profitably use free space.
During the work you will need the following tools:
- drill;
- screwdriver;
- bow saw;
- rasp;
- measuring tape;
- electric jigsaw;
- clamps;
- screwdriver;
- a simple pencil;
- building level;
- sanding paper;
- screws and other fasteners.
Prices for popular models of jigsaws
Jigsaw
In addition, you will need to prepare the following materials:
- furniture panels;
- bars and boards of wood;
- fasteners;
- hinged mechanism;
- materials for creating legs;
- decor
This is a basic set of materials and tools used in the course of work. Often you have to purchase additional elements - this is due to the individuality of each project.
Each project is unique
Step-by-step instruction
Step one: prepare the patterns. This process has the following sequence:
- it is necessary to transfer all the details of the drawing onto cardboard sheets;
- we sign every detail to avoid confusion;
- We mark the places where all the parts of the transformer will be connected.
Example drawing
Step two: assemble the base. It is necessary to determine the exact dimensions of all parts of the frame, and then perform the following steps:
- cut out parts using ready-made patterns;
- cut out all the parts according to the markings using an electric jigsaw, and then sand the edges;
- transfer the fastener location marks from the pattern to the frame parts;
- connect the parts with European screws - for this you will need to make preliminary holes along the edges.
Sawing the parts
Grinding the surface
We connect the parts of the base together
Step three: make a box for the mattress. This is the most labor-intensive process of making a wardrobe bed, which not every beginner can handle. When cutting, it is recommended to be careful and follow the exact markings.
The box manufacturing process has the following features:
- You will need to cut out the bottom and back wall of the structure from a sheet of plywood.
- Make the side walls, and then sand the edges of the parts using sandpaper and edge tape.
- Use Euroscrews to secure the resulting wall parts to the plywood base. It will be necessary to maintain a gap of 30 centimeters between fasteners.
- Wood blocks should be laid along the entire perimeter of the structure - they will serve as support for the mattress pad. Their size should be about 5x5 centimeters. They are fixed on the sides using self-tapping screws.
- To make the mattress pad itself, boards are used, which are attached to the timber with screws. They should reach freely from one edge to the other, so it is necessary to calculate the length correctly. They are fixed in the same place as the plywood bottom. The distance between them should be about 20 centimeters.
Sawing chipboard
Making the walls of the box for the mattress
Fixing the slats
Step four: installation of the transforming mechanism Thanks to the presence of such a mechanism, the box will be pulled out if necessary. Installation has the following nuances (it is recommended to carry out such actions together with an assistant):
- The hinges of the mechanism are attached to the mattress pad and the main bed frame. It is important to remember that the main load should be on the fixed frame of the structure.
- It is necessary to correctly compare the sizes of these two elements and then connect them.
- Upon completion of the installation process, it is necessary to lift the mattress pad to ensure that the dimensions match the frame.
- The hinges can only be installed correctly when using a building level - this will allow the bed to rise without any obstacles. It is necessary to obtain exactly one line at the place where the lower part of the mattress pad and the top of the frame are fixed.
This process can be greatly facilitated by installing add-ons that affect the movement of the mechanism (gas lifts). Such a system will be especially useful if the bed will be used by a child - this will allow him to transform the structure with minimal effort.
Gas lift installation
Step five: make the head of the structure. It is important to consider that the headboard of the transformer should be soft, especially if it is a children's bed. In addition, the bottom of the sides of the bed will need to be made from such soft material. The most affordable option for a soft backrest is upholstery with furniture foam. If necessary, it can be replaced with padding polyester.
Backrest manufacturing method:
- Fold the material several times.
- Cover the soft material on the front side with any decorative fabric.
- In order to simplify maintenance, you can make the bed upholstery with zippers - this will allow you to remove it and wash it if necessary.
- The total height of the soft part should be about 60-70 centimeters, and sometimes even 100 centimeters. This is done so that the person rests his head against the soft upholstery in a sitting position, which is why it is also needed on the sides.
- The upholstery is fixed to the frame using screws and fabric loops (special elastic bands can be used). If it is not intended to be removed in the future, then you can use metal staples and a furniture stapler for similar purposes.
Sawing sheets
Marking the location of the buttons
Fixing the foam rubber
Fastening the upholstery
Attaching buttons
For more information on how to make a carriage screed, read the special article.
Step six: make the legs. The legs of a transforming bed must move. To do this, it is recommended to use a metal strip with bends.
Method of attaching legs:
- measure the height of the mattress pad above the floor level to obtain the optimal height of the legs;
- measure the width of the mattress pad, and then calculate the length of the bar;
- drill holes for fasteners on the leg itself and the box;
- After installing the fasteners, you need to make sure that the legs are mobile.
In the process of unfolding the structure, you will need to screw the legs and then install the bed itself on them. When the mattress pad rises, the legs will disappear under the cabinet. In addition, a metal strip helps to fix the mattress on the box - this way it will not fall when the structure is unfolded.
Taking measurements of the mattress pad
Making holes for the legs
Installing the bed on metal legs
Step seven: decorating the structure. Thanks to the existence of various decorative elements, you can disguise a transforming bed. Sometimes such a structure is mounted directly into a furniture wall (if it matches the style).
Example of structure layout
Video – Making a wardrobe bed yourself
Table with glass top
Glass products combine favorably with various modern interior items; moreover, a glass tabletop requires minimal maintenance and, due to its transparency, does not clutter up the space.
During the manufacturing process you will need the following:
- a sheet of durable glass with a thickness of at least 0.6 centimeters;
- legs and fasteners;
- wood glue (becomes transparent after drying);
- sandpaper for finishing edges;
- oil and solvent;
- plywood sheet (required when laying glass);
- ruler;
- marker;
- rubber hammer;
- Bulgarian.
Tempered glass is used for furniture
Step-by-step instruction
Step one: cut the sheet of glass. To do this, you need to make the appropriate marks on the sheet and then cut it. To obtain a product of the correct shape, the glass must be placed on a perfectly flat surface (plywood sheet). Even if there are small foreign fragments between the glass and the work surface, an incorrect cut can be made. When using a glass cutter, you will need to lubricate it with a small amount of oil - this will ensure better glide.
Roller glass cutter
Step two: process the workpiece along the edges. It is necessary to use a file to make the edges of the glass tabletop rounded. While working, you will need to wear safety glasses and a mask to avoid getting glass dust in your face. At this stage, the correct shape of the edges should be formed.
Processing must be carried out with water!
Step three: assembly of the structure. In order for the table to be level, it is important to be careful at this stage. You will need to make preliminary markings to know where the legs will be located. After that, holes are made in the upper part of the legs for the suction cups, and then they are fixed with glue. Most often, only suction cups are enough to secure the tabletop, so there is no need to use additional fasteners.
When the glue dries, it should become completely transparent and invisible to others.
The finished table needs to be wiped with a damp cloth and installed in the room.
Selection and application of veneer
Veneer is thin sheets of wood that are glued to supporting structures. Depending on the production method, veneer is distinguished, planed and peeled; depending on its purpose, it is divided into facing, sub-facing and reinforcing.
Facing veneer is made from decorative wood (mostly planed veneer) with a thickness of less than 1 mm. First of all, it determines the appearance of the furniture.
Sub-cladding and reinforcing veneer performs structural tasks. This veneer is made from cheaper wood species with a thickness of 0.7-1.8 mm by peeling. In most cases, the texture and color of peeled veneer does not matter.
When cladding extruded particle boards, first of all, the goal is to increase their bending strength. For this purpose, peeled veneer up to 2 mm thick is used, which is glued so that the direction of the veneer fibers is parallel to the direction of production of the boards.
Of great importance is the gluing of wood boards with veneer made from cheaper wood species, with a weakly defined structure, which until now has been used only for secondary purposes. After veneering, a pattern of decorative wood texture is applied to this veneer using one to four cylinders using printing.
Thanks to the presence of pores in the veneer, the imitation looks so believable that even a specialist finds it difficult to distinguish veneer with a pattern printed on it from genuine veneer. This economical method allows, under certain circumstances, to achieve significant savings and make the most efficient use of veneer. For example, sapwood walnut veneers, which were previously largely wasted, can be excellently used for wood grain printing.
When choosing veneers, the main focus should be on ensuring sufficient stress equalization to prevent warping. Since different types of wood swell and shrink differently in the tangential and radial directions, one side of the product cannot be faced with peeled veneer and the other with sliced veneer, even if the veneer is of the same type of wood. In rotary cut veneer, veneer shrinkage along the width always corresponds to tangential shrinkage; in sliced veneer, it mostly corresponds to radial shrinkage. Cladding with veneer of varying thickness leads to significant stresses due to changes in humidity and ambient temperature.
Application of molded parts from chips
Currently, parts molded from chips are increasingly being used for various purposes. The chip preparation technology is similar to the technology used in the production of particle boards. In a press with special and very expensive tools, the product is given a certain shape. The surface of the parts pressed from the chips can then be lined or finished, after which no further treatment is required. For the manufacture of furniture, for example, profiled and shaped table tops, chair seats, legs, small cabinet products and other structural elements can be made. This method is also used to make cases for televisions and radios.
The use of pressed parts from shavings can significantly save wood, since waste is mostly used as raw material. In addition, the furniture manufacturing process is greatly simplified. Typically, when using pressed parts from chips, many operations associated with their subsequent processing are eliminated. In mass production, the cost of producing chip extruded parts is generally lower than the cost of producing conventional structural components, and it decreases as production volumes increase.
DIY loft style furniture
Table
To make the structure you will need to prepare the following:
- boards;
- legs;
- screws;
- sander;
- drill;
- stain;
- varnish
Sander
Prices for popular models of eccentric sanders
Random orbital sander
Step-by-step instruction
Step one: you must first make a design drawing indicating the location of the parts.
Approximate table layout
Step two: use screws or nails to connect the frame parts, as shown in the photo below.
Connecting the parts
Step three: next you need to install the corners for the legs and secure them.
Installation of corners
Attaching the legs
Step four: after which you will need to carefully sand all parts of the structure using coarse and fine-grained sandpaper.
Sanding parts
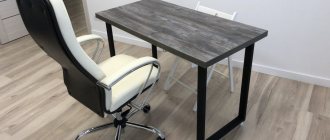
Step five: the last step will be to treat the table with stain and varnish.
Coating with stain or varnish
Ready table
Video – Table and shelving in Loft style
Wooden pallet chair
An armchair made of wooden pallets will harmoniously fit into a loft style interior. In addition, such a design will have a low cost.
During the work you will need the following:
- wooden pallets;
- sandpaper;
- screws;
- saw;
- stain, varnish;
- upholstery fabric.
Prices for various types of wood varnishes
Wood varnish
Step-by-step instruction
Step one: you will need to carefully sand the pallets with sandpaper, and then cover them with a layer of stain and varnish.
There should be no burrs on the outer surface, otherwise you can get a splinter
Step two: place several pallets on top of each other, forming a seat and backrest from them.
We fix the back to the base with metal corners
Step three: cut out parts from additional pallets.
The armrests are fixed to the structure with the same furniture corners
Step four: we cover the back and seat with soft material of the desired color.
Finished seat
In one of our articles we will look at various options for making wooden chairs yourself.
Application and processing of polymer materials
The ever-increasing shortage of wood is forcing the furniture industry to increasingly replace it with various polymer materials.
According to Boehm, in 1980 the ratio of replacement of wood with plastics will be from 1:5 to 1:3. Depending on the type, plastics have a number of advantages over wood: resistance to mechanical, climatic, chemical and thermal loads, the ability to produce profiled moldings, boxes, and beautifully shaped fittings. In addition, they are distinguished by ease of processing and ease of maintenance. The integration of hygienic bread bins, drawers and containers for bulk plastic products into kitchen furniture, guides for sliding doors and drawers increases the consumer value and functional reliability of the furniture. The manufacture of furniture is simplified, since a number of technological operations are eliminated.
For several decades now, polymeric materials have been known as wood gluing materials. Adhesives based on synthetic resins provide high strength and, due to their short setting time, allow for continuous production.
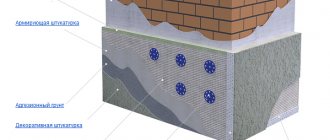
The next area of application of polymers is surface bleaching. Along with coatings and various varnishes based on synthetic resins, high-strength surface coatings are obtained by pressing, in a hot press, paper impregnated with synthetic resins with printed decorative patterns. For this purpose, both high and low pressure presses are used. This technology is widely used in the production of kitchen furniture. In addition to significant savings on veneer, when using decorative film based on impregnated papers, you can easily select surfaces by color and texture. Decorative film is resistant to light, heat and moisture.
Resin-impregnated paper without a pattern printed on it is used as an inner layer under the veneer veneer to level the surface of the particle board. This paper is also used as a primer when applying colored varnish.
Recently, facing materials based on unsaturated polyesters have become increasingly important.
Materials based on unsaturated polyesters make it possible to produce films with both an embossed and non-embossed surface, with a pattern printed on them or in one color, as well as films of various thicknesses and with different degrees of gloss. Such films, using low pressure, can be glued to any surface, even slightly curved ones.
The possibility of combining plastic with wood is to use foam materials as the internal filling of panel elements. Such panels are much lighter than particle boards, but withstand less bending load.
Foam materials made from polyester and polyurethane can be of particular importance in the production of molded parts that cannot be made or can be made with great difficulty from wood. For example, when restoring various products or interior decoration using foam materials, it is possible to completely restore the appearance of the original. Molded parts with appropriate profiles capable of withstanding the appropriate static load will be widely used, which will allow the use of simpler connection principles in design. But research and design are only just beginning in this area.
Taking into account the specific features of polymer materials, it is possible to improve the functional reliability of furniture and improve its quality.
Advantages of sliding wardrobes
Sliding wardrobes have the following advantages:
- Space saving . Simple cabinets require space to open them. This does not apply to sliding wardrobes; they save space in the room and are suitable even for a small apartment. Since sliding doors do not take up space, the coupe can be installed even in very narrow niches.
- Capacity . To store things in the compartment, absolutely the entire volume in depth, height and width is used.
- Versatility . The product is suitable for any room, regardless of its design and purpose.
- Multifunctionality . Any items can be stored in the compartment. You can choose the filling of the cabinet yourself: the number of elements and their location, the presence of additional compartments, an ironing board, and so on. You can even build a compact workstation into the compartment.
- Zoning . Using a compartment, you can divide the room into functional zones. This technique can be used in studio apartments.
- Large selection of designs . Unlike standard wardrobes, you can choose the design of the compartment yourself, bringing it as close as possible to the overall style of the interior. You can use materials of various colors and textures and their combinations. You can use cabinets with mirror surfaces. This makes it possible to visually make the room more spacious, and also eliminate the need to additionally buy a large mirror.
- Reliability . Sliding wardrobes do not have the disadvantages of standard designs: the doors will not loosen or fall off. Caring for them is very simple. It is enough to regularly clean the cabinet and monitor the condition of the wheels.
Expert opinion
Korzhavin Daniil Dmitrievich
Designer of stylish home furniture
With a number of advantages, sliding wardrobes are no more expensive than simple ones. A large selection makes it possible to choose a product that matches the financial capabilities and desires of the buyer.
Application of metals
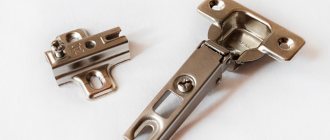
First of all, in order to increase functional reliability, almost all mounting hardware is made of metal. It provides high strength, hardly wears out and is easy to handle.
Wide design possibilities open up with the use of chrome-plated or varnished metal furniture legs, seating furniture frames made of steel profiles and light metals. This eliminates the need for heavily loaded wood joints. In addition, such products are very easy to clean.
In general, for the manufacture of furniture, the main materials used in production are given. Along with the above examples, there are other areas of application of metal parts in the production of furniture products, including fittings.
I also advise you to read the review article – Review of flooring – Linoleum/marmoleum “Forbo”. Good luck with construction and renovation! Write in the comments and subscribe to new articles.