Methods for attaching washbasins
On the market you can find different types of sinks, which differ from each other in design and type of fastening:
- With a pedestal. Such products are fastened using brackets or other fasteners; utility lines are hidden behind the pedestal.
- Invoices. Washbasins are installed on the countertop; it is important to mark in advance the place where the mixer will be located.
- Mortise. When choosing this model, it is necessary to install the sink into the countertop, above which a protrusion of 2 or 3 cm must be left.
- With wall mount. The plumbing fixture is carefully attached to the wall surface with self-tapping screws or stainless steel screws.
- Furniture. The equipment is additionally equipped with cabinets and stands that have certain geometric parameters.
Despite the fact that the installation diagram for all varieties is the same, in each individual case there are significant nuances.
How to install a washbasin with your own hands
Hanging washbasins can be attached directly to the wall or other vertical structure. Floor-standing ones are attached to the wall (for example, the popular “tulip”) or are a type of bathroom furniture. Built-in ones are installed during the finishing of the bathroom, as an element of the interior; this also applies to overhead washbasins (the latter can be removed if necessary).
For us, not professional craftsmen, floor-standing models of washbasins, which are fixed to wall structures to improve stability, as well as wall-mounted ones, since for installation we will need a hammer drill or impact drill, can pose a certain difficulty in installation.
The main difficulty at this stage is drilling the tiles correctly. Since it cannot be drilled using a “blow”, the tile may crack, as a result of which drilling is carried out in several stages. First, we make markings, outlining the places of the washbasin fastening loops, to do this we place it in the required position, and outline the fastening places with a marker.
After removing the device, carefully chip off the outer glaze of the tile in the marked places. This is done using a special hardened core, lightly tapping it with a light hammer.
After we have removed a fragment of glaze slightly larger than the head of a match, the base of the ceramic tile can easily be taken with a simple concrete drill. After the tiles have been passed, you can turn on the hammer drill or drill “on impact”.
We insert plastic dowels into the drilled holes (they are often included with the washbasin, but are also available for sale separately). We screw the anchors with threads on the tip into our dowels and hang the bowl on them. We tighten the nuts on the anchors about halfway, then we place a pedestal under our bowl and tighten the anchors completely (the main thing here is not to overdo it, you don’t need to overtighten, otherwise you can crush the ceramics). We place an elastic silicone gasket under the support
Before installing the washbasin, it is necessary to partially install the plumbing fixtures, as far as the design allows. Often you can install a mixer with flexible hoses and a siphon neck. Naturally, it is important to take care of the connection points to the water supply and sewerage networks in advance.
We installed the sink ourselves. Now let's talk a little about the materials and tools that we will need. If we may not need a hammer drill, then to connect the water we will need: a pair of adjustable wrenches with jaws that diverge by 0.3 cm and a bottle of silicone sealant for high-quality processing of the connections between the sewer tap and the siphon.
So we figured out in general how to make and install a washbasin. As the work progresses, everything will become even more clear. But if you still have questions, ask them in the comments to this article!
What needs to be done at the preparatory stage?
Before you begin installation work, make sure you have everything you need ready:
- drill for concrete;
- electric drill or hammer drill;
- silicone sealant;
- screwdriver or screwdrivers;
- keys;
- fasteners.
First of all, the home handyman will have to dismantle the old sink:
- Shut off the water supply at the inlet.
- Remove the fasteners securing the mixer.
- Disconnect the water pipe.
- Remove the mixer.
- Unscrew the nuts to secure the bottom of the washbasin.
- Drain the remaining water from the siphon and remove it.
- Remove the old sink.
After disconnecting the pipe from the faucet, you need to place it in a bucket or other container to drain the water that remains there. There may be a lot of liquid in the liner, so it is recommended to take precautions, otherwise the bathroom will be completely flooded.
As soon as you disconnect the siphon, close the drain pipe to prevent unpleasant odors from entering the room.
Self-installation of a washbasin on brackets
The design of the tulip model has its own characteristics; competent installation of individual elements is required: legs, siphon and mixer. For such a sink, the water drains inside the pedestal, which means that each part will need to be securely fastened and insulated.
If the instructions for installing the sink are followed, then you don’t have to worry about leaks, and you won’t need to repair the sink for a long time. Brackets are used as fastening elements for tulips; standardized fasteners are intended for standard plumbing fixtures.
Sealing rules
When installing a sink with your own hands, it is imperative to carry out sealing - any type of modern plumbing equipment is equipped with special gaskets. But in order to work with them correctly, you need to follow the following rules :
- Any sealing must be carried out on completely dry components. If necessary, they can be dried with a hair dryer.
- Make sure that your fingers do not come into contact with the surfaces of the sealing gaskets. If the opposite happens, then you need to degrease the gasket before installation - just wash it in a solution of any detergent and dry it thoroughly.
- Red and/or yellow rigid gaskets (paronite) are installed between the metal supply pipe and the plastic parts.
- All pipe cuts must be absolutely straight - the slightest distortion will cause a leak, even if the sealing is carried out according to all the rules.
- Before installation, rubber gaskets must be treated with silicone-based sealant. Both rubber and silicone individually are very durable, strong and reliable materials, but when they are used simultaneously, the most reliable connection of parts is obtained; the seal will last for many years.
From the material presented, you can understand that installing a sink with your own hands is a simple matter; it is much more difficult and important to make the right choice when buying a sink and all its components.
( 88 votes, average: 4.70 out of 5)
DIY sliding doors: types of sliding doors and recommendations for their installation
Textiles in the interior: rules for decorating walls with fabric
Related Posts
Sequence of installation work
The first mark for the bracket is made on the wall surface, draw a horizontal line from the floor base 85-90 cm, measure the thickness of the washbasin from the side adjacent to the wall. Step back from the drawn line at a distance equal to the thickness of the product, and place a second mark in this place.
Measure the width of the sink, mark on the line where the brackets will be located, and make holes at the marked points. Install the dowels, screw the brackets to them, install the bowl, it should fit tightly to the wall surface, it is necessary for the structure to be stable.
If you consider at what height to install the sink, it may vary; mount the plumbing fixture so that it is convenient to use.
At the final stage, connect the drain to the mixing device, treat all joints with sealant. If the bowl is mounted on a foot, place the tulip at a distance from the wall surface. This method is difficult for an inexperienced person to do independently, since it requires high-quality fastening of the sink.
Pros and cons of a pedestal sink
The sink leg will serve as a support for the sink. In addition, this pedestal will easily cover the pipes and siphon, which means that the aesthetic appearance of your bathroom is guaranteed. And if the wall structure is not suitable for hanging a heavy sink, a pedestal sink will be the most preferable option.
Back in Soviet times, pedestal sinks became increasingly popular; they were found in many homes and often became a source of pride for their owners. Times have changed, no one brags about new sinks anymore, but such sinks remain popular in our time. Of course, there were some changes. Today, there is no longer that Soviet monotony; manufacturers offer us a variety of models, from the smallest, easily fitting into any interior and space, to the most bulky and elaborate, with all sorts of patterns; such sinks are often used in apartments with large bathtubs. The pedestals themselves have also changed. Now you can choose a sink to suit your height, increase or, conversely, decrease the width of the leg.
However, a pedestal sink also has its disadvantages. The first is the use of space. You can easily hide pipes and other sewer elements that are unpleasant to the eye behind the leg, but you won’t use it for anything else. In this sense, a cabinet will be much more convenient. It can easily hide the siphon, cleaning products, sponges, soap packages, shampoos and much more. In addition, a corner cabinet is suitable for a very small bath. It will not take up much space, and can easily hide even a small water heater behind its doors.
And yet, in spite of everything, the leg completely fulfills the functions assigned to it: it hides the pipes and supports the sink itself, without creating a large load on the wall.
Installation of overhead or mortise bowls
Washbasins are mounted on countertops and furniture made of fiberglass, wood, brick or stone. As a rule, special holes are made in the countertops for bowls; if there is none, you will have to do it yourself using a jigsaw.
When the washbasin is installed on wooden furniture, it is necessary to additionally make waterproofing; after installing the sink, all that remains is to connect the pipelines, siphon and mixer.
Installation of a mortise sink
To prevent water from splashing when washing dishes, choose a deep sink and install a low tap.
The sink is installed in a pre-cut hole in a solid countertop. Moreover, the sink itself can be made of various materials: stainless alloy, earthenware, porcelain, etc.
To insert a washing container, you will need some tools and additional materials:
- jigsaw with a fine-toothed file;
- drill, screwdriver;
- pencil, ruler, tape measure;
- self-tapping screws, silicone sealant;
- wrenches for installing the mixer;
- sandpaper, construction knife.
The contours of the installed panel are marked with a pencil, turning it over and laying it on the countertop. The distances from the front and rear edges of the latter are at least 5 cm. Then the location of the bowl relative to the edges of the panel is measured. The outline of the hole cut for the sink appears along them.
Diagram of a double overhead sink.
The bowl can be of various shapes, so it is necessary to transfer its geometric parameters to the surface of the tabletop as accurately as possible. Manufacturers of mortise sinks often include a template with the kit, according to which the shape of the hole is drawn.
The cutting line should extend outward from the sides of the bowl by about 1 cm. A hole is drilled at one of the points on the contour to insert a jigsaw blade. For a rectangular bowl shape, holes are drilled in the corners of the intended contour.
You may be interested in: How to choose the right kitchen sink
Painting tape is glued to the outside of the outline. It will protect the surface of the tabletop from damage by the jigsaw foot when cutting. On a removable tabletop, the material is sawn with a jigsaw from the front side, so the surface cladding is less damaged. In the process of cutting the opening, self-tapping screws are screwed into the cut to a small depth so that the inner part does not fall out during operation. The sector to be removed can also be secured from below with support.
The edges of the tabletop along the saw cut are covered with silicone sealant to protect the material from moisture penetration. The sealant is also applied under the edges of the panel along the drawn contour. A sink with a built-in faucet and siphon is inserted into the prepared opening and secured to the countertop with clamps included in the plumbing kit. All that remains is to connect the mixer to the water supply and drain the sink through a siphon to the sewer.
The nuances of installing a washbasin with a cabinet
If the washbasin is equipped with a cabinet, you will need to make all the connections in the cabinet before starting installation work: the corrugated pipe to the siphon and flexible hoses through which water will be supplied. It is possible to install a sink above a washing machine if the washing machine model fits into the interior space of the cabinet.
Sitz baths that can be installed in a small bathroomConnecting an automatic washing machine without running water in a country house or village
Review of pumping stations for water supply at home: connection diagrams and installation rules
Sometimes it turns out that the holes made in the cabinet for the siphon with hoses are absolutely not suitable, then the home craftsman must cut new openings using a circular saw or electric drill.
A building level will help you level the cabinet during installation; it will indicate whether the adjustable legs need to be tightened or not.
The photo of the sink installation shows the final stage of installation, install the bowl and attach the sink to the wall with silicone sealant or anchor screws, the second method is more labor-intensive. The last step is to connect the siphon to the sewer system and the mixer to the water pipe.
Installation of an overhead washing panel
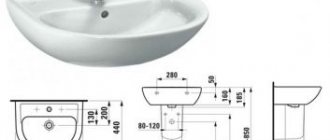
Sink connection diagram: 1 – mixer pipe; 2 – gasket; 3 – fixing nut; 4 – flexible hose; 5 – pipeline supply; 6 – overflow hole; 7 – combined drain; 8 – drain device; 9 – compression ring; 10 – compression coupling; 11 – double-turn siphon; 12 – drain pipe.
Overhead types of sinks are easier to install than others. This is the traditional way of installing dishwashing equipment. In the kitchen interior, it is a free-standing cabinet with a sink, complemented by a panel for storing washed kitchen items.
The panel is fixed on the cabinet using fasteners in the form of brackets or is pushed onto the base into the grooves of the cabinet using special slides.
The sink kit may include an adhesive tubular seal that is inserted into a groove on the panel. The joint between the cabinet and the washing panel is coated with silicone sealant to protect against moisture penetration.
Rubber seals do not adhere tightly to the joining surfaces and have a short service life. More often they are replaced with a moisture-resistant sealant; it tightly fills the gaps and retains its properties for a long time when dry.
Attaching the sink to the countertop.
The underframe usually does not have additional internal elements; this provides access for repairing supply pipelines, cleaning the siphon and sewer pipes. Sometimes supporting bars are attached under the overhead sink, reinforcing the strength of the structure.
You may be interested in: How to repair any type of faucet in the kitchen?
Before attaching the sink to the countertop, the mixer, water supply hoses and siphon are installed. The overhead sink is secured with L-shaped fasteners with an oblique slot. 4-5 such elements are installed. Self-tapping screws are screwed into the mounting points marked on the inner surface of the cabinet. They should protrude 5 mm from the walls of the underframe. It is better to screw in the screws with a screwdriver; if you use a screwdriver, the tabletop may be damaged.
During installation, the fastening grooves are placed on the screws and the sink is moved until it is firmly fixed to the overhead sink. Then the screws are tightened and the protruding sealant is removed.