Types of lambrequins. Advantages of hard
There are several options for this decorative element of curtains:
- simple;
- hard;
- soft;
- combined.
The first is a strip of fabric gathered into folds on a curtain tape or by hand. A rigid lambrequin has a fabric front side and a dense non-woven back or inner part.
The soft one consists of a certain number of alternating sequentially complex elements with folds - swags, de jabot, molds. Combined is a combination of the two previous options.
The advantage of a rigid lambrequin is that with a fairly simple sewing technology, a very beautiful, effective decorative product is obtained. This effect is achieved thanks to the ability to make a complex curly bottom that will be fixed.
Rules for caring for a lambrequin
Products, regardless of type and shape, require a fairly careful approach to operation. This is especially true for hard lambrequins, which are difficult to clean.
To prevent them from accumulating dirt, they can be vacuumed, but you just need a special attachment for furniture, which is additionally wrapped with damp gauze. It is recommended to use carefully so as not to damage the hard material.
To maintain the shape of the product, it should only be washed if it is heavily soiled, i.e. infrequently (once a year is enough). Wash hard lambrequins by hand in a large basin using a soft sponge and a special washing gel. They also dry it carefully - you can do it both vertically and horizontally, securing it with clothespins.
It is also recommended to wash soft systems by hand no more than once a year. To do this, use a small amount of detergent. You cannot wring out the product; it is better to let the water drain. To prevent it from looking wrinkled, hang it on a hanger for several days. It is not necessary to iron the structure, since it forms beautiful folds if they are laid correctly.
What is a bando
A hard lambrequin is made with your own hands on the basis of dense non-woven material. The following can be used:
- bandeau;
- interlining;
- doublerin;
- proclamin;
- wooden frame.
The first one is best. The bandeau can be self-adhesive, hot-melt, with one or two adhesive sides. May vary in density. It's convenient and easy to work with. Compared to a wooden frame, it is light in weight, and the lambrequin is easily attached to the cornice using regular Velcro tape.
Where to begin
If you are determined to create a bandeau with your own hands, then study the master class and get started. As a rule, a solid base is used to make such a rigid lambrequin. You can also choose adhesive material.
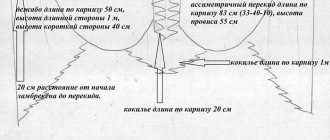
Before sewing a bandeau with your own hands, be sure to take measurements, and do this with maximum accuracy. Measure the window opening, taking into account the curves of the cornice. It is better to first cut out a paper sketch so that you can attach it to the window and evaluate future results. This way you can make sure that you have chosen the right design and taken into account all the proportions.
Also, to make a lambrequin, it is better for you to purchase a ready-made bandeau-pro, the width of which is 45 centimeters, or a special adhesive fabric - doublerin.
How to sew a rigid lambrequin
So, you have decided to decorate your interior with this decorative element. The operating procedure will be as follows:
- Take basic measurements.
- Draw a diagram of what you want to see.
- Prepare materials in the required quantities.
- Draw a pattern on paper and cut it out.
- Place it on the bandeau, trace around without allowances and cut out.
- Place the non-woven fabric template with the adhesive side on the inside out of the fabric, which is best secured to a table or ironing board. Leave an allowance of 2 cm on top, 1.5 cm is enough for all the rest. For the best gluing, you should turn the product over and run the iron along the front side.
- Make the lining for the bandeau from the same fabric. To do this, fold the flap with the right sides inward so that the fold line runs no closer than 5mm to the most protruding element of the bottom edge.
- Pin both layers along the allowances so as not to damage the adhesive base.
- Sew the side seams and the bottom edge at a distance of 3mm from the bandeau. The value depends on the thickness of the non-woven material. Do not stitch the top edge.
- Cut off the excess fabric, leaving 0.5 to 1 cm to the seam.
- On the arched parts, carefully make notches with scissors, trim the corners so as not to damage the stitching.
- Turn the product right side out through the top edge.
- Run a finishing stitch along the outline.
- Iron the top edge allowances inward.
- On the wrong side of the lambrequin, sew a Velcro strip, the other part of which is glued to the cornice.
By following all the steps in sequence, you can make a beautiful hard lambrequin (photo above) of any shape.
Making lambrequin patterns
The selected pattern for the bandeau is transferred to paper and cut out.
In each specific case, a rigid lambrequin requires making your own pattern. Because bandeaus can be made in any style: classic, romantic or avant-garde. For children's rooms, such decorative detail is often made in the form of funny figures, for example, the sun and clouds. The shape of the future structure depends entirely on your imagination, tastes and preferences.
To make a pattern, you will need to take measurements from the window. First of all, you need to find out its width, taking into account the side curtains. Remember that the gang lambrequin is a static part of the decor. It cannot be moved to the side or folded. Therefore, the calculation must be carried out very carefully. Most often, a rigid lambrequin is placed along the entire length of the curtain rod.
Then you need to think about the shape of your structure. It makes the most sense to first draw a rough diagram of the pattern and only then transfer it to paper or polyethylene in real size. Typically, a rigid lambrequin is placed along the entire length of the curtain rod. And its widest part occupies approximately 1/5 of the height of the curtain.
Article on the topic: Where to start renovating a bathroom: photo of the sequence of work
Such products of complex geometric shapes, made in the form of teeth of different lengths, look very interesting, but such products are much more difficult to sew. The main difficulties for beginning craftswomen arise with processing corners. Therefore, it is wiser to choose rounded, smooth shapes.
Product diagram
Before you start sewing or even making a pattern, draw, or better yet, draw to scale a diagram of your curtain with a rigid lambrequin. It will allow you to see how the element will look, and will also help when building a template according to size.
It is better to make the diagram on a scale of 1:10, when in 1 cm on the sheet you will have 10 cm of real ones. In this case, when creating a pattern, you can easily find out the length of any element.
Bandeau for curtains
Bandeau for curtains is a synthetic material that is used as a lining and to create decorative elements or design of window curtains. Quite often, bandeau fabric is used to visually increase space and hide the cornice.
When creating a gang, adhesive surfaces are used. A lambrequin bandeau is used to create the illusion of a half-open window.
To make a rigid bandeau lambrequin, you need to use specialized adhesive cushioning materials and thick fabric. It is better to choose bando from popular manufacturers so that the quality is at the highest level. Features are models that come in horizontal and vertical, they are used for different places near window openings, so you need to choose everything wisely.
The solid base can be made of wood, plywood or a certain fabric. It can be successfully combined with soft ones to give the room greater aesthetics and beauty. A rigid bando is used for sewing solid lambrequins.
- hot-melt adhesive - high temperature is used to activate the adhesive;
- self-adhesive film - the material is fixed after removing the protective coating.
You can also make such a design element yourself. The main stages of creating a gang:
- preparation (selection of base, fabric for decoration, threads and Velcro);
- gluing (measuring and cutting the base);
- processing of edges (lining, folding, bias binding, braid for decoration);
- securing the lambrequin (placement on the cornice using tapes or fittings).
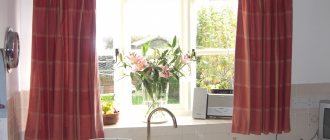
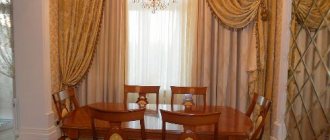
Curtains with a rigid lambrequin are a combination for decorating window openings, and the lambrequin must match the color and tone of the curtains. Curtains can have different lengths, widths, shapes, for example, with wavy or clear lines.
The room where it is better to hang curtains with a rigid lambrequin is the kitchen, but only here it is better to use thinner and more transparent fabric. You can hang them in a children's room, decorating them with funny cartoon figures that will keep their shape well thanks to the rigid bandeau lambrequin.
Patterns: we make them ourselves and use ready-made ones
To sew a rigid lambrequin with your own hands, you will need a template from which to cut out the parts from the gang.
If you are going to make a lambrequin of a simple shape, it is easier to create a pattern yourself on a 1:1 scale.
It makes sense to use ready-made options in case of repetitions of some module or a very complex asymmetrical shape, which, due to lack of skills, cannot be drawn by yourself.
If you decide to make the pattern yourself, prepare the following materials:
- a long strip of paper corresponding to the size of the lambrequin. You can use unnecessary wallpaper, graph paper, whatman paper, glue together a format from office printer paper or newspapers. The last option is not very good, since the paper is too thin, and using the template you will have to trace the outline of the product on the gang.
- pencil;
- ruler;
- square;
- a compass if you will have arcs or semicircles;
- scissors or knife.
You need to build a pattern like this:
- Draw a rectangle corresponding to the maximum dimensions of the lambrequin in width and height, respectively.
- Construct an axis of symmetry if the shape is like this.
- From the completed center line, set aside the required distances to the left and right and line up the figures.
If you have previously made a diagram to scale, then you can simply measure from the lower left corner the lengths that you take from the diagram, multiplied by the scale factor. For example, on your sketch you have 3cm, with a scale of 1:10 on the pattern it will be 30cm.
If your bottom edge is made in the form of repeating shaped modules, it’s enough to build one on another sheet, and here just circle it several times.
Having mastered the creation of patterns for rigid lambrequins, you will be able to make templates of any complexity yourself. You won't have to look through a lot of images on the Internet, wasting your time. An idea appeared, they took it and implemented it, first in the pattern, then in the material.
How to make a rigid lambrequin from plywood.
To make a gang-box, you can use not only plywood, but also pine boards.
- Cut out the main part from decorative fabric 15 cm wider than the total width of the rigid lambrequin facade and its ends. Cut a piece from the same fabric with a length of 10 cm and a width equal to the width of the previous piece.
- Cut out a piece that covers the top of the box 2.5 cm wider and longer than the top of the box.
- Cut out a piece of lining fabric 5 cm long shorter than the main piece and the same width.
- From padding polyester or batting, cut out a piece equal to the front and end parts combined.
- Cut out two bias tapes, 4 cm wide for the roll, you can use a twisted cord on the “eyelash”.
- Cut out one top, one front and two end parts from plywood, in accordance with the required dimensions:
7. Glue and fasten all the parts together with screws.
8. Make a roll from linen cord and bias tape and stitch it to the bottom edge of the front part.
9. Sew the bottom edge of the main piece to the lining. Iron the seam allowance to the lining side:
Decorative finishing
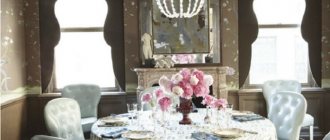
Any curtains that have a rigid lambrequin (photo below) look stylish and very original due to the shape of the part. However, additional decoration will also come in handy. You can decorate the edges of the finished product as follows:
- fringe;
- braid;
- cord;
- bugles.
Usually this is done from below. The surface of the part can also be decorated with a sewn pattern from the elements listed above or use other objects, such as:
- bows;
- flowers;
- butterflies and dragonflies;
- beads;
- eyelets;
- sequins.
The choice of decor is determined by the fabric, shape and model of the lambrequin. If it is sewn from several multi-colored parts of a complex shape or the fabric has a contrasting bright pattern, additional decor will not be required.
How to perform sewing steps
You should follow the instructions:
Pattern of a rigid lambrequin.
- Apply a special pattern prepared in advance to cut out the base of the bandeau.
- Iron the fabric with a warm iron.
- The fabric is glued onto the bandeau with a warm iron.
- Excess fabric from the edges is trimmed to 5 cm.
- Next, the fabric is placed on the lining.
- Using pins, pierce three sides without the top.
- Sew one centimeter from each edge of the bandeau.
- Next, the excess fabric is trimmed.
- After this, the product is straightened to the front side.
- The upper edge is turned right side out, pulled taut, and pinned with a pin.
- After this, you need to pin the Velcro on the hard side to the cornice.
- After this, the Velcro is fixed with machine stitching.
- Next, you need to trim the material exactly next to the adhesive tape.
- After this, the adhesive tape is unscrewed and pierced with a pin.
Related article: How to glue combined wallpaper: combination options, expert advice
If this method of making a rigid lambrequin is too complicated, then the panel is made without a special lining, cutting off the fabric exactly where the edge of the adhesive base passes. Using a glue gun, reinforce the finishing material along all edges. The decoration can be cord, braid, fringe.
In the process of making a rigid lambrequin yourself, you should follow a few simple steps:
To sew a lambrequin you will need a roll of thick fabric.
- Make a regular pattern. First, for the template, exactly all the dimensions of the future gang lambrequin are taken. It is first necessary to determine exactly how the product will look, covering the entire cornice. The shape of the bandeau can be strict or have shapes and teeth.
- You will need to buy a frame, that is, a finished bandeau-pro product in a roll. This is a dense fabric, which is non-woven or dublerin, perhaps also a material for decoration.
- According to the pattern, it is necessary to cut out the frame, taking into account all seam allowances (5 - 6 cm on all sides).
- Prepared pieces of fabric need to be glued to the bandeau panel (you can use a steam generator, which is ideal for appliqués).
- The edges of the bandeau are treated with Velcro, which is glued at a distance of about 3 cm from the edge so that it is invisible.
- The decorated lambrequin should be placed on a special cornice where it was planned.
How to make an openwork drawing
If you don’t like to overload the space with dense fabrics, but at the same time want to do something original, make an openwork hard lambrequin with your own hands. The operating principle and technology are the same as described above. The difference lies in the template used. In this case, it is not just a rectangle with a figured edge, but a carved decorative pattern.
If you know how to draw, you can easily design the ornament yourself. You can also find any vector (contour) image on the Internet. If the file is in exactly this format with the extension *.cdr, *.ai, *.eps, you will simply scale it without losing quality in the appropriate editor. For such a service, you can contact an advertising agency that offers large-format printing. There they will make a template for you on a scale of 1:1.
It will be difficult to make such a pattern using a jpg file, since when enlarged the contours will turn out blurry, but if you try, everything will work out with such a sample. It is worth paying attention that the ornament should not contain too many small and complex elements. It will be difficult to do this in the material, especially if you are a beginner.
Industrially, openwork lambrequins are made using special laser cutting equipment, when the design is made directly from a two-layer base. You will have to do all operations manually.
So, you have learned how a rigid lambrequin is made. It's not difficult if you follow the sequence of steps. Having correctly calculated the dimensions, you can easily create a pattern yourself or modify any ready-made template. Design, sew, decorate your interior.
How to make a hard lambrequin with your own hands?
Materials and tools:
Sewing pattern for a rigid lambrequin stretched over a cornice and complemented by a symmetrical cascade on one side.
- thermal bando;
- life-size paper pattern;
- steam iron;
- pencil;
- paper;
- ruler;
- centimeter.
First, you need to redraw the pattern of the model on a thermoband. It is necessary to take into account that the dimensions of the structure correspond to the dimensions of the room and window opening. The element is cut out, and there is no need to leave seam allowances.
Then a piece of the same dimensions is cut out of fabric. This part will become the top of the finished product. The part is cut out with seam allowances of 2 cm.
The material is glued by steam treatment with an iron. It starts from the middle of the product. To do this, iron the fabric laid on the thermal band with an iron and steam. This is necessary so that the fabric does not shrink.
Then you need to wait a little until the fabric cools down. After this, iron the fabric again with an iron without steam so that the surface of the product is completely glued.
In order for the model to have a finished look, you need to process its edges.
They are treated with decorative trim, braid, and lining fabric.
To attach the product to the cornice, you need to sew Velcro in the upper part at a distance of 2 cm from the edge. This way the Velcro will not be visible. It must be sewn on carefully, using a hidden seam.
This concludes the production of a rigid lambrequin. Taking into account all the simple recommendations, you can make an original, exclusive item. The design will be strong, reliable and durable. It will fit perfectly into the interior of the room. A handmade product will bring the craftsman a feeling of joy and satisfaction with the results of his work.
After hanging curtains on the cornice, the understanding often arises that in order to achieve a more attractive appearance, in addition to drapes and curtains, the window opening must also be decorated with a lambrequin. If the curtains were made independently, then you can make a suitable option in the same way. In this case, it is best if this detail of the window design is rigid, providing not only a more attractive appearance of the curtains, but also visually hiding the cornice. And if you need a hard lambrequin, then you can do this work quite simply and quickly, and do it yourself.
A rigid lambrequin, also called a bandeau, is understood as a decorative element of curtains made on a dense basis using fabric and various accessories. This product received its second name due to the fact that for its production the fabric of the same name is used - bandeau, which is glued to the base material, thereby providing support for the required shape. In addition to its aesthetic purpose, gangs are also used to hide the cornice on which curtains are placed. A rigid lambrequin is also used to visually change the height of a room, namely to increase it.
Very important when making a rigid lambrequin for curtains is its height, which should be 1/6 of the length of the main fabric. In order for the lambrequin to be combined with the curtains, it can be made from exactly the same fabric or another material correctly selected in color and texture. For decoration, you can use various accessories, fringe, lace and much more.
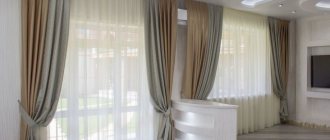
A lambrequin made using several types of material differing from each other in color and texture and complemented with various decorative inserts and fringe looks very interesting. Thus, various patterns or designs can be created on it. The use of such a lambrequin will make the design of the window opening even more interesting, and the curtain itself, even if it is made of a plain, not bright material, will look very beautiful.
How to sew a figured rigid lambrequin yourself
Transfer all dimensions of the future lambrequin to thick fabric.
You should first correlate the size of the future product with the width of the room. Transfer all dimensions to a panel made of wood or dense material, where the figured pattern and sidewalls are indicated. Next, a special lining and gasket of the same shape are cut out with a seam allowance of 1.5 cm along the edges of the template. To make a rigid lambrequin yourself, you will need:
- Wooden plank.
- Special material for covering the template and lining.
- Rings sewn onto a lambrequin.
- Cord and braid.
- Special glue for fabric.
Related article: Do-it-yourself ceiling beams: wooden, polyurethane, plasterboard
Step-by-step execution of cutting work includes:
The fabric is secured to the rigid base of the product using pins.
- Strengthening the interlining fabric. The product is placed on a pad, keeping it in the middle. Afterwards you need to cut its edges where the allowances go. All cuts are made to make it more convenient to tuck the edges of the gasket around all the corners and curves. After this, the edges of the strip and the material are lubricated with special glue. All edges are glued, pressing firmly with your hands. Similarly, it is necessary to attach the gasket to the sides of the product.
- Carrying out cutting of a product from the base material. You should cut, adhering to the grain thread. The panel is laid with the gasket down on the wrong side of the base material. After this, you need to cut the fabric, leaving a seam allowance of 3 cm around the overall perimeter. After this, the fabric is cut in the same way for each of the sidewalls.
- Strengthening the fabric to the rigid base of the product. You should make cuts on the fabric, as you would on the interfacing, to bend all the edges to the curves of the prepared interfacing fabric. The parts must be pinned together using pins, stretching the same fabric, laying on the base of the panel. The notched corners are glued to the base and interlining fabric, then ironed with a hot iron. Do the same with the edges of the side parts.