How to assemble a sliding wardrobe can be read in the “Instructions for assembling a sliding wardrobe”, which is included in the package. However, there are some details that require strict adherence. A sliding wardrobe is furniture that performs many functions; now such models have become very widespread.
Sliding wardrobe "Maestro"
Assembling the Maestro sliding wardrobe takes a little time and is not particularly difficult. Installing such a product for an adult man who has a little knowledge of the instrument is a matter of one or two hours. It is recommended to watch the video instructions first.
Parameters in millimeters:
- width 170 cm;
- height 222 cm;
- 60 cm deep.
Maestro cabinet parameters
Inside, the shelves are arranged functionally and thoughtfully. There are also mezzanine shelves. Cabinets are produced covered with a pleasant soft color (wenge or ash). The front of the cabinet can be Loreto or oak. White doors create an image of imposingness and sophistication. There are large format mirrors with special bevel processing.
Inside view of the cabinet
Installation Guide
Before assembling the cabinet, prepare the necessary tools and parts
Before you start assembling the Maestro sliding wardrobe, you should read the step-by-step instructions.
- In the package you should find:
- leading fasteners;
- racks that secure the sidewalls;
- internal bulkheads.
It is necessary to find the main structural elements, so that the assembly algorithm for this product will be approximately clear.
If you mix up the main blocks, you will have to start all the work again, having first disassembled the already assembled elements.
- Assembly of the main block, frame.
When assembling the Maestro sliding wardrobe, first of all, you should mount the unit, which is located at the bottom. The massive slab is screwed to stands that are located along the elongated side. The fastening elements are self-tapping screws (confirmants), which work quite effectively. The hex key is sold with the cabinet and is always included in the packaging.
- Installation of internal partitions. The lower ends of the partitions have holes; chopiks (small cylindrical wooden elements) are inserted and secured into them. Vertical bulkheads are being installed (someone may need to help, the elements weigh a little, but they are bulky).
- Installation of shelves. The installation of shelves is very important, they give rigidity to the entire structure, in this case they perform the same role as the ship’s frames. The shelves can be “mounted” on self-tapping screws, this will be quite reliable.
- Installation of racks on the side, installation of the cover. The final step is to install the racks and the lid on top. These nodes are installed almost simultaneously. First of all, the side elements are mounted; at the bottom they are secured with self-tapping screws. Then the top cover is installed; in this case, you should carefully study the drawing so that all the joints and holes match.
- Centering of the structure. You should take a tape measure, a square and a two-meter level. Diagonals are measured and angles are set. The structure is secured with self-tapping screws.
- Installation of chipboard sheets. The sheets are nailed on the back side of the product. These elements also give the cabinet additional stability and rigidity. The sheets have different treatments and are often coated with a pleasant color scheme. They are nailed using small nails that are included in the package. As a rule, markings on where to nail such nails are present on the panels.
- The most labor-intensive and crucial moment is the installation of rails. At the bottom of the rail there are special recesses along which the wheels move; this process should take place without any effort. The holes in the guides are already there; you just need to secure them correctly using self-tapping screws.
The distance between the edge of the base and the front cream should be no more than 2.45 cm.
As you can see, the assembly diagram of the Maestro cabinet is simple. Care and precision are required; if there is an error during installation, the doors will move with difficulty or will jam.
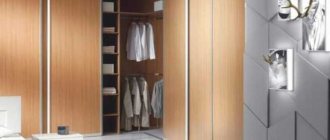
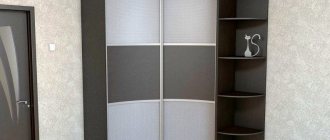
Only after appearing on the market, sliding wardrobes gained popularity among the majority of residents of large and small cities. They have been confidently holding a leading position in the list of furniture sales for many years now. In today's understanding, a sliding wardrobe is a simple combined system that allows you to save space in the house and favorably emphasizes the features of the interior. It is worth noting that this piece of furniture fits into almost any design. The ability to install a wardrobe even in a small apartment, as well as sliding doors, are the main advantages of this model. In this article we will talk about how to install sliding wardrobe doors with your own hands. If you follow the recommendations provided in this article, then installing this element of cabinet furniture will not take much of your time and effort.
Sliding wardrobe doors do not take up much space, which is why many owners of small apartments choose it. This is due to the fact that the cabinet doors do not need to be opened 90º. It is convenient to take things out of such a closet. It is quite functional, and thanks to design variations, even the most atypical buyer who has decorated an unusual interior in his house/apartment can find his own wardrobe.
Wardrobe doors can be decorated in different ways - from a personal photograph to a favorite landscape, from painting to artificially aging the surface. There is quite a lot of scope for imagination here.
Some companies offer their services for assembling a cabinet and installing doors to it. Typically, such a service costs about $50, which can significantly hit your wallet during the repair period.
The cabinet is assembled according to a simple scheme. The greatest difficulty lies in installing the doors. In order for them to work well and reliably, you need to adhere to their installation pattern. You will need top and bottom guides. There should be 1 of them. top and bottom for each door. The main load of the door falls on the lower guides, which means that you should not skimp on these elements. If you really want to save money, then it is better to buy lighter doors, but no less high-quality guides. Another useful detail of the door design is the stopper. It is used to adjust the opening width of the product.
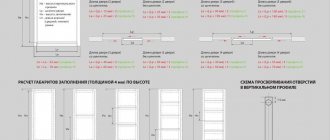
The dimensions of the guides must correspond to the width of the cabinet. The difference between plus and minus 3 mm is not significant, so a small error in size is allowed. First, install the top rail.
The guides are fastened with self-tapping screws with a 4.2×16 press washer or with universal-purpose screws with a 3.5×16 countersunk head. Make a hole in the top guide using a 4mm drill. The pitch between the holes is approximately 300 mm.
If you have to secure the guide profile with a screw with a countersunk head, then you need to make a countersink in the holes using a 6–8 mm drill. This is necessary so that the screw, so to speak, sits completely. So, the instructions for installing the top rail are quite simple. After you make the holes in the profile, it needs to be inserted, aligned flush and secured.
In this case, you also need to make holes in the profile. But don’t rush to fix the bottom rail to the cabinet. This is due to the fact that it needs to be shifted inside the cabinet by 20 mm. To accurately determine the indentation, you must first place the lower guide profile in the cabinet. Then install the doors to the closet. In this matter you cannot do without an assistant. The door must be installed strictly vertically. This can be achieved by moving the lower guide profile, while checking the vertical level.
Installation of the clamp is carried out before screwing the lower guide. How to do this correctly will be discussed further.
A stopper or latch is needed to ensure that the doors are held tightly (locked) in the closed position. It prevents the formation of a gap with the touching side. The stopper is installed in the groove of the lower guide. One lock is required per door.
So, you need to insert one stopper into each groove, then screw the bottom guide, install the door and adjust the closing tightness of the retainer.
To ensure the stopper or latch is installed in the correct location, close the doors completely and then mark the center of the wheel on the guide screwed to the bottom. The stopper is installed with the center along the mark. If necessary, you can move the lock with a flat-head screwdriver.
The lower wheels were designed so that with the help of an adjusting screw located on them, it was possible to adjust the uniformity of the door to the side panel at the top and bottom. To do this you will need a special 4 mm hex key.
If necessary, lower the right corner and adjust the right wheel. To do this, turn the adjusting screw counterclockwise and vice versa.
Buffer tape is glued to protect the interior of the cabinet from dust. In addition, it softens the impact of the door on the sides during their closing. If you no longer need access to the adjustment screws, then it's time to apply buffer tape. This is due to the fact that it covers the holes on the vertical end of the door.
There are 2 types of tape:
- With short pile - up to 6 mm.
- With long pile - up to 12 mm.
Although short-pile tape is more popular, its long-pile counterpart provides more comfortable use of the cabinet. The color of the buffer tape depends on the color of the system attached to the ends of the wardrobe doors. To apply the tape, you need to remove the protective film and glue it to the vertical end of the door.
For example, let's take a sliding wardrobe, which has the following dimensions: width 2000 mm and height 2400 mm.
First of all, let's look at how to measure the width of the doors, and then the height:
- Width. So, we know the total width of the cabinet is 2000 mm. Subtract 16 mm from both sides (the thickness of the side walls against which the door will rest). This means that the width that needs to be closed with doors is calculated as follows: 2000 – 16 – 16 = 1968 mm. This cabinet has two doors. Therefore, it is important to take into account the distance that the doors will overlap with each other. Here it is best to take a margin of up to 25 mm for each door. Now we add this amount to the existing width: 1968 + 50 = 2020 mm. This is the total width of the two doors. We divide this amount by 2, the total is 1009 mm, this is the size of one door in width.
- Height. Now we determine the height of the doors for the wardrobe. In our case, the cabinet height is 2400 mm. When calculating, you should take into account the lid on top and the lining at the bottom of the cabinet, 16 mm each. The gap between the upper and lower guides of 15 mm is also taken into account. Now it remains to determine the height using the following action: 2400 – 16 – 16 – 15 – 15 = 2338 mm.
So, we determined the dimensions of the two doors, which is 1009 × 2338 mm. After this, you can order the material.
After this, you should accurately calculate the required material or components for the doors. So, you will need 4 handle profiles that will be mounted vertically on each side of the doors. A framing profile for the bottom and top is also required. Take measurements and purchase the required footage.
To build the frame, you need to buy 2 sets of accessories, which include:
- 4 tension screws for connecting vertical and horizontal profiles.
- 2 support wheels.
- 2 bolts for securing wheels.
- 2 door positioning supports for top guide.
Now we take the vertical handle profile and cut it to the height of our door, which is 2338 mm. As a result, you should get 4 segments with these dimensions.
The handle profile is covered with a protective film, which protects it from damage during delivery. Also, do not remove it when cutting.
Next, cut the upper and lower horizontal profile to the appropriate length. In our case, the door width is 1009 mm. However, you should subtract the width of the handle profile, which is 25 mm. On both sides it is 50 mm. Also in the vertical profile of the handle there is a special groove, which is intended for positioning the horizontal framing profile. The groove has a depth of 1 mm. This means that the vertical profile will include a horizontal profile 1 mm from the left and right. Accordingly, we make the following calculations: 1009 – 25 – 25 + 1 +1 = 961 mm. This result is the length of the horizontal profile for the bottom and top; in the end you should get 4 segments of 961 mm each.
Afterwards, you need to mark the drilling locations for the screws for the upper horizontal profile. So, 7.5 mm should be measured from the end of the profile. This measurement should be transferred to the vertical profile. On it, mark the place to remove the hole from the end of the profile and mark the center of the hole. These measurements should also be made on the vertical profile of the handle, but only on the other side of the whip. It is also necessary to make a mark for attaching the support wheel. To do this, take the support wheel block and measure from the end to the middle of the mounting hole. This dimension also carries over to the vertical profile.
At the marked points, drill through holes for a Ø5 mm self-tapping screw through 2 strips. So, you should have 3 holes in each vertical profile: 1 for fastening the upper horizontal profile, 2 for the lower and 3 for fastening the support wheel.
At this stage it is necessary to connect the horizontal strip with the left and right vertical strip. We tighten all the parts together with a self-tapping screw. Before final tightening, the top support should be installed in the top profile for positioning.
Next, it is necessary to install the rollers on the door in the lower horizontal profile. To secure the support wheel, insert a bolt that should be tightened 2 mm. In the future, using it, it will be possible to adjust the position of the doors.
Filling installation
Let's say you decide to install a mirror as a door filling. To do this, put a rubber seal around its perimeter. After this, the previously assembled structure should be unscrewed; just unscrew the tightening screws. There is no need to unscrew the lower wheels. Next, insert the mirror with the seal into the upper and lower bars, and then tighten the structure again. Make sure that everything matches exactly, otherwise the mirror may burst. The door is assembled using the same principle if the filler is a USB plate.
Work technology
Before starting the active phase of work on creating doors for a wardrobe, it is necessary to prepare all elements of the canvas for work. Preparation can be done by yourself.
It all starts with cutting profile elements according to calculations that must be made in advance.
Vertical and horizontal profiles for one sash must be the same.
The hole must be drilled from the outside of the vertical profile: the top one should be at a distance of 8 mm from the edge , and the two bottom ones should be located at a distance of 42 and 8 mm from the edge.
A through hole must be made through the profile. Next, it will be used to secure the canvas and assemble the profiles. In this case, the hole on the inside should have a diameter of 5.5 mm to match the dimensions of the fastener. The diameter of the hole in the outer wall should be 10 mm. To create it, you first need to drill a hole with a 5.5 mm drill. After this, a second drilling of the outer wall is made with a 10 mm drill.
A special film must be glued to the back of the mirror or glass. This will prevent the appearance of fragments when the material breaks down.
Silicone seals cover inserts made of fragile materials around the entire perimeter. Moreover, it should be cut in such a way that does not reach the edges by 2-3 mm
Where to start assembling a wardrobe
First you need to check whether all the spare parts were delivered to you. There should be several boxes with chipboard (at least two), doors and packaging with hardware. The manufacturer can pack hardware and additional elements in a box with chipboard. Be careful when receiving the cabinet, as delivery workers may sometimes forget some elements or may damage some of its parts, be sure to check this.
What tools will you need to assemble the cabinet:
- Phillips screwdriver PH2;
- hex key, edge width 5 mm (L-shaped);
- roulette (ruler);
- level (optional);
The assembly process will speed up significantly if you have a screwdriver with bits (hex and Phillips), but you can do without it.
Preparing to assemble the wardrobe
Assembling a wardrobe with your own hands is a labor-intensive process, so immediately find an assistant who will help you hold or supply the spare part. Before you start assembling, you need to open all the packages and sort the boards by size. After this, it will be easier to determine which elements are where.
Each panel has characteristic connection holes, which make it easy to determine its purpose.
There are 3 basic diagrams for connecting chipboards:
- using confirmed screws;
- eccentric couplers (minifixes);
- one of the above methods, but with the addition of wooden dowels (chops).
Each connection has its own characteristic holes on the plane and at the ends of the boards. There are two types of holes for confirmations:
- in one part through in a plane with a diameter of 7 mm;
- in the second part there is a blank with a diameter of 4.5 or 5 mm.
There are also 2 pairs of holes made for eccentric couplers:
- in one part there is a blind part in a plane with a diameter of 5 mm into which the minifix rod is screwed;
- in the second part there is a hole at the end of 8 mm connected to a recess in the plane with a diameter of 15 mm for the clamping cylinder.
Holes for dowels are made blind at the end and in the plane with the same diameter from 8 to 10 mm.
Before assembling the wardrobe, look at the set of hardware; their presence will make it clear what type of connections you have and in what order to assemble the elements.
Before deciding on the details, it is worth remembering that the front side (end) of all boards is glued with an edge, and the back (where the fiberboard is nailed) remains bare. This way you can position the shelves, lintels and sides correctly.
Actually assembling the wardrobe
not that difficult if you follow a certain sequence.
Advantages of sliding wardrobes
The characteristics of such furniture, which are undoubtedly its advantages, can be depicted in a table:
| Advantage | Description |
| Compact and spacious | In such a closet you will place twice as much clothes without the expense of the enormity of the furniture itself. |
| Possibility of convenient placement of the cabinet in a room of different sizes and shapes | Some models of wardrobes can be transformed to suit the features of the room: the presence of a corridor, recesses in the wall where the wardrobe can be placed. |
| Room zoning | With the help of a wardrobe, you will visually separate different zones in the room, for example, a working area from a relaxation area. |
| Sliding door mechanism | To open the closet, you don't need to remove chairs or move other furniture |
| Convenient assembly and disassembly of the cabinet with your own hands | Assembling a wardrobe with your own hands is quite easy and anyone can do it simply by following the instructions. |
| Beautiful design | Compared to conventional furniture, built-in compartments are distinguished by a variety of shapes and a palette of colors. A huge selection of shades and color combinations, various designs and thematic images will give the room in which the compartment is located a special character and mood. |
Assembling the body of a sliding wardrobe basic principles
Decide how you will assemble the wardrobe - in a lying or standing position
Take one of the outer walls of the cabinet and lift it as if you were lifting an assembled cabinet; keep in mind that the height of the sliding wardrobe will be higher with an overhead roof.
If the side wall does not touch the ceiling at an angle, then the cabinet can be assembled in a lying position, which will make it easier to nail the fiberboard, and the sliding wardrobe will be quite simple to assemble.
Install end caps or mortise trims into the side walls
Before assembling the wardrobe
Arrange the parts in order of use during assembly, drive in the ends or screw the mortise supports into the side walls.
Why are tips or supports needed? If the side walls are installed directly on the floor, then when washing the floors, there will be direct contact of the chipboard with water and, accordingly, peeling of the edges and swelling of the chipboard will occur.
Install adjustable plastic supports
The plastic supports are the same as in kitchens and allow you to adjust the height of the wardrobe during assembly. In addition to this function, when the sliding wardrobe is loaded, the supports will prevent the bottom of the sliding wardrobe from falling and breaking.
Although there is another approach: the sides rest on the bottom of the cabinet, and the bottom on the base box, or place the bottom directly on the floor. You can also find such designs.
The size of the indentation of the supports from the rear edge of the bottom depends on the width of the plinth and is about 50 mm. A plinth is attached to the front supports with clips, everything is very similar to the one in the kitchen. By the way, the plinth is also an additional support for the bottom of the wardrobe.
The installation depth of the front supports depends on how much you want to “sink” the plinth, usually about 30 mm.
Sequence of assembling the wardrobe body
You must begin assembling the cabinet by connecting the side wall to the bottom. First, assemble the structure according to the drawing. This design already has a certain stability and rigidity. If you do not follow this rule, then the side walls of the wardrobe will tilt and the confirmations will tear out, breaking the bottom and partitions.
The last element to be installed is the cabinet roof.
| Rice. 8. Installing the wardrobe roof |
Nailing the back wall of fiberboard to the wardrobe
Sequence of screwing the back wall when assembling a sliding wardrobe
The fiberboard is screwed around the perimeter of the cabinet, to the intermediate vertical walls and horizontal walls.
Before screwing the fiberboard, it is necessary to align the cabinet diagonally so that diagonal A=B. A maximum of 5 mm of diagonal discrepancy is allowed, otherwise there will be problems when installing drawers and sashes.
Start attaching the fiberboard along the top, check the diagonals. If the diagonals are uneven, level them by lightly pressing on the side wall.
After checking the diagonals, we fix one of the corners and check the diagonals again. If the diagonal has “gone”, then unscrew the corner and set the diagonals again. Next we screw the fiberboard
along the perimeter of the cabinet and the axes of the internal filling parts. Screwing pitch 150 -200mm.
In the lower guide it is enough to make 2-4 holes along the axis.
Attaching the upper and lower guides for compartment doors
First, we attach the top rail so that it does not protrude beyond the side wall of the wardrobe.
Many of us are faced with the need to buy a wardrobe. The wardrobe model has become very popular. Its door design is extremely convenient and saves free space in the room. They are even used as partitions. There are two ways to solve this issue:
- contact a company that assembles furniture;
- order cabinet parts and assemble it yourself.
The second option, of course, will cost less than the first. But this process will require certain skills and abilities. It is very important to correctly measure all design parameters, think over the dimensions of all compartments and shelves, the height and width of the product. If you are ready to take on this job, then you need to figure out how to do it.
Preparatory stage
Performing calculations
Carrying out calculations is the most important step in independently creating sliding doors for any storage system. Precision is necessary to prepare the sash elements. Let's consider the procedure for carrying out calculations for Aristo profiles.
Calculations are carried out in the following order:
- Carrying out measurements of the doorway, the result of which will be obtaining the values of height (hereinafter Hp) and width (hereinafter Lp).
- Calculation of the height of vertical profiles (hereinafter referred to as Hv). So: Hb = Np-40 mm.
- Calculation of the length of the upper and lower guides. Their parameters are equal to Lп (opening width). If you plan to install a stop, regardless of its type, the length of the guides should be reduced by 3 mm.
- Calculation of the sash width (hereinafter referred to as Lc). This parameter depends on the number of sashes, the type of vertical profile, and the presence of shegel. For a better understanding of the calculation procedure, we offer a table of ratios.
- The calculation of the width of the insert (hereinafter referred to as Lз) depends on the type of profile and the thickness of the material. To simplify the calculations, we suggest that you familiarize yourself with the table.
- Calculation of the height of the door insert depends on the number of fragments and the thickness of the filling material. We suggest using the formulas given in the table.
The last stage of the calculations is the calculation of horizontal profiles.
Knowing the required width of the sash, you can easily calculate the length of the horizontal elements using the formula:
- for an open type vertical profile (C) - this is the sash width (Lс) - 52 mm;
- for closed type elements (H) - this is the width of the sash minus 70 mm.
Door installation
Be careful when working on doors. The ease of use of the door also depends on the quality of the profile. It is sold unassembled and consists of the following parts:
- guides - rails;
- base – bottom frame;
- the side frames (C, H) act as door handles, and rollers and the upper frame are attached to them;
- plastic and rubberized rollers;
- stopper for the bottom guide;
- a strip of pile, which is attached to the end of the door, serves to soften the impact of closing the doors;
- silicone seal for attaching the mirror.
The sealant must be applied evenly and carefully over the entire length. The profile frames are attached at the top and bottom to the mirror, which is in a horizontal position. Next, the side frames are put on the mirror in a vertical position. The frames are connected to each other with self-tapping screws into prepared holes.
Door installation begins with fastening. We measure the attachment points at the bottom and top of the cabinet. The guides are attached with self-tapping screws with press washers, also in prepared holes. First install the top part, combining it with the side frames, then the bottom one. Use a level to avoid warping. Install a stopper to secure the door. We insert the door into the upper one and then lower it into the lower guide. The height and angle of the door can be adjusted using the lower rollers. Your closet is ready.
At each stage, pay attention to the assembly diagram for this model. To clarify all the difficult points, watch the video instructions. If you doubt your construction skills and design abilities, turn to the professionals.