Principle of operation
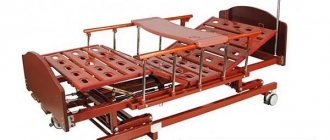
All modern beds with a lifting function work on a similar principle - moving the base, lifting it to a certain angle and maintaining the position using both muscle force and special clamps.
The design of most mechanisms is approximately the same: there are two metal plates, upper and lower, which are attached to the base and side of the laundry box, respectively. The connection of these plates is carried out using a special rod (or rods - there may be several of them), the location of which forms an opening arc.
The operating principle of all beds is approximately the same.
Important! In most cases, such a mechanism is equipped with a force compensator to make the base easier to lift, but in the cheapest options it is usually absent.
Video material
At this point, the process of assembling a bed with a lifting mechanism can be considered complete. Using the lifting mechanism, you can lift the entire bed with just one hand. The most important thing is to maintain consistency during installation. Please note that the finished structure should have a smooth lifting speed.
Types and varieties
Today, many multifunctional beds can have a built-in mechanism made according to one of three common design schemes:
Manual lift hinges
This design involves lifting solely through muscular strength. Considering that there will be a mattress, a blanket and, often, pillows on the base, then significant effort will be required. This solution assumes the presence of only a ratchet, which allows you to fix the opening angle - no springs or shock absorbers are provided here.
A bed with a manual mechanism will require considerable effort to lift.
Mechanism with spring compensator
This option is structurally similar to a manual mechanism. The key difference here is the presence of a compensating spring, which is in working condition (stretched) when the substrate is lowered. During the lifting process, the spring begins to compress, which partly reduces the degree of force applied.
In a spring mechanism, part of the load is carried by the spring.
Gas lift
This is what professional jargon calls a gas shock absorber, which is installed to relieve some of the effort when lifting the base, and also as an extreme position lock. Unlike the previous case, this solution allows you to easily and smoothly transform the bed.
With the help of a gas lift, the bed rises easily and smoothly.
Beds with a lifting mechanism: advantages and disadvantages
Most of the advantages of lift-top beds can be attributed to any type of opening mechanism. Therefore, it makes sense to highlight the positive aspects common to all designs:
- Compactness. Bed linens, blankets, pillows and clothes are stored under the bed, freeing up space elsewhere.
- Low noise level.
- Easy to use.
- Reliability. Especially in solutions where gas lift is used.
- Wide range of bed frames. You can choose a bed with a lifting mechanism to suit every taste and budget.
- Easy to maintain.
Lift beds have many advantages.
There are also disadvantages, which are typical for all options:
- Small gap between the bottom and the floor surface. When dust accumulates under the bed, removing it from there is a rather labor-intensive task without rearranging it.
- Lack of mobility. Due to its dimensions, such furniture can be placed in one place for a long time.
- Sagging. Cheap foundations begin to weaken over time, which affects the use of the structure as a whole.
The design also has its drawbacks.
Moreover, each version of the lifting mechanism has its own pros and cons.
Manual
The advantages include simplicity of design, reliability and ease of maintenance. As for the disadvantages, there is only one, but a significant one - the applied force required to lift the base.
The manual mechanism is the simplest and most reliable.
Spring
The advantage of this solution is the presence of a compensating effect, which allows you to remove part of the load (muscle force) during operation of the mechanism. The negative side will be the need to periodically replace the springs (over time they lose their original stiffness and stretch), as well as the complexity of installation, adjustment of the compression force and increased noise levels.
The springs will need to be changed periodically.
Gas bed lift mechanism
The advantage of gas shock absorbers is smooth operation during operation, lack of noise, unpretentiousness and durability. Among the disadvantages, it is worth mentioning the short stroke, reduced efficiency at low temperatures, and the impossibility of repairing at home.
Gas lift has both pros and cons.
Labor and cost
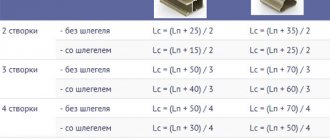
The amount of working time spent on making the bed is shown in the following table.
Taking into account the time spent on purchasing, transporting materials and work interruptions, the production of this furniture took me 3 days.
I recorded all the costs for purchasing the necessary materials in a notebook. They made up:
- hardware (confirmations, bolts, nuts, washers, bushings, screws) – 100 rubles;
- furniture corners - 20 rubles;
- steel corner 32 × 32 × 1400 mm – 20 rubles;
- MDF sheet 2440 × 1830 x 30 mm – 2800 rub.;
- fiberboard sheet 2440 × 1830 mm – 200 rubles;
- furniture legs (6 pcs.) – 60 rubles;
- edge furniture tape (10 m) – 70 rubles;
- two gas shock absorbers – 2000 rubles;
- edged board – 50 rub.
Total: 5320 rub.
I took this bed to the dacha. And for my bedroom I made another model, slightly different in the width of the body. I assembled a new bed with lifts with my own hands, measuring 180 × 200 cm. This time I made the body from laminated chipboard. I placed thin foam rubber and covered the outer surfaces of the case. I did this using a stapler. It turned out very beautiful and inexpensive.
Many of the residents of apartments in high-rise buildings would like to buy themselves a large bed, which will allow them to spend their holidays in comfort. But at the same time, the area of some bedrooms leaves much to be desired - sometimes it is simply not enough. Very often a situation occurs when a huge bed blocks access to the wardrobe or prevents the door to the balcony from opening, or even the door to the room. In such cases, there seems to be only one rational solution - this is the search and purchase of furniture that would have a special mechanism. The use of such structures would save a lot of space, but, unfortunately, not everyone understands assembling a bed with a lifting mechanism. Let's look at this seemingly complex procedure and pay attention to the main nuances.
How to choose a good mechanism?
When planning to purchase a bed with a lift-up top, in addition to other selection criteria, you should also pay attention to the installed lifting mechanism. It is recommended to consider the following:
- Compression force. Determines the force required to raise or lower the base, along with the mattress and bedding.
- Number of compensators. Typically, mechanisms using springs or gas shock absorbers are installed on both sides of the box. This allows you to reduce the applied force at the moment of opening and reduce the requirements for spring or gas lift power.
- Opening angle. Most often, this parameter directly depends on the capabilities of the compensating element.
- Workmanship. The ease of use and longevity of the mechanism directly depend on the reliability of the fastenings. Therefore, it is advisable to reject options using cheap designs. It is better to give preference to German or Italian manufacturers.
The choice of mechanism is carried out according to certain criteria.
Important! Typically, the power of the compensator is indicated in Newtons (N), while for springs it is determined by its stiffness, and for gas lift - by the pressure in the cylinder. For a single bed, this value starts at 300N, however, depending on the design, it can reach 2kN.
The power of the compensator may differ for different models.
DIY mechanism: what is needed for this?
The simplicity of the basic design suggests that such a mechanism can be made by yourself. This is partly true, but only if you have experience working with metal, a drilling machine and a welding machine.
You can also make a structure with a lifting mechanism yourself.
If we talk about manufacturing in the context of general operating principles, we can highlight several key points:
- Drawing. Design features such as the width of the support plate flange, the length of the rods and the distance between the holes are calculated depending on the point of application of the load, its nature (point or distributed), as well as the position of the axis relative to the center of mass of the entire structure. If such calculations are difficult to do on your own, it is recommended to look for the most suitable ready-made solution.
- Construction type. The manual version is the simplest from a production point of view. However, if you want to install a compensator, the choice here is obvious - a gas shock absorber. Installing a spring requires an accurate calculation of its stiffness: a weak one will not hold the base, but a too stiff one will require significant effort when opening. In addition, it may simply not be in the store.
- Nature of use (intensity). This will determine how powerful (reliable) the mechanism is needed.
DIY “floating” bed
Hello, dear readers and DIYers! In this article, the author of the YouTube channel “HomeMadeModern” will tell you about a method for making a rather unusual “floating” bed, without magnets or any magic. Welding and a little carpentry - that's the trick!
Materials. — Untreated white cedar board — Angle steel, profile pipe 25X25 mm, strip 75X6 mm, mesh — Plexiglas plate — Abrasive polishing paste — Bolts, washers, nuts — Machine oil, aerosol primer for metal, enamel, linseed oil. Tools used by the author. — Multifunctional construction metal detector — Spring clamps, clamps — Chameleon welding helmet — Semi-automatic welding machine — Magnetic welder’s angle — Circular saw — Grinder, diamond cutting disc for metal — Abrasive “coral” cleaning disk — Orbital sander — Screwdriver, cobalt drills — Polishing wheel for a screwdriver - Hand-held circular saw - Swenson's square, tape measure, marker. Manufacturing process. The headboard will be made from a wide slab of white cedar, so the edge of the headboard will have a natural edge. By the way, this piece of wood is worth a lot...
The bed frame itself will be made of steel profile pipe 25X25 mm.
The latter is measured in length, the grinder is cut into sections. Only two tools are involved in the manufacture of the frame - an angle grinder and a welding machine.
Then all the elements are laid out in this order on the floor. In this case, in the middle, the long sections protrude slightly beyond the lines of the frame (about 2.5-3 inches). These protrusions are necessary so that the frame is slightly spaced from the wall so that the slab headband can be installed.
During welding work, the master uses a magnetic corner. The latter allow you to hold steel parts at a perfectly precise angle.
During the welding process, long crossbars may become slightly skewed. To prevent this from happening, the author recommends using a long clamp.
Instructions for making a similar clamp were given in a recent article.
Now we have to weld a couple of vertical posts that will hide behind the slab and fit right under the wall. In these areas, it is necessary to properly clean the welds until a smooth surface is obtained.
After this, the following cuts are made in the vertical segments.
To rigidly attach the head of the bed to the wall, the master uses a 75X6 mm steel strip. He drills holes in it for the screws that will secure the bed to the wall.
Then the craftsman presses the steel strip with clamps to the vertical posts and welds it.
Next, in addition to the two legs that will be hidden behind the slab, the author plans to install another wide central leg made of plexiglass. It will give the entire structure reliability and stability.
To attach a transparent plexiglass plate to a steel frame, the craftsman cuts out a 50X50 mm piece from a steel corner and welds it to the center of the bed frame.
Next, he drills several holes in it through which the plexiglass plate will be attached to the base.
Although this part of the bed will be hidden from view, the author still intends to close the gaping holes in the profile at its ends. To do this, he cuts out several squares from scraps of profile pipe, fixes them with a magnetic corner and welds them around the perimeter. All seams are processed with a sanding disc.
The author wants to more securely attach the bed to the wall; to do this, use a metal detector to determine the location of the profile behind the drywall.
This is a very simple model; I would recommend this multifunctional construction metal detector.
The craftsman temporarily places wide plywood under the place where the plexiglass slab will later be located.
After which the entire structure is screwed to the wall. The author tests how much the frame will bend and comes to the conclusion that the frame should be strengthened a little more.
So, several more bulkheads are welded onto the frame.
Now an expanded steel mesh is spread over the frame. It will also add rigidity to the structure. Excess parts of the mesh are cut off with a grinder.
The mesh is fixed to the frame with a section of profile and two clamps, after which a painstaking welding process takes place.
Now the entire structure is covered with a layer of aerosol primer for metal.
Then the joints and recesses are rubbed with putty and sanded after drying.
The frame is covered with two more layers of white spray gloss enamel.
Next, on a circular saw, a plexiglass plate is cut to size using a disk with fine teeth. All its edges are carefully polished, starting from 150 to 220 grit.
Before processing all the cuts with 320 abrasive paper, the author drills holes in the slab, using a piece of plywood with prepared holes as a guide.
However, you can achieve maximum transparency of thick plexiglass in another way, namely, using a gas burner or a technical hair dryer.
The time has come to install the wide leg. The two corners of the plexiglass had to be ground down a little so that the plate attached to the welding seam could be pressed as tightly as possible against the steel corner.
Additionally, the master applies a layer of silicone sealant in the gap between the corner and the slab to create a kind of pad that softens the rigid connection of the softer plastic with the hard article.
Next, the bolts and nuts are screwed in.
Now it’s the turn of the headboard. Excess wood is cut off.
The slab itself is processed with a grinding disc; the author takes special care to round off the corners and side edges. After this, the wood is additionally sanded with an orbital sander.
The finish is first applied in a thick layer, then spread over the surface with a brush or piece of cloth. After 10-15 minutes, go over the cloth again, rubbing the varnish into the surface, removing dry areas and rubbing the places where the varnish has accumulated.
Finally, the author uses a lint-free cloth to remove excess substance.
Before placing the finished headboard on the steel posts, the craftsman saws two shallow grooves, approximately 10 mm deep, into the back of the slab to provide additional space for alignment.
All that remains is to fasten the headboard with screws and the “floating” bed is ready!
This is how beautiful it turns out.
Now you can organize LED lighting for even greater effect.
I thank the author for the unusual bed design!
Good mood, good health, and interesting ideas to everyone!
The author's video can be found here.
Source
Become the author of the site, publish your own articles, descriptions of homemade products and pay for the text. Read more here.
Installation specifics
Based on the similarity of the circuit diagram and design features of most lifting mechanisms, we can propose a certain universal approach regarding their installation:
- Preparing the frame. First of all, you need to assemble the bed frame. In this case, it is enough to prepare a box (linen box) and a base for the mattress. At this stage they will be separate elements.
- Assembly of the mechanism. If this is a purchased product, it may either already be assembled, or appropriate instructions should be included with it. For a homemade mechanism, you should adhere to the considerations on the basis of which the design was developed (assembly may include certain nuances that are specific only to a particular case).
- Actually, installation. First of all, the mechanism is attached to the sides of the linen drawer. For the standard version, this is done on both sides. At this stage, it is necessary to strictly maintain alignment at the landing points, otherwise, when opening, you can get not only vertical movement, but also rotation around the conditional center between the supporting side plates. The base is attached to the mating part of the structure.
- Functionality check. Here it is necessary to evaluate the performance of the mechanism as a whole: lifting the mattress backing, keeping it open, smooth operation, presence of runout or play.
Possible difficulties
Of course, professionals with extensive experience in assembling various types of furniture can easily handle assembling beds with a lifting mechanism. But beginners in this matter may encounter some difficulties, which can be found in the table.
| Possible difficulties | Solution |
| Need for drilling holes | Holes for fasteners will need to be made in different parts of the structure. It is especially important to properly organize them in the headboard for its secure fixation on the frame. A screwdriver is required to create the holes, and the headboard is secured with screws. |
| Assembly and installation of gas lift | The installation process itself is quite complex, so the work must be done without haste, carefully, and consistently. It is important to maintain symmetry in work and adhere to safety measures. |
| Mistakes in marking the bed frame | An error at this stage will negate all efforts, so it is worth reading the assembly instructions from the manufacturer of this model in advance. You can also ask the opinion of experienced furniture makers. |
Remember a few more important points.
Many of the residents of apartments in high-rise buildings would like to buy themselves a large bed, which will allow them to spend their holidays in comfort. But at the same time, the area of some bedrooms leaves much to be desired - sometimes it is simply not enough. Very often a situation occurs when a huge bed blocks access to the wardrobe or prevents the door to the balcony from opening, or even the door to the room. In such cases, there seems to be only one rational solution - this is the search and purchase of furniture that would have a special mechanism. The use of such structures would save a lot of space, but, unfortunately, not everyone understands assembling a bed with a lifting mechanism. Let's look at this seemingly complex procedure and pay attention to the main nuances.
The need for dismantling and its features
In most cases, disassembling the mechanism itself is not necessary. Even when transporting furniture, it usually remains folded on one of the parts of the frame. However, there are a number of circumstances that may require direct intervention in the structure:
- Spontaneous change in the position of the base.
- Jamming (jamming) of the mechanism, change in operating behavior other than typical.
- The appearance of squeaks, displacement in the horizontal plane, beating or friction in a certain place.
In some cases, the mechanism will have to be dismantled.
As a rule, such symptoms are signs of a malfunction of the lifting mechanism. To dismantle it, you should clear the bed of all unnecessary things, remove (unscrew) the base and, having gained access to the mechanism, inspect the condition.
Choosing a bed with a lifting mechanism
When choosing a bed equipped with a lifting mechanism, you need to pay attention to the following:
- Workmanship and design. No beating, jerking, creaking or play.
- Frame strength: the linen box matches the base used. A good frame should not allow deflection or sagging.
- The type of base itself. It is best to choose an option designed for an orthopedic mattress - it allows you to distribute the load more evenly.
- Materials and filling.
- Ease of use.
There are several factors to consider when choosing a bed.
The use of structures with a raised top can be an excellent help for residents of small apartments or adherents of minimalism. This can also be a good option for those who live alone - everything you need can fit in a linen drawer. Therefore, if there is such an opportunity, it makes sense to give preference to this particular solution.
How to choose a bed with a lifting mechanism
To choose suitable furniture, you should focus on the operating conditions:
- if you do not need to regularly raise the base (for example, things that are rarely used are stored in the bed), you can purchase a model with a manual mechanism;
- For regular use, spring installations or a model with gas shock absorbers are suitable;
- For a children's room, it is better to choose a bed with a gas lift, but one with a spring mechanism is also suitable if you plan to change the furniture within a few years.
You can always get great pleasure from creating a bed with your own hands.
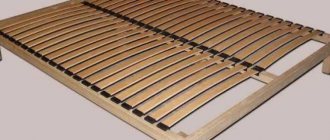
It is important to pay attention to the materials of manufacture, namely the strength of the lamellas. Budget models usually use inexpensive chipboard, which can quickly become unusable. The best in comparison with them will be beds made of MDF. This material is durable and safe.
Once the base is raised, you will have access to a lot of space.
The larger the furniture, the more weight will be placed on the mechanism. According to the standard, such beds are 2 m long and 90 cm wide (single) and 2 m (double). The dimensions of the product must be taken into account when choosing a mechanism. It is worth checking with the manufacturer what loads it is designed for.