How to calculate the dimensions of wardrobe doors
It is very important to calculate everything correctly and take accurate measurements so that the finished structure securely takes its place. Any inaccuracy can lead to jamming or misalignment of the doors. First of all, we measure the width of the site for the structure.
When measuring, check the dimensions at several points.
The next step is to calculate the wardrobe doors. We will be interested in the dimensions of the opening for them, its height, width and depth. The last preparatory step is to determine the number of sashes and the pattern of their overlap. The simplest design is with two doors and one overlap. Let's arm ourselves with a calculator and start counting.
It is quite possible for a person with practical skills to assemble a wardrobe with their own hands.
Height
To measure correctly, you should take into account the vertical component of the total space of the niche. This will be the maximum indicator for the entire storage system. For example, with a ceiling of 2.5 m, this figure for the structure should not exceed 2.4 m.
To avoid mistakes, you must strictly adhere to the rules for calculating the size of canvases.
To get the final result, we will take measurements at three points - along the side walls and in the middle of the site. You should focus on the smallest of the three measurements, otherwise the structure will not fit into the opening. When making calculations, you should take into account the thickness of the top floor. To calculate the dimensions, it is important to take into account the dimensions of their fastening elements.
It is important to take into account the height, width of the opening, the number and size of doors, the type of profile and other fittings.
The vertical of the canvas will be the difference between the height of the cabinet and the thickness of the structural elements:
- overlap thickness – 1.6 cm;
- total thickness of guides and rollers – 6 mm;
- the gap between the sash and the guide rails is 1.5 cm;
- the technological gap for installing the sashes in the upper grooves of the guides is 1.4 cm;
- The thickness of the aluminum profile for the frame is 3.2 cm.
We subtract and get the vertical size of the door - 231.6 cm.
Width
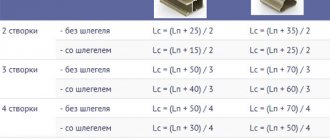
The calculation of the width of the structure is also carried out at three points - at the top, along the ceiling, at the bottom, near the floor and in the middle. We take the smallest indicator as a basis. The width of the canvas and their number are determined by the number of partitions that divide the niche into separate sections, each section is closed by its own door. In order to find the width of one, you need to divide the width of the opening by the number of doors. Since they are all identical, further calculations will be carried out only for one of them.
The correct determination of the dimensions of door structures depends on the accuracy of the measurements.
Let's look at everything using a simple example:
- The total width of the cabinet niche is 3 m, the number of partitions is two.
- It is clear that there will be three sliding elements, each 1 m wide.
- The doors, when closing, overlap one another and overlap. To create an overlap, each side needs to be increased by 2.5 cm.
- Thus, the width of one will be 105 cm.
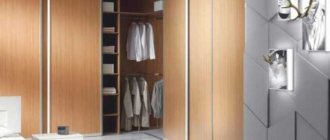
The standard filling of a wardrobe opening can consist of 2, 3 or more panels that move relative to each other in a single plane.
Depth
The design of the doors is designed in such a way that when closed, part of one overlaps the other. Ideally, when the doors are closed, only the handle profile framing the door is visible. However, it should not overlap the filling area that is located behind it. The place where one movable leaf overlaps another is called overlap. The number of overlaps is always one less than the number of doors.
When the opening is closed, the internal racks overlap by the width of the profile. These intersections are called overlaps.
The depth of their landing after they are installed in place is part of the depth of the niche and depends on the height of the handle profile in the cross section. The profiles have a C-shaped, H-shaped and symmetrical section. The planting depth is determined at the overlap point. With a profile height of 3.4 cm, it will be 34 * 2 + 2 mm = 70 mm, where 2 mm is the technological gap between the closed doors.
Correct calculation of all the component parts will eliminate mismatches, distortions, and failures during the installation of the panels in the wardrobe.
Filler
The door leaf material (MDF, mirror, glass) is called the filler; it is framed in an aluminum profile frame. Consequently, the dimensions of the filling will be smaller than the dimensions of the overall canvas by the width of the profile.
The filling parameters are determined by subtracting two values from the door dimensions - the width of the horizontal strips and vertical posts (handles), as well as two thicknesses of the buffer tape.
Let's look at an example:
- the width of the handle profile is 2.6 cm, of which we remove 10 mm, the depth of the landing groove, and we get a parameter of 1.6 cm;
- there are two handles (on both sides), so we double their width 16*2=32 mm;
- add another 2 mm - the thickness of the seal (1 mm), also on both sides, 32+2=34 mm;
- subtract 3.4 cm from the door width and get the horizontal size of the filler, 1050-34 = 1016 mm;
When combining inserts, it is necessary to take into account the wall thickness of the aluminum I-profile, which is attached to the frame posts.
The vertical size of the filling is calculated in the same way.
Article about furniture
Author - designer of the company DEZALT Sukhanov Eduard
Briefly, in order not to waste your time, the optimal width can be from 650mm. up to 1000mm, and the optimal height is from 2000mm. up to 3000mm.
If you have an opening for compartment doors, divide it by the number of doors to get an idea of how many you can get. For example, you have an opening of 1600 mm, divide by two, you get 2 doors of 800 mm each, and if you divide by three, you get 533 mm. It turns out that the best option in your case is 2 doors. I'll explain why.
If you make a door 533mm. (I won’t bother you with the overlap of the door, the binding of doors on the walls, this all affects the width of the door) then when you try to move, the door may warp. You push her with your hand, and she will resist you. Watch the video, in it I clearly show what can await you.
It is better to make the door 650mm. width, in extreme cases, 600mm, but if less, you doom yourself to torment.
With such a width of 600mm, it is advisable to make the door heavier. Use mirror and glass inserts; they are heavier than laminated chipboard or MDF inserts. The door will be more weighty and will not warp at the slightest push.
I don’t advise you to play with the difference between the doors in the closet, when one door is 400mm, and the other two are 600mm. You won’t gain much by doing this, the cabinet will be inconvenient to use, don’t forget about the drawers and that you will have a narrow entrance of 400mm into one section.
But if we are talking about a narrow entrance to a dressing room or a double-door wardrobe, we have tried the following trick several times. The opening is slightly less than a meter, 927mm. If we subtract the thickness of the planks that we attach to the sides of the walls, 895mm remains. We add 18mm to each door. for overlap, it turns out that each door will be 465mm wide, this is very little. The door will warp when pushed lightly. Then we made one door at least 500mm wide, and the second one was 430mm wide. Thus, we made one door almost complete, and the second door, I will say so, is defective. The first “wide” door will serve as the entrance to a deep closet, it will be opened more often, and the second door will be moved less often and with both hands. Naturally, everything was discussed with the client.
Look what we did in the video.
Of course, the symmetry is broken, the right door is narrower, so it is less visible than the left one. But the mirror visually masks this asymmetry, everything seems uniform.
The wider the doors, the more beautiful they look. The widest doors we made were 1400mm. It is better not to use glass in such doors, they will be too heavy. If the wheels can withstand 5-7 years, then aluminum is unlikely. Most likely, the lower screws of the wheels, on which the weight of the doors presses, will push through the aluminum with their heads and the door will sit on the rail. To prevent this from happening, use lighter material as inserts, for example thin 8mm chipboard. Italian plastic is perfect for such purposes, but its price is exorbitant. You can also use thin MDF, it is slightly heavier than laminated chipboard, but of course lighter than glass.
I don’t recommend making wide doors in hallways; moving them is still a little more difficult than narrow ones. The volume of the door and its weight affect. Closers can be installed on wide doors, but they last less because the door weighs quite a bit and the mechanism wears out faster.
For the living room or bedroom, you can make wide doors. Firstly, it will be prettier, and secondly, you will use the closet in the bedroom a little less often than, for example, in the hallway. In the hallway, as a rule, there is a closet common to all family members. Each resident uses the closet several times throughout the day. But in the bedroom, the furniture is usually used by those who sleep in it, usually 2 people. Therefore, beauty, in my subjective opinion, comes first in bedrooms and living rooms. Make the doors wider.
Let me sum it up.
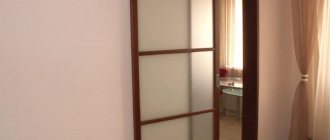
If you have a 1 meter opening for compartment doors, I would not recommend making compartment doors. Consider an option with swing doors or accordion doors.
One more tip. (This German brand produces the coupe system) has a special mechanism for the lower rollers, which prevents the narrow door from warping. We ourselves have never worked with it, but we know that it exists. If you have extra money (Raum+ is a very expensive profile), then you can install narrow doors with lower locks.
Take a look at some of our works with wide sliding doors.
All articles
How to assemble wardrobe doors with your own hands
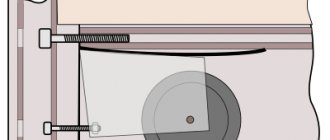
A diagram of how to assemble doors for a sliding wardrobe with your own hands, calculation of dimensions, which were carried out using vertical C-shaped profile handles, is shown in the drawing. The serial numbers of the elements correspond to the details (table).
A step-by-step table for assembling a wardrobe door will help in this difficult task.
Positions 3 and 4 – upper and lower two-rail guides. They are fixed structural elements along which the doors move. Attached to the lid and base of the structure.
The door should be assembled using fastening screws, position 15 of the drawing. The lower support roller is secured with an adjusting screw, designation 14a.
If you have certain skills, you can make sliding doors with your own hands.
If necessary, horizontal jumpers can be installed in the canvas. There are two ways to install them:
- Without fixation with centering in the inner sides of vertical profiles.
- Installation with mounting screws, similar to the top rail.
As you can see, the theoretical part of creating doors for a wardrobe does not cause any particular difficulties. It is much more difficult with the practical side of preparing installation parts; here you will need certain skills, special tools and materials. Before deciding on such an experience, carefully consider all the risks.
Calculation of compartment door filling height
In order to calculate the internal filling of a compartment door, pay attention to the sections of the horizontal upper and lower connecting profiles, as well as the horizontal divider.
| Rice. 8. Cross section of the upper connecting profile |
| Rice. 9. Cross section of the lower connecting profile |
When a compartment door is completely filled with chipboard, the insert height is:
Chipboard filling height = compartment door height – 47 – 12.
47 mm is the height of the lower profile 57 mm minus the depth of the groove in the profile 10 mm.
12 mm is the height of the top profile 22 mm minus the depth of the groove in the profile 10 mm.
When a compartment door is completely filled with glass, the insertion height is:
If the filling is glass, then you need to fold back another 2 mm on each side to the thickness of the silicone seal.
Sometimes for calculations they take a size of 1.5 mm per side, that is, before calculating, measure the thickness of your silicone seal.
As a result we get:
Glass filling height = compartment door height – 47-12-4 (or 3 mm).