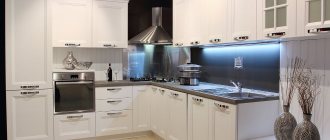
The hob looks very beautiful and modern in the kitchen. So, you bought a hob. Now how to embed the hob into the countertop with your own hands? Is it possible to do this yourself and what are the subtleties and recommendations in this matter?
So, you decided to save money and install the hob yourself and not call a furniture assembler, then this article is for you!
Installing a hob is not that difficult, but, as in any business, there are some subtleties. The most important thing is to have the necessary tools at hand, desire and a little patience.
Modern hobs can be dependent (i.e., the hob is installed only in conjunction with a dependent oven) or independent (in this case, the independent hob is connected autonomously).
Dependent hob
connects through the oven, and both components are controlled using a touch panel or conventional controls located on the surface. The dependent hob is located above the oven, as in the design of a conventional kitchen stove.
Independent hob
can be installed anywhere at the client’s request, the main thing is that it does not violate the basic rules for installing hobs.
Hobs are also divided according to heating method into: gas and electric.
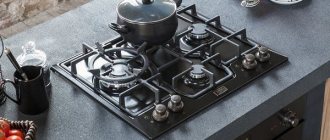
Gas hob
When purchasing a gas hob and installing it yourself, you need to carefully check the correctness of all connections, as this is dangerous for your life, so it is better to call a specialist who can connect your hob to natural gas. There are situations when it is impossible to install a hob because the gas pipe runs too far from the wall and, as a result, the size of the countertop and hob will not allow you to do this. Consider this.
Electric hob
With an electric hob, everything is much simpler; just follow the rules of electrical safety and caution when working with electrical appliances. When purchasing a hob, you should carefully consider the dimensions of the hob itself.
Installing the hob
What tools are needed to install the hob? You won’t need a lot of tools, namely:
- drill or drill-driver;
- screwdriver;
- electric jigsaw;
- pencil;
- roulette;
- measuring angle;
- a pair of adjustable wrenches;
- flat and Phillips screwdrivers.
This is the tool needed to cut in and install the hob.
The installation of a hob can be divided into several separate types of work.
First
– this is the implementation of the correct insertion of the hob into the countertop.
Second
– what you need to do, actually connecting the hob to gas or electricity.
And so let's get started. The first step is always to read the documentation that comes with the hob. There are always approximate instructions and a diagram of the insert for the hob. Based on the dimensions of the hob recommended by the manufacturer, you will need to make a cut in the countertop. Although manufacturers provide cutting instructions in the hob documentation, their accuracy should still be checked.
In order to embed the hob into the kitchen countertop, you need to apply markings along which the technological hole will be cut.
Typically, the hob is embedded above a special work table, into which the oven will then be installed.
Where the hob will be installed, from the edge of the tabletop, which is adjacent to the wall, measure from 50 to 75 mm. The manufacturer recommends a standard of 50 mm, but in some cases this is not possible, since either a gas pipe passes through, or this is the wish of the owners. In this case, we measure and put marks in two and draw a solid line along them with a pencil, along this line the tabletop will be cut. Once again we check the distance from the edge of the tabletop to the line in several places, guided by the expression measure seven times, cut once!
Now that we have the first line, we can begin further marking the surface. Of course, there are so many craftsmen, there are so many ways, but I usually do this: I put a ruler at the bottom of the tabletop along the wall and draw a line on the edge of the tabletop on one side and then on the other, then I continue it with the help of a measuring angle, so that it goes to the top table tops, so I know exactly the edges of the inner walls of the work table.
Then, using the same corner, I draw these lines until they intersect with the first line. I check the intersection angle between these lines, it should be 90 degrees. After this, from the first line along these lines you need to measure a distance equal to 490 mm and put marks along which we will draw a line parallel to the first.
But that's not all, since we only marked two along which the saw will go. Now we measure the distance between the lines that we drew from below; it may differ in size, but it is approximately equal to 576 mm, and our width should be equal to 560 mm. Now subtract 560 from 576 and divide the resulting value in half. It turns out that on each side you need to step back 8 mm inwards and draw a line on each side.
Now the outline along which we will cut is ready. Once again we check all the dimensions for compliance, check the diagonals, they must be the same. We drill holes in the corners so that the jigsaw file can pass through them freely.
Connecting the hob
Once everything is done, you can connect the electric cooktop to electricity. To do this, use a wire for single-phase current - three wires of four square millimeters each. For this, a PVS 3 x 4 cable and a special 32A socket are used. Most apartments have one phase, so it is necessary to install jumpers according to the diagram below. For three-phase, use a 5 x 2.5 mm² wire.
The technology for embedding a gas surface is the same, but in addition to the wire, it is necessary to ensure that the gas hose is sealed.
Popularity:
1,925 views
Installing a hob: basic rules and recommendations
The joy of purchasing a hob is understandable - now a new beautiful and smart assistant will appear in your kitchen. However, in order for her to fully demonstrate her talents, she needs to know how to install the hob correctly.
How to install a hob: general requirements
This technique comes in electric or gas format. This is reflected in the difference in panel installation, but the general rules before the process itself remain the same:
- The presence of a ventilation system is mandatory. Modern hygiene and safety rules dictate that there must be a hood above any hob. If this cannot be done, then you should definitely install a high-power fan on the window.
- The source material for the countertop can be anything - the main thing is that its heat resistance does not fall below 100 °C. This imposes certain obligations on the thickness, which should be within 25 mm (not thinner).
- If the installation is done between two cabinets, then you need to leave a distance from the wall of each to the stove of no less than 15 cm. For the kitchen wall, the requirements are slightly reduced, but you still should not cross the threshold of 5 cm. If this rule cannot be observed , then it is imperative to lay heat-insulating material between the wall and the panel.
Installing a hob into a countertop: process features
The surface of the table top will have to be sawed through - a jigsaw is best for this. The materials you should prepare are:
- special sealant;
- self-tapping screws;
- clamps.
After meeting the general requirements, you can begin the work itself. It will consist of following the following simple algorithm:
- The instructions usually indicate the dimensions of the panel. If it is not there, then you can measure it yourself, but you don’t need to do it closely - you need to leave a gap of 1-2 mm between the panel and the tabletop.
- It is better to attach and trace the cardboard model first.
- The gaps between the hob and the edge of the countertop should be at least 5 cm.
- Drill out the corners of the tabletop with an electric drill.
- Carefully cut along the marked lines from one cut corner to another.
- Seal the edges of the table top at the cut points with a special sealant (included with the purchase). It is also recommended to use silicone sealant, which will protect the countertop from the negative effects of excessive moisture.
- Lower the hob into the resulting niche.
- Align it, but do not apply too much force.
- Firmly fix the surface using special clamps, securing them with self-tapping screws - this will hold the panel in one place.
Further actions in the event will depend on what connection method this equipment has.
Connecting the hob
Hobs or hobs are one of the elements of built-in household appliances and are divided into electric, gas and combined.
The working surface of the hob is embedded in the countertop and can be dependent or independent. The dependent hob is controlled from the oven panel located underneath it. An independent hob does not depend on the oven and is controlled independently.
Connecting the hob and oven
has a number of technical features, and therefore requires special knowledge during connection.
Therefore, when placing an order, you are guaranteed to receive professional installation and connection of the hob by highly qualified specialists with extensive experience, using only proven modern materials, manufacturer’s technical requirements and mandatory compliance with current standards and regulations.
How to install an electric hob
Installing a socket for a hob
An initial grounding check is of great importance in connecting such a stove. The second important rule is the ban on the use of adapters and extension cords.
The installation of an outlet for the hob also has its own characteristics. You need to take care of its location before starting work so that this moment does not distract. It is best to place it below the tabletop level.
Very often, in this process, the kitchen set is dismantled - this is necessary to prepare a new electrical wiring channel, strengthen it and cover it with a cement or putty layer. Only after this is a hole cut out in the back wall of the furniture, through which the panel will be connected to the outlet.
Following actions
They must follow these instructions:
- The electrical cord with grounding is connected to the connectors of the stove.
- The panel itself is connected to communications. It is possible to improve the power supply system.
- Functionality check in progress.
If the connection is made to a single-phase network, then the work is supplemented by the following points:
- A separate electrical line is laid (it is better to use a three-core 3x4 wire).
- A special socket with grounding is installed.
- A circuit breaker is installed.
Refinement of the power supply system is also very important - this significantly reduces both the breakdown of the device itself and the risk of electric shock to the user. To carry it out, you should contact specialists.
A similar installation can be seen more clearly in the following video:
About the power of the panel and the electrical outlet for it
The Gefest hob, which according to the manufacturer's documents is called a built-in electric household table, with all burners turned on, consumes 5-5.5 kW of electrical energy. Panel power 220-230 volts. You can calculate for yourself that at maximum operating mode, the electric current in the panel’s power circuit will be 5500÷220=25 Amperes.
We use the table for calculating the cross-section of the electrical cable and the current strength of the circuit, we see that for this mode you need a cable (copper) with a core cross-section of at least 2.5 mm2. Or aluminum wires (cable cores) with a cross section of 4 mm2.
In my version, the house was not new, and the wiring in it was “original” in excellent condition, but made of aluminum. No one planned to change the wiring, so we limited ourselves to a visual inspection and replacement of the circuit breaker for the stove's power supply group. The wiring for the stove is separate with a grounding wire, which fully complies with the rules of the PUE.
Related article: Which refrigerator to choose for an apartment
Installing a gas hob
Due to the specific nature of connecting such equipment, only a gas service employee should carry out its connection - poor quality work by amateurs can lead to tragedy. The recommendations below are specifically for them (and for those who have already repeatedly connected devices to the gas main).
Connection features
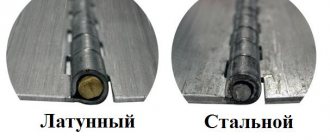
There is a difference between receiving jets for main or bottled gas. This should be taken into account when connecting. You can unscrew them with keys 6, 7 and 8. Those that go for main gas have a larger hole diameter.
The panel is connected to a gas source using a special flexible hose. In combined panels, for additional safety, it is worth installing a thermal shut-off valve - it will shut off the gas supply if the temperature crosses the threshold of 80 degrees (a second such valve will need to be installed on the gas cylinder).
After connection, all joints are checked for leaks. Usually a soap solution is used for this - bubbles will appear on it if something is leaking somewhere.
It is best to turn off the gas valve after each use, so it must be controllable and in an accessible location.
It is very important to adjust the burners - the flame on them should be even. The appearance of yellow glare from the fire is unacceptable.
How to choose an electric hob: a collection of the most useful recommendations
Glass-ceramic hob - Glass-ceramic hob: new fashion or super technology?
Page Tags:
Did you enjoy this article?
Share it with your friends! Installation cost 1250 rub. built-in gas panel includes:
a) Arrival of the master in the city of Moscow within the Moscow Ring Road
b) Installation of a gas panel on a finished bench
c) Connection of a flexible hose after the tap and to the panel
d) Installation of a gas hose after the gas supply tap
e) Feed and check all connections for leaks
e) Repeated test check of all connections and brief instructions for the user
g) Reproductions and additional materials are paid separately according to the price list.
2) The cost of installation is 2100 rubles. taking into account the material includes:
a) Visit of the master to the city of Moscow within the Moscow Ring Road
b) Dielectric rate and setting the dielectric rate
c) Flexible hose 1.5 meters including installation
d) Connecting the hose to the hob and checking the hose for leaks
e) Check all connections for leaks, including burners
e) Test check of all connections and brief instructions for the user
g) Finalization of the niche and materials are paid separately according to the price list.
Installation of the hob must be carried out strictly in compliance with the requirements of the rules for installing the hob in terms of the Manufacturer’s recommendations and ensuring electrical, gas and fire safety of the equipment. Only professionals, thanks to their experience and access to these types of work, are able to evaluate all the nuances and correctly install and connect the hob, ensure high-quality and fast work, and adapt the equipment to the existing conditions.
Installing a gas hob consists of the following steps: disconnecting the old gas hob (if there is one), dismantling the excess section of the gas line and, finally, connecting the gas hob using a flexible connection.
Installation of a built-in hob also requires high-quality grounding. An additional type of work when installing this type of hob is combining it with the dimensions of the kitchen interior.
The installation of an induction hob is due to the peculiarity of this type of panel - it works on the principle of creating a vortex magnetic field using an induction coil. A distinctive feature of this type of hob is the presence of a multifunctional computer. Mechanically, the installation of an induction hob is no different from a conventional electric hob; connecting the hob to the electrical network is identical. But the peculiarity of the electronic filling of the induction surface requires additional control and accuracy of the work.
At the moment, all manufacturers offer almost identical types of surfaces in terms of connection. In this regard, connecting an Electrolux, Bosch, Zanussi or any other manufacturer’s hob is carried out in the same way.
Connecting an independent hob is not done through the oven, as is the case with combined appliances, but separately, with all the necessary work performed. Moreover, if you want to equip the hob with an oven, then the connection of an independent hob is carried out together with the oven.
A gas hob is considered fully connected if the following work has been completed:
Holes in the tabletop and a niche, if necessary, have been prepared.
Dielectric inserts are installed to the valve that shuts off the gas supply.
A bellows hose is installed to the panel and dielectric insert.
The electrical outlet is connected to the wire for electric ignition, if necessary.
The hob is installed in the countertop, connections and mounting fasteners are checked.
Testing and consultations on the operation of equipment were carried out.
Work on drilling holes, drilling holes in the countertop and dismantling used equipment is priced separately.
Note!
When ordering, please do not confuse the price of a Complex connection of the device with the price of Installation on ready-made communications.
Hello.
Today we will talk about built-in kitchen appliances.
The vast majority of modern kitchen sets include a hob. Therefore, those who want to make kitchens must be able to install it, especially since it is not at all difficult.
So how is this done?
Everything is very simple: you need to take a tabletop, cut a niche in it, insert the hob there, and secure it. It seems like that...
But for greater clarity, I propose to consider all the important points associated with the installation of this equipment.
Personally, I advise, if possible, to purchase cookers with plasticine. But, in any case, such a technique is not a sink, which, usually, when installed, is attracted with its entire surface to the countertop.
The hob fastener is located, I don’t even know how to put it correctly, in short, it is located “goat style”, and no matter what you do, you won’t be able to pull it with its entire surface to the countertop. Therefore, during installation, it is necessary to treat the outside of the joint with silicone.
Yes, it is better and more convenient to attach this equipment when the tabletop is already attached to the lower modules. And plan the set in such a way that the hob is not located close to the sink (well, at least not closer than 250-300 millimeters).
Well, that seems to be all regarding the installation of the hob.
I would also like to note one more detail: Nothing ideal ever happens anywhere.
Therefore, if, when installing the hob, a small gap has not been removed somewhere, look at the fasteners (maybe they need to be bent), and if nothing helps, fill the gap with silicone and don’t worry, this is not an ideal technique. Not everything depends on you here.
Yes, still. Try to tighten the fasteners only once, otherwise, often in cookers, the threaded holes for the fasteners are such that if you screw the corresponding bolt in there a couple of times, the threads will slip off, and then you won’t be able to tighten the fasteners with anything at all...
Have you thought about making your own kitchen furniture? Then it’s time for you to find out that making it is only half the battle, and the second half of this job is to complete the furniture with all kinds of equipment. These include built-in washing machines and dishwashers, a sink, an oven, and, of course, a hob, which will be discussed in this article. Together with the site okuhne.net, we will deal with the question of how to install a hob with your own hands and how to connect it to the home gas pipeline and electrical wiring.
Hob installation photo
Electrical connection
To connect the built-in hob to the network, just check for voltage and plug the plug into the socket. When preparing for installation, you must make sure that the cross-section of the wires corresponds to the connected electrical power that the built-in panel has. Otherwise, you need to draw a separate line from the input panel to the stove. Then installing an outlet may not be necessary. We talked in more detail about connecting the hob in a separate article, which we strongly recommend that you read.
A built-in hob can be connected to a separate line, provided that a separate circuit breaker for the hob, suitably rated, is provided on the distribution panel. If the house is supplied with a 380 volt power supply, that is, 4 wires, when connecting the electric stove, the load should be evenly distributed among the phases.
You can learn about connecting an electric hob from the video:
This is the technology used to install a built-in hob and connect it to the electrical network with your own hands. We hope that our step-by-step instructions and the provided video examples helped you carry out installation without the involvement of a specialist!
It will be useful to read:
2 comments
Your site is space! My wife and I are doing renovations (well, mostly me, but she rips off the wallpaper, although she cleans it up later), so the question arose about how to install a brand new Hotpoint Ariston panel. I read it and did it, everything is clear and understandable. Great as always, thanks.
I agree, hotpoint has excellent panels. We use this one too, but we just installed it recently.
Installing a hob: marking the installation site
Marking is perhaps the most important stage of work associated with installing a hob with your own hands, which, oddly enough, has the most nuances. Judge for yourself - the entire appearance of the kitchen depends on how clearly and accurately you can mark and then cut a hole for the hob. This is exactly the case in which a mistake of one centimeter can turn out to be irreparable - you always need to remember the cost of the countertop. Buying a new one is not that cheap. The fact is that the panel itself must fit clearly above the cabinet, and there is practically no margin in width.
There are two ways to mark the mounting hole - you can simply lay it on the tabletop, center it by eye and trace it with a pencil, or you can follow the path of the professionals and calculate everything down to the millimeter. Naturally, it is better to choose the second option to resolve the issue, since in this case the chances of making a mistake are minimal. This is done as follows.
Now all that’s left to do is cut out and install the hob into the hole. We'll talk about this further. For those who do not like to read and delve into what is written, we attach a video on installing a hob into a countertop.
Installing a gas hob: two ways to cut the hole
You can cut a mounting hole for the hob using three different electric tools - a jigsaw, a drill or a hand-held milling machine. The most accurate and beautiful cut is obtained when using a hand router, but you don’t even have to ask about the presence of one in the home workshop of a person not involved in construction. Not everyone has a jigsaw either, but at least it is not very expensive, and you can buy it to carry out this work. Well, almost every business man has a drill. We’ll start with that, but first I’ll warn you about the quality of the hole obtained with a drill - it is, one might say, disgusting. It is quite difficult to seal torn edges, but this must be done, and problems will arise in this regard. In principle, they are solvable, but more on that later.
After the hole is ready, it is imperative to waterproof it - if water or even just moisture gets into the end of the tabletop, there is a very high probability that the material from which it is made will swell and the tabletop will deteriorate. As a rule, the end of the cutout is treated with silicone. If you cut a hole with a drill, then it will be quite difficult to do it efficiently - you will have to tinker.