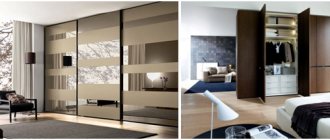
Purpose of hinges for kitchen facades
First of all, hinges for furniture doors are needed to secure the facades to the body. They also make it possible to open and close swing doors. The possibility of adjusting the facades themselves (thick, radius), the degree of fixation of the doors, the maximum possible angle of the doors when opening, the smoothness of the free movement of the doors, the absence of creaks, distortions and other possible defects depends on which hinges will be selected.
Mounting device and features
The most popular model for the facades of kitchen cabinets are four-hinge hinges, popularly called “frogs”. This design is very durable, has the ability to adjust the position of the facade and a stopper to prevent arbitrary opening of the doors. You can read about the standard sizes of kitchen units in this material.
The production of four-hinged hinges occurs by stamping sheet metal (steel). The product is covered with a layer of galvanic coating on top, which provides an aesthetic appearance and protection against rusting (corrosion). They can also be covered with various decorative coatings, making the surface matte, chrome or colored.
Parts of a four-joint hinge:
- Cup. It has a square shape with rounded corners. Inserts into the hinge hole on the inside of the door. And it is attached using self-tapping screws; it is possible to use an additive.
- Shoulder. Four-joint mechanism that acts as a lever for opening/closing.
- Mounting plate required for installation. The hinge body is attached to the strike plate. Special screws can be used to adjust the position of the facade.
Additionally, the kit may include:
- Bowl covers.
- Shoulder pads.
- Closers (allow the hinge to close smoothly).
Types and sizes
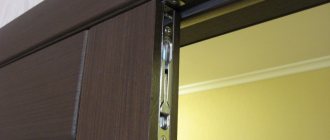
- Invoices. When attaching the hinges to the facade in this way, it is completely closed on the side, eliminating gaps. When the door is closed, the angle between the facade and the side of the box is 90 degrees. When the door is open, this angle is 110 degrees. This fastening option is used in cases where it is necessary to cover the open part of the box with one or two doors.
- Semi-overhead. Such loops have a bend at their base. Installed on the facade, they cover half of the side of the box. The hinge angle when closed is 90 degrees, when open it is 110 degrees. They are used if there is a need to install hinges on one partition in order to open the doors in different directions (when installing overhead hinges, the doors will not be able to open).
- Deposits. They are installed inside the box and have a large bend at the base. When using these types of hinges, the sides of the box are visible. The hinge angle when closed is 90 degrees, when open it is 100 degrees. They can be attached to the sides of the box or to its partitions.
- Angular. Hinges are used for installation on corner drawers. In this case, the width of the side parts that are located next to the facade must be the same. The hinge angle when closed is 45 degrees, when open it is 95 degrees.
- Inverse. Installed when it is necessary to open the door completely. The angle of the hinge when open is 180 degrees, the facade is located on the same straight line with the sidewall of the box.
- Piano hinges are single-hinged. They are rarely used because without an additionally installed magnet the doors do not close completely. Most often they are mounted on furniture with a top-opening door.
- Card. The structure is similar to piano hinges: two hinge plates are mounted parallel to the hinge. Installed on retro style furniture.
- Mezzanine. Used when it is necessary to open the facade upwards. The principle of operation is similar to door closers, only the mezzanine ones have a spring installed, which allows the doors to smoothly open and close.
- Secret. They are arranged according to the principle of piano and card games. Installed on furniture whose doors open downwards.
- Ombre. Installed on folding facades. Often used to make kitchen folding tables.
- Pendulum (bar). Spring hinges, which are similar in structure to piano hinges. They ensure the opening of facades by 180 degrees (following the principle of fittings for bar counters in Mexican countries).
- Heel. They are used extremely rarely, because to install such hinges the door must be light in weight, mainly for small corner kitchens.
Types of furniture hinges, how to choose:
How to install on corner or non-standard furniture
As a rule, kitchen furniture doors are already ready for installing hinges, but if you need to install a non-standard door or install new hinges, then first you need to take measurements. You can find out about a rattan chair here.
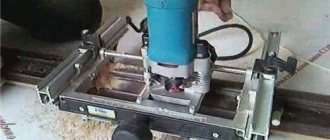
To drill the hole for the bowl, you will need a Forstner drill bit. Also required for installation: calipers, drill and wood drill bit, screws, locking brackets.
First, we make markings on the door depending on the number of hinges required. We retreat 21 or 22 mm from the edge. In the designated places, use a pencil to mark the center of the future holes. Drill holes using a Forstner drill. The diameter of the hole for the bowl is 35 mm, depth 12 mm. Before you start drilling, you need to make sure that the drill will not go through.
How to choose the right one
When choosing piano hinges, you need to pay attention to the following parameters:
- Material of manufacture. Modern piano hinges are usually made from materials such as brass, nickel, stainless steel and aluminum, as well as using galvanized metals. It is worth remembering that steel provides high reliability and durability of the fittings, while zinc and brass provide increased protection against corrosion.
Steel hinges with different shank
- Piano hinge sizes. Fittings may vary in length, width and thickness. Make your choice depending on the parameters of the furniture - its dimensions and the weight of the doors.
Piano hinge size chart
- Cost and manufacturer. Obviously, it is best to purchase furniture hinges from reliable manufacturers that have been tested by many customers at a price above the minimum. Cheap fittings from unknown suppliers are unlikely to provide you with everything necessary for long-term and reliable operation of the hinges.
Choose the right hinges so that in the future you will not encounter such defects as misalignment (and piano hinges cannot be adjusted), poor shuttering, and squeaks when opening and closing furniture doors. It's better to spend more now than to lose even more later.
Tips for installing hinges and closers
Depending on the size of the door, the number of hinges that need to be installed varies:
- Door length up to 90 cm, weight about 4 kg - 2 hinges.
- Length from 90 cm to 160 cm, weight up to 13 kg - 3 loops.
- Door length from 160 cm to 200 cm, weight up to 17 kg - 4 hinges.
- Length from 200 cm to 240 cm, weight up to 20 kg - 5 loops.
- When marking, the top and bottom hinges should be at a distance of 70 to 120 mm from the top and bottom edges of the door, respectively.
- When marking and placing hinges, you need to make sure that shelves and partitions will not be located in these places.
- Before starting installation, it is necessary to measure the thickness of the hinge so that it fits firmly into the drilled hole.
When installing internal hinges, markings are made from the inside of the door, taking into account the gap between the door and the frame of 2 mm.
Video: how to replace hinges on kitchen cabinet doors
Replacing the hinge on a cabinet door:
DIY repair
Over time, furniture hinges may fall out of their installation sockets. There is no need to immediately throw out the closet or change furniture fronts. First you need to remove the loop and carefully widen the hole (10 mm deep). Next, you need to lubricate the wooden dowel with wood glue (or PVA) and drive it into the resulting hole.
We do everything carefully so as not to pierce the material through. After the glue has completely dried, we cut off the protruding part of the dowel with a hacksaw. We tighten the screws that secure the loops directly into the dowels.
Manufacturers of furniture fittings
Bloom furniture hinges, advantages and disadvantages:
- SCILM. An Italian company that produces high-quality furniture fittings and components, frame profiles, plinths and other products that are used in furniture production.
- Boyard. Ekaterinburg company supplying furniture fittings from China.
- "RosAks" . Moscow manufacturer of furniture fittings.
- VIBO . An Italian company, the largest manufacturer of accessories in its country.
- BLUM. Austrian manufacturer of fittings and solid wood furniture.
- FENNEL . For many years, the Ukrainian company has been a leader in the supply of furniture fittings to more than 60 countries.
- TBM. Domestic manufacturer of metal furniture fittings.
You can read more about the features and range of Blum fittings in our article.
Tips for choosing furniture fittings for the kitchen:
When choosing hinges for cabinet fronts and fillers, you need to pay attention to the following factors:
- Required opening angle and cabinet location.
- Type of lockers (corner, with doors opening up/down, etc.).
- Door weight and length.
- The quality of the metal from which the hinge is made (it is recommended to choose a brass-zinc alloy for covering furniture).
The hinges on the doors may not be the brightest detail of the kitchen façade, but they are one of the most important. After all, the comfortable and reliable use of a furniture set depends on the quality of cabinet fittings. See also information about handles for kitchen furniture here.
Characteristics
Advantages and disadvantages of piano hinges
Despite the fact that piano hinges are considered outdated fittings that were widely used several decades ago, they can still be found quite often in new furniture. Piano hinges have the following advantages that cannot be ignored:
- Simplicity of design, which includes a minimum number of elements.
- Easy installation that does not require the use of special equipment and tools.
- Problem-free operation and maintenance of the fittings.
- Affordable price on the furniture fittings market.
- Ensuring increased rigidity of the entire structure.
The list of advantages is really long, but with piano hinges not everything is so rosy. The main disadvantage of such fittings is that they are obsolete, which is why they are being actively replaced by other types of hinges. If performance characteristics are of decisive importance to you, do not pay attention to the history of this fittings - it copes well with its purpose and can be safely installed in furniture.
Below you can view photos of piano hinges to clearly see how they differ in design. You will undoubtedly notice their resemblance to card fittings.
Piano hinges installed on furniture
Piano hinges are completely devoid of adjustment. If you need hardware that can be customized, opt for other types of hinges.
Design features
Piano hinges are almost identical in design to card hinges that are familiar to the eye - they have the same structure, with the exception of a higher length, which is significantly larger than the width of the fittings. Such hinges are often made by skilled home craftsmen in artisanal conditions due to the fact that factory production of piano hinges is gradually disappearing, and such fittings can now only be found in wooden furniture.
Loops can be cut to the desired length
Marking, adding and adjusting furniture hinges on cabinet doors in examples
There are a large number of types of furniture hinges on the modern furniture fittings market. In modern furniture production, four-hinged modifications are most often used, which are improved hinges from the times of the USSR. Of course, today's hinges are much more reliable and better quality than their predecessors. Today, the choice of components for making furniture is quite extensive.
Let's figure out what types of hinges are used by furniture makers today in the manufacture of furniture.
The most commonly used hinges are overhead hinges, which are used mainly for attaching facades (doors) to the furniture body. There are also semi-overlay hinges, internal, corner, with closers, spring, etc.
Today we will look at installing an overhead type furniture hinge. I would like to note that the installation of all other types of canopies will be similar.
First, you need to figure out what parts the loop consists of. First of all, this is the mounting strip and the mechanism itself. The fastener bar should be mounted to the inside of the case, the loop should be mounted on the facade in a special hole, which must be made blind, twelve to thirteen millimeters deep.
The diameter of the hole depends on the type of loop, and can be twenty-six or thirty-five millimeters.
Canopies with a bowl of twenty-six millimeters are used extremely rarely.
Furniture makers use them only in cases where it is necessary to attach the facade to a module in which a washing machine is placed (non-built-in). This is explained by the fact that the gap for attaching the hinge in this case is very small, and it is not possible to attach a standard canopy.
Hinges "BOYARD"
Such a small detail as a furniture hinge plays a significant role in creating functional and aesthetic furniture. Hinges not only set the doors and facades in motion, but are also responsible for the convenience of the opening and closing process, and also ensure the impeccable appearance of the facades.
The range of BOYARD furniture hinges includes options with different hinge cup diameters for different facade materials, including glass doors. Particularly popular are modern models of furniture hinges with a closer, which ensure smooth, soft and silent closing of the door.
BOYARD furniture hinge systems meet the most stringent requirements for quality, practicality and aesthetics. Hinges undergo serious testing before being released for sale - for the strength of fastening the hinge to furniture, for the rigidity of the fastening and for durability.
Furniture hinges are made from high-quality alloy, have a nickel-plated coating, made using classical electroplating technology with a copper underlayer that provides protection against corrosion and exposure to aggressive environments.
The service life of BOYARD hinges is 8-10 years under active use conditions.
In the “Hinges” section of the catalog, products are divided into two currently relevant categories: hinges with a shock absorber and hinges without a shock absorber.
| Principle of code formation |
| Types of loops |
| Key-hole system hinges: translated from English as “keyhole”. The hole in the arm of the hinge body, through which the hinge body is attached to the mounting plate, is made in the form of a keyhole, which is where this system gets its name. Easy to install, reliable in operation. | |
| Slide-On system hinges: the most successful type of hinge in terms of price and quality, as well as ease of use. The name of the hinge reflects the design features of the fastening: the screws of the strip are easily inserted into the grooves of the hinge, only one simple movement is required. The Slide-On system hinge is one of the most popular on the furniture fittings market by all cabinet furniture manufacturers due to its universal technical characteristics, which allow the use of the hinge of this system in furniture of a wide variety of design solutions. | |
| Clip-On system hinges: quick installation hinges. They are the standard in the production of high-quality furniture. The specific system for attaching the hinge to the mounting plate does not require tools - just a finger press is required for installation. | |
| Adjusting hinges during installation | |
| Hinge height adjustment | |
| Adjusting the hinge depth | |
| Lateral hinge adjustment |
| Calculation of the required number of loops for installation |
| Scheme 1 | The question of the number of hinges required for installation on one door does not have a clear answer. The dimensions of the door, as well as its weight, are of great importance. In special cases, such as glass doors, doors with aluminum profiles or unusually wide doors, a trial installation of the fastening hardware is necessary. Door designs in which the width is too large in relation to the height should be avoided. For normal doors made of normal materials, the data given in diagram 1 can serve as guide values. | Scheme 2 |
In extreme cases, one additional loop should be planned. For loops with a reduced cup diameter, you can use scheme 2, also not forgetting about an additional loop for non-standard sizes or weights.
| Preparation for mounting the cup |
| H — drilling depth for cup D - drilling diameter L - center-to-center distance (distance between the centers of holes for fasteners) F - offset of holes for fasteners (relative to the center of the hinge cup) |
| Methods of fastening during installation and drilling for various types of fasteners |
| M4x16 mm screw , without pre-drilling | ||
| for Euroscrew 6.3x13 mm , with pre-drilling of the plate | ||
| for a foot with a diameter of 8 mm , with pre-drilling of the plate | ||
| for a foot with a diameter of 10 mm , with pre-drilling of the plate |
| Installing the hinge on the body |
| For Slide-On hinge: The upper part of the hinge body is slotted under the pre-assembled striker screw (1) and secured in position. | |
| For the Key-Hole hinge: The upper part of the hinge body with the hole is lowered onto the pre-mounted screw of the strike plate (1), inserted under it (2) with a translational movement and fixed in the desired position. | |
| For the Clip-On Hinge: The top body of the quick-release hinge is inserted into the slots of the pre-installed strike plate (1), secured by pressing at the top (2) and adjusted with the mounting screw. |
| Methods of fastening during installation and drilling for various types of fasteners |
| M4x16 mm screw , without pre-drilling | ||
| for Euroscrew 6.3x13 mm , with pre-drilling of the plate | ||
| for a foot with a diameter of 8 mm , with pre-drilling of the plate | ||
| for a foot with a diameter of 10 mm , with pre-drilling of the plate |
← Back
Progress
Marking furniture hinges
First, you need to mark the centers of the future holes. Since all doors have different heights and intended installation locations, the figures for each option will vary from seventy to one hundred and twenty millimeters. One more point: depending on the weight of the door and its size, three or more canopies can be installed.
When installing three or more hinges on one facade, pay attention to ensure that the hinge does not end up on the horizontal internal parts of the cabinet (for example, shelves, drawer ends, etc.). Make a mark for the hole at a distance of twenty-two millimeters from the end of the door.
Drilling a hole for the bowl
Armed with a screwdriver and a 35mm end mill, start drilling. Basically, the depth of the bowls is twelve to thirteen millimeters. You should not try to drill deeper, because chipboard, which is only 16 millimeters thick, does not always have high-quality outer laminate layers. If you drill a slightly larger hole, there is a risk of damaging these layers, which, unfortunately, will be impossible to mask or repair.
It is recommended to use a well-sharpened cutter, with which it will be impossible to damage the surface or make chips. Also, to avoid chipping, the screwdriver should be held strictly vertically.
Installation of overhead hinges. Insert the loop into the resulting hole, align it with the end of the facade.
Use an awl to make marks for the screws. Then screw them into the holes.
Hanging the facade
Attach a pad for attaching a hinge to the inner side of the case. Connect the two parts of the canopy. Adjust the front to the body using a screwdriver.
It is very convenient to do this NOT in weight, but just on a flat surface in a horizontal position. Those. the sidewall on which you need to attach the hinge pad should be in a horizontal position, so you can easily try on and screw the facade to the sidewall.
How to embed furniture hinges: just about simple things
In this article we will talk about preparing the facade for hanging on a frame, and what tools you need to have for this.
Let me make a reservation right away that there are many types of hinges that have different diameters of the landing cup (this is the part that directly cuts into the material). These cups can have diameters of 26mm, 35mm, 40mm.
But the most common of them (those that are most often used) are those that have a diameter of 35mm. These are the ones we will talk about.
The loop is cut directly into the facade, and attached (with an installation platform) to the side of the box on which this facade should “hang”.
It cuts in very easily. To do this, you need to have the following list of tools:
- Tape measure for marking
- Awl
- Electric drill (for making mounting holes)
- Forstner drill, or, in common parlance, a 35mm cup cutter
- Screwdriver for screwing in self-tapping screws
For fasteners, you need 4x16 mm self-tapping screws (or something close to them).
So, first, the facade is marked to find the center of the future hole, from which you need to use a cutter to select a part of the material (exactly enough for the landing cup to “sit” in it).
When marking, you should take into account that the hinge is not at the same height as the shelf or any fittings, which will make it impossible to install (and as a result, the facade will be damaged).
Therefore, the builder is very careful to give indentation from it to the edge of the facade.
You should also take into account the size and weight of the facade itself.
These parameters determine how many loops you need to cut into it. You can read more about this point in this article (it also discusses this hardware in more detail).
Typically, the center of the hole (35mm) is marked in such a way that there is a distance of 4-5 mm from the cup to the extreme edge of the facade (or, from the edge of the facade to the center of the hole - 22-23mm).
When everything is marked, a hole is drilled.
This is the most crucial moment.
The fact is that, as mentioned above, the hole must be of such a depth that the landing cup “sits” completely into it. And if you get carried away when cutting holes, you can “punch a hole” right through the façade.
To prevent this from happening, some experts install a drill with a cutter on a special rod with a limiter, which limits the depth of immersion of the cutter into the facade. But I think this is unnecessary (there were many cases when, for one reason or another, the settings of this rod were lost and the facades were damaged).
All this can be done carefully, by hand.
Then, the loops are inserted into the holes made and aligned with a bar (so that they do not move along the axis, otherwise they will wear out during operation).
After this, the holes are “drilled” through which the cups are secured with screws in the facade, and, in fact, after all this, they are secured (with a screwdriver or an electric drill with an inserted bit holder and a bit for the screws).
Here, in this simple way, all this can be done.
Adjusting furniture hinges
As for the adjustment of furniture hinges, it can be carried out in three planes: vertically, in depth and fixing the canopy, horizontally.
1. Adjusting the hinges in depth and fixing the canopy is, first of all, necessary in order to press the facade closer to the body, or, conversely, to weaken this pressing. Use a screwdriver to tighten the oval hole. Very often, in this way, hinges are adjusted in rooms with uneven floors.
2. Vertical adjustment allows you to move the door higher or lower. Since facades, like everything else, are subject to gravity, they can sag over time. It is necessary to make such adjustments to the canopies from time to time. It is performed by the same twisting of the oval holes.
3. Horizontal adjustment. In other words, it is a side adjustment. Due to it, you can avoid gaps between the facades and the body part. This method is also good if the room has uneven floors or walls.
Well, now you know everything about attaching furniture hinges to a furniture façade. We hope our instructions will help you avoid the most common mistakes when installing furniture hinges yourself.
Adding loops
Author: Julie · Published 06/17/2013 · Updated 10/26/2016
The term “ hinge addition” refers to drilling a blind hole on the back side of the facade, usually with a diameter of 35 mm. and depth 12 mm. Such a hole is necessary for attaching a four-hinged hinge to the facade. Of course, if you need to make an additive on a dozen or more facades, then it is better to contact a furniture workshop or carry out the addition of hinges using specialized equipment. But with a small amount of work, you can add loops with your own hands , using a minimal set of tools. In this tip I will tell you in detail how to do this correctly.
Types of loops and their design
Modern door and furniture hinges are classified according to a number of characteristics: design features, location and method of fastening, as well as material of manufacture.
Furniture
The most popular are furniture hinges, overhead hinges, inset hinges (internal), secret hinges, cupless hinges, four-hinged hinges, and also for specially designed facades. They are presented in the assortment not only of construction stores, but also of ordinary hardware stores.
Cupless: piano, card, pin
Cupless hinges are rarely used in furniture production. They are designed for installation of interior doors. You can find cupless hinges in Soviet-style furniture. Nowadays they play more of a decorative role and are used in the installation of secretory sheets and folding covers of book-tables.
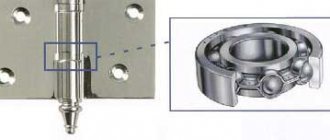
Quadruple joint
In most cases, the hinged doors of modern furniture are mounted on four-hinged hinges. This allows you to adjust the tightness of the canvas to the furniture body, adjust the location of the door vertically and horizontally relative to the frame.
The four-hinged part consists of two parts connected to each other:
- mounting plate;
- bowls with knee.
Overhead hinges that do not require drilling of the facade
Installed when installation of ordinary four-hinged hinges is impossible. For example, if the thickness of the facade panel is insignificant.
Hinges for fastening specific facades
They are used if the aluminum frames of the prefabricated façade fabric have different widths. Parts are divided into internal and overhead. They are installed in corner cabinets, the front doors of which open to 45°, 135° and 180°.
Hinge Installation Instructions
To install the hinges correctly, you need to collect all the necessary materials and tools and follow the step-by-step instructions, observing the steps for installing furniture hinges.
Materials and tools
Before installing furniture hinges with your own hands, you need to remove the door leaf: first, unscrew the side of the door hinge adjacent to the structure, and then, from the already removed sash, remove the old one that is out of order. As a rule, furniture manufacturers use overhead hinges in the manufacture of products. With their help, the facades are fixed to the body.
The four-hinged model of overhead-type door hinges comes in different sizes and consists of the following parts:
- strips (connects the door and the cabinet body);
- mounting cup (which is attached to the facade of the canvas);
- shoulder (acts as the skeleton of the part).
For installation, in addition to a simple or black pencil and ruler, you will need the following tools:
Marking
At the next stage, it is necessary to accurately mark the future holes on the door leaf. They retreat from the edge of the façade slab by 8-12 cm, depending on the number of fasteners. The key condition is that the distance between the loops (and therefore the centers of the holes) should not exceed 50 cm, the minimum - at least 45-46 cm.
Hole preparation
The next stage is inserting furniture hinges. To do this, you can use a drill or screwdriver. You also need to install a wood cutter, this will eliminate chips and deformation of the facade surface.
Hinge Attachment
Loops are placed in the prepared holes. The correct position is corrected using a regular ruler, building level or tape measure. If the canopy does not fit tightly to the surface of the rear side of the facade, the door will also not close tightly, protruding obliquely along the edge.
Hanging a facade or door
Hanging the façade fabric is carried out in several stages:
- mark a place for mounting loop platforms;
- attach the platforms located on the facade, which will allow you to secure the door hinges;
- hang the façade panel to the side of the cabinet;
- Use a screwdriver to adjust the sash.
For convenience, it is recommended to hang the door on a flat surface to avoid distortions. Therefore, the cabinet should be placed on a horizontal surface so that the side to which the hanging strip is attached is parallel to the floor.
Adjustment
The final stage is adjustment vertically, horizontally and relative to the depth of the hole. To correctly adjust the mechanism, sometimes it is necessary to unscrew and screw the loops back several times, but a favorable outcome is guaranteed.
- Regarding the depth of the hole. This is especially true for rooms whose floors have an uneven surface. This will allow you to determine the degree of pressure of the front door to the body.
- Vertical adjustment involves tightening the oval holes to move the facade leaf relative to the height of the body.
- It is especially necessary to avoid horizontal adjustment in rooms with uneven walls and floors, which will avoid gaps and gaps between the facade and the body of the furniture.
Thus, installing furniture hinges on your own does not require specific skills and knowledge. The main thing is to follow the prescribed recommendations, then you will be able to avoid gaps and prevent the formation of cracks on the front part of the door panel.
Frequently asked questions about hinges and their answers
What basic settings do you need to know for adding hinges? What diameter are the hinge cups?
The hinge cup is attached to a facade made of solid wood, particle board or MDF, in a pre-milled hole, the diameter of which follows the diameter of the cup and is the same for all manufacturers: 35 mm for standard or 26 mm for facades of smaller sizes and with low weight . The strength of the cup's fixation in this hole is achieved due to its tight fit and fastening with screws or other fasteners into the cup's mounting holes. Recently, cups with a diameter of 40 mm have appeared for thick facades.
The edge of the hole in the facade for the cup is located at a distance of approximately 3-7 mm from the edge of the facade. This value is called the distance to the hinge cup from the edge of the facade. The same type of hinge may differ in the way the cup is attached to the facade - fastening with screws (4 mm in diameter and 13 mm in length) or fastening with foots with a diameter of 8 mm or a diameter of 10 mm, as well as a Euro screw measuring 6.3 mm x 13 mm.
What are the center-to-center distances between the hinge cup mounting holes?
The distance between the centers of the holes varies from manufacturer to manufacturer. For Italian hinge manufacturers, this distance is 48 mm and is the most common on the market. In the assortment of the Austrian company, most of the hinges have a center-to-center distance of 45 mm, while the German manufacturer has 52 mm. As a rule, the assortment of these companies also includes hinges with center-to-center distances of 48 mm, but the majority of the assortment consists of hinges with these dimensions. BOYARD manufactures hinges to all major additive standards.
What drilling patterns are used to install the hinge?
Fastening elements for fastening a cup, even of the same type of loop, can be located at different distances relative to each other. This must be taken into account when pre-drilling mounting holes for the cup in the façade. There are several hole drilling patterns that are expressed by two numbers (values in millimeters), the first of which shows the distance between the centers of the mounting holes, and the second - the distance between the center of the cup hole and the straight line passing through the centers of the mounting holes.
Basic schemes:
- 52 / 5,5
- 48 / 6
- 45 / 9,5
What are the hinge installation angles?
The standard angle between the sash and the body wall to which the hinges are attached is 90° (right angle). This value is taken as the reference point and is the installation angle of 0°. A negative installation angle shows how much it is reduced, a positive angle shows how much it is increased. Examples: 45°, 90°, 115°, 120°, 135°, 180°, 270°.
How to calculate the parameters for installing an overhead hinge?
In order to correctly install the overhead loop, you must use special installation formulas. These formulas are in the BOYARD technical catalogue.
Let's look at the example of loop H100A02, which has the formula H=15+KD, where:
- K – distance to the cup from the edge of the facade;
- D – door overlay (distance from the inner surface of the side wall to the edge of the facade);
- H – basic installation height of the hinge body (height of the mounting plate).
Below the formula is a table in which:
- The K value is acceptable in the range from 3 to 7 mm (selected depending on the desired overlap and the values of D and H).
- H value – from 0 to 4 mm.
- Let's look at how to decipher the table using the example of installing H100A02/0112 in a cabinet with a side wall thickness of 16 mm.
- Deciphering the article, we see that for this loop H = 2.
- Let's choose the size K=3 mm.
- Substituting H=15+KD into the installation formula, we get 2=15+3-D. D=16 mm.
This means that the front will completely overlap the side wall on the side where the hinge is installed.
We can determine the height of the hinge strip H100A02 to be ordered if we know the required overlay size D.
- Example: D=18 mm, K=3 mm.
- We substitute the values into the same formula H=15+KD.
- H=15+3-18=0. It turns out that the height of the bar is H=0. This means you need to select article H100A02/0110.
The table helps you find the desired values without making additional calculations, just by looking at the result in the table at the intersection of columns and rows with known values.
How to calculate the parameters for installing an inset hinge (C)
Now let's look at the rules for installing an inset loop (C). To do this, you need to use special formulas for installation, which are located in the BOYARD technical catalog.
For example, let's take loop H306C02, which has the formula H=K+A-6, where
- K – distance to the cup from the edge of the facade;
- A – reveal (distance from the inner surface of the side wall to the edge of the facade);
- H – basic installation height of the hinge body (height of the mounting plate).
Below the formula is a table in which:
- The K value is permissible in the range from 3 to 7 mm (selected depending on the desired reveal A and the H value).
- H value from 0 to 2 mm
Let's look at how to decipher the table using the example of installing H306C02/5010 in a cabinet with a facade thickness of 16 mm.
- Deciphering the article, we see that for this loop H = 0.
- Let's choose the size K=4 mm.
- Substituting H=K+A-6 into the installation formula, we get 0=4+A-6. A=2 mm.
- This means that the reveal (the distance from the inner face of the side wall to the edge of the façade) is 2 mm.
We can determine the height of the strip for the H306A02 hinge that needs to be ordered if we know the required reveal size A.
- Example: A=1 mm, K=5 mm.
- We substitute the values into the same formula H=K+A-6.
- H=5+1-6=0. It turns out that the height of the bar is H=0. This means you need to select article H306С02/5010.
The table helps you find the desired values without making additional calculations, just by looking at the result in the table at the intersection of columns and rows with known values.
The installation dimensions for the hinge strip are different compared to the dimensions for overhead and semi-overlay hinges. For overhead (A) and semi-overlay (B) hinges, the strip is installed at a distance of 37 mm from the edge of the side wall, and for the inset hinge (C) the installation size is 37 + B (where B is the thickness of the facade).
Let's look at an example:
- H=16 mm
- It turns out that in order to install the mounting strip it is necessary to retreat from the edge of the side wall 37+16=53 mm.