How to install swing and sliding doors in a closet with your own hands
In a spacious or small apartment there are always wardrobes, cupboards, and bedside tables that provide places for organizing and securely storing clothes, dishes, books, and other necessary things behind a closed facade.
This is why cabinet doors perform one of the most important structural functions. Today it is proposed to use various methods of fastening traditional swing doors, as well as sliding ones, which are installed mainly in sliding wardrobes. You can install any doors into a closet with your own hands if you familiarize yourself with the mechanisms of their operation and follow detailed instructions.
Installation of a swing facade on furniture hinges
Today there are the following types of door hinges:
- hinged;
- four-hinged (overhead, semi-overhead or inset);
- products for glass structures;
- corner;
- inverse.
How to mount a door leaf on hinges
Before installing hinges on the door and cabinet wall, you need to take into account the material the furniture is made of, and also determine how many door hinges will be needed. The number of products used depends on the size of the door and its weight. For example, with a facade height of about 1500-2000 cm, which weighs up to 13 kg, you will need 3 hinges.
Get ready for work
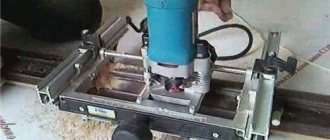
You should select the following tools with which you can hang swing doors in a closet with your own hands. Prepare:
- electric drill and drill corresponding to the diameter of the mounting screw;
- milling machine, nozzle of equal diameter;
- tape measure, pencil for marking;
- building level;
- We screwed it with a regular screwdriver that fits the size of the fasteners.
Procedure
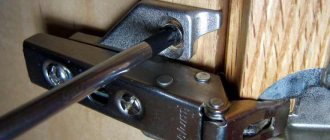
- Mark the location on the door to install the hinges. The distance between the loops depends on the height of the fabric, and 8-15 cm should be measured from the edge.
- Place the hinge on the door and use a pencil to mark the location for the cup of the fixture.
- Drill out niches for the cup using a router with an attachment. Use the sharpest possible tool, drilling to a depth of 13mm.
- Insert the loop inside the finished recess, align the device horizontally. Mark the locations for preparing holes for fastenings.
- Drill holes for fasteners.
- Attach the hinge to the door surface.
- Place the door against the cabinet body with your own hands, align the position of the panel, and mark the cabinets where the strike plate should be installed.
- Drill through the cabinet at the marked points.
- Install the strike plate onto the screws.
- Connect both parts of the loops.
- Use a screwdriver to adjust the hinge to the correct position.
How to strengthen door hinges
The process of strengthening door hinges
The process of strengthening the loops itself consists of several main stages, the sequence of which plays a rather important role.
1. First you need to remove the door leaf from the hinges. It is best to do this together, since almost every door weighs quite a lot.
2. Using a hammer, you need to knock out the rod of the lower, and then the upper loop.
3. Using a screwdriver, you need to unscrew the screws that hold both hinges. This should be done very carefully, trying not to damage the fasteners, since they will also be needed when attaching the hinges.
4. If there is loosening of the screws, then it is necessary to drive pre-prepared wooden wedges or matches into the holes that remain after unscrewing the fasteners. It is worth noting that these wooden products must first be thoroughly lubricated with wood glue.
5. The remainder of the matches or pegs that do not fit into the screw holes must be cut off with a well-sharpened cutter. This must be done very carefully so as not to cut yourself.
6. Before screwing in a new screw, you need to drill a pilot hole with a small diameter drill, and lubricate the screw itself with wood glue. Thus, it will be possible to increase the accuracy of installation of the fastener, and hence the strength of the fastening.
7. The final stage will be the installation of hinges and the subsequent installation of the door leaf in its rightful place. It is also necessary to check the door for functionality.
Having completed all such work, you can eliminate various kinds of squeaks, as well as sagging of the door leaf.
It should be noted that in some cases the cause of creaking and also warping of the door may not be the weakening of the hinges, but an error in their installation. For example, by recessing such elements into a doorway, you may accidentally remove more material than necessary. You can correct this situation and eliminate all problems by simply making special linings yourself.
Materials and tools
To carry out the process of making the backing for the hinges, you will need cardboard, which will be used as the main material, as well as scissors and a screwdriver.
Substrate manufacturing process
1. First you need to remove the door and unscrew the hinges (this process can be carried out in parallel with strengthening the hinges).
2. Next, you should cut out a piece of cardboard prepared in advance, which will be the same size as the cutout for the loop. This very cardboard element must be placed in the cutout and the loops re-attached. It should be noted that wood glue can also be used as an additional fastener.
3. The next step will be to install the door leaf and check its functionality. If the door is still “dangling” or other consequences of weakening hinges are observed, then you can add more cardboard to the backing.
It should be noted that hinges, as mentioned above, are a very important element of any door leaf. Therefore, it is very important to prevent weakening of such elements in a timely manner and carry out all the necessary work to eliminate such defects. If none of the above methods can resolve the problems with the hinges, then you need to re-attach them to the door leaf. Of course, it is imperative to choose a new installation location at the end of the door leaf, where the wood has not yet cracked.
By carrying out all the necessary repair procedures on door hinges in a timely manner, you can be sure that such a door will last for many more decades. It is very important, when carrying out any of the above methods of repairing hinges, to strictly adhere to the sequence of actions, as well as the accuracy and precision of execution.
Sliding wardrobe panels
The sliding wardrobe is the most popular furniture today. This is facilitated by the ability to rationally use living space. Often the closet occupies the entire space from floor to ceiling, has a large capacity and, when using a sliding door, does not at all interfere with the movement next to it.
In order for such storage furniture to serve for a long time and without failure, it is important to correctly assemble the entire structure. The main role belongs to the flawless installation of sliding facades. By precisely fulfilling the requirements and recommendations of specialists, a person with the skills to use special tools can install the cabinet door system with his own hands.
What do you need for work?
Before you start installing the door yourself, check that you have the necessary components for the sliding system in the closet. In addition to the facades themselves, the following must be prepared:
- Bottom and top rails or guide profiles. These are the main parts that ensure the movement of the door leaf.
- Motion limiters and stoppers. Parts that help the door move smoothly along the guide rail and stop the movement at a certain point.
- Closers are mechanisms that ensure the sliding of the door panel.
- Accessories for façade systems. For example, seals, screws, rollers, etc.
Prepare your tools:
- electric drill;
- metal drill with a diameter of 4 mm;
- a set of straight and Phillips screwdrivers;
- spirit building level;
- imbus key;
- plumb line;
- sandpaper;
- pliers;
- hammer;
- stationery knife;
- roulette.
Carefully familiarize yourself with the main structural elements of the sliding wardrobe door and their location.
Step-by-step instruction
You can begin installing sliding facades with your own hands only after the installation of the wardrobe itself has already been completely completed. The doors of the structure must be set according to the level. When performing work, be extremely careful and careful, as components can be easily damaged.
- Measure the width of the cabinet opening at the top as accurately as possible. The top guide rail will be mounted there. You need to subtract 1-2 mm from the obtained value.
- Use a ruler (square) to accurately mark the cutting line perpendicularly according to the obtained size. Cut the profile using a grinder or a hacksaw.
- We prepare mounting holes for self-tapping screws. Along the entire length of the guide profile, at regular intervals of about 40-60 cm, mark the holes for the screws; they should be located on the same line.
- To avoid damaging the profile while drilling, use a chair, table, etc. as a support. Drill the holes, then sand the edges with sandpaper.
- Install the finished guide profile in the upper opening of the wardrobe. Use screws or self-tapping screws for this.
- Trim the lower profile in the same way as the top one. Mark the mounting holes, then drill and sand the edges of the cuts.
- Install a stopper at both ends of the profile guide. The device is designed to fix the state of the cabinet door leaf in the closed position. For the latch to function correctly, it must be inserted: in the right panel - in the recess on the right, in the left panel - in the recess on the left.
- We use a plumb line to check the correct position of the profile.
- Installing a door on profiles in a wardrobe. Alignment of the position of the facade canvas.
The sliding system used involves the use of special rollers, which are placed on both sides of the facade (top and bottom). The upper elements are stationary; they fix the door leaf. The lower rollers perform the function of workers - the door moves along them.
- Carefully insert the upper rollers with your own hands into a special place in the upper profile, and the lower wheels into the groove of the lower profile rail. The diagram clearly illustrates installation locations and methods.
- The sliding wardrobe doors are installed, it's time to adjust their position. For this, there are special wheels that are located on both sides of each door leaf. To properly adjust the balance, the cabinet doors must be in the closed position.
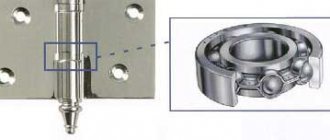
Purpose of hinges for kitchen facades
First of all, hinges for furniture doors are needed to secure the facades to the body. They also make it possible to open and close swing doors. The possibility of adjusting the facades themselves (thick, radius), the degree of fixation of the doors, the maximum possible angle of the doors when opening, the smoothness of the free movement of the doors, the absence of creaks, distortions and other possible defects depends on which hinges will be selected.
Mounting device and features
The most popular model for the facades of kitchen cabinets are four-hinge hinges, popularly called “frogs”. This design is very durable, has the ability to adjust the position of the facade and a stopper to prevent arbitrary opening of the doors. You can read about the standard sizes of kitchen units in this material.
The production of four-hinged hinges occurs by stamping sheet metal (steel). The product is covered with a layer of galvanic coating on top, which provides an aesthetic appearance and protection against rusting (corrosion). They can also be covered with various decorative coatings, making the surface matte, chrome or colored.
Parts of a four-joint hinge:
- Cup. It has a square shape with rounded corners. Inserts into the hinge hole on the inside of the door. And it is attached using self-tapping screws; it is possible to use an additive.
- Shoulder. Four-joint mechanism that acts as a lever for opening/closing.
- Mounting plate required for installation. The hinge body is attached to the strike plate. Special screws can be used to adjust the position of the facade.
Additionally, the kit may include:
- Bowl covers.
- Shoulder pads.
- Closers (allow the hinge to close smoothly).
Types and sizes
- Invoices. When attaching the hinges to the facade in this way, it is completely closed on the side, eliminating gaps. When the door is closed, the angle between the facade and the side of the box is 90 degrees. When the door is open, this angle is 110 degrees. This fastening option is used in cases where it is necessary to cover the open part of the box with one or two doors.
- Semi-overhead. Such loops have a bend at their base. Installed on the facade, they cover half of the side of the box. The hinge angle when closed is 90 degrees, when open it is 110 degrees. They are used if there is a need to install hinges on one partition in order to open the doors in different directions (when installing overhead hinges, the doors will not be able to open).
- Deposits. They are installed inside the box and have a large bend at the base. When using these types of hinges, the sides of the box are visible. The hinge angle when closed is 90 degrees, when open it is 100 degrees. They can be attached to the sides of the box or to its partitions.
- Angular. Hinges are used for installation on corner drawers. In this case, the width of the side parts that are located next to the facade must be the same. The hinge angle when closed is 45 degrees, when open it is 95 degrees.
- Inverse. Installed when it is necessary to open the door completely. The angle of the hinge when open is 180 degrees, the facade is located on the same straight line with the sidewall of the box.
- Piano hinges are single-hinged. They are rarely used because without an additionally installed magnet the doors do not close completely. Most often they are mounted on furniture with a top-opening door.
- Card. The structure is similar to piano hinges: two hinge plates are mounted parallel to the hinge. Installed on retro style furniture.
- Mezzanine. Used when it is necessary to open the facade upwards. The principle of operation is similar to door closers, only the mezzanine ones have a spring installed, which allows the doors to smoothly open and close.
- Secret. They are arranged according to the principle of piano and card games. Installed on furniture whose doors open downwards.
- Ombre. Installed on folding facades. Often used to make kitchen folding tables.
- Pendulum (bar). Spring hinges, which are similar in structure to piano hinges. They ensure the opening of facades by 180 degrees (following the principle of fittings for bar counters in Mexican countries).
- Heel. They are used extremely rarely, because to install such hinges the door must be light in weight, mainly for small corner kitchens.
How to knit
It is better to knit an asymmetrical loop for a feeder at home, carefully and slowly, because when creating it, the length of the arms, the size of the twist, and the quality of the knots are important.
Installation diagram
Step-by-step installation of an asymmetrical loop for a feeder:
- A piece of fishing line about a meter long is folded in half.
- Using a double knot or a figure-of-eight knot, twist part of the tackle into a small ring, onto which the leash will subsequently be attached.
- A twist 10-15 cm long is removed from the resulting circle and secured using a similar knot.
- A swivel with a fastener is put into the fishing line so that the twist is on the side, 5-7 cm from it.
- Measure a loop 15-20 centimeters long and tie a locking knot.
- The final knot connects the main line and the swivel to the clasp, as shown in the diagram below.
- The leash is also attached using a swivel.
After installation is complete, you should make sure that the feeder can move freely from the twist to the base, and cut off all excess ends of the fishing line so that it does not get tangled.
Knitting pattern for an asymmetrical loop for a feeder:
Knitting pattern
When the fish actively bites, the length of the asymmetrical loop for the feeder should be reduced, and in the case of passive biting, increased.
Shock absorber insert from feeder
A thin line is less noticeable even for cautious fish and is more sensitive to bites, but when catching a large specimen, such tackle can break. To prevent this unpleasant situation, they use a feedergam - a shock-absorbing insert made of elastic rubber, which reduces the load on the leash and compensates for sudden jerks of the “prey”.
Step-by-step lesson on using feedergam to strengthen asymmetrical equipment:
- Take a rope 8-12 cm long and tie loops at both ends using a figure-of-eight knot (the tackle should be taut during operation).
- Insert the feeder elastic into the place to which the leash will be tied, and secure it “loop to loop”.
- A leash is attached to the remaining free loop.
Shock absorber insert from feeder
Thanks to the installation of the feedergam, you can use any, even the thinnest leashes.
Nuances to consider
For successful fishing, it is not enough to learn how to knit an asymmetrical loop for a feeder; you need to take into account several more aspects:
- when casting, the equipment needs to be slightly pulled towards you, then the feeder will move to the edge of the fishing line after sinking to the bottom;
- It is best to fish with a feeder on a flat area of the bottom, so that the bait does not roll into the depressions and the hook is always inside the feeding cloud.
You need to use only high-quality elements. If the clasp breaks, it will be very difficult to replace it without ruining the loop.
Your question to an expert
Leonid Grachev
Fisherman with a lot of knowledge and experience
Ask a Question
How to install on corner or non-standard furniture
As a rule, kitchen furniture doors are already ready for installing hinges, but if you need to install a non-standard door or install new hinges, then first you need to take measurements. You can find out about a rattan chair here.
To drill the hole for the bowl, you will need a Forstner drill bit. Also required for installation: calipers, drill and wood drill bit, screws, locking brackets.
First, we make markings on the door depending on the number of hinges required. We retreat 21 or 22 mm from the edge. In the designated places, use a pencil to mark the center of the future holes. Drill holes using a Forstner drill. The diameter of the hole for the bowl is 35 mm, depth 12 mm. Before you start drilling, you need to make sure that the drill will not go through.
Now you can attach the hinge base in the drilled hole. Fastening occurs with two self-tapping screws on both sides of the hole.
We fix the central screw on the hinge body (in the center of the groove) so that we can adjust the hinge back and forth.
We bring the door to the side wall of the box and mark the attachment points. The strike plate is fixed at a distance of 37 mm from the edge. Leave about 1.5-2 mm between the door and the body. We tighten the self-tapping screws and adjusting screws.
Tips for installing hinges and closers
Depending on the size of the door, the number of hinges that need to be installed varies:
- Door length up to 90 cm, weight about 4 kg - 2 hinges.
- Length from 90 cm to 160 cm, weight up to 13 kg - 3 loops.
- Door length from 160 cm to 200 cm, weight up to 17 kg - 4 hinges.
- Length from 200 cm to 240 cm, weight up to 20 kg - 5 loops.
- When marking, the top and bottom hinges should be at a distance of 70 to 120 mm from the top and bottom edges of the door, respectively.
- When marking and placing hinges, you need to make sure that shelves and partitions will not be located in these places.
- Before starting installation, it is necessary to measure the thickness of the hinge so that it fits firmly into the drilled hole.
When installing internal hinges, markings are made from the inside of the door, taking into account the gap between the door and the frame of 2 mm.
Video: how to replace hinges on kitchen cabinet doors
Replacing the hinge on a cabinet door:
Alutech roller hinges with hidden fastening
ALUTECH Group announces the expansion of its range of fittings and offers roller hinges with hidden fastening for doors made from the profiles of the “warm” systems ALT W62 and ALTW72.
The development of the hinges was carried out jointly with the designers of the Giesse company, who took into account all the features of the ALT systems and the wishes of customers. The result was an innovative loop with high-tech features.
ALUTECH roller hinges are made of extruded aluminum. Reliable hidden ball bearings are installed in the hinge body, which provide the hinges with a resource of 2,000,000 opening-closing cycles. Tests were carried out in accordance with the EN1191 standard, which confirmed the number of opening cycles and the maximum sash weight of 220 kg (for 4 hinges) . Tests were carried out on doors made from ALUTECH system profiles, after which the hinges and systems received a CE certificate.
Loads:
- 2 loops – up to 180 kg
- 3 loops – up to 200 kg
- 4 loops – up to 220 kg
Ordering data and exact tables of weight characteristics of hinges depending on the dimensions of the sash can be found in Appendix 1 of the letter.
| Design features: | |
| Description | Image |
| The hinge has a horizontal micrometric adjustment of ±2, while the alignment of the hinge cards does not change and the appearance of the hinge remains the same presentable. The hinge also has a micrometric vertical adjustment of ±2.5 mm. | |
| The hinges can be adjusted without removing the door leaf. Removable stainless steel pins allow you to remove the sash for maintenance without dismantling the hinge frame parts. | |
| Together with the hinges, special templates have been developed (a separate template for each hinge) that allow for the most accurate processing of frame and sash profiles. Templates and hinges were tested at the Alutech Group test site. It is recommended to use at least two templates for installing hinges; this will ensure accuracy, speed and ease of processing profiles. | |
Loop versatility:
The hinge can be used for both left- and right-hung doors. Before installation, only the position of the vertical adjustment bolt is changed.
The loop includes:
- extruded hinge parts
- removable pins
- embedded elements
- plastic plugs
- mounting screws
- adjustment pins
- plastic bushings
- hidden ball bearings
Please note that correction factors apply for any number of loops when using door closers. In the case of using a closer without a built-in brake, a correction factor K = 0.57 , if a closer with a built-in brake K = 0.83 .
We are confident that the constant expansion of the range of accessories will allow our partners and clients to increase the competitiveness of the APS ALUTECH offer.
ALUTECH Group
- Tweet
DIY repair
Over time, furniture hinges may fall out of their installation sockets. There is no need to immediately throw out the closet or change furniture fronts. First you need to remove the loop and carefully widen the hole (10 mm deep). Next, you need to lubricate the wooden dowel with wood glue (or PVA) and drive it into the resulting hole.
We do everything carefully so as not to pierce the material through. After the glue has completely dried, we cut off the protruding part of the dowel with a hacksaw. We tighten the screws that secure the loops directly into the dowels.
Manufacturers of furniture fittings
Bloom furniture hinges, advantages and disadvantages:
- SCILM. An Italian company that produces high-quality furniture fittings and components, frame profiles, plinths and other products that are used in furniture production.
- Boyard. Ekaterinburg company supplying furniture fittings from China.
- "RosAks" . Moscow manufacturer of furniture fittings.
- VIBO . An Italian company, the largest manufacturer of accessories in its country.
- BLUM. Austrian manufacturer of fittings and solid wood furniture.
- FENNEL . For many years, the Ukrainian company has been a leader in the supply of furniture fittings to more than 60 countries.
- TBM. Domestic manufacturer of metal furniture fittings.
You can read more about the features and range of Blum fittings in our article.
Tips for choosing furniture fittings for the kitchen:
When choosing hinges for cabinet fronts and fillers, you need to pay attention to the following factors:
- Required opening angle and cabinet location.
- Type of lockers (corner, with doors opening up/down, etc.).
- Door weight and length.
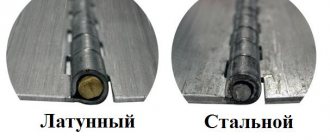
- The quality of the metal from which the hinge is made (it is recommended to choose a brass-zinc alloy for covering furniture).
The hinges on the doors may not be the brightest detail of the kitchen façade, but they are one of the most important. After all, the comfortable and reliable use of a furniture set depends on the quality of cabinet fittings. See also information about handles for kitchen furniture here.
Types of door hinges
Depending on the place of installation, door hinges are divided into hinges for entrance and interior doors. Based on the type of installation, hinges are divided into the following types:
- Detachable. To remove a door with such fastenings, you do not need to unscrew the hinges.
- Universal. To remove the doors, you will also have to remove the universal hinges.
The above is not a complete classification, because overhead door hinges are divided into three types according to their design:
- Invoices with insert (universal). Such hinges consist of two parts with holes, one is attached to the door leaf, the second to the door frame. They are often made of durable steel, so they are highly reliable and have a long service life.
- Overlays with insert (detachable). Complex installation, but easy installation and dismantling of the door leaf, as well as adjustment of the hinges themselves. As in the previous case, they are highly reliable and durable when used correctly.
- Invoices without insert (universal). They are easy and quick to install, do not cause problems during adjustment, cheap and reliable, and also the most popular.
Most often in practice, the above types of loops are used. More rarely, you can find screw-in and bar door hinges, as well as hidden ones that add reliability to the structure.
Such hidden loops will not allow unauthorized persons to break into
Rules for installing furniture hinges
As in the article about the types of furniture hinges, we will consider the installation of four-hinged fasteners, with three degrees of adjustment.
The four-hinged hinge consists of two detachable parts:
- The fastening (mounting) strip is attached to the body. At the same time, there is a difference in the markings for internal (inset) and overhead loops.
- The hinge itself is fixed on the facade by installing it in a special technological hole. The depth of the hole is about 12-13 mm, the diameter depends on the size of the bowl. Mostly, fittings with a bowl with a diameter of 35 mm are used, less often - 26 mm.
Correct installation of furniture hinges with your own hands involves preliminary calculation of the required quantity, depending on the height and width of the door, and its weight.
Hinges with a quantity of three or more per swing door are distributed at an equal distance from each other, and you need to follow the markings so that the fastening strip does not “get” into the shelf.
The distance from the edge of the façade along the body is usually 100 mm. Since the door is always 3-4 mm smaller, for the overhead version the distance to the center of the hole for the bowl is about 98 mm.
Features of a piano loop
The piano hinge is a mechanism that consists of two plates. One plate of the mechanism is attached specifically to the inside of the facade, the second - to the end of the side wall of the furniture element body. Piano hinges are used, as a rule, in kitchen hanging cabinets, kitchen corners, to open seats in ottomans, and in all kinds of bedside tables.
As you can see, the scope of application is quite wide. In order for the piano loop to properly fulfill its purpose, it is used together with magnetic holders. It should be noted that piano hinges do not have springs (like standard four-ball furniture hinges), therefore, thanks to the auxiliary magnet, they will fit tightly to the body.
Scheme for calculating the number of furniture hinges for installation
There is no clear answer to the question of how many hinges need to be installed on one swing façade. Each manufacturer of fittings and components gives its own recommendations. Typically, the scheme for calculating the number of furniture hinges is based on two values, the size and weight of the door:
- The height of the door determines the number of connection points to the frame. If the number of hinges is insufficient, the door may bend over time. Its width is no less important. It is recommended not to design facades whose width is too large relative to their height.
- The weight of the door also plays a role. It is logical to assume that a facade made of laminated chipboard, on top of which a mirror sheet will also be glued, will require additional fasteners. Installing a standard number of furniture hinges may not be able to withstand the increased weight - this will require reinforcement.
The standard installation scheme for furniture hinges is as follows.
It can be followed if there are no other recommendations from the manufacturer.
Types of furniture hinges
Today, the supporting fastening mechanism for modern furniture is manufactured in a huge range. A variety of furniture hinges, their versatility makes it possible to enjoy using kitchen sets, bedside tables, and easily close and open drawers, cabinets, and doors. Furniture hinges are divided into types according to their purpose, design features, and installation:
- invoices;
- semi-overhead;
- internal;
- corner;
- inverse;
- piano;
- card;
- mezzanine;
- secretory;
- gallery;
- card;
- pendulum;
- heel
Overhead and semi-invoice
Classic locking mechanisms are used for furniture, entrance, and interior doors. It has different shapes, sizes, and can withstand loads well. They ensure free opening and closing of the cabinet door at an angle of 90, support the doors at the required level, and prevent distortion. The hinges on the cabinet are attached with the main part to the side inner wall of the furniture.
Furniture holders differ from overhead holders in the bend of the base. The mechanism is fixed when it is necessary to mount two doors at once on one of the side doors, opening in different directions. Typically, such hinges are used for kitchen sets.
Semi-overhead
Semi-overhead and slip-on
Semi-overhead
Invoices
Invoices
Internal and corner
Furniture fittings have a general resemblance to a semi-overlay hinge, but with a deeper bend, mounted inside the body of the product, ideal for wooden cabinet doors and heavy cabinet doors. The mechanisms are attached at different angles to furniture doors, are widely used for corner cabinets, and have different configurations depending on the intersection of the installation planes. Corner hinges are produced for installation at an angle of 30°, 45°, 90°, 135°, 175°. They may have built-in or separate closers that allow the door to open smoothly.
Domestic
Domestic
Inverse and piano
Connection for furniture with a rotation angle of 180, widely used for doors of built-in bedside tables and cabinets. The hinge securely connects the side post and the door, forming a straight line.
The connecting holder consists of two perforated plates, movably fastened to each other. Despite the fact that the furniture hinge is considered an outdated option, it is installed on swing facades and in other products.
Piano hinges
Piano
Piano
Inverse
Inverse
Card
The design of the hinge for connecting furniture elements is similar to a piano mount. The fittings, consisting of two parallel plates connected by a hinge, are attached to the facade and frame through holes located along the edges. The mechanism comes in different sizes and is mainly used for retro furniture design and jewelry boxes.
Mezzanines and secretaries
The hinge is similar to an overhead fastener and is installed on the doors of kitchen wall cabinets. Fixed for vertical opening. Its main element is the spring.
Furniture hinges are designed for small desks with folding boards and front walls of cabinet furniture. A special feature of the mechanism is double adjustment, the presence of a secretory bracket, and convenient standard milling of holes with a diameter of 35 mm.
Secretaries
Secretaries
Secretaries
Mezzanine
Mezzanine
Gallery and card shops
The hinge, by its design, is considered the most popular fastener when it is necessary to connect a facade to a false panel at an angle of 90°. The fittings allow doors of any size or shape to close easily and silently.
A furniture holder designed for folding fronts is most often used in the production of kitchen tables. It is fixed at the ends of the connecting parts of the structure, which allows you to open the door 180 degrees.
Adit
Adit
Card
Card
Pendulum and heel
The main feature of the fastening is the ability to open the structure in different directions. The mechanism, being a type of door hardware, ensures that doors open 180 degrees. The loop has a highly specialized application; during installation, it requires correct and precise adherence to the instructions.
A simple type of hinge is mounted in the top and bottom corners of the box, secured using small cylindrical rods. The mechanism operates on the principle of hinged canopies. They are used in the manufacture of kitchen cabinets with light-weight doors for small spaces. The installation of hinges on glass facades is being considered.
Heel
Heel
Pendulum
Pendulum
Pendulum
Installation of overhead furniture hinges with markings
Before installation, it would be a good idea to make markings so as not to make mistakes when drilling and fastening the mounting strip and bowl. You can use a ready-made template (conductor) or measure it manually. We take into account the following nuances:
- The overlay facade does not completely cover the frame. Taking into account the gap, for example, for a kitchen cabinet with a height of 720 mm and a width of 400 mm, it will have dimensions of 716x396 mm. This means that if along the box for installing the fastening strip there is a 100 mm indentation from the edge, then along the façade the indentation will be less, equal to 98 mm.
- A hole 11 mm deep is selected for the four-hinged hinge on the door. This can be done using a Forster drill with a scoring edge and a spout designed specifically for installing furniture hinges (diameter 26 or 35 mm). Special drills have a limiter that will prevent you from piercing the front part through when milling. Provided, of course, that the thickness of the facade is at least 16 mm.
- The depth of attachment of the mounting strip from the edge of the cabinet side when installing an overhead furniture hinge is 37 mm. The distance between the holes at the bar is 32 mm.
Adjusting furniture hinges with your own hands
According to the diagram for installing furniture hinges, a mounting plate is separately attached to two 3x16 mm screws and a bowl (also to two screws), on the side of the frame and on the inside of the door, respectively. After the furniture is placed in the designated place, they begin to hang the facades. To do this, the arm of the hinge with the bowl is threaded into the fastening bar and tightened with a fixing screw. There is no need to tighten the fasteners too much near the plank - all of them are involved in the process of adjusting the furniture hinge with your own hands.
If the floors are piled towards the center, then most likely the doors will not press tightly against the frame. Adjusting the furniture hinges in depth allows you to tighten them more tightly or, conversely, loosen the pressure.
For uneven floors, lateral adjustment (horizontal) in combination with vertical adjustment may be useful. With its help, you can even out gaps on double facades and align them more evenly relative to the frame.
Also, the adjustment “removes” unpleasant squeaks when opening and closing. It is worth tightening the screws on the hinges from time to time - furniture doors inevitably sag under their own weight. Timely adjustment will extend the service life of fastening fittings.
Hinges for gates
The range of these fasteners is varied in both length and diameter. These elements are special metal loops. Hinges provide strong fastening of doors or gates to the supporting frame. The cantilever load from the sashes falls on these fasteners. The main requirements for this type of hinge are reliability, durability and high strength characteristics.
Different sizes of hinges for making gates allow the buyer to buy exactly the hinge that will be optimal for his case. Properly selected fasteners allow you to ideally “fit” the doors onto the hinges, ensuring their smooth operation and external aesthetics.
Different sizes of hinges for gates
In order for the hinges to help heavy gates move smoothly for a long time, a special bearing must be installed on them.
In the production of hinges for garage doors or gates, metals are used that have high resistance to mechanical damage. The production of each fastener requires a well-drawn drawing, the use of high-quality materials and modern equipment, as well as the presence of the necessary qualifications among workers.
Careful quality control, which is carried out at all stages of production, produces loops that can withstand the weight of tens and even hundreds of kilograms for a long time. Even after many years of using the hinges, you can eliminate the occurrence of squeaking when opening and closing the gate.
Drawing with the dimensions of the hinge for the gate.
For this product, it is enough to periodically fill it with machine oil. Return to contents