I was wondering, what if you want to diversify your activities and temporarily turn into a plasterer? They say it's useful to change the nature of work. At the same time, you can acquire a new skill. Maybe it will come in handy over time! There is no need to talk about saving money. Even if during training you throw a bag of gypsum plaster down the dog’s tail, but when you learn, you will be able to level the walls in your apartment yourself without the involvement of specialists. This means they won't have to pay. In a word, I’ll tell you everything, show you, and you decide whether it’s worth getting involved in this dusty, but very profitable job.
Who needs it?
Now many people are buying new apartments without finishing. Or cottages. You understand that living in such a brick and aerated concrete interior is not the ultimate dream. Even if you yourself are an ardent ascetic and can easily live in a hut, you have some obligations to your family. When the joy of buying a new apartment has subsided a little, your spouse and children have the right to ask a reasonable question: “Are we just going to live in these bricks?”
Another variant. You have been living in your spacious apartment for a long time, you are not going to change it, but you have decided to make at least cosmetic repairs. After the old wallpaper has been stripped from the walls and sent to a landfill, you may notice that the walls in the rooms are somehow uneven. This is visible even to the naked eye. And if we apply a ruler, or, as the builders call it, a rule, we can only wonder how we have lived in such Spartan conditions until now.
After all, a crooked wall is not only unaesthetic. Sometimes the unevenness is not even noticeable to the eye. But once you start hanging shelves, arranging furniture, and... “something doesn’t add up here” 
Naturally, the thought arises about whether it is possible to somehow correct the “dangerous” curvature at the same time.
Any builder or finisher will tell you that this is not only possible, but even necessary to do. And he will immediately offer you his services. At first you will be happy, but looking at the number, you may get scared, especially if you are the happy owner of a large apartment, or, God forbid, a cottage..
Why is it worth getting involved in?
First, let's look at the purely economic component.
A decent light-drinking team of finishers... I mean those who do everything properly, can ask for their work 150 rubles per square meter of plastering work. This is already with the material.
At first the price is not too scary. Well, think about it, 150 rubles. But then, when we multiply this number by the number of meters, it becomes no longer a joke. It turns out like in the parable about the inventor of chess. I won’t retell it, you’re probably aware of it.
Let's just take it and estimate very roughly how much it will cost to plaster an ordinary two-room apartment with an area of 50 square meters. 50 squares is the floor area. Many customers base their calculations on it. However, we will talk about the area of the walls. We are going to plaster the walls, not the floor.
To calculate it, you need to calculate the sum of the lengths of all the walls in the apartment and multiply it by the height. Some, wanting to simplify their calculations, reason like this: 50 square meters is if the length of the room was 10 meters and the width was 5. They quickly calculate on a calculator and get a wall area of 78 square meters. Then they multiply the resulting area by the cost of the work - 150 rubles per square, and get a completely ridiculous amount - 11,700 rubles. In principle, this is nonsense; it is quite possible to hire craftsmen instead of killing yourself.
Moreover, do-it -yourself plastering done by a beginner does not always look the same as it would have been done by a professional team .
In fact, the calculation would be correct if the room did not have internal walls. But they exist and, alas, also need finishing. Therefore, before you give your consent to carry out work, you need to measure the length of all existing walls in your apartment as accurately as possible. Just start from the threshold and walk along all the walls as if you were an ant and set the task of traveling around the world around the apartment. To do this, you can use a regular tape measure or, for example, a laser rangefinder.
I'm sure you won't believe your eyes when you get the final result. If you decide to try on, you will get about the same amount. Yes, dear ones! Your apartment with many walls, partitions, ledges and other architectural features can put you in a real situation. The result is about 300 square meters!!! (more precisely - 296.4). In fact, a little less, since windows and doors fortunately do not have to be plastered.
When a specialist plasterer names such an area, it can be difficult for a beginner to believe in the reality of what is happening.
I see that you yourself do not fully trust the result. Would you like to count together:
A 50-meter apartment is, for example,
- corridor 8 sq.m.,
- kitchen - 10 sq.m.,
- bath - 4 sq. m.,
- toilet - 2 sq. m.,
- room 1 - 10 sq. m.,
- room 2 – 16 sq.m.
____________________________
TOTAL - 50 sq. m. - other room areas are possible, but we will take a typical two-room apartment to calculate the cost of plaster.
Now we begin to count the total length of all walls. To simplify, we will assume that all rooms have a width of 1 meter.
Attention! The calculations given here are given as an example. Before starting work, measure the perimeter of each room yourself.
It turns out the following:
- corridor 18 m.,
- kitchen - 22 m.,
- bath - 10 m.,
- toilet - 6 m.,
- room 1 – 22 m.,
- room 2 - 36 m.
TOTAL: 114 meters - the length of the path of an ant that decided to crawl along the baseboard of all the walls of your apartment.
Now we multiply this length by the height of the room 2.6 meters and get the same number: 296.4 square meters .
And now, dear Rockefellers, multiply the result by 150 rubles per square meter - it turns out to be almost 45,000 rubles .
For some it is not money at all. For others, it’s a reason to think seriously.
For example, when I bought myself a house in the village and estimated the approximate cost of plastering all the walls , the amount that I would have to part with was simply magical - about 180 thousand rubles. Only for one wall plastering!
Do you want me to add fuel to the fire? Please!
150 rubles per square meter is the most affordable price for a non-central region. Choose a cool finishing company and the cost of plastering walls 6 mm thick will be 350 rubles per square meter . Moreover, with the magic prefix “from”.
Then your two-room apartment will “pull” 103 thousand and kopecks out of your wallet, and with my cottage I generally risk being left “without pants” - about 400 thousand!
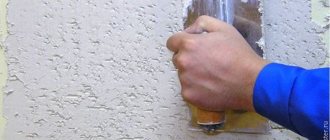
I hope I have instilled enough fear in you and you are ready to at least look at how to plaster walls with your own hands . You'll see, there's nothing wrong with that. Any beginner who is not afraid to get dirty in mortars can do the job quite well.
DIY plaster
First you need to seal the cracks and holes, if any. Wait until it dries. If the vertical is displayed, first you need to install the beacons in the place where the rule is most distant from the wall. Beacons are easier to install horizontally.
Installing beacons horizontally to align the vertical wall
As a rule, we look at the approximate distance that is between the wall and the rule installed vertically. Draw a horizontal line with a pencil in this place. We throw the plaster in small pieces on a horizontal line with a distance between them of about 15-20 cm. The plaster should be the consistency of thick sour cream. The moldings should be slightly thicker than the distance from the rule to the wall. We fix a galvanized beacon profile 6 mm thick onto the moldings. We set it with a rule with a level so that when the rule is adjacent to one side of the wall, and the other to the profile, it is vertical.
Installing the beacon vertically
We set the profile along its entire length, so that the rule stands vertically everywhere, recessing or lifting the beacon from the wall, fixing its position with plaster. It is important that the beacon is not stained with plaster and that the rule glides over it easily. The rule in this case is to use a length as close as possible to the height of the ceiling.
I recommend: How to make an interfloor ceiling and an attic window
When the plaster has dried, the solution is applied using a trowel, spatula or plaster ladle, or applied using a large wide metal trowel and a small spatula as an auxiliary one, that is, first the solution is laid with an auxiliary spatula on the trowel, and the mortar is applied to the wall with the trowel.
The rule is to cut off excess mortar by running one side along the lighthouse and the other along the plane of the wall. It is important that the upper and lower parts of the rule pass exactly along the wall and along the lighthouse, and not along an already dried or still wet layer of plaster. That is, sometimes you need to make some effort to cut off the excess solution. This way the wall becomes level, the plane is leveled according to the rule - a long, even strip.
What types of plastering are there?
To be brief, there are only 4 of them:
- simple plastering
- improved plastering,
- high quality plastering,
- decorative plastering.
Probably purely intuitively the difference is quite clear. The first option can be used in non-residential premises, where no one really pays attention to the quality of work. For example, when repairing the entrances of apartment buildings, plaster is applied in one layer without beacons (then we’ll see what it is). The result is a fairly rough surface. However, in some cases this quality is quite sufficient.
Improved plastering is already the usual walls of an ordinary apartment. Then, when the wallpaper is laid on the plaster, no one will ever see that the surface was rough and that “shells” remained in some places.
High-quality plastering consists of several layers with beacons. This prepares the walls for further painting. The walls should be strictly vertical, and the corners of the room should be perfectly straight. The surface should resemble a sheet of white plastic and be so flat that if you attach a three-meter furniture shelf to the wall, it will fit snugly along its entire length, and not slosh “back and forth”, resting on the “belly” (bulge in the wall) in the middle.
Let's leave decorative plastering alone for now. Maybe someday he will get around to it too.
For now, let's agree that for ourselves, our loved ones, we will choose the third option. At the same time we will gain a very useful skill.
Leveling walls with wet mixtures
The most common method remains the use of wet type wall leveling. To perform this type of work, minimal skills in using a spatula and removing beacons are required. Mixtures for leveling walls can be purchased at any building materials store. There you can also find instructions for preparing solutions.
Before the main leveling stage, you need to remove the old coating (wallpaper, whitewash, paint) from the surface. In necessary situations, flimsy, falling off old plaster in corners and other places is removed. In practice, it is more common to clean all the old coating down to the underlying concrete or brickwork.
The procedure for leveling walls begins with measuring differences along the entire length of the wall. This can be done using a long special tool - a building level. Or by stretching any cord along the wall. The verticality of the surface is measured using a simple plumb line. If there are differences of no more than 30 mm, start working. The largest layer of laid plaster should not exceed the permissible dimensions.
Plastering walls for a beginner. Tools
The very minimum you may need is a trowel, a bucket for preparing the solution and trowels:
With their help you can perform some local work. For example, the plaster had fallen in some places in the corridor, or on the balcony I wanted to hide old bricks on the wall. It is very difficult to obtain an absolutely flat and smooth surface of a large area using these tools. Especially for us newbies. But, sometimes it is enough to have at least a slight semblance of a flat wall.
The full arsenal of tools and consumables for plastering (in addition to building mixtures and water) looks like this:
{wsview src=[/images/house/17/plasterwork/tools/] width=[180] title=[tools for plastering walls] thumb=[cut] order=[asc]}
Of course, some of this may not be necessary. In any case, before you go shopping, let's take a look at the process itself. This is necessary to understand the purpose of each tool.
Plastering walls
Step 1. Preparing the wall surface
It all starts with making the original wall as level as possible. All wallpaper is torn off from old walls, old plaster is peeled off. If the walls are completely new, then all protrusions and irregularities must be knocked down. Here you should be guided by a simple rule - protrusions are “bad”, depressions are “good”. To remove protrusions, you can use a regular hammer.
Then you need to make sure that the walls of the room are strictly vertical and all corners are right. If any inconsistencies are discovered, for example, a “blockage” of the wall, non-parallelism of opposite walls, angles other than 90 degrees, then this can be eliminated with plaster. To do this you will need a plumb line and a square.
Do not succumb to the provocation of the “trowel and rule workers” (emphasis on the second syllable, please), who declare that “since the walls are crooked, then nothing can be done - plaster will not fix it.” Plastering is precisely what exists to give the room the correct geometry.
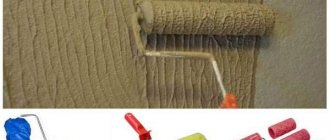
A surface that is completely ready for plastering is primed to increase adhesion (adhesion of the surface to the applied materials). There is such a liquid - a primer. Very inexpensive. Apply with a roller as if you were just painting a wall:
Step 2. Installation of beacons
These are not some kind of electronic devices, as you might think. Beacons are a special type of metal profile:
They come in different heights and are needed to make the treated walls perfectly even. First, the beacons are installed in the corners of the room:
Installing these corner beacons is a very responsible task. You will need tools such as a plumb line, level or laser level:
Beacons must stand strictly vertically. The slightest deviation will lead to blockage of the plastered walls. In other words, they will turn out slanted. I understand that in most cases this is not even noticeable to the naked eye. However, there are some customers who, when accepting a job, will not be too lazy to take measurements (they will be discussed in a separate article). Based on their results, you may have an unpleasant conversation with the customer, who has the right to demand a complete redo of the work.
I myself have repeatedly had to act as an expert, assessing the quality of work of finishing teams. Now many people work conscientiously, but sometimes you come across either beginners taking their first steps in repair work, or “jacks of all trades” who in words “can do everything”, but in fact are not averse to experimenting, using the customer’s materials and on his charge.
It is very easy to expose such specialists to clean water. It is enough to have only two tools in your hands. But we’ll talk about this later, in the article “How to control the quality of plastering work.”
After carefully installing the outer beacons, we proceed to the intermediate ones. The distance between adjacent beacons may vary, but you should not make it more than 2 meters. To create a single plane of beacons, we use a nylon thread, which we stretch along the wall in several rows from one extreme beacon to the other:
Just don’t even think about tying a thread to the outermost beacons - if you pull, you will definitely “take” them and have to start all over again. To fasten the thread we use a regular nail:
When all the beacons in the room are placed in their places, and the solution holding them has “set”, we begin to conjure up the recipe for the plaster solution.
Step 3. Making the solution
There are different types of plaster. We will use plaster. It has a pleasant white color and, more importantly, does not “shrink” when dried. This useful property prevents the formation of cracks.
Gypsum plaster comes in many different forms. Personally, I usually prefer to use this one. It's inexpensive and quite decent.
Here it would be appropriate to answer the question: how many of these bags should I buy? I answer. In a normal situation with relatively flat walls and a plastering thickness of 10 mm, the consumption will be 8 kg. per 1 square meter. In other words, one such bag will be enough for you to process a little more than three and a half square meters.
Next, we consider: if we have the 50-meter “kopeck piece” discussed above with a wall area of 296 square meters, then we will have to buy 79 of these bags (WOW!). Of course, life sometimes makes its own adjustments. It may happen that you will have to buy a couple more bags. This is better than buying “more at once” and then dragging around with the extra ones like a chicken and an egg.
The cost of your purchase at the price indicated above will be 22,120 rubles. Fortunately, the material can not be purchased all at once, but gradually, as the premises of the apartment are processed. Fortunately, stores have an almost inexhaustible supply of it.
If you have any discount card, don't forget to take it with you. If you don’t have your own, ask a “familiar builder” for a while. For example, with a discount of only 10% you immediately save 2212 rubles. They will certainly be useful to you for something else.
Be sure to order delivery to your apartment... at least for a fee. Believe me, when you carry your purchase on your back to the 5th floor without an elevator, you will lose the ability to move normally for a long time. Don't show off and try to show what a strong man you are! Save your energy. They will still be needed.
Pay special attention to the integrity of the bags. If you tear the packaging, the material will need to be used as soon as possible. Any contact with water or even water vapor leads to damage to the material.
Do you think this is very expensive and inconvenient? Have a conscience!
To plaster the new cottage, your humble servant needed 285 (!) bags of plaster with a total cost of 79,800 rubles and a total weight of... EIGHT AND A HALF TONS!
Can you imagine smearing eight tons on the walls? What about unloading the car? Have you changed your mind about buying a cottage yet?
Even with my “golden” discount card I had to pay a decent amount.
Of course you can save money. Make a not so thick layer of plaster. Or first make a layer of cheaper material, and put a finishing layer on top - gypsum, or immediately putty. Here everyone decides for themselves. I will say one thing - the thicker the layer, the warmer the room, the smoother the walls can be made. The latter is especially true if everything is not going well with you. Here I inform you that the maximum layer of gypsum plaster should not exceed 15 mm.
The recipe for preparing the solution is written on each bag. It's very difficult to make a mistake. It is important to pour the mixture into the water rather than pour it over it. To mix, you should use a special construction mixer:
In principle, a powerful drill with a special attachment will do.
This is what your workplace will look like. There will be a lot of dust around, so a respirator or gauze bandage will not hurt. I'm not even talking about work clothes.
Step 4. Throw plaster onto the wall
Now the most “intellectual” part of the work begins. We take a trowel in our hands, scoop up a certain amount of mortar and throw it on the surface of the wall. That is, we make a banal “blunder”. Next, we observe how the resulting “frog” behaves. If it did not stay on the surface and fell to the floor, the solution was too thick. You need to add water and stir again.
If it floats down the wall, the solution is too liquid. You need to add the mixture and mix again.
Sooner or later we get what we need - the “frog” remains in the place where it was smacked. Next, we select a section of the wall that will most likely be invisible (for example, filled with furniture) and begin testing the pen.
First, we evenly throw a whole bunch of “frogs” between the beacons. Please note that the layer height should be greater than the height of the beacons:
Then we take a long bar - rule (accent on the 2nd syllable) and begin to level the surface, moving the bar from bottom to top along the beacons:
After the rule “passes” along the beacons, as if on rails, the protruding parts of the “frogs” will be removed, but perhaps depressions will remain in the surface of the plaster layer. Repeatedly smack the solution onto the problem areas and work the rule until the surface becomes even and smooth.
Just in case, I must warn you: at some stage of the work it may seem to you that everything is going wrong, the surface turns out, to put it mildly, far from ideal:
Don't despair, keep working. Sooner or later your efforts will be rewarded. Moreover, we will soon move on to the next step and bring the surface to complete perfection.
Separately, I would like to say the following. Some experts prefer to apply plaster not in one, but in several layers. In this case, each subsequent layer is applied after the previous one has completely “set”.
And one more thing: it is very advisable to complete all the work indoors in one day. It is only at first that it will seem to you that the process will last forever. But after just an hour or two of work, you will gain some experience and will work faster and better.
When you finish plastering the walls of your apartment, you can try to put out a humble advertisement for carrying out similar work to order. However, before that, I would still recommend practicing one more time and doing repairs in the apartment of one of your relatives. They will be endlessly grateful to you, and you will gain even more valuable experience.
The full strength of the applied plaster occurs in 7 days.
Step 5. Smoothing the plaster
This must be done after the plaster has dried. We take a trowel (there is a picture at the beginning of the article) and begin to move it along the wall, performing circular movements. It is advisable to slightly moisten the surface to be smoothed. Instead of a grater, you can use a spatula, but when using it, the movements should be arched—“along the wool.”
How to plaster walls “as a rule” without beacons
Do-it-yourself plastering, usually without beacons, is done as follows. Let's break it down point by point.
Dismantling works
The first step is dismantling work. Everything that is on the walls must be removed: wallpaper, old paint, falling off plaster, old peeling putty, protruding screws, nails and dowels (dowels do not need to be pulled out, but cut with a utility knife or hammered flush with the wall with a hammer, they will hide under the plaster) . The basic rule of dismantling work before leveling the walls with plaster is that you need to remove everything that falls off and will interfere with the work, and what does not fall off and holds tightly can not be removed.
I recommend: How to make (build) a barn at your dacha with your own hands
Secondly, we check the plane of the wall using a rule with a level, preferably 2-2.5 m long. You can use the rule of shorter length, but the “understanding” of the wall plane will be reduced, and the quality and convenience of work will be much to be desired, and then you will understand why.
Studying the plane of the wall
After the dismantling work, we “take” our wall and begin to study it... We apply a rule with a level to the plane, look at the resulting gaps between the rule and the wall, as well as the vertical level. So we go through the entire wall, passing with the rule leaning against the wall. And also the bottom (where the floor plinth will go), the top (where the ceiling plinth or stretch ceiling profile will be) and the corners. We study the situation, gradually a “picture of the wall” will line up in your head. For the first time, you can draw the differences you see with chalk, pencil or marker directly on the wall. As a result, the picture may look like in the figure.
Wall differences
We check the verticality of the wall, if it is required to display it using a rule with a level or an ordinary rule, with a level leaning against it on the reverse side. It is better to use a level at least half a meter, the rule with a bubble level is 2-2.5 meters.
The vertical is checked by bringing the rule with a bubble level to the wall and stepping back with the upper or lower edge from the wall until the bubble is placed in the center of the level. This will make it clear what layer of plaster needs to be applied to the wall to make it vertical and whether you need it or not.
Removing the bumps
Having identified differences, it is necessary to understand which parts of the wall can and should be removed for better leveling. To do this, you need to know what material the walls are made of. There are 2 options: either it is a load-bearing concrete or brick wall, or an interior partition. The second option is easier. If this is a load-bearing wall, then chipping concrete is not an easy task, but it will be possible to chip away small bumps.
You can determine whether a wall is load-bearing or not by tapping; by tapping several walls in your apartment, you will determine by sound and vibration which wall is load-bearing or not. On a load-bearing wall the sound is dull, vibrations are not felt, on the partition the sound is ringing, vibrations are felt when struck with a palm. You can also pick it out with a knife, a screwdriver or something else: you won’t be able to pick out the concrete, and, therefore, it will be clear what the wall is made of.
If the wall is load-bearing and there are bumps at the top or in the upper corners of the wall, then most likely they can also be knocked off, since at the top of the wall and in the corners there is often a layer of plaster that hides the technological holes. This is not a fact, it depends on each specific case, but be sure to check it.
I recommend: Plastering walls and how to plaster walls with your own hands
Primer
Next, the surface of the wall must be primed. Priming is carried out with the aim of removing dust, strengthening and reducing the porosity of the surface (base), so that moisture from the plaster does not quickly go into the base, promoting good adhesion of the plaster composition. We perform the primer with deep impregnation soil, you can prime with PVA diluted with water 1 to 8. There is no need to take cheap PVA or primer, their quality leaves much to be desired, the average price category is suitable.
Using a roller and brush or spray gun (or garden sprayer), we go over the entire section of the wall; the primer should flow slightly from the surface. In places where the surface is smooth, it is advisable to use a contact primer (concrete contact). Concrete contact is, roughly speaking, sand with glue; it will create a rough surface with good adhesion (adhesion).
All this dries for at least 2 hours, but it’s better to leave it overnight.
Preparing the solution
We did the dismantling, primed the surface, and it was time to prepare a solution for plastering walls without beacons with our own hands. Take a bucket, preferably one like the one in the photo below, 15-20 liters, with sharp corners at the bottom. It is more convenient to remove the remaining solution from such buckets.
Convenient buckets for plaster
Pour water, usually 2/5 of a bucket to get an almost full bucket of plaster mortar. We use gypsum plaster, preferably not the cheapest one.
Pour the plaster into a bucket of water until a mound forms above the water. Mix using a hammer drill or a drill with a mixer attachment until the mixture becomes medium thick sour cream. You can add water or dry mix while kneading for 2-3 minutes to achieve the desired consistency. The finished mixture cannot be diluted with water, at least for critical work. Stir the mixture until no dry mixture or lumps remain. You can wait 2-3 minutes and stir again. While kneading, use a mixer to thoroughly pass the bottom and corners of the bucket, as well as the edges and center, in a circular motion.
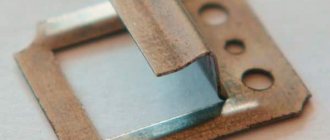
What to do with corners when plastering
We are talking about protruding corners. For example, if you need to process a window opening, or the projections of suspended ceiling structures.
To give them a civilized look, to make them as straight as possible, you need to use these corners:
There are a lot of options for corners - for internal and external corners (the picture shows the option “for internal”). There is only one purpose - to make the angle even. They are “plastered” into the walls.