Making a textured wall from putty, paint and decor
Today we’ll look at how to make a beautiful wall using putty and paint.
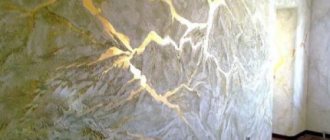
In this case, the wall turns out to be textured, the surface is somewhat reminiscent of slices of cheese, ripples on the water, or the lunar surface with small craters, whichever is more convenient to compare with. For practical reasons, I recommend using this method of decoration to first decorate one wall, for example the kitchen wall, in the dining area. The method and material are especially suitable for those who have a gas stove at home and the wallpaper quickly gets dirty due to soot, but want coziness and comfort in the kitchen. It would also be good for a dacha, where the stove is heated with coal or wood. For a country house, when the room has a fireplace. Where the whitewashing and painting of walls has to be done regularly. And for a number of reasons, other materials are not suitable.
This method of decoration has its pros and cons.
pros:
- Perfect replacement for wallpaper. For the next few years, you definitely won’t have to update them every year, which is undoubtedly convenient for those who have tension over time, have a limited budget for repairs, or, for example, find it difficult to glue wallpaper alone.
- In order to update a wall, it is enough to refresh it as needed with a layer of water-emulsion paint, painting it in the same color or any other color.
- Giving a new look is as easy as shelling pears - just remove the old decor from the wall and add new elements.
- Scratches, damage from animal claws, small cracks and cracks can be easily decorated or disguised in just five minutes. It is enough to apply a spot-on new layer of plaster and then paint.
- Putty-paint fits well on lightly washed whitewash, and works great on previously painted walls. You can paint it with enamel, if desired, and then wash the wall with a brush. In the latter case, as an alternative to tiles, if it is not possible to lay them in this place.
- A variety of designs and textures, literally from improvised means, give complete freedom of creativity.
- The method is simple to implement, it is relatively easy to do everything alone, or create together with children.
And minus:
Having covered the entire wall with putty, and even more so all the walls in the room, if you suddenly don’t like the result and decide to return to wallpaper, you can only hang new wallpaper after removing the putty and paint. Partial or complete, depending on the thickness of the layer. Therefore, as I said earlier, I recommend starting with one wall, for example a small area above the table.
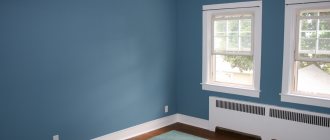
*This is not decorative plaster for interior work, which is sold in finishing materials stores, but putty-paint. Although, there are some similarities. That is, it will not shine beautifully with a pearlescent gloss, and it will not be covered with wax, and it is easier to apply. In my example, the wall will have a matte white and blue surface. A budget option for decorative plaster, but it’s up to you.
Materials and tools:
- white putty-paint (a lot, depending on the thickness of the layer and the size of the wall);
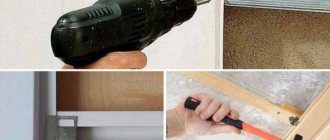
- wide construction spatula with a smooth edge or a tool for applying plaster;
- narrow spatula or tablespoon;
- plastic film, scissors, masking tape;
- gloves;
- color scheme;
- water-emulsion paint;
- paint tray, or container for diluting and coloring paint;
- brushes or roller for faster painting.
Optional:
- roller to create a spectacular texture;
- artificial flowers and grass for decoration. You can replace them with natural ones, such as fern leaves (maple leaves, gypsophila with small flowers, spikelets), to create texture on the wall. Gild with paint, glitter;
- PVA glue, for gluing decor to the wall.
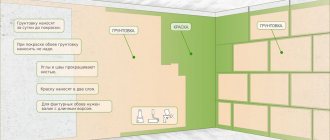
1. Preparing the wall . We completely remove the old wallpaper. If the wall was previously painted with a water-based emulsion, or the old whitewash remains on it, walk with a wet rag over the entire surface of the putty. Leave it for a while and let it get wet so that the putty will adhere better. We glue masking tape to the baseboard. To protect the floor from paint splashes, we also lay out plastic film along the wall.
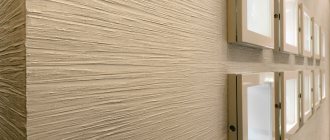
2. Making an invoice
Using a spoon or narrow spatula, spread putty-paint onto a wide spatula. Apply with light short movements, literally barely touching the wall, a thick layer of putty, about 1-1.5 cm, and spread it very slightly over the wall, lightly pressing on the spatula with your hand. We hold the tool almost parallel to the wall, and move it that way, as if removing the top layer.
This movement, without short strokes, leaves a beautiful pimply mark after the first pass.
The thicker the layer of putty, the more beautiful the effect, but the greater the consumption, of course. If you run a spatula over the same place two or more times, or smear the putty on the wall, the entire effect of large burst bubbles will disappear. The most beautiful is obtained on a thick layer, with light hand movements.
Texture on magnification
It didn’t work out beautifully the first time, no problem. We take a small piece of plastic film, about the size of a bread bag, and place it on a layer of putty-paint. Smooth it along the wall with your hands. And very quickly we tear it off the wall. Experiment with tack speed, pressure, and smearing movements of the spatula to get the best effect.
There will be nicks and characteristic ripples on the surface of the putty layer, which is what we need. We repeat the action until the result suits us.
By making circular movements with your hand and patting your palms on the wall, you get the effect of a mud wall. Or you can leave children's handprints as a souvenir. I used a variety of techniques. Basically, with crumpled plastic film (No. 2, 3 in the photo below).
Photo for example. A drawing that is obtained by using various objects.
dry thoroughly . Especially if you need a texture with pointed edges and teeth, in a small hole, like cheese.
For the cheese effect, I decorated this wall with oil-based putty. I applied it with a small spatula, and then, after it had completely dried, I painted it with white enamel (it glares in the photo, the surface is glossy). Such a wall can be washed with a brush and chemicals. Even three years later, the wall is still like new, after repairs, nothing has cracked or fallen off.
During subsequent painting of the putty-paint with water-emulsion, part of the pattern will become wet and smeared, and the holes will be painted over. Therefore, the more prominent the design is initially, and the drier the wall is before the first painting, the better.
Wide spatula and crumpled film, plaster roller
4. We color and paint
Add the selected color to the water-emulsion white paint. Can be painted with ready-made colored paint. I have a soft blue wall color in my kitchen, I used a violet color. Proportions by eye, approximately 1:10 or less. We paint the wall with a slightly wrung-out fur roller, and difficult areas with a brush. Then let the paint dry, this will take about a day. Carefully remove the tape and film from the floor. At this stage you can stop, everything is ready.
Or continue with the decor, in accordance with your idea.
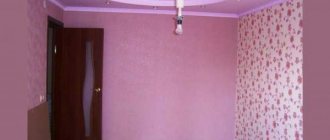
In the photo behind me: the wall after painting. My husband and I celebrate finishing work with an orange.