Preparing walls for wallpapering
It won’t be difficult for you to properly paste wallpaper in the corners of your apartment if you follow simple rules. Initially, it is very important to prepare all the walls for wallpapering, including in the corners, and only then start applying glue to the surface. To do this, you should get rid of all the unevenness of the walls by thoroughly puttying. After it has completely dried, it must be sanded with sandpaper, because the canvas will peel off if the surface is not perfectly smooth. The last stage in preparing the walls is processing all the walls. Only when the primer has dried completely can you stick the wallpaper.
Why do we need smooth walls and corners?
Firstly, aesthetics. After all, even the most expensive wallpaper will look sloppy on crooked walls, but inexpensive, tasteful wallpaper will look great on well-prepared walls. The second is practicality. During subsequent repairs, the walls will not need to be prepared again. And wallpaper with a complex pattern is extremely difficult to glue at a crooked angle, not only for beginners, but also for professionals.
The speed of work completion directly depends on the surface preparation. It is simply impossible to stick high-quality wallpaper on some surfaces: concrete, loose or uncleaned surfaces. We can go on and on, but surface preparation is of great importance in the question of how to glue wallpaper in the corners of a room or on its walls. The correct preparatory stage applies not only to wallpapering, but to almost all types of finishing work.
Features of pasting in internal corners
Pasting wallpaper on internal and external corners differs significantly, so there is no single correct solution on how to glue wallpaper in the corners. Let's take a closer look at the process of wallpapering internal corners. The wallpaper should be glued so that it turns the corner by 3 centimeters. It is very important to thoroughly coat the entire corner with glue, and in places where the roller did not reach, use a brush. The allowance should be exactly 3-5 centimeters, because if it is smaller, there is a risk that the canvas will come off after complete drying, and if, on the contrary, it is more, the strip may begin to “wrinkle” and you will have to deal with this problem by transverse cuts of the canvas itself.
The inner corner can be glued with an overlap
The next step will be to fix the second canvas to the adjacent side of the room. You need to use a tape measure or ruler to accurately measure the place where the far corner of the wallpaper will be, taking into account that the wallpaper should overlap by 2 centimeters. Standard wallpaper rolls have a width of 53 centimeters, while rolls have a width of 1 meter. Next, using a plumb line, you should draw a straight vertical line along which the canvas will be glued in the future. Only after a vertical stripe has been drawn on the wall can the second sheet of wallpaper be pasted. We press the canvas tightly with a sponge or a dry cloth to expel all the air and the wallpaper canvas fits tightly to the wall.
Straighten the wallpaper and cut off the remains
External corners: how to rotate the canvas?
The outer ledge must be perfectly smooth. If its edge has chips or unevenness, they need to be puttied. The work is carried out with a metal spatula; the outer corner must be smooth and strictly vertical. If these conditions are met, the canvas is wrapped behind it. The edge of the strip is checked with a level, since the correct positioning of the following sheets depends on it.
The second gluing method is carried out similarly to gluing in the inner corners. The strip is wound around the corner by 5 cm, the next one is glued overlapping this allowance. Then, under the ruler in the middle of the overlay, a vertical cut is made in two layers of wallpaper. It is important that the ruler does not move while working with the wallpaper knife, otherwise the cut may go to the side. That is why it should be metal, as it has greater rigidity than plastic.
These methods of processing corners are suitable for wallpaper that is glued end-to-end. They do not shrink after drying, so the seam will not come apart and the wall will not be visible. However, paper wallpaper requires adherence to a technological overlay of 0.5 cm wide, as it shrinks along the width. In this case, using a plumb line, the strict verticality of the folded edge is controlled. If it lies on the wall incorrectly, you should draw a line and cut off the excess. The next strip is overlapped by 0.5 cm.
Removing excess wallpaper residue on inner corners
The process of gluing wallpaper on the inner corner is almost complete; the most difficult and time-consuming stage remains. Using a ruler and a building level, we use a knife to cut two layers of wallpaper close to the corner, which we ended up with overlapping. Some craftsmen use a construction knife and an iron knife for such purposes. The excess wallpaper that was pasted second can be easily removed or will fall off onto the floor on its own.
Note!
To remove a strip of the bottom sheet, unscrew the top sheet slightly.
When the strip of the bottom sheet is completely removed, you need to re-coat the folded edge of the wallpaper with glue and stick it on the wall, pressing it with a sponge or dry rag. This method of gluing wallpaper in a corner is considered the most common, since it can be used on thin and thick wallpaper.
Tools needed when gluing wallpaper on the external corners of a room The method that is used when gluing wallpaper on the internal corners of a home is not applicable to the external corners, so the next question discussed in this article will be the question of how to wallpaper the external corners.
In order to properly and beautifully wallpaper the outer corner of the apartment, you will need the following tools:
- the wallpaper you are going to use to glue the corner;
- special wallpaper glue;
- roulette;
- a simple pencil;
- long ruler;
- plumb line;
- roller or rag;
- sharp wallpaper knife.
Wallpaper should cover the second side of the corner
Pay special attention to the outer corners
The need to tape external corners arises even more often than it might seem. The secret to the success of gluing wallpaper in external corners lies in strict adherence to the pasting technology.
There are two main ways to glue wallpaper on outer corners:
- the position of the stripes overlaps by approximately 0.5 cm. Suitable for paper wallpaper. This type of canvas requires similar actions, since after drying it tends to diverge slightly;
- The position of the strips end-to-end is assumed for wallpaper that does not shrink, so there will be no gaps or gaps.
Undoubtedly, the protrusion should not have any irregularities or chips. Otherwise, puttying with a metal spatula will help achieve a smooth edge. An important condition for the technology is the exact vertical angle. How to glue wallpaper in the corners next? Only if all the stated conditions are met, the strip of wallpaper can be folded over the edge. The edge going around the corner should be checked with a level or plumb line, because the entire subsequent process, the location of the strips will depend on it. Subsequent interior finishing is similar to the gluing process used on internal corners. You can use a special glue at the joints that has additional adhesive ability. To avoid abrasion of the outer corners in the future, they are often covered with wooden or plastic corners. Such protection is glued to “liquid nails”. The ideal passage of all corners and a clear match of the pattern of the canvases determines the quality of the finishing work performed. Indeed, gluing wallpaper on straight walls can be done even by inexperienced people, but only professional craftsmen know how to glue wallpaper in corners correctly. You can familiarize yourself in detail with all the stages of this process by watching the following video on how to glue wallpaper in the corners .
Pasting wallpaper on external corners
Pasting wallpaper on the outer corners of the room will not be a huge task or problem if you adhere to a few basic rules and follow the instructions described below.
- We cover one of the walls near the corner with wallpaper so that the edge of the wallpaper wraps approximately 2-4 centimeters to the other side of the outer corner of the room. The width is determined depending on how even the angle is in level.
- We press the wallpaper tightly against the wall and try to expel all the air and get rid of bubbles using a sponge or clean rag.
- If folds or bubbles form during gluing, make small horizontal cuts on the canvas to get rid of these problems.
- At the next stage, we cut off the folded edge of the wallpaper with a sharp construction knife so that only a thin edge of the canvas remains on the second side of the corner.
- Next, on the second side, using a plumb line and a ruler, we determine where the far corner of the canvas will be located.
- We glue the wallpaper so that it overlaps the small edge of the wallpaper, but does not go beyond the edge of the outermost corner.
- We press the canvas against the wall and smooth it out to get rid of bubbles or wrinkles. You should also make horizontal cuts if folds appear.
Remaining wallpaper needs to be removed
How to properly glue vinyl wallpaper in corners?
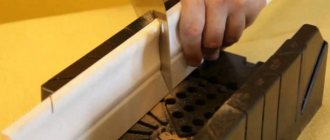
- From the very beginning you will need to measure the length. Measure the distance from the floor to the topmost fillet (if you leave a margin of 4 cm for trimming, then a regular roll will only be enough for 3 sheets).
- Next you need to do a fitting. The canvases (dry) are tried on in a corner with an overlap on the nearest plane. To mark the 2nd edge on the surface to be tiled, you need to draw a vertical line along a plumb line.
- Be sure to prepare the sheet - apply glue to it (fold the edges towards the center, and bend the workpiece in half).
- Of course, prepare the wall - a little further than the line made a little later (8 cm), apply glue to it.
- Perform cladding: place the canvas on a vertical surface, adjust one part of it.
Remember that if you do not level the corner with putty, the canvas on the next plane will end up with bubbles.
That is why, in the very center of the bubbles, it is necessary to make cuts from the end of the product to the corner, attach the cladding material overlapping, and treat it with an adhesive composition. Then you can start gluing wallpaper on another plane. Please note that the overlap should only be done on the glued material.
As soon as you try on a dry piece, create a vertical line along its free end onto the surface that is not yet tiled. If you draw a vertical line on the overlap of another sheet, keep in mind that the pencil is practically not removed after lining, and the decanter is mixed with the adhesive mixture. This causes smudges to form across the vinyl.
It would be very convenient if all the rooms in the apartment had smooth, strictly vertical walls, then there would be no problems with gluing. Take the glue continuously, bending the lines in the corners and moving on to the next wall. But the bulk of our houses are not built in the best, and therefore not the most even, manner. And what to do if problems arise? How to glue wallpaper in corners: video, tips and photos in our article today.
Rules for gluing wallpaper in corners
Thanks to the information presented above, we found out how to glue wallpaper in the corners. Regardless of which type of corner you are going to stick wallpaper on, there are general recommendations that you must adhere to when performing this type of finishing work:
- Firstly, keep in mind that most often the wallpaper begins to peel off from the corner, so be sure to coat it very carefully with adhesive. It is not always possible to completely coat the inner corner of an apartment with a roller, so in this case you should use a brush;
- secondly, you should not cover the corners of your apartment with solid canvases, even if you have perfect walls. There is a high probability that you will get a corner with folds, or the wallpaper on the second wall will not be level, and it is best to level it in the corners;
- thirdly, make calculations before applying wallpaper glue to the wall, since not even all professionals can paste wallpaper in the corners without clear calculations;
- fourthly, start gluing wallpaper from the corner. Previously, it was believed that wallpaper should be glued away from the window, because then the wallpaper was glued overlapping and, thus, it was possible to visually slightly hide all the joints on the wallpaper;
- fifthly, prepare the corners in advance for applying wallpaper. Try to make them as even as possible. Also keep in mind that you can apply wallpaper when the primer is completely dry, otherwise your wallpaper may quickly come off and you will have to re-glue it;
- sixth, turn off the electricity and remove all sockets before you start wallpapering. When gluing wallpaper in places where sockets are located, make a small cut according to the size of the socket cavity itself. Next, fold the cut wallpaper inward. Now the wallpaper will look neat and without cuts after you put the sockets back.
Pasting wallpaper in corners will not cause many problems and awkwardness if you know how to properly wallpaper corners. The gluing methods described in this article are applicable to all types of wallpaper: vinyl, non-woven and other types. Don’t write off wallpapering; it’s better to measure everything first, because wallpaper creates the final impression of your home and this type of finishing work must be done perfectly.
Rules for wallpapering corners
- Corners are the only place where wallpaper overlaps each other. This is a forced situation so that there are no gaps, because few people can boast of ideal corners in the apartment.
- The gap in the outer corners should be no more than 0.5 - 0.6 centimeters.
- A convenient option for gluing external corners is a wide overlapping sticker followed by cutting. That is, first a piece of wallpaper is glued, which goes around the wall by approximately 10 - 15 centimeters, and then the next piece of wallpaper is glued in a wide overlap. We apply a ruler to the corner and draw a line using a construction knife, then lift the edge of the wallpaper and get rid of the unnecessary piece that goes under the wallpaper and from the cut edge of the top wallpaper.
- For internal corners, do not use the entire wallpaper sheet, if it is too wide and will require a decent spacing on the next wall, it is better to cut off the inconvenient part, this way you will save time and nerves.
Gluing wallpaper in the corner Gluing wallpaper on the outer corner
How to dilute wallpaper glue for gluing in corners
Wallpaper glue is used not only for gluing wallpaper. It is often used as a primer for walls. This factor must be taken into account when determining the required consumption of wallpaper glue.
All adhesives on the market are divided into two types. Some are suitable for any type, others for a specific type. You can buy them ready-made, but most often it is a dry powder.
How to dilute wallpaper glue?
- You will need a container of water and the mixture itself.
- It is poured in a thin stream while constantly stirring the water. This method will prevent the formation of lumps.
- For dilution you need to use only cold water. The resulting mass is left for a few minutes, after which it is thoroughly stirred again.
To avoid the appearance of bubbles when gluing, the glue must be applied in an even layer. The coating is smoothed with a roller or soft cloth, moving from the center to the edges.
Separately, it is worth mentioning synthetic glue. It is very important to use it wisely. First, the wall is coated with paste, then newsprint is applied to it and left until completely dry.
After this, the wallpaper itself is used; press it with a soft cloth. It is not advisable to use synthetic glue for washable materials. EXCELLENT VIDEO ON THE TOPIC
How to properly glue wallpaper in corners video:
See inaccuracies, incomplete or incorrect information? Do you know how to make an article better?
Would you like to suggest photos on the topic for publication?
Please help us make the site better!
Leave a message and your contacts in the comments - we will contact you and together we will make the publication better!
Wallpapering has been and remains the cheapest and most beautiful way to decorate walls. Beginners can master it on their own; it is also used by masters with pleasure. This is a simple and easy process that takes little time. But, as in any repair work, you should have a minimum of knowledge and master some skills, without which the result may disappoint a diligent worker. The question of how to properly paste wallpaper in the corners of a room is of concern already at the initial stage of work and requires careful preliminary preparation.
Non-woven wallpaper: how to glue in corners
There are many types of wallpaper. They differ not only in color, texture, but also in the base. As practice shows, non-woven ones are mainly used. This is explained by the fact that they have many advantages. Durable, reliable and convenient in the process of pasting. They will be a great decoration for any room.
But few people know how to properly glue non-woven wallpaper in corners. As a result, difficulties arise with this process. To avoid this, you must follow the following recommendations from experts. They will allow this work to be completed quickly and easily.
When pasting a corner, the strip of wallpaper should fit completely into it, as shown in the photo. At the same time, it extends to the other wall. It is necessary to press the wallpaper especially carefully. After which you will need to iron it with a sponge or cloth. This will expel all the air that has accumulated under the wallpaper. This way the wallpaper will stick firmly and securely.
It is important to note that if we are talking about uneven corners, they must first be leveled. You can use plaster for this. After it has dried, you can start gluing the wallpaper.
The second strip of wallpaper should overlap the first. The gluing process is carried out in the traditional way. The end result will be a beautiful angle.
Vinyl wallpaper: how to glue in corners?
Vinyl wallpaper is no less popular than non-woven wallpaper. They are also widely used in the design of residential buildings. Presented in a large assortment. They will be able to realize any fantasy, simple and easy to use.
Gluing vinyl wallpaper in corners is just as difficult as non-woven wallpaper. An excellent assistant in this process is the instructions below. It consists of performing the following work:
- Measuring the height of the corner. It is determined by the distance from the floor to the fillet, which is located at the very top.
- Performing fitting. Before gluing the wallpaper, you need to try to attach the canvas to the wall. At the same time, you cannot smear it with glue.
- Preparing a strip of wallpaper. A layer of glue is applied to it. After which it is folded with the edges towards the center. This will allow the liquid to thoroughly saturate the canvas.
- Preparing the wall. Glue is applied to it.
- Gluing wallpaper. In this case, it is necessary to approach the corner especially carefully.
- The second strip is laid overlapping. It is prepared in the same way.
If bubbles form in the corner after gluing, then it is necessary to make small cuts in these places through which excess air is expelled. As a result, the surface becomes smooth and even.
You can clearly see the whole process in the video below. It shows all the features and subtleties. If you know them, then there will be no problems with gluing wallpaper in the corners. It doesn’t matter what kind of base they have, non-woven or vinyl. The walls will be perfectly smooth and beautiful even in the most difficult places. Your work will be indistinguishable from that which would have been carried out by a professional.
Preparing corners
Even if visually the corners seem even, upon closer examination the picture turns out to be not so rosy. The slightest irregularities on the walls and a crooked corner line will cause the canvas applied to the surface to lie crookedly on the adjacent wall and cause the wallpaper to rip and unsightly creases. The next strip of wallpaper, glued end-to-end, will not lie strictly vertically, the pattern will shift - as a result, the wallpaper will have to be torn off the wall and work started again. To prevent this from happening, you must:
Pasting corners, as well as the walls themselves, should not be done “by eye”.
In order not to rack your brains once again about how to glue wallpaper in the corners of a room, you need to prepare the tools:
- spatula (it should not be wide, the optimal width is 15cm);
- plumb line (allows you to maintain a strictly vertical level of the glued strips);
- construction knife (with its help, excess pieces of wallpaper are removed quickly and accurately);
- roulette;
- pencil;
- brush;
- roller;
- scissors.
A large number of wallpapers offered for sale have to be glued end-to-end, rather than overlapping, therefore, when deciding from which angle to glue the wallpaper, it is better to focus on strict vertical lines. Since there are practically no perfectly straight corners in modern rooms, you can start gluing wallpaper from the door or window.
Types of angles
The order of work will largely depend on what angle awaits us:
- internal between two vertical walls - they are in every room, almost always there are at least four of them;
- external, also between two walls - they may not exist at all, they can be avoided;
- but if there is an outside corner it will require more work;
- internal horizontal below, between the floor and the wall;
- the inner horizontal above, between the wall and the ceiling - the last two types cannot be taken into account if we carefully approach the organization of these angles.
How to cover an outer corner?
Before gluing wallpaper with a pattern in the corners, you need to prepare a canvas of such width that it goes around the edge of the outer corner and rests a few centimeters on the wall adjacent to it. To do this, you need to measure the distance from the edge of the previous strip to the corner and add 2-3 cm to the resulting value, transfer the measurements to the wallpaper, cut off the excess, and only then start gluing the corners. An edge that has been turned around a corner may cause creases. In these places, cuts are made with a construction knife. The canvas is carefully smoothed and pressed tightly against the wall.
Advice! When using heavy wallpaper (for example, vinyl), glue is applied to both the wall and the wallpaper. To stick light (for example, non-woven) wallpaper, it is enough to grease only the wall. But in both cases, dried areas of walls and wallpaper need additional lubrication with glue.
A vertical line is drawn on the adjacent wall using a plumb line. The width of this section is determined from the corner and is equal to the width of the next panel with an addition of 0.6-1 cm. The second strip lies with its right side strictly along a vertically drawn line, and its left side overlaps the edge of the previous strip. It is necessary to carefully ensure that the motifs of the drawing on both canvases coincide. You must not only know how to glue wallpaper on the outer corner and use it skillfully, but also prevent the elements of the ornament from becoming chaotic. After the canvas is glued, you need to dip the brush in glue, coat the dried edges and press them tightly with a roller.
But, it’s one thing to figure out how to quickly stick wallpaper, another thing is to ensure that in the outer corners they don’t lift up or come off over time. It looks, to put it mildly, unaesthetic. To solve this problem, wallpaper corners are used. Long strips, reaching a length of 3 m, are quite easy to adjust to size. To do this, you can use a hacksaw. The next question arises: what is the correct way to wallpaper? They will not stick to wallpaper glue, and after using liquid nails, unsightly marks on the wallpaper cannot be avoided. Silicone sealant is ideal for these purposes.
How to wallpaper an outer corner
Gluing wallpaper onto flat walls is not a difficult task, but not everyone knows how to wallpaper an outer corner. There are simple tips that will help you cope with this completely solvable problem.
- Before gluing wallpaper on a corner, you need to cut the panel, which should go to the next wall. This will make it easier to wrap the piece around the corner.
- It is necessary to take measurements carefully and accurately. Measure the width of the gluing area up to the corner, at the ceiling and at the baseboard, add a margin of 2.5 cm and about 10 cm for gluing around the corner. We measure the resulting result on the wallpaper and cut it.
- We glue the wallpaper from the previous sheet, first smoothing the main part, then carefully wrap the wallpaper around the corner and also smooth it.
- Experts advise drawing a straight line around the corner using a plumb line in order to orient yourself and then paste along it.
- We glue the wallpaper scrap end-to-end, focusing on the line.
After finishing the work, the wallpaper joints are processed using a special roller.
How to wallpaper outside corners
The main difficulty in wallpapering is to avoid the formation of folds and at the same time make sure that the wallpaper does not come apart from below. Those who know how to wallpaper outer corners can do it without difficulty.
To do this, you need to glue the canvas in such a way that the grip along the adjacent wall is no more than 2 cm. It is necessary to take into account the degree of curvature of the angle; the greater it is, the greater the allowance required
In old houses in Russia, unfortunately, both the walls and ceilings are often uneven, which seriously complicates the task. It is important to press the edge firmly against the wall, and if folds appear, you can carefully make notches with scissors by cutting the sheet towards the folds. Next, you can begin marking so that it is convenient to apply a new strip to the adjacent wall. To do this, you need to set aside a distance from the first canvas that is equal to the width of the wallpaper being pasted minus 5 mm. Then, using a level, you need to draw a vertical line and stick the second sheet so that it lies strictly vertically along this line.
Important details:
- paper wallpaper quickly gets wet from the glue, so they cannot be overexposed,
- vinyl wallpaper, on the contrary, must first be well soaked so that it sticks securely to the corner,
- glue is not applied to non-woven wallpaper, only the wall is coated with it immediately before starting work, so that the composition does not have time to dry,
- Glass wallpaper due to its high density may not look very aesthetically pleasing at the joint.
- Accuracy and dexterity will help in the difficult task of gluing wallpaper in the corner. To make the job easier, it is recommended to hire an assistant.
How to wallpaper inner corners
- Pasting the inner corner begins with measuring the distance between the corner with wallpaper. We measure the width at the floor and under the ceiling, add 1 cm and about 1-2 cm for the overlap on the next wall.
- We cut off a piece of the required width from the wallpaper sheet and proceed to pasting.
- First, you should join the wallpaper with the previous canvas, smooth out all the wrinkles and kick out the bubbles. Then we use a wallpaper spatula or brush in the corner, pressing the canvas tightly, so the wallpaper will better adhere to the wall in the corner and there will be less shrinkage. Glue the remaining edge, smoothing it from the corner to the edges with a wallpaper spatula.
- For end-to-end gluing, draw a line on the adjacent wall at a distance equal to the width of the piece of wallpaper remaining after cutting; draw the line using a plumb line. And by gluing the piece remaining from the canvas glued to the corner.
- When gluing with an overlap, we also draw a vertical line along which we will be guided. It is easier to glue wallpaper without a pattern with an overlap; otherwise, you should carefully adjust the pattern. Glue the remaining piece of wallpaper straight from the corner.
Many people are interested in how to glue corners with non-woven wallpaper
Everything is very simple here - the technology is similar to conventional materials. The question of how to glue corners with vinyl wallpaper should also not cause problems. The strips are glued with a small margin extending onto the adjacent wall, the main thing is to do it as evenly and vertically as possible.
When choosing a material for pasting corners, remember that:
- For dry rooms, all wallpapers can be used.
- For wet ones, washable or vinyl ones are usually used.
- If there are uneven spots on the wall, it is better to choose a material with a dense pattern, embossed or paintable glass wallpaper.
How to cover an inner corner?
The work process is in full swing, and the vertical canvases lie flat on the wall, but the adjacent wall is getting closer and closer and you have to wonder: what does it take to hang wallpaper yourself in the inner corners? This is not as difficult as it seems at first glance, and certainly no more difficult than pasting external corners.
After the next strip is glued in front of the inner corner, you need to measure the distance from its edge on the right to the corner, add 1-2 cm to this value.
The dimensions are transferred to the next strip, it is carefully cut vertically (by eye). And for confident movement, use a spatula.
A canvas is placed on a wall carefully coated with glue. A strip of small width will also appear on the adjacent wall. You can get rid of creases using a construction knife. In the corner the canvas is very carefully pressed against the wall. A spatula is applied to the wall. The flat part is pressed against the wall and directed towards the corner. The construction knife follows the direction of the spatula. The narrow strip that ends up on the adjacent wall is carefully trimmed.
Advice! The dull parts of the construction knife must be broken off in a timely manner to avoid tears and inaccurate cutting of the wallpaper.
The part of the strip that was cut off can be used further. It is necessary to measure its width, subtract 1-2 cm from this value, transfer the dimensions to the wall, draw a vertical line. The ideally flat side of the wallpaper should lie strictly along a vertical line, and its left edge will overlap the previous strip. Using a sharp blade of a construction knife, carefully trim off the excess, as in the previous stage of work.
If novice craftsmen, when thinking about how to glue wallpaper in the corners of a room, begin to worry and rack their brains, then people who have mastered a simple technique with any wallpaper - be it heavy vinyl or light non-woven - cope with the same ease and speed. You only have to do the job correctly once, and then it starts to go wrong.
11890 0 1
Technology for proper gluing of internal corners
It is necessary to glue the wallpaper in the corners so that the paper, vinyl or non-woven fabric turns onto the next wall by about 5 cm. It is the correctly chosen allowance that allows you to avoid folds on the strips and the need to smooth out the excess. True, it is important to maintain a balance. If you leave a small allowance, the chances of the edges peeling off sharply increase even after complete drying. The following steps will help you fix the wallpaper properly:
- careful coating of strips with quality;
- good pressing with a rubber roller. Using rags for such purposes can lead to deformation of the wallpaper, which is extremely undesirable, especially for textured types.
To form a single joint, the panels are glued overlapping. The strip on the wall adjacent to the corner should be fixed at approximately two centimeters. Since wallpaper in the corners should be glued extremely carefully, you should resort to using a plumb line. Using it, you need to draw a horizontal line, and then use a sharp knife specially designed for wallpaper to cut two layers simultaneously. In this case, the upper sections are easily removed or fall off on their own. The lower sections can be removed by lifting the upper strip. But then, without fail, the wallpaper should be coated with glue and gently pressed to the wall surface.
The most common beginner mistakes
First of all, let's look at how not to glue wallpaper. The most common mistakes newbies make are:
- Poorly prepared surface.
The level of complexity of pasting the joint of planes depends on their quality. If the apartment has crooked corners, then it will not be easy even for a specialist to complete the finishing properly. Of course, it is not always possible to make the wall joints ideal, strictly at 90 degrees, but there should be no deviations from the vertical. Therefore, spare no time and effort in preparing the surface - putty the walls or even plaster them;
Plaster corners will help you quickly and easily align external wall joints. During installation, they are leveled and then glued with plaster or putty. The price of corners starts from 30 rubles per 2 meters.
- Cutting wallpaper.
As a result of this decision, the edges of the canvases may diverge or, on the contrary, overlap each other unevenly, and accordingly, the gluing looks sloppy. Therefore, according to the technology, it is necessary to provide a slight turn onto the adjacent plane.
The exception is paper sheets that can be cut vertically. The only thing is that in this case, you first need to stick a thin strip of wallpaper onto the joint of the walls in case the joints come apart;
- Big twist.
If the joints of the walls are even, then such a mistake is not terrible, but in crooked corners a large turn will cause the strip to deviate from the vertical. As a result, all subsequent canvases will be glued crookedly;
- The canvases are not completely glued.
When gluing the canvas, many beginners do not push it all the way, as a result of which a small area located opposite the inner corner hangs in the air. This leads to the fact that over time the coating begins to peel off and even tear; - Poorly applied glue.
If wallpaper on a non-woven basis is pasted, then the glue is applied to the surface of the walls, and not the canvas. In this case, it is a mistake to work with a roller, which does not always allow you to completely coat hard-to-reach places.
Beginners are often interested in what angle should they start gluing wallpaper? If they are all level, then it doesn’t matter where you start gluing. Otherwise, start gluing from an even angle to avoid distortion of the stripes on the walls.
How to glue wallpaper in corners, on the ceiling and with a pattern?
There is no doubt that wallpaper is the most popular material for renovation.
When working with them, you do not need to level the walls to perfect condition or purchase expensive construction tools. But if this is the first time you have decided to do the renovation yourself, then it is better to have an idea of how to glue wallpaper in the corners, on the ceiling and with a pattern. Where do they start gluing wallpaper
? It must be said that in the days of paper wallpaper they started gluing it only from the window. This happened because they were glued overlapping, and this way the joints could be made less noticeable. Today, in the era of non-woven fabric and vinyl, wallpaper is applied using the “butt” method. But the window still remains one of the main landmarks. Why is this happening? The fact is that in our homes it is almost impossible to find the ideal angle. And if you align the first strip of wallpaper at a crooked angle, then a further error will occur such as skew of the canvas. But the windows and doors are located strictly perpendicular to the floor. It is along them that the first wallpaper sheet should be aligned. Well, in which direction you go next, it doesn’t matter anymore, the main thing is not to change direction.
How to glue wallpaper in corners? Method No. 1
So, you have leveled the first sheet, glued it strictly perpendicular to the floor and went on to glue it further on a flat surface. We've reached the corner, what's next? First, apply glue to the corner very carefully and do it with a brush, not a roller. Secondly, never glue a whole canvas onto such a surface. Pre-measure the angle and cut the wallpaper so that its edge extends only 2-3 cm onto the next wall. Otherwise, there will be folds and the same distortion, and, therefore, it will not be possible to properly join the next canvas. Glue a strip into a corner, extend 2-3 cm onto another wall and glue the next strip close to the corner. In other words, you glue it overlapping. In the corner, the resulting thin edge will not be visible.
How to glue wallpaper in corners?
Method number 2 There is another way to properly apply wallpaper. Wallpaper is trimmed in the corners. Everything is done exactly the same as in the previous version, only leave 8-10 cm for the overlap. Take the next piece of wallpaper and glue it strictly vertically to the floor, and from the corner at a distance of 3-4 cm. You will get an overlap of 5- 6 cm. Now you will need a long metal ruler and a very sharp knife. Using these tools, cut the resulting overlap strictly in the middle, but be sure to cut both layers at once. If the wallpaper starts to tear, you should wait until it dries. Then carefully peel off the top sheet, remove both cut strips and glue the top back. The result will be a perfectly fitted joint.
How to glue wallpaper with a pattern
Have you bought wallpaper with a pattern and already mentally imagined how it will merge over the entire surface of the walls? Here you need to know that such material requires matching the pattern when joining the canvases. To avoid making mistakes, you need to cut out the first strip, spread it on the floor and unroll the roll next to it. Now you need to combine the pattern so that all the stripes and fragments of the pattern match, and cut out the next piece. Most likely, you will have to cut off small pieces of wallpaper. Accordingly, the number of strips from one roll will decrease. This means that it is better to play it safe and buy one more. And one more tip: count how many strips you need for the entire length and cut them at once. And from the remaining wallpaper you will cut out pieces that will be pasted above the doors or windows.
How to glue wallpaper to the ceiling?
To do this beautifully and correctly, you should step back 50 cm from the wall and draw a straight line along the entire length of the ceiling. Glue the first strip of wallpaper strictly along this line, and subsequent strips will already come from it. That seems to be all the tricks. Now you know how to glue wallpaper in corners, on the ceiling or with a pattern.
Gluing technology
As you know, there are two types of angles:
Each type requires its own approach when pasting, so next we will separately consider the process of gluing wallpaper on external and internal corners.
Domestic
The sticker instructions are as follows:
| Illustrations | Description of actions |
| Surface preparation. Beginners often carry out priming of walls with their own hands only using a roller, however, as in the case of glue, it is difficult to properly process corners with this tool. Therefore, after priming the walls, be sure to “walk” through hard-to-reach places with a brush. | |
| Applying glue. If non-woven wallpaper is glued, as mentioned above, the glue is applied to the walls, not the canvas. | |
Gluing.
|
This completes the gluing.
External
Now let’s look at how to stick this finishing material onto the external joints of the walls yourself:
| Illustrations | Description of actions |
| Surface preparation. As in the previous case, the surface must be primed and glue applied if the canvas is vinyl on a non-woven base. | |
Gluing:
If the wallpaper has a pattern, with such a small fold, you may need to trim the edge of the second sheet to match the pattern. |
Many people are interested in how to protect wallpaper on outside corners? For these purposes, there are special decorative corners that are glued on top of the trim.
Here, in fact, is all the information on how to properly glue wallpaper in the corners.
Wallpapering external corners
If the edge of the panel that goes around the bend does not fit properly, several cuts are made on it diagonally and carefully pressed against the wall, making sure that no swelling is formed.
When gluing the outer corner, the overlap on the adjacent wall should be approximately 3 cm. The wallpaper must be thoroughly coated with glue and carefully distributed over the surface of the wall. If non-woven wallpaper is used, then the glue is applied to the wall and not to the canvas.
If there are switches or sockets close to the corner, you must first remove the covers, remembering to turn off the electricity in advance.
Conclusion
We got acquainted with all the most important nuances of wallpapering corners. Before you get started, watch another video in this article. If any of your questions on this topic remain unanswered, write a comment and I will be happy to answer you.
There are now high demands on the appearance of the interior. Owners of Khrushchev apartments, who have repeatedly glued paper trellises in their apartments, now do not dare to begin repairs with their own hands. They don't know how to put wallpaper in the corners to make the room look good. Vinyl and non-woven fabrics are more difficult to work with. They are heavy and require certain skills. If you properly seal the corners with wallpaper, then the next repair will not happen soon.
Preparing the corners
As you know, angles can be external and internal. Their preparation is almost the same, unlike wallpapering in the corners. The only difference is that the outer corner is usually set level, and the inner corner - along the plane.
The internal corner can be leveled both during the process of plastering the wall and after that. To simplify, they use a plastic painting corner with a mesh around the edges, but it will be quite enough to stretch it out as a rule, and when plastering along the beacons (if they are positioned correctly), the corner will stretch out on its own.
To finish the outer corner, use a painting metal corner. You can, of course, use plastic, but metal will provide the corner with greater strength. You only need to set the corners on the plaster mixture, although many advise using putty. Remember that putty is not used for leveling walls and corners, since the grain size of the mixture is very small and over time the corner will definitely fly out (perhaps without even getting to the point of gluing wallpaper to the corner of the wall).
Preparation is a rather important stage. This directly affects the answer to the question of how to properly glue wallpaper in the corners.
Uneven corners frighten novice craftsmen, but even ones are very rare
It is difficult to bring two planes together perfectly. Therefore, even with smooth walls, the corners have a lot of deviations. I had a lot of work and Vadik had to decorate his aunts’ apartments on his own. He was hesitant to start because he didn’t know how to properly glue wallpaper in the corners.
I decided to show my friend how to wallpaper the rooms of old houses in practice. One of my teams was renovating an apartment in a historical building. Vadik could see:
- preparation;
- alignment methods;
- how to use perforated corners;
- finishing the room.
The technology for finishing corners with wallpaper of all types is the same. Only thin paper trellises and fiberglass webs can differ. Work should begin from the front door of the room when gluing end-to-end. When applying the edges of strips of thin trellises - away from the window.
Preparatory stage - you can’t miss a single detail
Before you start gluing wallpaper in the corners and on the walls, you should rid the surfaces of the remnants of previous finishing materials (wallpaper, etc.). In this case, it will be much easier to carry out the subsequent stages of repair. If the wall surfaces are smooth, then the likelihood of bubbles or wallpaper peeling off after a short period of time is minimized. First, the wall is cleaned and puttied. Then the dried putty should be cleaned with sandpaper, and after that priming is done. Only after waiting for the primer to dry completely can you begin to figure out how to glue the wallpaper in the corners evenly and correctly.
Preparation and leveling makes subsequent finishing easier
When doing renovations in old apartments, I always putty the walls and install perforated corners. They simultaneously serve as beacons and protect the ledges from destruction. I choose cardboard ones if the inner corners have slight unevenness. In all other cases I use a PVC profile.
- I check the verticality of the walls with a laser level. You can use a plumb line. I choose a flatter base surface.
- I putty and embed the profile in the solution, leveling it.
- After drying, I smooth it with another layer of putty. For paper and non-woven wallpaper I use an additional finishing compound.
If customers don’t want to spend money on leveling and corners, then I simply fill up large depressions. I cover the corner with wallpaper, cut a strip 10–12 cm wide. I place it evenly on both walls, making cuts for a tight fit. After this, it is easier to glue wallpaper in the corners. If the top fabric has to be cut or the paper trellises burst, then thanks to the background made of the same material it will not be noticeable.
Advice! It’s better to align the corners well once than to fool your head every time you wallpaper a room.
Paste over the protrusions
The last strip in front of the corner is cut off so that it extends onto the other wall by approximately 2–5 cm, depending on the curvature. The greater the differences, the wider the approach. It should completely cover the most convex place by at least 8 mm.
For a better fit, I make notches with a sharp knife or just cuts with scissors. It is desirable that they be inclined towards the edge. I cover the corners with wallpaper and smooth out the main part first, then the strip around the corner.
How to glue wallpaper in the corners of an apartment?
Before you start gluing the wall from the corner, measure the width of the trellis and draw a line vertically along the level. I also check the condition of the corner. The side surface of the strip should go along the deepest dent. I paste it strictly vertically, according to the markings. Near the corner the edge lies flat. The protrusions are hidden under the wallpaper that was pasted earlier.
It is better to cut wallpaper with large patterns so that the lines match. A slight shift will not be noticeable.
I cut thick vinyl wallpaper using a ruler at a distance of 2 mm from the edge of the top sheet. Using a sharp knife, I cut both pieces strictly vertically along the entire height. I remove the excess and the canvases lie end to end. For strength, I put a painting mesh.
Advice! Use clear glue.
We start gluing from the door
My friend was able to see everything and now wallpapering in the corners did not scare him. Before you start finishing the room, you should draw vertical lines and check the condition of the corners. If there is no professional level, you can use a weight on a thread.
- We glue it with an overlap of up to 5 cm on the adjacent wall.
- Smooth the main fabric to the corner and glue it.
- We make cuts and tightly fill all the unevenness with wallpaper.
- We mark the vertical and, taking into account the pattern, glue the next strip end-to-end to the corner.
- Using a ruler, we cut both sheets at a distance of 1–2 cm.
- Remove excess pieces of wallpaper.
- By bending both edges we glue the painting mesh. Coats it with additional glue.
- We connect the strips end to end along the cutting line and press.
Before gluing wallpaper in the corners, make an approximate marking of the location of the stripes on all walls. If a piece of wallpaper ends close to a corner, immediately move the first strip. You can start with a strip cut along the length.
How to glue wallpaper with a pattern in the corners. Step-by-step instruction
Working with plain wallpaper is much easier than with patterned ones. But to enliven the room and get an unusual design, you will have to complicate the task and work with the selection of patterns.
To apply wallpaper with patterns to external or internal corners, you need to adhere to the following technology:
- Take measurements of the first strip and cut it off.
- Measure 2 cm from the cut edge of the first strip and draw a thin line with a pencil. Fold the fabric along the marked line.
- Do the same work with the second piece that will be glued (also make a margin of 2 cm and bend the fabric along the line).
- You just need to first adjust the pattern, which will match in both canvases if they are bent along the lines.
- Then glue 2 strips on converging or diverging walls.
When gluing wallpaper with a pattern, you need to match the pattern as accurately as possible. Despite the fact that the corner is pasted over, all errors will be clearly visible.
To make the work easier, you can follow the advice of professionals:
- Buy wallpaper that is plain or has a small pattern. Due to this, you won’t have to spend a long time selecting a pattern on the corners.
- Using wallpaper with a large relief pattern, you can hide minor unevenness in the walls (or prepare the wall in advance and level the walls with plasterboard).
- For work, use only a sharp construction knife, otherwise it will be difficult to make an even cut on the canvas.
- Be sure to use the technology of wallpapering overlapping corners. If the panels are glued end to end, they will come apart over time.
- If, after gluing the canvas, excess glue passes through the joints, it must be immediately removed with a clean cloth. It is not recommended to use a hard brush, which can damage the top layer of material.
- Carry out the work carefully, because some types of wallpaper are afraid of getting glue on them.
Anyone can master the technology of wallpapering corners. If you follow the instructions, be careful and take your time, you can easily paste wallpaper not only on internal and external corners, but also on arched structures and around window openings.
If you decide to make repairs, get ready for a complex process that will take a lot of time and effort. And turning to professionals will also be costly in terms of finances. Therefore, in order to save your money, we suggest doing at least part of the work yourself. For example, you can easily cope with such a process as wallpapering walls. The only difficulty you will have to face is the design of the corners of the room. As a rule, this work always causes difficulties.
Unfortunately, both apartment owners in old buildings and new buildings encounter uneven corners.
Often there are defects on the walls that prevent you from hanging wallpaper beautifully and quickly. What to do in such a difficult situation and how to glue wallpaper in the corners? Below you will learn about all the important points, and for clarity you can watch the video. Pasting corners: features
If you are pasting external corner protrusions, make sure that the wallpaper fits tightly to the wall, so it is not recommended to glue the entire strip to the corner at once.
If the joint of the walls is bad, it will simply gather in ugly folds. Moreover, the wallpaper should never end in a corner. It is necessary to leave an overhang of approximately 3 cm (if necessary, trim it with a knife). This way you can achieve a perfectly even pasting. When using thick wallpaper to decorate walls, use a plumb line.
If there are switches or sockets nearby, remove their covers and turn off the electricity. Next, glue the canvas on top, then cut out circles of smaller diameter than the casing itself. When finished you can put them back.
Preliminary preparation
It’s worth noting right away that all the preparation needs to be done long before gluing the wallpaper in the corners. First you need to remove the old finish and level the surface. To align the joints of the walls, use plastic corners, securing them with putty.
Then the surface is treated with a primer, which can be found in every hardware store. The primer is applied with a roller or brush.
Simple techniques to hide unevenness by combining
I told Vadik earlier that to create an original interior, a combination of different patterns and tones is used. After a tour of the ancient building, he expressed the opinion that the designers came up with such a technique to hide defects.
Before starting renovations, consider options for decorating the interior with companion wallpaper. First, cover the walls with trellises with a pattern, extending onto the adjacent wall. Then you create the transition with plain stripes. The cutting lines will visually look like straight corners. Irregularities will not be noticeable.
For those with no experience, combining is more accessible than wallpapering with a pattern. At the same time, you adjust the shape of the room and enlarge it.
How to choose the right wallpaper depending on the shape and purpose of the room
Wallpapering walls is an affordable modern means of interior decoration. Depending on the material used, you can hide some flaws and defects in the walls. People involved in renovation know that incorrect wallpaper application technology and haste lead to ugly consequences and a waste of time and effort.
Before you get started, read the instructions for applying wallpaper to walls.
Rules for gluing the inner corner
The seam where two panels meet end-to-end will become invisible after drying.
When gluing an internal corner, the wallpaper should be cut so that the fold onto the adjacent wall is about 1.5 cm. The glue is also applied to the wallpaper itself or to the wall, depending on the type of product. The place where the fold is in the corner should be pressed with a spatula so that there is no void left.
You can apply wallpaper correctly to internal and external corners yourself if you follow these simple rules.
What angle should you start from?
Properly hung wallpaper will look perfect in the interior of your home. To work you will need:
- wallpaper;
- wallpaper glue;
- ruler;
- roulette;
- dishes for diluting glue;
- pencil;
- roller and brush (different sizes);
- soft dry cloth or wallpaper brush (to remove air bubbles);
- sharp stationery knife;
- stepladder or chair.
Many people recommend starting work from the door, while others recommend starting from the window. In fact, it's the other way around. Previously, canvases were produced with a special edge for overlap. Therefore, we had to start gluing from the far wall with the window. Nowadays they produce different types of wallpaper, which are preferably glued end-to-end.
Under no circumstances should you start gluing the material from the corner.
Be sure to level the walls and prime them. Wallpapering uneven walls is not only difficult, but in some cases impossible.
For those who prefer to overlap, the first roll should be glued from the window. If you are not confident in your abilities, it is better to start from the doorway.
The main thing is to glue the first roll and then build on it.
Cutting wallpaper at corners
Cutting is a method of gluing wallpaper, in which the first sheet should be cut and glued in exactly the same way as described above, but the width of the edge left should not be less than 8 centimeters .
After this, you should take another canvas and glue it strictly vertically, stepping back a few centimeters from the corner. As a result, the overlap should be about six centimeters.
At the next stage, we arm ourselves with a wallpaper knife and use it to cut through the overlap exactly in the center. It is important that the cut is vertical .
To do this, take a plumb line and a long ruler. Try to cut through two layers at once. This is a complex process that is sometimes complicated by some unforeseen circumstances. Often the wallpaper breaks at the cut site.
It's not scary. You should wait until the wallpaper dries, then peel off the top layer and carefully remove the cut strips. After this, the top layer is glued back.
We are considering the question of how to glue vinyl wallpaper on a non-woven backing. Read about the use of gray wallpaper in the interior here. We look at photos from leading designers.
We learn about the color of furniture such as milky oak in our material on this topic.
Rules for gluing
The industry produces various types and types of wallpaper. There are paintable wallpapers - non-woven wallpaper. The advantage is that they can be painted in any color. An economical way of interior decoration, because the costs are only for paint.
The wallpapering technique requires sequential steps:
- wall preparation;
- temporary removal of skirting boards (if possible);
- diluting the glue according to the instructions on the package;
- lubrication of the canvas (sometimes lubrication of the wall is required);
- applying the roll to the wall from top to bottom;
- removing air bubbles and wrinkles.
The rules for gluing simple wallpaper (53 cm wide) differ from meter wallpaper (1 meter wide). At first glance, it seems that meter-long materials are much more difficult to glue.
It turns out that this is quite simple if you understand how to hang regular wallpaper.
There are a number of advantages that will change your mind:
- less effort and time;
- cheaper than standard wallpaper;
- creating a seamless effect;
- high quality (made in Belgium, Italy, France);
- creating an interior for every taste.
Before purchasing wallpaper, be sure to calculate the cost. For this, a formula from geometry is used: (wall + adjacent wall) x 2. And remember that the length of one canvas on the wall is taken with a margin of 5 cm. Always take a spare roll so that there are no shortcomings when you paste over door jambs and ledges. Be sure to check the length of the canvas itself on the roll in the instructions.
A mandatory safety condition is to turn off the power to the apartment or house. After disconnecting, remove the top panels of sockets and switches. When starting gluing, it is necessary to clean the room from dirt and dust.
Remove old wallpaper coverings using ordinary warm water. Wet the coating with water using a spray bottle and wait 20 minutes, after which the wallpaper will easily come off the walls. Remove paper using a knife or spatula. Vinyl sheets are easier to tear off using perforation.
It's much more difficult to get rid of paint. To do this, use a grinding machine or drill with a special attachment, but it is better to use chemical solutions for removing paint and varnish products.
Using the wet method of removing old coatings, less dust is generated and the plaster does not peel off. After removing the old coating, it is necessary to eliminate and repair weak points (cracks, potholes, bulges).
Be sure to level the walls and prime them.
Wallpapering on uneven surfaces is not only difficult, but in some cases it is impossible to do. A particular difficulty for beginners in this business is the issue of gluing external and internal corners.
Internal corner
Action technology:
- Applying glue to the canvas or, if necessary, to the wall. Be sure to lubricate the wall joint thoroughly, as this is the most labor-intensive part in the corner.
- The canvas is glued so that it overlaps the adjacent wall by 4-5 cm.
- Knowing the width of the material, stick the next wallpaper (2-4 cm) on top of the previous one.
- Trim the protruding parts and glue the top material in place.
If there are sockets or switches in the corner, you need to cut a round hole (smaller than the size of the switches) from the canvas in this place.
The presence of rounded corners contributes to the formation of air voids. Be sure to make an incision in this area and glue the material tightly. More glue is applied to this area.
External corner
The outer corner is especially noticeable in the apartment, so it requires strict accuracy.
There are 2 types of gluing external corners depending on the unevenness of the corner:
- If the angle is even, the canvas is glued so that it protrudes 3-4 cm on the adjacent side. Next is the gluing process using standard technology.
- Uneven walls. In this situation, the protrusion of the canvas onto the adjacent wall increases (4-5 cm).
It is necessary to measure the width of the panel and retreat another 5 mm. This way the gluing will overlap.
A cut is made in the middle of the overlap. Pull back the top part of the wallpaper and remove the protruding parts of the canvas. After removal, glue the top sheet in place.
Cuts are made on the convex surfaces of the wall and the material is pressed tightly against the wall. These methods are intended for overlapping gluing (for wide wallpaper). The designs of these wallpapers are designed to hide imperfections and protrusions.
These options are not suitable for standard paper webs. In this case, the first option with butt gluing is used.
We dilute wallpaper glue
How to properly glue wallpaper in the corners of a room? First you need to properly prepare the wallpaper glue. First, a little about the choice:
- Glue must be selected strictly according to the type of wallpaper.
- When purchasing, pay attention to the expiration date, as it exists for wallpaper glue.
- Glue is purchased with a reserve. The packaging usually indicates the average glue consumption, but for substrates with different absorbencies this figure may differ.
- Price is not a determining factor, so there is no point in overpaying for brands.
To prepare the glue:
- Use the proportions indicated on the package, which is especially important for beginners.
- Do not use too warm or hot water, as you may simply not have time to fill the pack completely.
- The glue is poured in slowly while stirring. This will prevent lumps from forming.
- You can mix manually (using, for example, a stick) or using a screwdriver and a whisk.
- Do not forget to maintain a technological pause, after which you need to stir the glue again.
The lifespan of diluted glue depends on its brand: usually 7-10 days.
If the walls are uneven
Perfectly straight walls are a rarity. Small errors in the unevenness of the walls are acceptable, but with large deviations and noticeable curved surfaces it is impossible to hide this when wallpapering. On the contrary, the appearance of the room’s interior is distorted.
If there are cracks, they must be sealed with cement mortar.
. For minor cracks, use gypsum plaster. Also, it will not be possible to paste wallpaper beautifully and efficiently. The appearance will not match the expected results. In such cases, preparatory work must be carried out. Putty will be your assistant in this.
Application rules:
- clean the surface from dirt and dust;
- tear off the old coating (if any);
- apply antibacterial impregnation;
- prime the wall;
- apply 1 layer of starting putty;
- apply a painting mesh over the putty (to prevent cracks from appearing);
- apply a second layer of putty;
- coat with two layers of finishing putty (thickness 2-4 mm);
- after complete drying, wash with a primer;
- remove all roughness and uneven surfaces using sandpaper.
Features of gluing
Working on smooth areas of walls, even with meter-long canvases, rarely causes major problems. But corner elements most often give rise to the following problems:
- In the corners you can see crumpled, creased, torn wallpaper. Look at the wallpaper you have pasted
Wallpapering cornerswith your own hands, are there any similar symptoms? If there is, then this will need to be corrected.
- It is the angles that can serve as a criterion for the professionalism of the finisher. If shortcomings may appear during his work, then in the corners they will definitely appear.
- In apartments and private houses, you can often observe a deviation of the geometry from the drawings. Horizontal and vertical lines can be called this quite conventionally. The unevenness of walls, ceilings and floors makes it difficult to properly hang vinyl or non-woven wallpaper, a meter wide, in a corner.
- If a person plans to become a master who glues wallpaper with high quality, then during training he should take special care.
Sticker according to all the rulespay attention to this aspect.
IMPORTANT! If you have well-made walls, high-quality materials, but when wallpapering in the corners of the room, creases and unevenness are visible, then this can completely ruin the whole renovation picture.
If you use not very expensive materials, but at the same time, all the lines are straight, then this immediately improves the overall picture. Therefore, if you are planning a renovation with your own hands, then you need to know how to properly glue wallpaper in the corners.
The procedure for pasting wallpaper in the inner corners
In apartments with a standard layout, the rooms have four internal corners. Without internal corners, difficult
Sticker diagram
imagine a living space. Therefore, it is when working with internal corners that you should pay attention.
Instructions
We start work from the corner. Let's move away from it to the width of the wallpaper and glue the first canvas. The pasting goes to the other corner, along a flat wall as you can see from the photo.
- Approaching the corner, it is necessary to calculate the number of strips so that the last section of the free wall is less than the width of the canvas.
- The wallpaper strip should be cut so that it overlaps the next wall by 20 mm, at its narrowest point.
- Carefully coat the wallpaper and wall with glue. Paste the wallpaper and carefully add the wallpaper to the wall using
Required overlapspatula, or roll with a roller. It’s not scary if the wallpaper on the wall is not hung vertically. The most important thing is that there are no folds in the corner.
- From the corner, on the adjacent wall, to the width of the canvas, draw a vertical line. Take a new canvas, apply the adhesive mixture to the wallpaper and wall. Glue the corners with wallpaper on a meter-wide non-woven backing, focusing on the drawn vertical line. After pasting, the new canvas should overlap the first canvas by at least 20 mm.
- Find the thinnest point of the overlap. Its width should be divided by two, and a vertical line should be drawn through this point. Take a ruler and a utility knife and cut through the wallpaper all the way to the base.
- Remove the two pieces of wallpaper that came out when cutting. Bend the edges, apply the adhesive mixture, and roll the seam well with a roller. After this operation, the seam will be without overlaps and gaps as in the photo.
IMPORTANT!
You should not cut blades if they are very wet, you will easily tear them and will not achieve a good quality cut. You need to wait for the adhesive mixture to dry and then cut the blades.
How to glue wallpaper in outer corners
There are two ways to wallpaper the outer corners.
The first method of wallpapering in outer corners
If the outer ledge is treated with putty and is perfectly smooth, and the remainder of the wallpaper strip to be pasted is large enough, then it simply wraps around the corner. In this case, the wrapped end does not need to be cut, and the next strip is glued in the same way as it was done on a flat surface.
The second method of wallpapering in the outer corner
If your walls are not perfectly smooth, then it is better to approach this issue more carefully.
Paste the first strip
First, you need to stick a strip of wallpaper on one of the walls of the outer corner so that one of its ends is turned at a corner by 3-4 cm. After this, we cut the wrapped end of the wallpaper vertically, leaving a thin strip around the corner, not noticeable through the second sheet.
Working with the second wallpaper strip
Next, you need to draw a vertical line on the wall, departing from the corner the width of the wallpaper and about 6 mm more. The next strip of wallpaper is glued along the drawn line. Its other edge should overlap the edge of the strip wrapped from the previous wall, but not go beyond the edge of the corner.
If after reading the article you still have questions, you can watch the video on wallpapering corners, presented below.
Features of gluing in internal corners
Pasting the first strip of wallpaper
On the wall where the wallpaper is already pasted, glue the next strip so that it extends 3-4 cm onto the adjacent wall. Then press this corner well with a dry sponge.
Try to coat the turn of the wallpaper with glue as thoroughly as possible; here you should press down harder on the canvas for reliable fixation.
Gluing the second strip
To do this, first use a ruler to measure the location of the farthest corner of the end of the wallpaper so that the edge closest to the corner overlaps the pasted strip by 2-3 cm. At the same time, we check the contour using a plumb line with a cord.
When the markings are made, glue the second strip of wallpaper onto the adjacent wall and press it again with a sponge.
Cut off excess wallpaper
After this, use a knife to cut both layers of wallpaper at the same time close to the corner; to ensure accurate cutting, it is better to use a ruler. The part cut off from the top sheet will fall to the floor. To remove the lower parts, you need to lift the top layer of wallpaper, then additionally coat it with glue and press it against the wall. Thus, a perfect joining seam should be obtained.