Types of door frames for installation
Door frame kits offered by hardware stores are divided according to installation technology into several options:
- Direct
- Diagonal
- Groove connection
Each of the mentioned methods has its own characteristics, so it would be useful to know the installation features before starting work.
Types of thresholds for interior doors
If you want to install interior doors with a threshold, then first you need to decide on the material from which it will be made.
The following types exist:
- Wooden. The most popular ones are made of pine and oak. They are most often placed indoors. Moreover, oak wood is much more durable than its pine counterparts. But they also cost more.
- Metal. These are more used for bridging the joints of floor coverings. They are single-level, multi-level and corner. The most popular metal ones are aluminum. They are much cheaper than brass and stainless steel. Their resistance to wear is higher than that of wood and plastic.
- Plastic. This type is a middle option between wooden and metal thresholds in terms of wear resistance. Their distinctive feature is their attractive, neat appearance.
- Stone. The most durable and expensive type. Its features include rather problematic installation into an already inserted frame (see How to assemble a door frame without problems).
Door frame with right angle
Installation using this method is the simplest of all those listed and is accessible even for beginners. It does not require special skills or specialized tools, and is quite accessible for self-installation of an interior door with a frame.
The structural elements are sawed down, taking into account the dimensions, at right angles, and connected using special hardware. The door frame can be installed either separately or together with the door.
Cashing: what to register for and how to install
There are several options for attaching cash. Most often, especially in the absence of additions, it is attached to finishing nails, which can be copper or steel. In my case, everything turned out to be much simpler. Cash was purchased specifically for doors with extensions. If you noticed, the grooves are visible in the previous photo. They are the ones who help fix it. As for fastening to the wall, the same “liquid nails” came to the rescue.
Having prepared the material, I measured the required length along the vertical posts, taking into account a 45˚ diagonal cut for the connection. After installing the cashing racks in place, the top strip was measured. In fact, no problems should arise in such work, especially if the door frame was previously assembled with your own hands.
Installing vertical cashing racks
In general, it turned out, in my opinion, quite decently. I'm not saying that I'm a complete amateur in this kind of editing, but my experience is minimal. I suggest you see what I ended up with.
Do-it-yourself interior door assembled and installed: the final result
Door frame with diagonal cut
Installing a box with a 45 degree cut has a much more attractive appearance.
When installing it, you will need a miter box, which will allow you to cut the planks more evenly. The connection of structural elements also occurs using self-tapping screws. Can be installed together with the door leaf.
Interior door frame with tenon connection
The peculiarity of this method is that the connection of structural elements occurs with a slight overlap, not exceeding the thickness of the plank.
It is characterized by a sufficiently high structural rigidity, which allows the use of this method for doors intended to operate in difficult conditions.
Some manufacturers supply the market with kits already equipped with a prepared end connection. Self-preparation will require additional tools and some experience.
Tools required for installation
When wondering how to properly install an interior door with a frame with your own hands, it is worth considering that successful installation of a door frame largely depends on the availability of high-quality tools.
Before starting work, you should prepare the following tools:
- electric drill or screwdriver
- building level
- angle grinder
- miter box
- self-tapping screws
- locksmith tool
In addition to the above, it would be useful to stock up on small wooden blocks of different sizes. They will be needed to properly coordinate the assembled frame in the doorway.
How to install an MDF door
The above diagram shows that the most important thing when installing a single-leaf or double-leaf door is the correct installation of the frame. However, fixing the door leaf can also cause difficulties.
In principle, installing an MDF door leaf is no different from installing a wooden door leaf. However, in the first case there are advantages: in a factory product, as a rule, many of the marks are already present.
It will also be interesting to learn more about how the insulation of a metal entrance door occurs.
The installation consists of several stages.
- While the frame is being installed, the door leaf serves as a template for the exact dimensions of the timber, as well as for checking the correct installation.
- Door hinges are first installed on the door leaf. Installation depends on the nature of the fittings: as a rule, they deal with a “butterfly” or other overhead or mortise hinge. At a distance of 20–25 cm from the edge to the end of the canvas, apply half a loop and trace along the contour with a pencil.
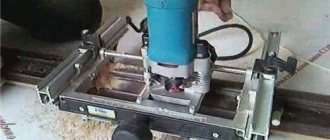
- The groove for the loop is cut with a chisel or a hand router. The fittings are secured with self-tapping screws. It is advisable to drill holes for them.
- The gap between the canvas and the frame slope is determined by the nature of the fittings. In any case, the gap should be large enough to accommodate the pivoting axis of the hinges.
- After installing the door frame, the leaf is hung on the hinges to check the correct installation. A door handle with a lock for interior doors is installed last.
- To do this, remove the sash, use a milling cutter or drill to select the material for the lock, and cut out holes for the handles. On MDF doors, as a rule, the places where the locks are attached are marked with stickers, and the locks and handles themselves are included in the kit.
- The technology for installing a lock and latch depends on their type. In any case, the counter part of the lock is installed after the lock is mounted in the MDF sash.
It is also worth learning more about how the installation of entrance door slopes occurs, and for this you should watch this video.
On video how to install an MDF door:
MDF door leaf is not uniform. It is advisable to use the areas indicated on the product for fastening, and drill holes for fastening. Pressed wood is not as strong as wood and requires care. Even if you made a slight mistake with the dimensions, MDF trim will completely hide the defects.
Door frame assembly
Assembly work must be carried out on the most flat surface possible; the correct fit of the door leaf along the entire perimeter of the frame will depend on this.
If it is impossible to find such a surface, you can get by with lining bars of suitable thickness.
Assembling the door frame at right angles
It is worth considering that with this connection method, the upper part of the box is attached to the upper ends of the side posts. Therefore, the length of the side pillars increases by six millimeters relative to the door leaf.
As a rule, when installing interior doorways, thresholds are not installed, so you should plan a gap between the floors and the door leaf within one centimeter.
Assembling a door frame with a diagonal cut
The preparatory work for assembling the door frame is similar to that described above, with the exception of some points.
The dimensions of the side pillars are calculated as follows: door height + thickness of the top bar + two gaps (if there is a threshold, 3 mm, if there is no threshold, 10 mm).
Angle cutting must be done using a miter box, this will help to avoid unevenness when sawing.
The location of the hinges is marked on a vertical post, at a distance of two hundred millimeters, both above and below relative to the door.
How to make a ceiling with your own hands - 135 photos and video descriptions of how to make various types of ceilings- Combined bathroom - stylish design methods and examples of competent interior selection (125 photos)
- How to make a heated floor with your own hands - 160 photos and video description of how to make a heated floor
The place where the loops are attached is deepened based on the thickness of the loop. A similar operation is carried out on the door.
Determining box dimensions
The first and very important stage of the entire assembly process is the accurate calculation, down to the millimeter, of the length of the sill posts, the threshold (if any) and the upper lintel.
Measuring the racks
The height of the racks should be equal to the height of the door. Typically, the standard door height is 2000 mm. Having made sure of this, we add the width of the gap between the door leaf and the door by 2-3 mm to the height of the door leaf. When installing doors with a threshold, the width of two gaps of 3 mm each must be added to the height of the door leaf, for a total of 6 mm. In the version without a threshold, we add only one gap measuring 3 mm, and add 1 cm at the bottom so that the door leaf does not cling to the floor when opening and closing the doors.
Related article: Design of a one-room apartment for a family with two children
As a result of accurate measurements, we obtain the following parameters: with the option with a threshold, the height of the doors and pillars will be equal to 2000 mm + 2 gaps of 3 mm = 2006 mm; with the option without a threshold, the height of the doors and pillars will be equal to 2000 mm + 3 mm + 10 mm of clearance = 2020 mm.
Measuring the threshold and upper jumper
The size of the threshold and the upper lintel of the door frame must be the same. Let us correctly determine their length, which will be equal to the sum of the width of the door leaf, the width of the gaps between the door and the door and the thickness of the profile beam from which the door will be assembled.
In addition, on both sides of the lintel and threshold sections, it is necessary to cut out landing sections, that is, cut off the protruding parts of the opening into which the door rests when closing. The cut should be equal to the thickness of the post at its widest point.
To correctly cut the samples, measure the thickness of the stand on both sides from the edge of the lintel and carefully cut it with a small hacksaw.
Next, having installed the jumper vertically, use a knife or chisel to cut off the excess part of the threshold or jumper.
After this, you can screw up the door frame with a calm heart.
Installation of a door frame in an opening
The finished door structure is mounted in the doorway and positioned along all planes. A laser level will allow you to get the most accurate installation; if you don’t have one, you can use a regular plumb line.
With the help of wooden spacers, the box is securely fixed in the wall opening. The resulting voids between the wall and the frame are filled with foam for installation work.
Before you start filling the voids, you need to check and fix the gap between the posts and the door leaf; it should be three mm around the entire perimeter of the frame.
The gap is fixed using wooden planks of equal thickness. After the polyurethane foam has dried, its remains are cut off with a utility knife, in the same plane as the doorway. The final stage of installation work will be the installation of platbands.
Assembly work on installing doors does not involve any difficulties. By spending a little time watching a video on how to install an interior door frame, you can learn the basic steps for installing it. By using this article, you can avoid major mistakes when installing it.
Door installation in 2 options
We chose the doors, found out the dimensions and tolerances, now we just have to figure out how to install the interior door ourselves, but to install the interior doors we need another tool and then a few words about it.
Tools and auxiliary materials
Tools, of course, come in different quality and different prices. For example, a miter saw is easier to work with than a hand saw, but it is several dozen times more expensive than a hacksaw. Therefore, we will try to limit ourselves to the minimum set of essentials.
- Hand saw;
- Wooden or plastic wedges;
- Hammer;
- Set of chisels;
- Electric drill;
- Level;
- Roulette;
- Construction square;
- Screwdriver;
- Knife;
- Plumb;
- Pencil;
- Awl.
Without high-quality tools and devices, it is impossible to install an interior door yourself.
Important! If your health is dear to you, then do not even try to cut wood with an angle grinder; the rules of T/B and the popular experience of craftsmen strictly prohibit this.
In addition, to install doors you need a small set of auxiliary materials:
- Self-tapping screws in assortment;
- Anchors
- Polyurethane foam;
- Masking tape.
How to prepare a doorway
According to the rules, preparing a doorway for installing an interior door consists of plastering and completely leveling the perimeter to zero. But since the gap between the box and the wall is often filled with foam, and then the whole thing is covered with a platband, there is no particular point in such work.
Before installing an interior door, it is necessary to at least roughly level the perimeter of the opening
In order to check the geometry of the opening, you need to measure it at 3 points horizontally (top, middle, bottom) and at 2 points vertically (along the edges). But the most important thing is to measure the diagonals, they should be the same. If there is a problem with the diagonals, then take a plumb line and find out where and by what distance the opening is deflected.
To install interior doors, the geometry of the opening must be ideal, and for this the diagonals must be the same, while the condition of the edges of the opening plays a secondary role
Important! If the installation of a double interior door requires increasing the width of the opening, then on the partitions the width can be increased without restrictions, and when working on a load-bearing wall, the opening can be expanded by no more than 50 - 70 mm. Otherwise, there may be serious problems, both with the wall itself and with the inspection authorities.
How to assemble a door frame
The supporting frame under the doors is assembled with your own hands in 2 versions. The first involves joining sections with trimming at 45 degrees, and in the second version, the lintel and side posts are connected at a right angle.
Advice! High-quality trimming of adjacent frame slats at 45º can only be done using a miter saw or a professional miter box; with a cheap plastic miter box you will simply ruin the frame. If there is no such tool, then join the box at a right angle.
Buying a cheap plastic miter box is a waste of money; such a tool breaks down after only 5 – 7 cuts with a hand saw
| Step-by-step instructions for trimming a door frame at 45º | |
| Photo | Recommendations |
| Trim the verticals The first to be trimmed at 45º are the vertical posts. | |
| Trim the ceiling The upper horizontal strip (lintel) is trimmed taking into account the gap between the frame and the door leaf of 3 mm. To avoid manually measuring with a tape measure, you can use pieces of fiberboard as a gap template. Just lay them around the perimeter of the doors and mark them. | |
| Check the cut Now fold the entire structure step by step and check it for distortions. | |
| Drill holes for screws Before assembling the box, we need to drill holes for the screws; without them, the box may crack when screwing in the screws. The standard diameter of the self-tapping screw is 3.5 mm, so we take a drill for it that is 2 – 2.5 mm. | |
| Secure the box with self-tapping screws. 2 self-tapping screws are driven into each side of the corner. At this stage, there is no need to tighten the screws tightly; you may still have to unscrew them. | |
As already mentioned, joining the box elements at right angles is an order of magnitude simpler than a corner connection, so it is better for a novice master to stick to it. In general, there is no particular point in trimming the frame at the corners, since the frame will then be covered with door frames and these corners will not be visible in any case.
| Step-by-step instructions for trimming a door frame at a 90º angle | ||
| Photo | Recommendations | |
| Try on the lintel If necessary, the top posts are trimmed at a right angle, but usually they are already trimmed. Next, insert the canvas between them, lay down templates from pieces of fiberboard and measure the size of the lintel.
| ||
| Trim the stock Now we are considering the case where the lintel is inserted between two side posts. Along the inner perimeter of the box there is a bar against which the door rests when closing. In order for the lintel to fit clearly between the racks, we need to cut pieces of this strip to the thickness of the lintel. To do this, the plank is cut with a hacksaw, after which it is chipped off and cleaned with a chisel. | ||
| Fix the lintel As in the case of corner trimming, you first need to drill a couple of holes on the side for the screws, and then drive the screws into them. | ||
| Diagram of a lintel above the racks Do-it-yourself installation of a lintel placed on racks is done in the same way, with the only difference being that the door stop strip is cut on the lintel, and not on the racks. | ||
How to embed awnings
For any door, installing awnings is considered one of the most important stages. You can embed them both before and after installing the box. But if you install the doors yourself and there is no one to help you, then it is better to embed the awnings on the floor.
Important! If the door swings open to the left, then you insert the canopies on the left, respectively, if the door opens to the right, then the canopies are attached to the right post. (It seems understandable, but amateurs often make mistakes).
There are overhead and mortise (hidden) canopies; overhead canopies are now called “butterfly hinges”. Working with butterflies is easier, especially for an amateur, so we will look at their installation in more detail.
| Photo | Recommendations |
| Mark the canvas under the awnings The distance from the upper and lower edges of the canvas to the canopies is 200 - 250 mm.
| |
| Screw the awnings to the canvas The small (inner) sector of the butterfly is attached to the canvas, and the large (outer) sector is fixed on the box. They are made on the butterflies, hidden under the heads of the screws, using them you will determine the front side. Next, drill holes for the screws and screw the canopy on. | |
| Mark the canopy on the frame We have the box assembled, now we need to put the door leaf with the canopies into it, insert pieces of fiberboard to ensure a gap of 3 mm and mark the sector for installing the canopy. | |
| Screw the canopy to the box In order to accurately screw the canopy to the box stand on the floor, in a lying position, you need to disconnect this stand from the lintel. Next, drill holes for the screws and fix the canopy to the stand. The final stage is the final fixation of the rack and lintel with self-tapping screws. | |
| How to install a hidden canopy Installing mortise awnings yourself is not much different from installing butterflies. Here, using a chisel and a hammer, a bed is cut out for each sector of the canopy, according to the thickness of the canopy. Otherwise, everything is the same as with butterflies. |
Methods for installing interior doors depend on the specific situation. Next, we will look at the 2 most popular options for installing interior doors.
Option #1. Classic door installation
At this stage, we have already assembled the box, doors are inserted into it, hinges are cut in and a lock is installed. Now this entire structure needs to be installed in the opening.
| Illustrations | Recommendations |
| Secure the box with wedges The installation diagram for interior doors using wedges is shown in the photo on the left. The wedges are driven in stages, in a checkerboard pattern, for example, one wedge on the left, the second on the right, and so on until all of them are included. If you go in a chain around the perimeter, the box will definitely warp. | |
| Check fixation Now take a plumb level and check the installation of the structure horizontally and vertically. If necessary, we weaken or, on the contrary, knock out the wedges in the right places. | |
| Fix the box In block and self-leveling houses, it is better to fix the frame with wooden anchors and self-tapping screws. The hole for the anchor is drilled through the box post to the required depth. Next, countersink the hole and drive in the anchor. The fixation point is decorated with an overlay. In addition to anchors, the box can be fixed with self-tapping screws, but if for anchors with a diameter of 8 - 10 mm 4 fixation points are sufficient (2 per post), then the screws are driven in increments of 50 cm. | |
| Blow out the perimeter of the box with foam At the time of filling with foam, everything must be assembled and installed, plus the frame is secured with anchors and fiberboard gaskets are inserted into the doors. The foam is blown in in doses, otherwise it can deform the box.
|
After installing the frame, you still need to install the door frames; this topic is quite extensive; detailed instructions in several versions with photos, videos and analysis of important points can be found “HERE” .
Option #2. Suspension mounting
Installation on hangers is usually performed when installing double-leaf interior doors. There the box is much wider and in addition to the side posts it is also necessary to fix the top crossbar.
A metal perforated hanger is considered the main fitting for arranging plasterboard boxes and its price is relatively low. The technology itself is not very different from fastening the box with anchors.
The size of perforated metal hangers is optimal for installing interior doors
- The assembly of the door frame and insertion of the canopies is carried out according to the scheme described above;
- Next you need to insert the structure into the opening and mark the installation points for the hangers. Typically, suspensions are mounted in increments of 50 - 70 cm;
- You take out the box and screw the hangers to it with self-tapping screws, there are 2 screws for each hanger, the holes are already provided there;
The hangers are attached to the box with a pair of self-tapping screws using a screwdriver or screwdriver
- Now insert the box back into the opening, wedge it and check the correct installation horizontally and vertically;
- Bend the suspension strips on both sides of the wall;
- Decide on the fixation point for the suspension and place marks on the wall;
- Bend the wing of the suspension and drill a hole with a diameter of 6 mm in the wall for a plastic dowel and immediately insert the dowel into it;
- Bend the wings of the hangers into place and fix them with a dowel-nail or self-tapping screw;
- At the last stage, the foam is blown in, after which the platbands are installed.
Dowel nails or self-tapping screws with plastic dowels are excellent for fixing hangers on the wall.