How to remove a sliding wardrobe door yourself: instructions from a master
What, for the better, distinguishes sliding wardrobes from their counterparts with hinged doors is their dimensions. It is the sliding system that allows, instead of a short wardrobe, to install a structure that is ceiling-high and 30% larger, due to the fact that there is no need to find space for a swing door.
Learning to remove a closet door
But when the question arises of dismantling such spacious furniture, certain concerns arise.
Sliding system design
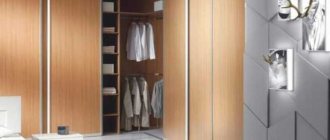
Its main advantage is the absence of a hinged door. In this embodiment, the door leaf moves along the guide, covering the adjacent leaf. Unlike an interior sliding system, the movement of the canvas in a wardrobe is limited by its volume. There can be several doors, but, as a rule, more than four are not installed, otherwise the guides - both upper and lower - will occupy too much of the wardrobe area. The photo shows a wardrobe with mirrored doors.
A more common design is in which movement is carried out along the lower rail, while the upper guide serves to support the blade in a vertical position. This method provides greater reliability, strength and quiet movement. If the weight of the canvas is too large, then another installation option is not allowed.
There are models in which the sash moves along an upper guide. This method is used for small wardrobe sizes and relatively light panel material, for example MDF or chipboard.
How to remove wardrobe doors step by step
- If there is a door closer installed on the doors of your closet, then you first need to remove it. It will be enough that you unscrew the closer from the door leaf. It is better not to disconnect it from the cabinet box. Then you will not have to re-adjust the closer when re-installing it.
- There are stoppers on both sides of the wardrobe doors, on top. You should unscrew the bolts on them one by one and remove the stoppers. Then they will not interfere with the doors moving off their guides.
- The wardrobe doors should be removed one at a time.
- Close the closet doors and lift the bottom corner of one of them. Using a screwdriver, spring the lower roller so that it pops out of the groove.
- Carefully lifting the door, gently pull its lower part toward you until it comes out of the mechanism.
- Lower the bottom of the door to the floor. And pull its upper part out of the guide.
- After you remove one door, the same actions should be performed with the second, third, etc.
- If your closet doors are very heavy, it would be better to have someone else help you when dismantling them.
And remember that the doors should be easy to remove. If something is preventing them from coming out of their guides, check that you have removed all the stoppers. Usually, they are the cause of difficulties when removing wardrobe doors.
How to remove a wardrobe door?
Share on social media networks:
There are often situations in life when there is a need to independently assemble or disassemble furniture. It seems to many that there is nothing complicated about this, but when faced with this process face to face, almost every home craftsman has certain problems. In particular, it is the use of modern technologies in the production of office and home furniture that stops work. Therefore, today we will answer the most common question: how to remove a wardrobe door yourself.
Types of modern sliding systems
Before removing the wardrobe door, you should carefully inspect the mechanism to understand what specific sliding system your furniture is equipped with. Doors are installed on similar interior items according to the two most common principles:
- The first type is considered the most reliable, due to this it is the most common. The mechanism in this design ensures the movement of the doors due to the presence of a lower rail. It is he who takes on most of the load that is created by the weight of the doors. Here is its main part, which carries out the movement. The upper guide serves to guide the movement of the sashes and also prevents them from deviating from the line of travel.
- The second type is considered cheaper. Compared to the first option, it is not as widespread and is significantly inferior in quality. We are talking here about hinged doors that are equipped with sliding wardrobes. This design option differs primarily in that the doors are attached via the top rail. It is there that the rollers are installed, moving along it, ensuring the movement of the doors.
Important! In the first version, rollers are present at the top and bottom, which ensures high-quality work and reliable fixation. Wall-mounted structures are installed in small-sized cabinets, since their doors are lightweight. The whole problem is that the suspended structure will not be able to work correctly under heavy loads. The disadvantage of doors of the second type is also that when opening and closing the cabinet they cling to each other or to clothes.
Importance of sliding mechanism cost
Consider the following properties of sliding mechanisms from different price categories to remove door panels with your own hands:
- In inexpensive models, rollers are equipped with guides located at the top and bottom of the door frame. Therefore, to remove them, it is enough to unscrew the stops on the sides and pull the doors out of the grooves of the guides.
- Expensive models use a more complex design of the fastening mechanism in all respects. They are equipped with door closers that hold the doors, and it is their dismantling that allows you to remove the doors yourself. To avoid unwanted damage and maintain operability and structural integrity, it is necessary to unscrew the door closer located inside the frame from the door leaf, and then the door will be removed without problems.
It is important to show maximum care and caution when performing such procedures, because the main thing is to do everything carefully, without using force and slowly, so as not to accidentally damage the furniture.
Important! As soon as you remove the door, immediately put the door itself and the tools used away away.
How to remove sliding doors from a wardrobe yourself?
In principle, with minimal experience with the simplest tools, any home craftsman will be able to figure out how to remove doors from a wardrobe. It is enough to perform simple steps to disassemble conventional furniture. For work, use an ordinary flat-head screwdriver.
Important! Despite the light weight of the door panels, be very careful when filling them with mirrors or plexiglass, because any careless or incorrect movement can lead to irreparable consequences.
Disassemble doors with a conventional sliding mechanism according to the following diagram:
- Start disassembling from the very first door.
- Lift the sash slightly, then spring the rollers from below using a screwdriver.
- Pull the door slightly towards you. You shouldn't use too much force here. If everything is done correctly, the rollers will easily go beyond the bottom rail.
Important! Do not extend the panel far from the cabinet itself, otherwise the upper guide may bend.
- When the sash comes out of the bottom guide, lower it towards the floor at a slight angle. The doors will come out easily from the top rail.
- Perform the same operations with the remaining canvases.
Important! You will complete all the work much faster if you use the help of another person. Perform all actions in a clear sequence so as not to violate the integrity of the structure.
If your closet is equipped with hanging panels, then you will have to act a little differently. Prepare an open-end wrench for work. Next follow the instructions:
- Stand on a chair and pick up the key.
- Loosen the clamping bolts a little, then pull the blade towards you.
- Once the door comes out of the grooves at the fastening points, carefully set it aside.
- Do the same with the other doors.
How to disassemble an old Soviet cabinet?
Wardrobes of the 70s and later periods of the last century were assembled mainly on eccentric ties, wooden dowels and screws. If you need disassembly and subsequent reassembly for moving, follow the instructions:
Stage No. 1: Shelves, drawers, handles
- Prepare the tools: rubber hammer, set of screwdrivers, screwdriver, chisel.
- Clear the floor near the cabinet so that it can be placed.
- Remove the shelves that rest loosely on the shelf supports.
Stage No. 2: Fasteners and mezzanine
Depending on the type of fasteners, remove them with the appropriate tool:
- The connection on the eccentric coupler is dismantled by turning a screwdriver inserted into the cross slot of the eccentric counterclockwise. The cylinder is removed by prying it off with a flat screwdriver. You can then quickly separate adjacent panels of the cabinet body.
Stage No. 3: Back wall, hinges, frame
- Use a chisel to pry up the plywood back wall and lift up the nails. Press the wall back down and remove the nails with pliers.
- Remove the plywood and the connecting strip, if any.
- Remove the fasteners in three corners of the box. Remove the released panels.
- Now disassemble the remaining fastening.
- Place the bottom with the support frame facing up. Remove the frame by unscrewing the screws.
- Also disassemble the mezzanine.
- In the Soviet wall, carefully remove the glass doors, freeing them from the hinge clamps. Then remove the loops from their sockets.
- All of the above also applies to Estonian-assembled furniture.
How to dismantle doors with additional elements?
You already know how to remove the doors of a wardrobe of a simple design, but it often becomes necessary to disassemble more complex mechanisms equipped with various additional elements.
Let's figure out how to act in the most common cases:
- Premium class cabinets are equipped with special closers that ensure accurate closing and soften the impact of the doors on the walls of the furniture. If you have them on your closet, you should initially get rid of them. There is no need to unscrew them from the frame; just remove them from the doors themselves.
- Some models are equipped with locks that prevent the rollers from jumping out of the guide rails. In this case, to remove the leaf from the bottom rail, you must first turn the lock upward 90 degrees and then remove the sash.
- There are designs equipped with an additional frame. When they are present, when closing the door leaves, they rest against it. It is even easier to solve this situation; it is enough to remove the fixing parts of the frame on the sides, after which the door with the guide can easily be rolled out.
Removing glue, repairing and replacing studs
As a result of long-term use and due to overload, the adhesive joints of chairs, tables, armchairs and other products are most often destroyed. Products become unstable and shaky. This occurs due to drying of the wood and poor quality glue. To disassemble and repair standard joints, an amateur carpenter must have a set of the following tools: a hammer, a mallet, chisels, a knife, a brace with drills, a rasp, a flat brute file, emery cloth, clamps, etc.
If the tenon products are weakened, the product must be disassembled, carefully removing the weakened tenons (without damaging the sockets or the tenons themselves). The spikes and sockets are cleaned of old glue with a chisel, rasp, or sandpaper - as a result, some looseness of the connection will be revealed. To eliminate it, use pieces of soft wood veneer or gauze.
Glue is applied to the tenon and into the socket, then, after wrapping the tenon with one or two layers of gauze, it is pressed into the socket using clamps or regular hammer blows through a wooden spacer. If veneer is used for sealing, it is cut to the width of the socket. After pressing, the ends of the gauze or veneer are trimmed and any glue drips are removed.
After gluing individual assembly units, the entire product is glued, clamped and kept under pressure for 20-30 minutes, then the clamps are removed and the product is held for 2-3 hours at a temperature of 18-20 ° C. The working methods are shown in Fig. 64.
Rice. 64. Repair of tenon joint (left)
Re-gluing joints on round and square dowels is done in the same way as regular dowels. To seal the joint, thin, durable shavings or gauze are smeared with glue and the mating elements are connected with light blows of a hammer through a wooden lining.
When repairing boxes with open tenons without disassembling them, to seal the tenons, inserts are prepared from wood of the same species and humidity^ from which the box parts are made. Inserts coated with glue are driven into the cracks until the proper density of the box is achieved. Remove any protruding glue with a damp cloth. After 2-3 hours of exposure, the inserts are cut off and the product is cleaned with emery cloth.
If a spike is damaged or broken during operation, it is removed and replaced with a new one. The tenon is made from wood of the same species and humidity, it must have the same color and texture. The length of the tenon block should be equal to twice the length of the tenon, and the size and shape of the tenon should be equal to the size and shape of the socket. The block prepared for the insert tenon must be secured in the part so that it completely replaces the broken tenon. To do this, select a groove in the part and insert a new tenon into it using glue. When performing this operation, a thin bow saw or cutter, appropriate chisels and other tools are used. The working methods are shown in Fig. 65.
Video material
Having analyzed all of the above, we can conclude that dismantling the wardrobe doors yourself is not at all difficult. And here you don’t have to be an expert; it’s enough to take the advice of professionals and follow the instructions given.
Reconstruction of filling and frame
If the wardrobe was installed ten years ago, and the apartment has undergone many changes during this time, the furniture product may not fit into the updated interior due to the shade of the wood or non-functional content.
The filling of most modern cabinets is made of white chipboard due to its low cost. However, it is still better to choose an edge made of PVC rather than paper. It is much stronger and more reliable in operation.
It is necessary to carefully consider all the distances - between sections, the height of mezzanines and shelves, the depth of the cabinet.
ATTENTION! When marking the cabinet, you need to remember that the thickness of the chipboard can be 16 or 18 mm! These values are very important!
Replacement of all chipboard parts is carried out as follows:
- Old elements are being dismantled;
- They are measured. Or a plan of new elements for the cabinet is drawn up;
- The chipboard is cut and the parts are glued with an edge on the visible side;
- With the help of a screwdriver, confirmations and screws, all elements are assembled into a single structure.
How to remove a wardrobe door
A sliding wardrobe is a practical piece of furniture that has undeniable advantages over its hinged counterparts. It makes it possible to save free space, is easy to use, has many variations in finishing, however, the cost of the products can hardly be called low. This is due to the high cost of sliding mechanisms, a significant amount of time and effort for assembly, as well as further installation. Costs await the owner even if any element breaks down - disassembling furniture is much more difficult than assembling it. How to remove a closet door so that they remain undamaged? It is quite possible to do all the work yourself, especially if in this case you are ashamed to use the services of a master or you want to save a little money. Removing sliding doors from a closet with your own hands is not a problem.
How to properly throw out a closet?
If the furniture is so decrepit that you decide to throw away the cabinet, then there are two options:
- Take out the entire wardrobe.
- Disassemble the cabinet for disposal.
Take out the entire wardrobe
You can move the cabinet without disassembling it by renting two lifting belts and inviting an assistant. That's what movers do. Carrying bulky furniture using belts is not particularly difficult. The technology can be mastered in a short time. If your home has a freight elevator, this will make the task much easier.
You can’t just put old furniture near the entrance or trash can. There is a specially designated place for bulky waste in each locality. Usually this is a solid waste landfill or simply a landfill. Residents of private houses were luckier. Burning waste in your own fenced area is not prohibited.
Disassemble the cabinet for disposal
In this case, arm yourself with a pry bar and a hammer. You can tear the doors out of their hinges by pressing them away from the body with a mounting spatula. Insert a pry bar into the cracks and separate the panels. Using a hammer and spatula, remove the filling elements. Collect everything disassembled into bags and take it to the garbage container site. Make sure this is not prohibited by your building code. Otherwise, use a waste removal service.
Wardrobe door mechanism
Having ventured into such a risky undertaking, you need to inspect the mechanism, first of all - a decisive attitude and motivation alone are not enough. There are only two principles for installing doors on a wardrobe:
- Cheap and not very popular, and the quality is questionable. The doors are hinged and move along the top rail.
- Reliable and widespread, and also more expensive. The movement of the doors is ensured by the lower rail, which takes on a large load, and the upper one performs a guiding function.
REFERENCE. The first type of mechanism is equipped with small cabinets whose doors do not have significant weight. The second is high-quality and reliable products, since in this case the sashes are firmly fixed and malfunctions are almost impossible.
We disassemble the wardrobe
Manufacturers are trying to simplify the process of assembling and disassembling furniture as much as possible, so for the job you only need a screwdriver and an assistant. In addition, it is recommended to immediately prepare a container for storing screws and other small parts, and also write down the sequence of actions. Before dismantling, it is necessary to remove all things, remove drawers and shelves. The same applies to glass elements and mirrors.
Removing the doors
The process requires care and accuracy, especially if the doors have a permanent mirror surface. Careless movement or haste can lead to damage, which means additional expenses. Procedure:
- You should start with the first door, which you need to slightly lift and pry off the lower rollers with a screwdriver.
- Next, the door is slightly pulled towards itself, and its lower part extends beyond the bottom rail. Excessive force is contraindicated here, otherwise the upper guide may be deformed.
- Finally, you need to lower the door down at a slight angle - in this case it will easily come out of the top rail.
The second door is removed in the same sequence. With an assistant, things will go much faster, and the likelihood of damaging anything will be much lower. If the wardrobe is equipped with hinged doors, then the procedure for removing them is slightly different. To do this, you will need a wrench to loosen the clamping bolts. Next, you should slightly pull the sash towards you and carefully remove it from the grooves. More expensive cabinets can be equipped with additional equipment, for example, closers, clamps, and an additional frame. In the case of closers and a latch, you should start with them, and in structures with a frame, you need to remove its fixing parts, which will allow the doors to roll out easily.
Removing cabinet shelves
Furniture shelves are located horizontally and are designed for storing things, while they are fastened with a variety of fittings:
- the eccentrics are removed using a Phillips screwdriver and are located under the shelves, which are removed by moving upwards;
- European-style screws will require a hex wrench, which can be used to unscrew the end fasteners first, and then the side ones;
- When fixing the shelf with hexagons, you will need to remove the covers of the plastic elements, and then unscrew the screws.
NOTE. Most often, fasteners are small in size in order to be as inconspicuous as possible in the structure, so you should fold them carefully so as not to lose them.
Removing the partitions and back wall
Finally, it is necessary to remove the partitions, following the same principle as with the shelves. There should be no difficulties with them, which cannot be said about the back wall, which is sometimes attached in a sophisticated way:
- if the wall is attached to everything possible (base, ends of shelves), then you should remove all the fasteners, of which there can be many;
- If it is fixed to the furniture lid and side walls, you can remove the wall only when the frame is disassembled.
To avoid problems associated with returning the cabinet to its original form, it is a good idea to record the sequence of actions or use the instructions that are often included.
Wardrobe repair: replacement of rollers and guides
Sliding wardrobes have become popular due to their spaciousness, functionality and the ability to be installed even in the smallest rooms. The design of a standard sliding-type wardrobe makes it easy to increase the number of shelves, change the design by replacing the doors with similar ones, only decorated with an original pattern, decorative inserts or mirrors. Despite the many advantages, almost every owner sooner or later faces wardrobe repairs. Replacing rollers and guides will be the topic of this publication.
Major breakdowns of the sliding system
Regardless of the structure and design, any sliding wardrobe consists of two main elements: the frame and the mechanical part.
The sliding system is responsible for the smooth movement of the sashes and their adherence to the vertical planes of the structure. If the cabinet doors open with force, and when closed there are gaps between the doors and the frame, this may indicate a failure of some component of the sliding device.
The main system failures are associated with:
- contamination of the guide groove;
- poor fixation of the track on the frame;
- incorrect location of the locking mechanism;
- failure of the lower or upper roller.
If the guide track is dirty, the cabinet door will move with great difficulty and jerking. The problem is solved by removing dust and debris from the groove with a sharp object and a vacuum cleaner.
During operation of the cabinet, gaps may appear between the doors and the body. This may indicate either problems with the frame or a broken fastener.
If a gap has appeared between the sash and the middle part of the body, this indicates that the cabinet is overloaded (experts call this a “barrel”).
In other cases, the culprit is usually a stopper that has fallen out of the bottom track groove. It just needs to be installed in the groove in its regular place and (if possible) secured with a fastener or polymer glue.
If the guide has “moved away” from the body, then you should dismantle the door and re-fix the track on the frame, screwing it with self-tapping screws through new holes drilled in the guide. Place the sash in its original place.
Mechanical design
The sliding wardrobe system has a lot of designs and modifications. Let's look at what one of the most popular Aristo systems, designed for two doors, is.
The diagram shows:
- Side profiles of open or closed type 1, in which the upper rollers 13 are fixed;
- Upper 3 and lower 6 track;
- Upper and lower rollers 13 and 14;
- The numbers 5 and 6 indicate the sash frames.
The design of the lower profile provides a mounting channel for the assembly screw, and its deep shelves house support rollers.
Instructions for replacing support and guide rollers
The first thing to do when replacing rollers is to dismantle the cabinet doors. This is done in different ways, depending on the design of the sliding mechanism used in a particular model.
For example, in the Komandor and Aristo systems, the door rolls only on support (lower) rollers. In order to remove the sash, you just need to lift it up and spring back the lower rollers: first from one corner, and then from the other.
In some models, to dismantle the door it is necessary to unscrew the upper and lower profiles and remove the door from the guides.
There is another common modification, where to dismantle the doors you need to unscrew the bolts that secure the upper rollers to the upper profile of the door frame.
You can get acquainted with the process by watching a short video:
Attention: Stoppers installed in the grooves may prevent the mechanism from moving off the guide
The locking mechanisms have different designs and can therefore be opened in the following ways:
- turning the locking flag;
- by bending down;
- method of removing the mechanism from the track;
Some systems do not use a locking mechanism at all.
If the stopper interferes with the process of dismantling the doors, then first open or remove the locking mechanism from the profile, only then lift the sash, pull its lower part toward you so that the wheels come out of the grooves, and remove the upper part of the element from the guide.
To replace the top roller of a sliding wardrobe with the Aristo sliding system you need:
- Remove the assembly screws from the top of the side profiles;
- Remove damaged elements;
- Install similar ones, paying attention to their design, which can be symmetrical (for closed H profiles) or asymmetrical (for open C profiles)
- After this, tighten the assembly screws (no. 15 in the diagram)
To replace the support rollers in such a system, you simply need to remove the wardrobe doors. These elements are not fixed and are located in the niche of the lower profile.
The only thing that may prevent the rollers from freely coming out of the profile shelves are the adjusting bolts (no. 14 a in the diagram). They need to be unscrewed using a hexagon socket.
Replacing the guide
If the wardrobe door jams in one of the positions, then the problem may be a damaged guide that needs to be replaced.
Rail profiles differ in design depending on the sliding mechanism used.
Important! You should not try to level this element of the sliding wardrobe system. It is almost impossible to do this at home, without changing the geometry, groove thickness and track shape. Defects in the guide can negatively affect the performance of the entire sliding mechanism.
We dismantle the doors of the wardrobe. After removing all the sashes, you can proceed to directly replacing the guides.
For this:
- Use a screwdriver to remove damaged guides;
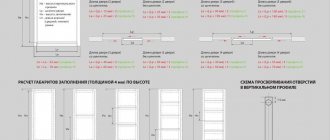
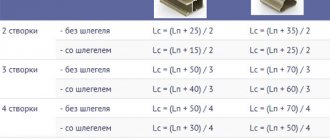
- Measure the new workpiece to size. Please note: the size of the opening gives the required length of the lower and upper guide profiles
- After cutting the workpieces to the required length, install new elements in place of the damaged ones.
Tip: for better fixation of the track to the frame, it is recommended to attach the rail to new fastening points. Old holes can be filled with a mixture of fine sawdust and PVA.
As a conclusion
Failure of sliding mechanism elements is one of the most common problems that every second owner of a sliding wardrobe encounters during operation. Repairing rollers and guides can be easily done with your own hands, saving a considerable amount on the services of a professional furniture assembler.
Did the article help? Rate it
Loading…
Source: https://mebsam.com/remont-shkafa-kupe-zamena-rolikov-i-napravlyayushhix.html
Features of the process and expert advice
There should not be any particular difficulties when disassembling the wardrobe if all actions are performed carefully and slowly. As for advice from masters, first of all, they recommend determining what materials the furniture elements are made of. For example, if the back wall is made of fiberboard, then you should make an effort not to damage it, or remove it first, if possible. The material is not durable and may develop dents or cracks. If the wardrobe is attached to the wall, you must first disconnect it, otherwise there will be no access to the back wall. For furniture consisting of several parts, each element is disassembled in turn, and if it is equipped with a mezzanine, then it must first be removed. The key to success is simple, as is the case with any furniture - all actions must be performed carefully and in strict sequence. This is the only way you can disassemble the cabinet without damaging anything, and then assemble it without any difficulties.
Main design elements
The wardrobe consists of several parts:
- housings;
- storage systems (shelves, rods with hangers, drawers or baskets);
- sliding mechanisms;
- components, fittings.
The outer box of the wardrobe has a regular geometric shape in the form of a square, rectangle, polygon or triangle. It is available with or without legs and is installed on floors. The case must be strong, assembled as rigidly as possible, otherwise it will move, the fasteners will weaken, and deformations will occur . The strongest cabinets are made from natural wood; products made from MDF and chipboard are not so durable.
The doors are equipped with guide rails made of metal profiles. They are screwed to the canvas with screws, screws, bolts. Wheels are attached to the top and bottom of the sashes. Most of the mechanical loads fall on the lower rollers and the frame fixed in the structure box. They most often fail and need repair.
Frame
Storage systems
Sliding mechanism
Components
All about doors
Sliding wardrobes have a huge advantage over their hinged counterparts. Saving useful space in the apartment, the ability to install large-sized structures, convenience and safety in operation, aesthetic appearance - these are not all the advantages of sliding wardrobes. From all these advantages, there are also disadvantages, because for any quality product you have to pay accordingly, in this case with financial resources and by investing more labor during installation. The working mechanisms of sliding systems are more expensive and complex than those of swing products, and therefore require more attention and labor during installation. In some cases, in order to install the cabinet efficiently and so that in the future the structure performs its functions correctly and without failure, it is better to contact a specialist.
Things are different when it becomes necessary to dismantle the product, because disassembling the structure is easier than assembling it. I don’t want to pay specialists for such relatively simple work, and a good owner would be a little embarrassed to call a specialist on this matter. Before disassembling, you need to read the instructions and perform all the steps one by one, one after another, as described in it. After dismantling, if there is a need to assemble the product, this will be easier than performing the initial assembly. In this case, the person who dismantled the cabinet already knows where all the structural elements should be, how and in what places they need to be secured.
Removing wardrobe doors, on the one hand, is more difficult than anything else. Unlike the frame elements, which are stronger than the doors, you need to be more careful here.
Dismantling glued joints
With traditional technologies for producing permanent connections (using welding, riveting, paper clips, etc.), the connection is disassembled with damage to the structural elements.
Since the task of glue, as well as riveting, is to provide a permanent connection, it is believed that during gluing, damage to the elements being glued will necessarily occur. The problem of disassembly arises during recycling, when the reuse of any materials requires the destruction of prefabricated structures, including unsticking. In this case, the remaining adhesive material does not have a negative impact on the environment. That is why the problems of disassembling adhesive joints began to be taken as seriously as the problems of gluing. One of the ways to solve the problem of disassembling and recycling glue is to design the product taking into account all stages of its life cycle, including the recycling stage. This allows us to consider the issues of its next disassembly already at the design stage of the adhesive joint. The principle of controlled disassembly. The main task is to improve the composition of the adhesive used for assembly in such a way that it becomes possible to carry out controlled destruction of the adhesive.
Special additives introduced into adhesive compositions should not have a negative effect on strength and durability. They begin to work only under the influence of an energy supply pulse (intense electric field, high-frequency vibrations, local overheating, etc.), i.e. directly during disassembly and do not affect the durability of the adhesive joint.
The mechanism of action of these special additives may be as follows:
- melting followed by decomposition;
- decomposition under the influence of magnetic, electrical and other radiation;
- evaporation in microcapsules, the swelling of which leads to the destruction of the glue.
The most effective is the last method. The mechanism of this effect is somewhat similar to the foaming mechanism that is used to create foaming adhesives.
Adaptation and optimization
Many consumers of adhesive materials, taking into account the problems that arise during disassembly and disposal of adhesive joints, began to introduce additional requirements into technical specifications for the development of new materials. As a result, new tasks arise:
- it is necessary to change the general approach to the creation of adhesive materials, which leads to an increase in their cost;
- it is necessary to develop new methods for obtaining capsules, which also leads to an increase in cost;
- destruction of the glue allows you to disassemble the glued joint, but it is necessary to completely remove the remaining glue from all surfaces of the parts being glued.
Significant achievements in this area can be achieved by creating a new group of materials that will promote rapid destruction of adhesives under the required conditions.
Conclusion. The reader may have an opinion about whether it is appropriate to end this chapter with a discussion of the problems of disassembling an adhesive joint?
In our opinion, this is appropriate, since the problems of strength and durability of glued joints are complex and require consideration of all emerging problems from a variety of points of view. Only with this approach:
- we can expect new advances in chemistry, physics, rheology, and mechanics, which will make it possible to create new adhesive materials;
- new, highly effective methods for assessing the probability of failure-free operation of an adhesive joint will be developed;
- New gluing technologies will be created that can significantly reduce the duration of the technological process.
It is worth paying special attention to the fact that knowing how to glue is one thing, but knowing how to glue is completely different. Knowing how to disassemble glued structures, you can learn how to glue them. Bacteria, insects, mollusks and even crustaceans are fully capable of destruction methods. This means that the book is missing another chapter on biological bonding. It will be written later, when man can penetrate the mystery of nature and understand the gluing technology used by living organisms.
Types of sliding systems
Before you start work, you need to inspect the mechanism to figure out what kind of sliding system is installed on your cabinet. Doors on this piece of furniture are installed according to two principles. The first type is more common and reliable. The design of the mechanism ensures that the door leaves move along the bottom rail. It takes on the main load created by the weight of the doors. The main part of it that carries out the movement is also located there. In this case, the upper guide serves only to guide the movement of the doors and prevent the doors from deviating from the line of travel.
The second option is cheaper. It is not as common and is inferior in quality to the first. We are talking about hinged doors installed in wardrobes. The main difference between this type of design is that the doors hang on the top rail. There are also rollers installed there that run along it, moving the doors. In the first version, there are rollers both at the top and bottom, which provides more reliable fixation and high-quality work.
Wall-mounted systems are installed on small cabinets, the door leaves of which are lightweight. The fact is that the hinged structure will not be able to work correctly if it is subjected to heavy loads. Another disadvantage is that when opening and closing the closet, the doors can catch on each other or on clothes. This also makes a significant contribution to reducing the service life of the cabinet.
Removing sliding wardrobe doors
To remove doors from a conventional wardrobe, you need to do a few simple manipulations. To work, you will need a flathead screwdriver and another pair of free hands.
Although the door leaves are not heavy, if plexiglass or a mirror is used as their filling, then any incorrect and careless movement can lead to irreparable consequences.
Disassembly must begin from the very first sash.
So, how to properly dismantle doors:
- Lift the sash a little and use a screwdriver to spring the rollers from below.
- Pull the canvas towards you. Do this carefully, without applying much physical force. If you do everything correctly, the rollers should easily clear the bottom rail. Do not extend the panel far from the cabinet so as not to bend the top guide.
- When you slide the sash out of the bottom guide, carefully lower the leaf towards the floor at a slight angle. The doors should come out easily from the top rail.
To remove all other sheets, perform the same operations.
It will be much easier to dismantle the doors if you involve an assistant in the work. Perform all steps extremely carefully and in order so as not to damage the structure.
To remove the hinged sliding door of the closet also does not require much work. Here you will need an open-end wrench and one assistant who will hold the blade while you unscrew the fasteners.
In order to dismantle, take the key and stand on the stool. This will make it easier for you to reach the clamping bolts. Loosen the clamping bolts and pull the blade towards you. When it comes out of the grooves at the attachment points, set it aside. Do the same with all the other doors.
Bottom cabinet rail
Instructions for dismantling standard wardrobe door systems
To remove the doors yourself, you need to do a number of simple manipulations:
- The nearest door leaf is dismantled first. You need to slightly lift it from below and pull it towards you. The guide wheels should come out of the rails.
It will be useful: Pantograph sofa transformation mechanism, what is it?
It is more convenient to dismantle wide canvases with two people. Although the canvas itself is not a heavy object, it is more convenient to lift and remove two corners from the guide profiles at the same time.
When you pull the door leaf towards you, you do not need to apply force to it. Do dismantling carefully so as not to bend the filling. Especially when working with materials like bamboo.
- Once the wheels are out of the bottom rails, you can proceed to the next step. Keeping the doors raised above the floor at a slight angle, we slowly move them out of the upper guide rails. We pull towards ourselves and down, as shown in the video.
To avoid unnecessary risks when dismantling the sliding system yourself, ask someone to help hold the structure. This advice will be useful in the following cases:
- the canvas is too wide and inconvenient to be grasped on both sides by one person;
- as a filler - glass or mirror.
- In exactly the same sequence we carry out the steps to dismantle the far door, which is deeper.