Pull-out and built-in ironing boards
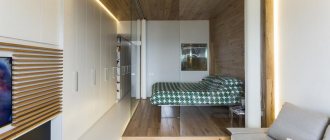
From the name it is clear that such boards are integrated into special furniture niches. They are great for studio apartments or one-room apartments, as well as in the homes of those who strive for ergonomics.
Built-in boards are great for small spaces.
Usually they are built into wardrobes or dressing rooms, where the board is “hidden” in a niche behind a mirror or decorative panel. Also, a folding board can be mounted in a chest of drawers or a kitchen set.
Typically, boards are built into dressing rooms or wardrobes.
When unfolded, the household accessory is no different from the floor board, with the exception of the folding mechanism and type of support. They are made from pressed sheet materials, plywood or metal, with a layer of filler covered with heat-resistant fabric.
When unfolded, the built-in board is no different from the stationary one.
Pull-out telescopic frames for wardrobes
To equip the interior space of the wardrobe, a useful device has been developed that provides a new higher level of furniture comfort - sliding telescopic frames with steel ball guides. The main advantage of these mechanisms is their independence from the width of the internal opening of the sections. The frames are designed in such a way that they can be expanded to the required width, due to which they are installed in any of the compartments having a clearance in the horizontal plane from 410 to 970 millimeters. Since the range of sizes is quite large, manufacturers produce frames for openings with different widths: • 410-550 mm; • 550-690 mm; • 690-830 mm; • 830-970 mm;
Frames are available for sections with a depth of 360 and 500 mm, which allows you to equip not only standard but narrow sliding wardrobes with these sliding mechanisms. In addition, these devices have another useful quality - they can be equipped with different types of baskets for storing things, making it easier to maintain order at each level in wide sections of the case.
Sliding frames are equipped with high-quality telescopic guides for partial or full extension, which are characterized by silent, smooth running and high reliability. Their frame is made of durable steel wire with a quadruple galvanic or powder metalized coating. The diameter of the wire is designed so that the frame can easily withstand the operating load. In addition to imparting rigidity to the structure of the retractable mechanism, horizontal wire jumpers are designed to fix various baskets, nets, trays and clothes hangers on them.
We use Italian Vibo sliding frames to fill sliding wardrobes. This fittings are not only reliable and convenient, but also look great inside the case, making it stylish and modern. By equipping the lower compartments with such sliding mechanisms, you can independently, using dividing elements, baskets, trays and hangers, shape the interior space of the wardrobe during its operation.
It would seem that how is it even possible to iron without an iron?
All photos pixabay.com
There are millions of homes that don't have an ironing board because you don't have the space to store one, you don't have enough money, or you just hate ironing. There are those who don’t have an iron or even time to buy one. If you are one of those people for whom an ironing board is not a friend, and you have never seen an iron in your life, then these chips are for you.
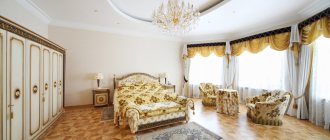
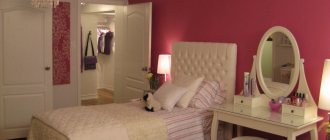
Installing an ironing board in a closet
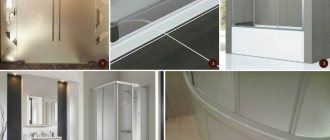
When folded, the pull-out ironing board in the closet should align with the drawer. The most comfortable models to use are equipped with rotating mechanisms.
The pullout board must be the right size for the drawer.
However, pull-out boards are often inferior to folding boards in terms of convenience: they are often built into kitchen units, and due to the limited space, using them can be problematic.
Pull-out boards are often built into kitchen units.
Folding boards are not only more convenient, but also easier to manufacture. They are mounted on a metal frame, which is fixed on a wall, shelf or in a niche. The most practical are boards attached to a shelf.
Folding boards are much more convenient than retractable ones.
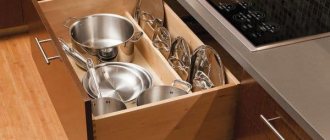
Firstly, you immediately have access to the drawers where the laundry is stored.
Secondly, the space is used ergonomically and there is no need to allocate additional space for household appliances. Thanks to the adjustable support, the board can be fixed at a convenient height.
The board can be fixed at a convenient height.
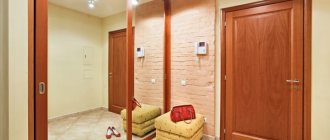
A type of folding boards are hidden boards. Their difference is that the equipment is stored behind a decorative overlay. Most often - a mirror or panel that slides according to the compartment principle or opens in a hinged manner.
Hidden boards are hidden behind a mirror or decorative panel.
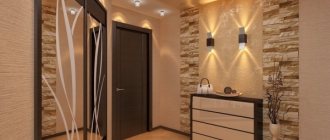
Ironing board on the door
Ironer on the door
For expressive personalities who can slam the door in the heat of the moment, this option is clearly not suitable. But if you have a calm character and like to decorate your interior, you may be interested in the placement of the board on the door. You can attach it using the same principle as on the wall, using hooks. Just for reliability, so that the ironer does not rattle every time it opens and closes, mount a few additional nails into the surface of the door and bend them. If necessary, you can use them to fix the ironing board, and it will be firmly secured.
DIY ironing board built into the closet
To assemble the board with your own hands, you first need to allocate space for the ironing board in the closet.
First you need to decide on a place for the board in the closet.
Attention! It is necessary to take into account the dimensions of the board. To use the mechanism comfortably, the lower limiter is placed no higher than 80 cm from the floor.
For comfortable use, the board must meet certain dimensions.
How to do:
- choose the size of the product, standard dimensions will be 120x30 or 130x40 cm;
- Focusing on the parameters, cut out the workpiece and, if possible, round the edges;
- take two beams (standard dimensions 3.5x4x30 cm) and three beams (standard dimensions (3.5x4x110 cm);
- process the parts using a jigsaw and milling machine;
- on long bars, make two marks - with an indentation of 52 cm on one edge and 58 cm on the other edge;
- drill through holes (drill diameter 8 mm);
- connect the bars with M10 bolts, turn the middle one 180 degrees;
- on short beams, make 2 holes on each side - retreat 3 cm on one side, 2 cm on the other end (drill diameter 8 mm);
- connect short and long bars;
- fix the support on the tabletop with a distance of 18 cm from the edge;
- using a milling machine, make a small recess on the other edge of the tabletop, it is necessary for the folding leg;
- make upholstery according to the dimensions of the tabletop (taking into account allowances of 10-20 cm, the standard size will be 150x50 cm);
- secure the covering to the board using a furniture stapler.
This way you can make your own built-in folding ironing board.
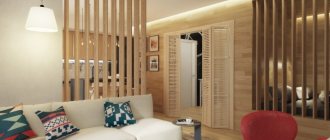
In a wall cabinet
If you like to make furniture with your own hands, you can make a special wall cabinet for the ironing machine. This will make your interior more harmonious and attractive, as well as functional.
Ironing board in wall cabinet
The ironing board can be hidden in a single cabinet or the design can be supplemented with shelves for storing household chemicals and various small items. And don’t forget that such a piece of furniture should fit harmoniously into your interior, so think carefully about its color scheme and the material from which it will be made.
Compact cabinet for ironing board
It’s so convenient not only to hide the board, but also to use it for its intended purpose.
And a few more important details that should not be forgotten: • Place the place to store the ironing iron next to the outlet. • Keep the iron and socket out of the reach of small children. If the outlet is located at a low level, cover it with special protective plugs, which are sold at any hardware store.
Wooden ironing board cabinet
A great way to hide not only the ironing board, but also the socket.
yfnecz
source: https://odomah.org/637684255564499148/
Where can I buy a finished board?
Manufacturers and stores do not often offer such products in finished form. However, an ironing board for a cabinet can be made to order in any furniture workshop or company that produces components.
Built-in boards are often manufactured off-the-shelf.
The optimal solution is to check with the manufacturer when purchasing furniture whether he can additionally produce an ironing board for the cabinet.
The folding board can also be made to order.
This will guarantee the perfect integration of the household accessory into the interior space of the furniture.
Ironing blanket
Aliexpress
The ideal covering is an ironing blanket. It sounds strange, but it is true and really very convenient. Available in several sizes, ironing blankets are typically made from silicone-coated cotton that is heat and burn resistant. Many are coated with non-slip foam, making ironing easier. Blankets can be easily folded and put away.
Even if you have an ironing board, there are times when you don't want to set it up just to quickly iron a collar or iron a single crease. An ironing blanket will help you with this.
Metamorphosis of the ironing board, or a new image of such a necessary accessory
My ironing board is a pensioner with a lot of problems, and then the support collapsed. Somehow I adapted, but what kind of life is this... So I decided that it would be necessary to resuscitate the old woman. And then I’ve come to such a point of life that it’s scary:
I'll try to magically transform my worker. The idea has matured; there will be not just an ironing board, but a whole complex - two in one. And now we quickly figure out in our minds what we are missing and run to the hardware store to buy varnishes, paints, rollers and other attributes of the creative itch.
The process has begun. At the first stage we will build a bedside table. Its size is assumed to be: H100cm x W50cm x D40cm. And for it we need two side parts and five shelves. The necessary parts were sawn from pine furniture board:
Next, we paint these very details in the color you like. I liked the gray one with a slightly brownish tint:
After the background painting, we go over the parts with smoky white glaze paint, and then coat it with two layers of varnish and send it to dry:
In this way I processed: two side parts only on the inside (I just painted the outside sides with background paint), four shelves on both sides (top-bottom), and for the fifth shelf I processed only the bottom side (the top side remains in its original form). Even if some of this is not entirely clear, everything will become clearer in the future.
Now it’s time for a creative impulse. We take our side parts, structural paste, palette knife and a beautiful stencil. Let's create!
This is what you should get:
After the structural paste has dried, we lightly go over it with sandpaper:
And then paint over with background paint:
And varnish:
When everything is dry, take bitumen varnish, a thin brush, white spirit and a soft cloth. Gently apply bitumen varnish to the relief with a brush, and then also carefully remove the bitumen varnish with a cloth soaked in white spirit:
Here's a blunder:
We cover our flowers with shellac, and then the entire surface with two layers of furniture varnish (of course, with each layer completely drying).
Next, I drilled holes for dowels in all the shelves, and, of course, in the appropriate places on the inside of the side panels:
Assembling our bedside table:
Now is the time to prepare the back wall:
Painted, patched and attached. It turned out interesting with the holes:
Yes, and for even greater reliability, I tightened the cabinet with self-tapping screws and attached small legs.
What's next on our plan? Remember, we didn’t process one side of the shelf in any way, so now it’s its turn. This is the top of our bedside table; my steam generator will be on it. When I ran to a hardware store, I came across defective remains of a mosaic (well, like defective ones, there were tiles missing in places). Having my eye on the ridiculous price, I bought a few things; in addition to the price, I really liked the color. So, returning to the topic, I will decorate this very top with mosaics:
We glue the mosaic with a special mastic, when the whole thing has hardened, you can rub the seams:
After washing off the excess grout, we get:
Now let's move on to the ironing board itself. We remove the old cover, remove the old caked backing, cut out a new one from fleece instead, I made it in two layers:
I sewed a new case from harsh linen fabric:
I attached a leg-support from a shovel handle to the board (I had to run to the hardware store) and simply wrapped it with jute rope:
The design turned out to be stable and reliable, and has already been tested in action. There is also storage space, which is never superfluous. Now I’ll try to explain why I chose this option: firstly, for the last four years I haven’t cleaned the ironing board at all, I have it constantly in use; secondly, here on the shelves it is very convenient to store all sorts of ironing accessories (spray bottles, sleeves, gauze, etc.), all these things are always at hand; thirdly, my iron-steam generator has its own stand-base, which barely fit on the metal extension that was originally there, but now not only the steam generator, but also various devices are quietly placed on the mosaic platform, and all this does not threaten to fall off every second. And I really value comfort and convenience in the work process! And since I’m going to get my own workshop in the near future, this is just the thing! Regarding the height, everything is individual, I chose the optimal height for myself, 98 cm.
The magic is very small, but I still sit and admire: