How to make a phone stand with your own hands: options for the office and car
Whether at work or in the car, we all need to be connected at all times.
At the same time, you don’t want to spend a lot of money on expensive stands, because they can be made from waste and used materials. Card stand.
The simplest version of a phone holder is a card stand. To make it, you need to carefully bend the unnecessary plastic card in two places, as shown in the photo below, without allowing it to break.
Experience shows that a plastic card stand is very reliable and can even withstand air travel during severe turbulence.
Stand made from office clips.
To make a phone stand from paper clips or binders, as they are also called, you will need one large and one small clip. The legs of the small clamp should be placed between the holding part of the large clamp and the resulting structure should be placed on the table so that the larger clamp rests on its surface.
Similar coasters can be made in five minutes from clothespins.
Paper clips make an excellent car stand. To make it, you need to disassemble a large clamp and slightly bend the metal parts, as shown in the photo below.
To avoid damaging the surface of the phone, it is recommended to wrap metal fasteners with thread in several layers.
We return the holders to their place, additionally securing them with adhesive tape and a rubber band. We attach the clip to the ventilation blinds. The phone is securely attached between the metal parts of the binder. Paper stand.
Ordinary office paper, folded in a certain way, can even support the weight of a large smartphone. To make a paper stand, you need to measure the dimensions of the phone and adjust the pattern below to fit them.
Cut the piece out of paper, fold it along the dotted lines and insert the side parts into the slots. This design is good because it allows you to charge your phone without removing it from the stand.
What to make it from?
A phone stand is a low-tech product, but, unfortunately, the possibilities of plastic molding and metalworking at home are extremely limited. Therefore, next we will look at how to quickly and easily make your own smartphone holder for a table at home or in the office, as well as a pendant for charging and a tripod for photography; Automotive, wearable, body/wrist, and other special holders still require the use of industrial technologies, and homemade products of this kind can damage the device beyond the warranty.
A simple desktop phone stand can be made in many ways from various available materials (see next figure): stationery, paper, packaging and craft cardboard, wood, plywood, cases from old tape cassettes, etc.
Homemade phone stands
Methods for its manufacture that satisfy the following conditions are discussed below:
- The stand must be completely stable on the supporting surface, both with and without the device. Justification - ask any workshop accordingly. profile, how much it costs to replace a smartphone’s “glass” – screen-touch panel – that is broken when accidentally dropped;
- When used systematically for a long time, the stand should not leave visible marks on the touch screen and the body of the device or otherwise cause damage to them, see below;
- The phone should not be firmly fixed in the holder, so that snatching it in a hurry would not damage the device. That is, a homemade telephone stand should support it freely, but not hold it by force. High-quality branded stands with rigid fixation are equipped with emergency release mechanisms (“unsnapping”), which is, to put it mildly, difficult to do yourself;
- It is highly desirable that the smartphone holder be made from scrap materials at hand without the use of expensive special tools;
- It is equally desirable that the technology for manufacturing a smartphone stand does not require any significant production skills from the manufacturer. A good phone stand is one that a child in the older group of kindergarten can make.
Note: good stands for smartphones are made from plastic cards (see figure), but they are low-tech for home use - to bend the card evenly as needed, you need an electric soldering iron with a special nozzle and fluoroplastic film. The option - industrial heater on low gas, a punch and a matrix - is even less technologically advanced if you do not have a sufficiently equipped home workshop.
Plastic card phone stand
Just in case you decide to take it, see the video:
Video: plastic card phone stand in 1 minute
We study popular options for stands for home comfort
A desktop phone stand for the home should not only be comfortable, but also durable, stylish and fit well into the interior of your home.
Let's consider options for such products. Stand made of newspaper tubes.
A phone stand made from newspaper tubes will be a wonderful gift and an excellent decoration for any interior.
To weave such a stand, you will need several pre-painted long newspaper tubes, scissors, knitting needles, a little glue and varnish.
We place six blanks parallel to each other at a distance of approximately 1-1.5 cm and firmly fix them in the machine or in any convenient way. We place knitting needles or wire in the outer racks to make it more convenient to form smooth and neat contours of the product. We begin to braid the base with a working tube using the rope technique or calico weaving. We monitor the parallelism of the rows and, if necessary, coat them with glue for better fixation.
We weave a rectangular piece of the required length. We take out the knitting needles or wire. The ends of the stands are carefully tucked in and trimmed. We give the workpiece the required curved shape, if necessary, wetting it a little with water.
Similarly, we weave the leg of the stand using fewer tubes.
We bend the finished leg, install it on the main part and secure its posts between the rows of the stand. We cut off the excess and hide it. We coat the product with glue, if desired, additionally paint it and cover it with 1-2 layers of varnish. After complete drying, the stand can be used for its intended purpose. Stand made of origami modules.
Modular origami is a fairly young, but very popular type of needlework. With its help, you can make many unusual and original gizmos, including a phone stand from modules.
To make the stand you will need double-sided paper in blue and pink. We cut the sheets into blanks and fold the modules.
We start weaving from the base of the stand. It will require 28 blue modules, which must be connected to each other and closed in a ring. We make three more rows in the same way. From the fifth row we reduce the number of modules by 1, 2, 3, 4 pieces. In the seventh row we place one pink module in the middle.
In the eighth row we put 6 modules, make a skip, another 10 modules, skip, 6 modules. The number of pink modules is 2 pieces. In the next row, we place three pink modules on the pink section. We begin to design the shaped edging of the stand, as shown in the photo below.
In the back part we form a heart-shaped pattern, above which we install a number of blue modules. Gradually narrow the stand until a triangular wedge forms at its back.
The module stand is ready!
Let's take it seriously
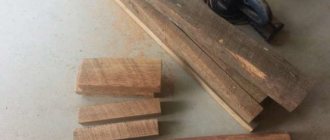
If you are interested in this article, then you must be not white-handed and not lacking in ingenuity. Therefore, we will begin our review of specific products with the most labor-intensive, but also prestigious: wooden ones. The phone on the table in a stand made of valuable wood is an undoubted respect.
What a simple wooden phone stand looks like is shown on the left in the figure:
Simple wooden phone stand
The option with a cable channel on the bottom plate (bottom left) greatly reduces the likelihood of connector breakage due to cord jerking. Dimensions are given in the center and on the right; the angle of inclination of the groove for the device is 10-20 degrees from the vertical.
Factory-made wooden phone stands or from private craftsmen are not cheap, because... their production requires quite complex and expensive equipment, for example. wood milling machine. However, exactly the same wooden phone stand can be made literally “on your knee” if you have:
- A suitable block of dense, fine-grained wood: oak, beech, walnut, etc.
- Hand jigsaw and initial cutting skills.
- Chisel 10-12 mm wide; You can use a sharpened flat screwdriver.
- Round coarse (bastard) file with a diameter of 13-15 mm.
- A strong wooden stick of the same diameter.
- Sandpaper (sandpaper) numbers 80, 120 and 240, i.e. from the coarsest to “semi-velvet”.
The manufacturing procedure is as follows:
- The contours of the groove are marked on both side edges and along the top surface. The wood grains should be oriented perpendicular to the groove;
- Using a jigsaw, starting from the face, file down its long (rear) edge by 10 mm, and the short (front) edge by 7 mm.
- Using a chisel, carefully select the wood between the cuts;
- Using a file, select a groove in depth until a semicircular bottom is obtained. It is even better than the “branded” one - the phone, if it is suddenly pulled out of the socket, will definitely not be scratched or stuck;
- With sandpaper wound around a stick, the walls of the groove are brought to smoothness;
- The lower cable channel is made in the same way (optional);
- External surfaces are cleaned;
- The product is varnished with acrylic varnish, dried for 2-3 days at room temperature - that’s it, the phone can be placed in the socket.
In addition, see the story on how else you can make a wooden phone stand from one piece:
Video: a simple wooden phone stand
cat
For such a cute stand that you can give to your girlfriend, you will need: a jigsaw, a chisel, PVA or D3 glue (PVA based), grit No. 80 and No. 120, acrylic paint, acrylic varnish, and of course, a piece of wooden board and a plane. First, saw off the workpiece of the required thickness and draw a circle and a cat with a simple pencil. Then, using a jigsaw, cut out the desired shapes. A strip for the telephone is cut out or cut out with a chisel in a circle.
The blank of the phone stand with your own hands must be carefully processed with sandpaper. First we take a coarser grain size - No. 80, then we open it with red paint. It is better to take acrylic paint, as it has no odor. You can carry out the entire process at home. Then, after the paint has completely dried, the surface is sanded again with sandpaper, but with a finer grit - No. 120. Then you need to cover the product with another layer of paint. After drying, a layer of acrylic varnish is also applied. This is a prerequisite when choosing acrylic paint. Any other varnish will not work.
After complete drying, the DIY phone stand is assembled together. The cat is glued to the stand using thick PVA glue or an analogue of D3, but also based on PVA. It is stronger than PVA and you won’t have to worry about your phone. The stand will support any weight. You can also cut out any character instead of a cat, for a child - a favorite cartoon character, and for yourself - a little man.
Simple wooden stand
Such a simple stand can only be made if you own a hand router. Then a thin strip (slightly larger than the thickness of your smartphone) and a compartment for small items are cut out of a simple blank of the required thickness. The recess can be used to store a phone charger or hold headphones so they don’t get lost.
All that remains is to go through it several times with sandpaper and acrylic varnish. We will not repeat the sequence of actions, since everything is described in detail in the first subtitle.
Hiking option
This DIY phone stand hangs on your keys and is always within reach. You can use it at work and on the go. This small wooden “stick” does not take up any space in your pocket, but it fully performs its function of supporting you in an inclined position.
It is better to make it from hard wood - beech, oak, ash, hornbeam, walnut, etc. This is necessary so that a piece does not break off when pressing the keys in your pocket. The length of the product is 6-7 cm, width is 3 cm. Stepping back a little from the edge, cut out a small square section with a jigsaw. Then a hole is drilled on the opposite side for a ring on which the keys are hung.
Then, according to a well-known scheme, everything is processed with sandpaper and opened with varnish. You can also pre-treat the wood with stain, giving the wood the desired shade.
Types of phone stands
By material
In order to know how to make a convenient phone stand, let’s find out what material is used to make it.
Often, an owner who wants to always have a phone at hand wants to position it in a convenient way.
- Metal. The metal accessory will be durable and last a long time. The cost of such a thing will be higher in comparison with others made from more affordable material.
- Tree. Popular and accessible material. Bamboo and ash are a common type of wood that is used to make holders.
- Ceramics. These holders look elegant, but, unfortunately, are very fragile. Masters who work with this material make coasters in the shape of animals, shoes, hearts, and geometric shapes.
- Textile. A more childish option is when the phone is placed on a small, specially sewn pillow or soft toy. You can make this type of phone stand with your own hands.
- Plastic. A universal material that allows you to choose color and shape.
- Paper. You can very easily make a phone stand out of paper with your own hands. This is a practical, lightweight option when there is no alternative at hand.
Modern smartphones have learned to do many different things, successfully replacing our watches, voice recorders, navigators, players, and even mobile cinemas.
By style
Note! When choosing a stand style, consider not only your individual preferences, but also the design features of the room in which it will stand.
Before you order or create your own phone stand, decide on the style.
- Vintage. An option made in the form of an antique item made of wood, metal, leather or ceramics, with a structure for fixing the gadget.
- Minimalism. Plastic and paper are the main materials of this style. An excellent choice for those who are not interested in unnecessary details.
- Classic. Option for conservatives. Mainly the manufacture of holders in this style is made of wood and metal.
- High tech. Modern style, without additional decorative elements. The material used is plastic.
The stand is a useful and convenient thing in everyday life.
By purpose
On the table.
The main thing is the strength of the structure.
- Adhesive based. Products are in the form of a circle, one side is glued to the phone, simulating a support, which makes it possible to place the phone at an angle of 45 degrees.
- On a stand. Fixes any size device. It consists of a bottom plate that is installed on the table and a clamp in which the gadget is placed.
Universal.
If you are a creative person, then you will find the makings of a phone stand in any object.
- There is an option when the bottom side of the holder has a mount that can be attached to a table or any other surface. The base of such a device is usually flexible and rotates 360 degrees.
- The second popular option: in the form of a flexible tripod, which can take absolutely any shape. This type can be used: while walking, in bed, while washing dishes, in the car - absolutely in any convenient place.
Temporary cardboard option
While you are thinking about making your own from wood, we can offer a temporary option made from cardboard. Look carefully in the photo at how to cut out the required part from a simple rectangle of corrugated cardboard, bent in half.
But this option can be used temporarily, as it does not look very nice. As you can see, making an original and effective stand is not difficult, the main thing is the desire and availability of the necessary tools.
Today it is impossible to imagine a modern person without a mobile phone, because it is not only a necessary thing, but also a stylish accessory. But a mobile phone has one significant drawback - it often gets lost. In order to no longer face the problem of tedious searching, you need to determine some permanent place for the device - for example, a stand. You can buy it at the store or make it yourself.
How to make a simple phone stand?
If you decide to create a stand yourself, you should first prepare all the necessary materials - a beautiful fabric, PVA glue, scissors, a marker, a stationery knife, a plastic container that should be flat (you can use a jar from any cosmetic product).
First, you need to go through all the empty bottles and jars in your house - choose the one that is the right size for your phone, and wash it thoroughly using hot water. Now you need to dry it well to remove all moisture, otherwise your stand will not last long.
We take the phone and apply it to the container, while placing their lower planes at the same level. Using a marker, we leave a mark on the bottle - we select the height of the future stand, which will be as comfortable as possible for you. On the front of the bottle we make a horizontal line and continue it on the sides.
We turn the bottle and draw its holder on the back. We make it with a sufficiently large hole that will fully correspond to the size and shape of the “plug” - it should fit into it quite easily when charging the phone.
Using a utility knife or scissors, we cut out the stand along the already outlined contour. Take sandpaper (fine) and carefully sand all the edges until they are perfectly smooth. You need to sand over the entire rest of the surface of the future stand, as it should acquire a slight roughness in order to better bond with the glue.
Next, take a piece of bright fabric (here you can use any material). The main thing is to take a piece so that it is completely enough to wrap the entire stand. Place the material face down.
We lubricate the front wall of the future stand with a fairly thick layer of PVA and press it as tightly as possible against the fabric in those places that we determined earlier. Now we coat all the sides of the stand with glue, do not forget about the back part, which also needs to be processed. Pull the fabric tightly so that there are no air bubbles or folds. We wrap the fabric in the same way in the bottom area - we must try to secure it well in the shape of the bottle.
As soon as the material is evenly distributed over the surface of the bottle, and you have secured it with glue on all sides of the product, with the exception of the bottom, take scissors and carefully cut off all excess as close to the edges as possible. Next, apply another layer of glue.
According to the shape of the bottom of the bottle, I cut out a separate piece of material and glue it to the bottom to neatly close all the cuts. Cover the bottom with an additional layer of glue.
At the end, you need to dry the stand thoroughly - you need to place it in such a way that the product does not come into contact with anything. We hang the stand on some kind of hook, spoon, pencil, pen, or place it in a glass.
Once the product is completely dry, use a utility knife to carefully cut a hole in the holder. You need to check whether you have secured the material to the cuts well. All protruding edges must be carefully glued.
How to make your own phone stand from paper clips
There are several ways to make a stand from clamps. Let's talk about simple and more complex ones.
Method with two clamps of different sizes
What you will need to make: one large clamp and a second smaller one - medium or small. Nothing more is needed.
Buy two clamps of different sizes
You only need to connect these two office tools in a certain way:
Method with two clamps of the same size
The clamps may be the same size. Then you just need to connect them differently: bend the handles of one clamp in the same way and connect them, but place them in the other clamp, not them, but the base of the clamp itself. Place the phone between the handles of the attached binder.
The stand can be made from two clamps of the same size
Another method using clamps of the same size. We will additionally need a sheet of paper in it. Its width will be equal to the width of the clamps, and its length will be the height of your phone. Simply clamp the edges of the paper with clamps on both sides. The lower handles of the binders will be the base of the stand, and the upper ones will be the holders. Place your phone between the top handles.
Attach two clips to a piece of paper
One clamp method
If you only have one clamp, you can still make a stand out of it. The advantage of this option is that you can attach this stand to any object that will “take” the clip.
Additionally, you also need insulation from the wires (for the previous methods it can also be used).
This is optional, but it is advisable to ensure that the paperclip does not scratch the phone. You also need a small piece of fabric and an elastic band (any kind, maybe a small one for hair or several stationery ones).
Insulation from the cable is needed to soften the landing of the phone on the stand
So, let's start assembling the stand:
- Carefully remove the handles from the base of the clamp and bend their upper round parts inward using pliers (use a piece of fabric so as not to scratch the handles of the clamp).
These folds will help securely secure the phone to the stand. Remove the handles from the clamp - We put the insulation on the handles, and insert the handles themselves back into the base of the clamp.
Insert the wire into the insulation - If desired, we put the insulation (already cut) on the lower edges of the clamp base.
A phone stand can be made from the most unexpected materials. We have prepared for you the most interesting ideas and master classes with photos and videos, with the help of which you can easily make this useful accessory with your own hands. Stands made from paper clips, a sheet of paper, corks and other simple things - everyone will find a suitable option for their phone.
Previously we told you how to make a popsocket. This is also a kind of phone stand. We recommend you look at this collection of ideas.
Paper clips
Using paper clips, you can make a great DIY phone stand in just a minute. This is very convenient when you need to watch something during any other activity, but you don’t have a popsocket or any other stand at hand.
We will need:
- any cardboard;
- 2 clamps.
Just attach them on both sides and the stand is ready. The phone will be firmly fixed in the “ears” of the paper clips.
This device can be used as a tripod. The holder is useful for taking group photos when you have nothing at hand.
Shell
You don't even need special instructions here. The main thing is to find a suitable shell from which you will make a phone stand. It should be big enough.
You will also need liquid nails or rubber glue that hardens into an elastic, plastic mass. If this is not available, you can use acrylic plasticine - it will not stain anything.
To make a phone stand, you need to apply a layer of this glue to the place where the gadget will come into contact with the surface of the shell. If it is not stable, glue can be applied to the bottom to firmly fix it.
This homemade mobile phone stand looks very beautiful and will fit into any interior.
Beautiful jar
The simplest stand for a mobile phone can be made from an ordinary can. The main thing is to choose the appropriate size and design.
Choose a jar into which the phone fits freely and does not tip over under its weight. If the source does not look too pretty, arm yourself with acrylic paints. With their help, you can make a beautiful phone stand with your own hands. Paint it in an original way, add splashes or patterns, or any inscription.
You can decorate the jar with twine or braid.
Wine corks
Don't throw away wine corks - this is a great material for creativity! They make just a great stand for your smartphone. Durable, environmentally friendly, beautiful, comfortable.
We will need:
- 20 wine corks;
- Super glue;
- lace;
- leg-split;
- any decor.
Glue the corks together in columns and in a row. First, assemble the pieces for the back wall. Then glue the front completely. The bottom of the stand is glued gradually. Place the plugs against each other one at a time. Then lean against the back wall.
For beauty, you can add lace, thin twine or floss threads and any cute little things.
Bamboo chaise lounge
A very interesting option for a phone stand is a homemade mini chaise lounge. It looks creative, and you can make it at home in just a few minutes.
We will need:
- bamboo mat;
- bamboo sticks;
- 6 coffee sticks;
- any paint;
- wire cutters;
- glue gun
Watch this short video master class, in which the author shows step by step how to make an original stand for a mobile phone with your own hands. The result is a bright, stylish accessory that can be used to decorate your desktop or even give as a gift to someone.
Origami
How do you like the idea of making a phone stand out of just paper? Previously, we told you in detail about the origami technique and its basic principles. We recommend reading our material on this topic, especially if you are a beginner.
For this craft, you only need a sheet of thick paper.
Watch the video tutorial in which the author makes a cool stand for his phone or tablet with his own hands. Repeat after him - it's quite simple. This accessory can be easily made in an office, university or school to use a mobile phone for reading or watching videos.
Simple and beautiful
The simplest phone stand without glue can be made not only from paper clips. You will need a plastic mayonnaise bucket and scissors, and the rest is a matter of taste. It is better to choose the most dense base so that the phone is securely fixed.
A step-by-step master class is shown in the video below. You can decorate the craft with acrylic paints, markers, stickers, glitter and anything else.
We hope you were able to choose a suitable master class to make a useful accessory for your phone. Each of them can be modified, improved or customized. Your coasters will turn out beautiful, original and very comfortable.
Views: 486
With a phone holder, you won't have to spend a lot of time looking for your mobile device. It will also be reliably protected. There is less chance that someone will drop it, step on it or spill tea, and most importantly, while driving a car, you will not be distracted. For aesthetic reasons, it can be an excellent decor for a car interior.
The simplest holder is a design for the steering wheel with silicone loops. The adjustable bracket on the panel into which the gadget is inserted is distinguished by the fact that it is compact and the phone is easy to install. Another very simple holder is a ball on a magnet.
Designer coasters are made from various materials and have different shapes - it all depends on the creativity of the artist. For example, there is a lawn on a plastic stand and a phone holder at the bottom.
The gadget holder can be made as an elegant wooden stand. For example, in the form of a tree with a hollow or improvised stumps. A neat wooden stand with randomly placed slots where a mobile phone can be inserted will look original.
A wooden stand can be very laconic and resemble a photo frame into which a smartphone is inserted. A wooden organizer on a panel can have not only a cell for a gadget, but also for pens and watches. A wooden stand in the form of a figurine supporting a phone looks original, but it needs to be firmly secured.
Sometimes phone holders make a nice souvenir when you don't have a gadget. For example, a gadget stand in the form of a rotary telephone looks original, showing the connection between times. Or look unexpectedly creative when the holder is an alarm clock into which a mobile phone is inserted.
Conceptually, the holder looks like a marble figurine holding a gadget in its hands. Even in winter, a shell stand will bring back memories of the sea. The stand can look like your favorite food, for example sushi, a hamburger or a sandwich with caviar. In such souvenirs, the wildest fantasy can turn into reality.
The highlight of the holder in a minimalist style will be the original mount. For example, on the principle of a table lamp attached to a table with a clothespin. Even an ordinary stationery binder will look original as a phone holder.
It’s worth looking at things with different eyes and making a cozy soft pillow or chair for your phone. If a woman is driving, it could be a fluffy basket, an original fabric pocket, a soft envelope with a cute hinged loop. Knitted animals in the form of a stand will always help you maintain a good mood. Stylish bright accessories will not only serve you by performing certain functions, but will also help you think positively.
The holders may have a flexible cord for fastening, a suction cup, or an adjustable bracket.
When choosing a phone stand, everyone is guided by their own taste preferences. In terms of functionality, the holder must have a good fit to keep the phone safe.
Convenient and stylish mobile phone holder for your car
This stand option is ideal for phones with a wide display and a long body. You can make such a model yourself; moreover, it is very easy to use and is perfect for use in a car. And to create it you will only have to spend a couple of minutes.
So, you will need to take a binder (this is a clamp that is used to fasten sheets of paper together). You also need to choose a suction cup, which will become a fastening device. In the place where the suction cup has a hook, we attach a binder to it and our phone stand is ready. You can easily attach it in any convenient place.
Attach a suction cup to the back cover of the phone (don’t worry, it won’t damage its surface, and there won’t be any unsightly marks left). You can easily position the device not only vertically, but also horizontally.
Mastering the technique of modular origami
You can make a phone stand using the modular origami technique. First you need to collect 24 white and 23 pink modules. The colors of the blanks can be chosen to suit your taste!
We fasten the white modules together in a circle so that a circle is formed, and between each pair of white ones, you need to insert 1 pink module. As a result, you will get a cone that gradually tapers towards the top.
This design must be continued until the stand reaches the desired height, which must be determined taking into account the size of the phone. The device will be located in the central part.
Expired bank card
This is a more complex design that requires additional materials. What you will need:
- Glue, preferably “Moment”.
- Pliers.
- Something the size of a bank card or a telephone.
- Well, the main “ingredient” is 2 paper clips.
That's all you need to make a phone stand out of paperclips. But no one limits the master’s imagination - you might want to decorate your stand, then you can use whatever is at hand. Let it be some stones, rhinestones, buttons, pieces of fabric or leather, whatever you can find within the framework of your taste and sense of beauty.
You can also go beyond aesthetics and add functionality to the holder. For example, attach clips or elastic bands at the corners so that the phone is fixed and does not fall out of the structure.
Instructions for implementation
How to make a phone stand from a paper clip - step-by-step instructions:
- Take 2 paper clips and bend them until an angle of approximately 60-70 degrees is formed.
- Create a loop shape by bending the free end of the paperclip on the shorter part so that it touches the second rod.
- On the second, longer part, you need to measure more than half and bend the metal in the opposite direction along this mark. As a result, the second, flat part of the longer half should lie with its entire area on the table or any other surface where the stand will be placed. The long part of the future clamp must be divided for bending so that its flat half is the same in length as the shorter edge of the structure. When installing the stand on a surface, the angle of 60 degrees should be on top.
- To finish the base, you need to take pliers and bend the edge of the flat part (the longer half) upward so that the device can rest against this bent part when installed.
- Repeat all manipulations with the second paper clip. It is important that they turn out identical, since the stand must be stable, because no one wants it to wobble or the phone to fall out of the structure, roll down, or be tilted in any direction.
- Take the material prepared for the backrest (an expired plastic bank card). Place the map on the workpieces to mark the places where you need to apply the prepared superglue. Glue the card to the metal as carefully as possible, maintaining symmetry.
When gluing, we must not forget to follow the instructions of the selected adhesive - as a rule, after application, you need to wait a couple of seconds before applying and pressing the card; the holding time in this position depends on the type of product.
Decoration methods
The stand made of paper clips for your smartphone is ready, now it’s time for a flight of fancy. The first thing you can do is to initially take colored paper clips so that the finished design turns out bright. If there are none, the metal can be painted with a spray can or nail polish.
The second is card manipulation. Here you can come up with many decoration options, for example, sew colored leather, buttons or rhinestones onto the fabric, and then cover the card with it. Or, on the contrary, you can choose a material of a single color or leather and make the stand laconic. It’s even easier to cover everything with stickers. For example, when making a holder for a child, it is better to choose stickers with cartoon characters or the now popular superhero theme.