Materials and tools
To assemble the cabinet you will need:
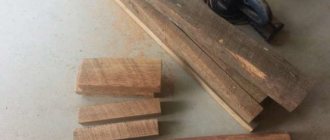
- Boards. The best option is pine. As for quantity, you should focus on the desired sizes. An important point is the thickness of the material. The fact is that a closet usually uses not only shelves, but also the walls themselves. Accordingly, if you plan to place heavy metal tools on the walls, then the board should be selected with maximum thickness.
- Plywood. This material is used to create partitions. You can also use it to make the back wall of a cabinet if you do not plan to store heavy tools or use the wall as a “shelf.” But such sheets are not suitable for the bottom, since they cannot withstand heavy loads. Again, the amount of plywood is determined by the dimensions of the box and the partitions.
- Beam. It is best if it is made from the same type of wood that was used in the boards. It will be needed to equip the cabinet with legs or runners. The optimal size is 50x50.
- Metal corners. Here you only need those elements that are used in the construction of furniture, as they are characterized by increased strength. If you want to make a closet with opening doors, then you should immediately take care of the hinges.
- Screwdriver. The tool will need appropriate drills and bits.
- Electric saw or hacksaw.
- Furniture screws. But when purchasing them, you immediately need to take care of special nuts for them. It is advisable to opt for brass products, since this material is highly resistant to moisture. This is especially important for those who plan to place their closet on the balcony.
- Self-tapping screws. These fasteners will be needed to secure the auxiliary fasteners. Here you can get by with galvanized elements. But in addition, it is worth keeping nails on hand, although some recommend discarding them, since wood tends to dry out, which means that the fastening will weaken over time.
Once all the materials and tools are on hand, you can start working.
Options for shelves and racks in the garage for tools
There are welded and bolted designs. The first category includes one-piece models. Fastening is done by welding. Elements of wooden rigid shelving are connected with nails and self-tapping screws. The only drawback is the lack of mobility. Sometimes there is not enough space for making inside the garage. It is necessary to bring in tools, machines, and lay out carriers.
Prefabricated structures are lighter and valued for their mobility. The parts are fastened with bolts. The only drawback is the lack of rigidity. Shelves often “play.” The disadvantage emerges during operation. Repairs and replacement of individual parts and connections will be required. It is better to use prefabricated structures when making shoe shelves.
Do you use convenient storage systems in your garage?
Not really
Requirements for the rack:
- strength;
- moisture resistance;
- durability.
The shape of the rack is selected individually. The size of the free area is taken into account. More often, straight structures are installed. Less often performed in the form of the letters “G”, “P”. The depth of standard shelves is 40-60 cm. They use solid fabric, gratings, and slats.
You can make a rack for your garage from metal or wood. For work you will need boards, a hacksaw, a hammer, and self-tapping screws. The depth of the shelves is 40-60 cm, the span length is up to 1.5 meters.
Assembly steps
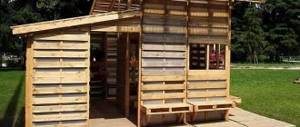
Tool cabinet yourself
To assemble a tool cabinet with your own hands, you need design drawings.
You can create them yourself, or you can simply find an interesting option on the Internet.
In the first case, a simple sketch will do.
The main thing is to determine for yourself the dimensions of the back and side walls, and also pay attention to the parameters of the lid and tray.
The main thing here is not to forget that when planning shelves, it is worth remembering the thickness of the boards, which will “eat up” a certain part of the space.
To create a tool box, you must perform the following steps:
- To make the legs, the timber is sawn into 4 identical cubes (50x50x50). It is recommended to fix them on runners made of the same material. The runners themselves are attached perpendicular to the sides of the cabinet, which indicate the length.
- Next, all wooden elements are processed. For such purposes, an antifungal solution is used. It will help protect the wood from rot and mold. As soon as the coating has dried, all parts are coated with wood primer, and when this layer is dry, Aquastop is used. BUT! Such work is carried out only with planed boards, and it is advisable that all materials are pre-cut into the required size parts.
- The first thing that is assembled in the closet is the frame. According to the drawing, the boards are adjusted according to the parameters, after which the side walls, bottom and lid are assembled. In the case of narrow elements, it is allowed to use two combined boards, but the main thing is to ensure that there are no gaps at the joints. Fixation is carried out using self-tapping screws. Thus, an external frame on temporary fasteners should be obtained.
- Now proceed to the main fixation. For these purposes, all connecting points are secured using furniture corners. Here, too, self-tapping screws or nails are used first. Next, furniture screws and nuts are screwed in, after drilling the corresponding holes in the right places. The most difficult part is drilling the holes at the end of the stroke in the shelves, lid and bottom. As a result, it turns out that their ends will have drilled holes. IMPORTANT! The length of the drill is selected to match the length of the screw.
- Now let's move on to the legs. A beam is attached to the bottom of the box, on the reverse side, like runners. There is no need for heavy-duty fasteners, so you can get by with simple self-tapping screws. Next, pre-prepared legs are mounted to them in the corners.
- As for the boxes, this work is carried out by knocking down a frame of the desired shape and size, where the bottom is nailed down. If shelves are needed, cuts are made on the inside where the partitions will be installed. They can be made from plywood.
If desired, doors can be attached to such a box, after which the entire product is varnished.
How to make a rack with your own hands
There are four main stages of manufacturing - selection of material, analysis of the diagram with calculations, preparation of tools, and actual creation. It is advisable not to skip the sequence. Otherwise, during the work you will have to run for a tool or finish drawing the drawing.
Garage shelving options
What materials can it be made from?
Standard garages without heating. In the spring and autumn seasons, moisture increases. Metal structures become covered with rust. The tree swells and deteriorates. When choosing a material, we recommend choosing protection right away. Modern antibacterial and protective compounds do their job perfectly. Cover the rack after production. Pre-processing of individual parts prior to assembly is allowed.
More often they make a garage rack with their own hands from wood. Even an absolute beginner can cut several boards and handle a hammer and nails. Craftsmen create real masterpieces. There are combined models - metal frame, wooden shelves. The same materials are suitable for making wine shelves where you can store champagne and other wines.
Pros of wood:
- availability;
- ease of operation;
- light weight.
Minuses:
- fragility;
- softness;
- bends under the load.
Required Tools
Let's consider making a wooden model of a garage rack. Sturdy boards will be required. It is advisable to choose processed material. We'll save a lot of time. Or we arm ourselves with sandpaper, a plane, and remove the defects ourselves.
What you will need for work:
- hammer, screwdriver;
- hacksaw;
- nails, screws;
- roulette.
We recommend preparing a simple pencil or marker. It is important to take measurements carefully. Excessive cutting means additional expenditure of money and effort.
Drawings and diagrams
The length of the frame does not matter. It is allowed to run shelves along the entire length or width of the garage. You just need to divide it into spans. The length of each should not exceed 1.5 meters. Otherwise, there will be deflections under the load. The height of the first horizontal crossbar from the floor is at least 60 cm. Then the distance is reduced. We recommend that you think about the storage and maintenance of existing items. Then we take measurements. The minimum height is 35 cm. We focus on a one and a half liter plastic bottle.
Next, based on our own measurements, we make a drawing. We offer a template option. We substitute the dimensions, draw with a regular ruler or pencil. At the same time, we calculate the amount of materials needed.
Arranging the tools
It was described above how to create a simple box, but in order to use it conveniently, its internal space must be ergonomic. For such purposes, shelves, drawers and hanging hooks are organized. This issue can be resolved this way:
- Upper compartment. To create shelves, you can use the same boards that are fixed inside the frame. It is permissible to fix them on ready-made hooks or by drilling holes in the ends (on the outside of the box) and place them on self-tapping screws. Such shelves can easily withstand the weight of small tools or boxes of nails and screws.
- Bottom part. For convenient use, it is best to make only one shelf in the lower compartment. More massive instruments can be placed on it. If you wish, you can install a folding table here.
There is also an option for mounting tools on the walls. It’s worth saying right away that all heavy elements should be located in the central part, but lighter tools are hung on the doors (if there are any).
Cabinet assembly diagram
Usually loops, nails or other elements are used for this, but boxes can also be placed. To ensure that they always remain in their places, they are placed on glue or screws.
The quantity and shape of the internal filling of the box directly depends on the needs. The more building material there is, the more shelves and compartments need to be created.
How a regular ruler can become better than a compass
An ordinary compass is a tool for working on paper, and it will not be possible to draw a large circle with it. You can, of course, use special templates or devices, but the problem of marking a large circle can be easily solved using a regular metal ruler.
Drill a small hole at the very beginning of the measuring device, for example a centimeter from the edge
And the second hole needs to be made at a distance equal to the radius you need
Using such a device is very simple: insert an awl into the initial hole and fix it in the center of the material you need, and insert a pencil rod into the second hole and draw a circle
In this way you can mark a tabletop or the arc of an arch; this simple idea will be useful to you in many works.
Improving the tool box
Depending on where the tool cabinet will be located, on the balcony or in the storage room, you can make its lighting with your own hands. This will significantly improve ease of use. There are several options for resolving this issue.
For those who understand electricity, we can offer automatic backlighting. Future lighting fixtures are marked in the box and holes are cut for them so that it is possible to install a base.
It is advisable that the product is already in place, since the next step will be choosing the length of the electrical cable. It is fixed to the wall or ceiling using screws, after which it is placed in the lid and closed. Next comes the sequential connection of the backlight to the cable - first phase, then “zero”.
IMPORTANT! Any work with wires and other elements is carried out only with the electricity turned off. Now the lamps are screwed into the base and the work is checked.
Halogen lamps. This option is suitable for a large box to illuminate its shelves. Typically, such kits are sold as ready-made kits consisting of:
- switch
- transformer
- halogen lamps
- connector
- wires
Initially, lighting is marked, after which holes (0.5 cm) are made with an electric drill and cutter. After this, the cutter is turned over and the points are completed.
If this is not done, there is a risk that the tool may seriously damage the wood, which will require you to redo the shelf or door.
According to the diagram, all the elements on the floor are connected into a single chain, after which the lamps are connected to a transformer and the operation is checked. For parallel connection, blocks and terminals are used.
In order for such lighting to work fully, it is worth remembering the following important points:
- transformer power ratings should be 5% higher than the total power of the lamps themselves
- minimum power output from the transformer is 12 volts
- pay attention to the operating voltage indicators of the lamps themselves
- For the backlight to work well, the maximum cable length should not exceed 2-3 m
- the transformer is mounted in a place so that it does not heat up from other sources (battery, heater, etc.)
Mini workshop with lighting
LED Strip Light.
Perhaps the easiest way to outfit your toolbox with light.
But this does not mean that such light will be ineffective.
LED strips are sold in reels, and you can buy a specific meter or take one reel, in which 5 meters are measured at once.
Additionally, you will also need a plug and wire to connect the entire system to the mains, as well as a power supply and controller.
The work has the following stages:
- first connect the unit with the cable, and then connect the controller to the power supply
- 4 multi-colored controller wires are connected to similar colors on the tape using a soldering iron or terminal blocks
- to check, connect the plug to the socket and see if all the lights are on
- Each tape on the reverse side has an adhesive backing, which is covered with a protective film - gradually removing it, the tape is pasted in the necessary places for illuminating the box
If desired, you can purchase multi-colored ribbon. As for the intensity of lighting, it all depends on the density of light bulbs per 1 square meter. m. - the more there are, the brighter the light.
Making tool box lighting is actually not that difficult.
Various types of designs
There are a considerable number of models. They are designed to store certain things.
A huge variety can be found on the modern market: specialized, office, instrumental, archival.
Each of them has its own design, and they are calculated for different loads. When choosing a model, this must be taken into account and known.
What models are there:
- Stationary. These devices are a frame into which vertical posts are built and transverse shelves are located horizontally. Additionally, the rigidity of the cabinets is increased by the sheet steel used to cover the sides. Such products can withstand quite heavy objects.
- Mobile. These products are equipped with wheels, with which they can be moved without first unloading them to different places. Due to the weak strength of the casters, these cabinets have some loading weight restrictions.
- Mounted. They are used to rationally use the space in the garage. Such cabinets are secured under the garage ceiling with special fasteners. The carrying weight of such products is small.
- Collapsible. They differ from stationary ones by the presence of a number of holes in the vertical racks, which allows shelves to be fixed at any height.
- Rotating. Serve to store various small items: nails, wrenches and small hand tools. Access to different tools can be achieved by rotating the box around its axis.
Cabinets in which tools are stored can withstand heavy loads. They are made of reinforced metal