<
>
Traditionally, chests of drawers are furniture in which drawers are located in a single body in 1 or 2 vertical stacks. This word itself is translated from French as “convenient,” and Americans call it “box on box.” But the fact remains that this type of furniture has firmly entered our everyday life, and can be installed in absolutely any room.
Why do you need a chest of drawers at all?
To free up as much space as possible in the room, make it spacious and tidy, things in the apartment should always be in their place. At the same time, I want to have quick and convenient access to these things.
You can use the mouse wheel to zoom in or out of an object. The "ESC" key disables the "Segment" tool.
- The gap between the facades is 3 mm minimum (that is, when you measure the size of the facade (both in length and width), immediately subtract 3 mm from the dimensions (which will be obtained in the drawing) for the gap, and 1 mm from each end to edge (this is if you are going to glue a 1 mm edge), and write down the resulting length and width in the detailing.
- Edge gap, 1 mm thick = 1 mm (2 mm = 2 mm, etc.)
- Thickness – 13 mm (there is an indentation on the drawings)
- Fiberboard (back wall and bottom of drawers) – 1 mm less on each side
The structure of the material is always located along the length of the part.
We also immediately write down what fasteners and accessories we will need.
How to assemble a chest of drawers based on a drawing
To do this, you need to know the places where parts and accessories are attached (what, at what distance and from where to attach). If you are near the computer, then you can immediately look at the distances on the drawing using the same “Segment” tool in the Compass program.
In this article, we have provided a small selection of drawings with exact dimensions, according to which it is quite possible to assemble a chest of drawers for storing things.
Making a chest of drawers
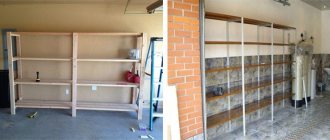
Step 1 . Prepare boards for work. They don't have to be new. For example, this project uses boards from an old dismantled structure.
Step 2 . Using a jigsaw or a regular hacksaw, cut the boards into the required pieces, the number and dimensions of which must correspond to the project drawing.
The details of the future chest of drawers have been cut
Step 3 . Sand the surface of the boards to eliminate even the most minor defects and irregularities. As a result, the boards should be as even and smooth as possible.
Prices for popular models of eccentric sanders
Step 4 . Assemble two side frames from the cut boards.
Assembled side frames
Step 5 . Start assembling the panels. To do this, install planks in previously made frames. It is advisable to use self-tapping screws as fasteners.
Boards are installed in the frames
Step 6 . Select the boards in width so that they can completely cover the wall without forming any gaps.
There should be no gaps
Step 7 . Attach the boards to the back of the finished frame, thereby creating the back wall. Here the boards should be used much wider than for the side parts.
The back wall is created
Step 8 . This is what the half-finished chest of drawers will look like from the front.
Finished chest of drawers without drawers
Step 9 . Start assembling drawers for your future chest of drawers. First, prepare the boards.
Boards for boxes
Step 10 . To assemble the boxes, you must use wood glue, such as PVA. It will be enough.
Drawer assembly
Step 11 . After installing the bottom, the surfaces of the boxes must be treated with a special waterproof material that will protect the wood from negative factors.
Processing the finished box
Prices for wood preservatives
Step 12 . Repeat all procedures with the remaining boxes. Once all the boxes are ready, sand them down using sandpaper.
Ready-made chest drawers
Step 13 . All elements of the wooden chest of drawers are ready. Now you can start assembling.
You can begin the final assembly of the chest of drawers
Step 14 . This is what the almost finished design will look like. All that remains is to add drawer opening mechanisms and handles.
Step 15 . As a final step, coat the chest of drawers with tung oil. It will make the product attractive.
Product after treatment with tung oil
Step 16 . Even though the work was done using old wood, the chest of drawers turned out to be truly beautiful and original. You can now enjoy the fruits of your work every day.
It turned out to be a really attractive chest of drawers
Why do you need such a chest of drawers at all?
To free up as much space as possible in the room, to make it more spacious and tidy, things in the house should always be in their places. And at the same time there should be quick and convenient access to these same things.
Moreover, just one may not be enough. After all, there are also things that cannot be hung on hangers or simply put on closet shelves. Such things include underwear, socks, handkerchiefs and many others.
A family in which a small child is growing up cannot do without such a useful device as a chest of drawers, since children's things must have their own specific place, separate from the parents' things. These are the things that a chest of drawers is needed for.
Also, the chest of drawers occupies not the last place in the overall interior of the room. Since the chest of drawers is one of the design elements in the interior of the room, it must fit harmoniously and best suit the interior of the room.
Chest of drawers - history, design features, selection tips.
"Commode" is translated from French as "comfortable."
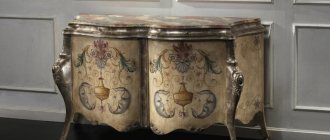
During the Soviet period, there was a time when chests of drawers, which made it possible to maintain order in a room and provide space for countless things, both small and large, embodied a symbol of philistinism, and their production was very limited in Soviet industry. However, now this piece of furniture, which combines a lot of conveniences, is again returning to the interiors of our homes, calmly and obediently solving new problems demanded by the time.
But what makes a chest of drawers so thoughtful in terms of useful use of every centimeter it occupies in your room? Definitely thanks to the boxes.
A classic chest of drawers is a piece of furniture, the design of which consists of several drawers located on top of each other. A similar definition can be found in the “Russian Language Dictionary” by S.I. Ozhegov. Meanwhile, now chests of drawers are often called furniture items that have additional hinged or sliding doors. And yet, the “type” of a chest of drawers is determined precisely by the presence of drawers. In addition to them, the chest of drawers is equipped with a tabletop, legs or base, and fittings.
There are miniature chests of drawers, similar to bedside tables, and bulky ones, like a small bookcase.
The advantage of drawers over niches and shelves is that the former move forward, so regardless of their depth, objects or things stored even in the most distant corner are always accessible. In addition, drawers can be used to store a variety of items - from bedding to all kinds of small trinkets. It is unlikely that you will be able to fill a closet shelf like this. Its contents will definitely fall out constantly, every time you open the door. This won't happen with dresser drawers. Everything you put in them will stay in its place. Linen and clothes are usually stored in boxes 15-25 cm high, and small items in boxes 7-15 cm high.
It matters how the drawers slide out. There are models of chests of drawers in which the drawer can fall out freely - as soon as you almost calculate the force and pull it out very sharply, which is completely inconvenient, especially if it contains a lot of small items. You will have to spend a lot of time collecting items that have scattered on the floor and putting them back in place. Other drawers have special limiters; they are designed to prevent the drawers from simply falling out of the chest of drawers. However, such drawers have the exact opposite drawback: they often extend only 2/3, sometimes 4/5, in which case things that are located at the back wall of such a drawer are sometimes difficult to reach. Silent cabinet furniture is now gaining popularity. This effect is ensured by the use of carefully thought-out fittings. Without the slightest effort, you can roll out the drawers, silently sliding along the guides until they are fully extended. The drawer closes just as smoothly, without warping or shaking (even with uneven load on its sides), slides inward, and when its front surface is approximately 2 cm from the body, it instantly slows down and silently fits close to the body.
A chest of drawers often comes complete with bedroom and some dining sets, as well as sets for an office or living room. However, it can also be sold separately. It is important that the chest of drawers fits harmoniously into the existing interior; to do this, consult with the seller: specify what style your home is decorated in, what size chest of drawers you need and in what color. It will also be useful to inform you about what you would like to store in it - you may need to provide reinforcement to the bottoms of the drawers and slides designed to allow them to slide, if necessary. Typically, manufacturers make chests of drawers of certain standard models, but you can choose the color scheme as you wish. Almost any company will be able to offer three or four color options, but there are companies that have a much larger assortment.
The chest of drawers is suitable for any room - hallway, bedroom, living room, kitchen or children's room. In the hallway it will be convenient for storing, for example, shoes in its lower drawers, umbrellas, hats, gloves, keys in its upper drawers, and you can attach a mirror above the tabletop. A chest of drawers in the bedroom can be used to store bedding, small items, etc. For example, in a drawer whose size is 90x60 cm and height is 24 cm, you can easily fit two pillows, a sheet and a blanket. Chests of drawers often contain various types of clothing: sweaters (in deep drawers), blouses, socks, handkerchiefs, knitwear, etc. (in shallow drawers).
By “distributing responsibilities” between the pull-out sections of the chest of drawers located in the living room, you can store CDs, video cassettes, etc. in them.
Chests of drawers located in living rooms are often used to store home curiosities, jewelry, letters, etc. And on the tabletop there can be flowers in a beautiful decorative flower pot or a TV.
How to use drawings
As a rule, everything is available; drawings of chests of drawers are made using the Compass 3D program, the file format of which is “cdw”. Therefore, to work with such drawings you will need the Compass 3D or AutoCAD program. That is, download any drawing of a chest of drawers you like and open it using one of the above-mentioned programs. The drawings show the main dimensions, so see if they will suit you.
How to make detailing based on a drawing of a chest of drawers?
To do this, using one of the programs, for example “Compass 3D”, open the drawing you need, then use the “Segment” tool to determine and write down the dimensions, that is, the length and width of all available parts that are indicated in the drawing.
You can find out how to determine the size of parts in a drawing in the Compass 3D program here
.
Using the mouse, you can easily zoom in or out of the selected object, and using the “ESC” key you can disable the “Segment” tool.
- The gap between the facades must be left at least 3.0 millimeters. For example, when measuring a facade (length and width), it is necessary to subtract 3.0 millimeters from the resulting dimensions for the gap and 1.0 millimeters from all ends per edge. The value of 1.0 millimeter is the thickness of the furniture edge, which is glued to the ends; if you have a different value, then subtract it, after which the resulting length and width must be written down in the detailing.
- The gap on the edge must be extremely precise, if the thickness of the edge is 1.0 millimeters, then the gap should be 1.0 millimeters, if 2.0 millimeters, then 2.0 millimeters, etc.
- The thickness of the guide is 13.0 millimeters; there is an indentation in the drawings.
- The fiberboard back wall of the chest of drawers and the bottom of the drawers are 1.0 millimeters smaller on all sides.
The structure of materials is always located along the length of the parts.
You also need to immediately write down what kind of fasteners you will need.
Let's prepare the details of the chest of drawers
You need to decide on the size of the chest of drawers and how many vertical sectors with drawers it will have. Using the technique described below, you can make chests of drawers with one or more columns of drawers. Let us plan to make a chest of drawers X x Y x Z, where X is the width of the chest, Y is the depth, Z is the height. We will make the chest of drawers from planed boards 100 x 25 mm. We use 18 mm thick chipboard.
Let's cut boards of the following dimensions: part (a) size: (Y - 25 mm - 18 mm) 4 pieces, part (b) size: (X - 50 mm - 36 mm) 4 pieces, part (c) size: (Z - 18 mm) quantity (1 + number of drawer columns). Parts (d) are cut out from scraps after assembly according to the size of the places into which they are inserted. These parts are needed only so that the hardboard does not hang in the air, but is attached to them.
Be very careful that the sides of the boards are strictly perpendicular to the long edges. The stability and appearance of the chest of drawers depends on this.
Let's cut two sheets from a sheet of fiberboard (hardboard), the first (back wall of the chest) with dimensions (X) x (Z - 18 mm), the second (upper wall of the lower stiffener box) with dimensions (X - 36 mm) x (Y - 25 mm - 18 mm).
Let's cut out the following parts from chipboard: side walls with dimensions (Y) x (Z - 18 mm) 2 pieces, front upper and lower decorative plugs with dimensions (X - 36 mm) x (100 mm) 2 pieces, bulkheads between vertical blocks (columns) boxes of size (Y - 25 mm) x (Z - 200 mm - 18 mm), the number is determined by the number of blocks of boxes - 1 (if there is only one block, then such elements are not required).
How to assemble a chest of drawers based on the drawing?
To do this, you need to know the exact places of fastening of all parts and (what, and at what distance and from what should be fastened). If, during the assembly process, you have the opportunity to be near the computer, then all the distances can be viewed in the drawing, using the same “Segment” tool in the “Compass 3D” program.
The distance should be measured from the extreme point of the part and directly to the center of the fastening point, for example, the middle of the plate is 16.0 millimeters = 8.0 millimeters. If you do not have the opportunity to use a computer, then you need to immediately put down all the dimensions on the drawing using the Compass 3D program and print the finished drawing.
In the Compass 3D program, using the Dimensions panel, use the Auto Dimensions tool as shown in the figure.
Imagine: how you measure the distance on a chipboard board with a tape measure and indicate these distances on the drawing (the dimensions in the drawing in this program are indicated in centimeters, but when adding dimensions you indicate them in millimeters, for example 10 centimeters = 100 millimeters) and print it.
- Preparing to create
- Tools and materials
- Step-by-step instruction
A chest of drawers is a very convenient and functional piece of furniture. Its main advantage is that it allows you to store many different things without taking up much space. The disadvantage is the high cost of factory-made products. Not every person has the opportunity to allocate money to purchase such furniture. But everyone can figure out how to do it. This piece of furniture may have a different shape and size, but the manufacturing technology remains the same in any case.
Installation of roller elements
Figure 2. Scheme of fastening roller guides.
Whatever type of drawer mounting you choose, you will need the following tools:
- drill with a thin wood drill bit;
- screwdriver with travel limiter;
- a set of screwdrivers with various blades (flat and Phillips).
Also, don't forget to have your measuring tools ready. You will need a tape measure or a long ruler and a square.
All necessary marks can be made with a simple pencil or colored chalk. The installation diagram of roller guides is shown in Fig. 2.
The process of installing guide systems on drawers occurs in 3 stages:
- Marking furniture walls and storage areas.
- Installing the bar on the drawer.
- Installing strips on furniture.
Figure 3. Diagram of the ball guides.
If you follow this sequence, you will be able to avoid possible mistakes.
The guide can be installed anywhere. But usually they are mounted strictly in the middle of the wall (this makes it easier to determine the location of the structure on the furniture) or flush with the top or bottom of the box. But roller systems are most often installed on the bottom edge.
It is wiser not only to mark the places for screwing in self-tapping screws, but also to drill them. This will ensure that the screw does not split the wood. You need to determine the location of the fasteners immediately both on the drawer and on the wall of the furniture.
The master should remember that the thickness of this type of guides is 1.25 cm. Accordingly, the width of the drawer should be 2.5 cm narrower than the internal width of the furniture (both sides are taken into account). Otherwise, the retractable structure will not fit into the housing. For freer movement, add 1-2 mm to this gap.
The length of the screws is selected based on the wall thickness.
The head of the fastener must firmly fix the guide, but not rise above the bar. In this case, the sting should not penetrate through the wall. First, the guides are fixed on the drawer, and then on the furniture. After which the storage system is placed in its designated place.
How beautiful it is to display and adjust our furniture!
On this page we will talk to you about various little things that seem insignificant to us, but on which the picture depends - the overall, final look
our furniture. That which pleases the eye. Let's start with the simplest. How to beautifully display and adjust our furniture! Level adjustment.
Don’t be lazy to use a level; furniture that stands level has never irritated anyone. You can check both the verticality of the rack and the horizon, for example the bottom
shelves or bases of the product. If we have adjustable supports, it won’t be difficult to level our furniture. To adjust large and heavy furniture, we
move it a little away from the wall and pile it on top of you, then turn the back legs (supports) out to the desired height, then roll it away from you and do the same
most with the front supports. If the supports are not adjustable, put something under the bearings of the rack. To avoid scratching the floor with all these movements
Glue felt pads to the supports. You can make them at home: double-sided tape and thin felt. We glue the tape to the felt, then cut it out
pads of the required size. Remove the protective film from the tape and glue it to the support. If you do not have clearly vertical walls, then it makes sense to level, for example, a closet
along the wall because visually it will look better than if the wall and the stand fall in different directions.
Adjustment of doors (facades).
Conventional furniture hinges, whether overhead, inset or intersectional, are usually regulated in the same way. This is a door adjustment up and down, away from you
and from the center to the right or left.
Up and down adjustment is carried out using oval lugs on the heel of the loop, which is attached to the stand with self-tapping screws. Raise or lower the door using these
ears is possible only by 4-5mm. no more, if there is a need to raise it to a greater distance, then you will need to rearrange all the heels of the loops on the stand.
In order to pull the door towards you, you will need to loosen the farthest screw; it usually has a large head. This screw connects both halves of the door hinge and
it should be tightened firmly after adjustment. To adjust the gap between the facades (doors), you need to screw in or turn out the threaded bushing,
usually it is made for a + screwdriver. If you cannot adjust the doors in any way, then the product itself is skewed, i.e. its diagonal is not aligned.
Adjustment of drawer fronts.
First of all, check whether your section or cabinet, chest of drawers or bedside table is level. If everything is straight, but the facades are crooked, then they need to be adjusted. If the facade
screwed on the screws from the inside, then only re-installation will help. You will need to unscrew it, seal the old holes with something (ordinary ones will do).
screw the screws back in.
Improper installation of the guides on the side walls of the drawer can lead to unpleasant consequences that cause the entire structure to bend. This will further lead to incorrect operation of the product, which will lead to its rapid breakdown.
To avoid such mistakes, you must immediately become familiar with the method of installing the drawer.
Preparing to create
Making a chest of drawers with your own hands begins with its design. Before making calculations, determining the appropriate size of the countertop, assembling drawers, etc., you need to choose a place to install the chest of drawers. Take a careful look around your room. Study the structure of the baseboards, see if there are switches, sockets, etc. on the wall, which must be taken into account when choosing the size of the chest of drawers. It is important that it does not cover anything and that nothing interferes with its use.
Making a chest of drawers with your own hands begins with its design. Before making calculations, determine the appropriate size of the tabletop, assemble drawers, etc.
Figure 1. Chest of drawers.
Next you need to choose the size of the chest of drawers. The most comfortable chest of drawers is considered to be one with a width of 80-130 cm and a height of 80-85 cm. The best chest of drawers is one that you would be comfortable using. If you can't figure out what your chest of drawers should look like, visit your local furniture store. Surely you will like something, and in the future you will be able to focus on the model you like.
Most often, home craftsmen make chests of drawers from wood. This is a relatively cheap and easy to process material. If you have never made furniture with your own hands before, opt for a wooden chest of drawers.
Next, you will need to create a project for your homemade chest of drawers. To do this, you can use special computer programs or draw it on paper. The main task at this stage comes down to determining what parts the chest of drawers will consist of. Next you will need to create a drawing. You can take the diagram in Fig. as a basis. 1.
A drawing is a must. If you can still do without a project, then you won’t be able to work without a drawing.
The drawing must show at least a side or top and front view.
It will be better if you can depict it in cross-section. Be sure to include the dimensions of each part. This will allow you to see how all the parts will fit, where indentations are needed, etc. When drawing up a drawing, it is recommended to focus on the following dimensions:
- thickness of wood or slabs – 1.6 cm;
- the distance between the outer parts of the drawers and the back wall of the homemade chest of drawers is at least 1 cm;
- a gap of 3 mm must be added to the dimensions of the inset facades, i.e. 1 mm for each individual end.
Return to contents
How to choose material for a chest of drawers
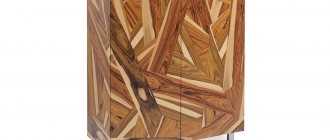
Of course, the most suitable material for making a chest of drawers is wood. It has many advantages over other materials. Firstly, it is an environmentally friendly material that will last a very long time. Secondly, wooden furniture always looks very unique and elegant. If you approach manufacturing with all seriousness, you can make incredibly beautiful and special furniture.
Chests of drawers are mainly used to store household items: dishes, books, records, bedding, towels and even clothes.
Note. For a chest of drawers, it is best to take rocks that are classified as hard, but any others are also possible.
Materials:
- Pine. It is softer, but at the same time very easy to process. It is best used to create stools, bedside tables, and chests of drawers. The downside is that the surface scratches very easily, so over time it doesn’t look very attractive.
- Birch. This is a harder wood with an attractive texture. The disadvantages are the inability to tolerate humidity and the ability to withstand only light loads.
- Beech. One of the most suitable options, because it is quite durable, can withstand a lot of weight, but also does not like moisture and quickly absorbs it.
- Oak. It is the most popular breed, because it has high strength and durability. At the same time, such a tree is not deformed, does not rot and is not affected by insects.
Furniture panels can be used as the main material.
You can take any of these species, but take into account some features so that the furniture lasts as long as possible. If the material cannot withstand moisture or cannot support a lot of weight, then you should not test its capabilities.
Even an inexperienced craftsman can make a chest of drawers with his own hands.
Tools and materials
thickness of wood or slabs – 1.6 cm; the distance between the outer parts of the drawers and the back wall of the homemade chest of drawers is at least 1 cm; a gap of 3 mm must be added to the dimensions of the inset facades, i.e.
Figure 2. Sidewall markings.
Almost all cabinet furniture is supplied to the retail chain in disassembled form. This makes it easier to transport and less likely to be scratched during transportation. Assembly of the finished furniture structure is carried out according to the diagram attached to the product by the manufacturer.
How to assemble a chest of drawers bought in a store? This task can be completed independently by a person who has the skills to handle a standard set of household tools and has perseverance and patience.
Decorating a finished product
The finished furniture design is not a very attractive thing. Therefore, it is very important to bring it to perfection through decoration. Wood is a very beautiful material that requires minimal processing. Decoration options are:
- A varnish coating that gives wood shine and also protects it from any impact.
- Use paint of any color that will blend favorably with interior elements.
- The use of coating film, which is a fairly modern method of decoration.
- In addition to all this, you can use different colors for each drawer, and also decorate them with unusual patterns. For this purpose, special stencils are sold, which are glued, then paint is applied, after which everything is opened with varnish.
When choosing the final option, it is important to consider the overall style of the room and interior items.
The design of the finished structure is optional. The main thing is that the detail fits perfectly into the overall design of the room. If you use your imagination, you can make a completely unique and unusual thing that all guests will admire.
General rules for assembling cabinet furniture
There are general rules for assembling cabinet furniture, following which you can assemble any cabinet product quickly and efficiently:
- Assembly is carried out according to the rule “from large to small”: the main body of the product is immediately assembled, and then equipped with parts
- To avoid unwanted distortions, the structure is assembled on a flat surface
- To protect product parts from mechanical damage and contamination, the working surface on which assembly is performed is covered with a soft cloth or cardboard.
- To avoid cracks in the chipboard or MDF parts of the product, you should not be overzealous when tightening the bolts.
What tools are needed to assemble a chest of drawers?
To assemble cabinet furniture, the following set of tools is required:
- Roulette
- Phillips screwdriver
- Drill/driver
- Hammer.
In addition, when assembling most modern models of chests of drawers, special keys for confirmants (euroscrews) are used, which are used to connect the main parts of the furniture structure. These tools usually come with the product.
How to assemble a chest of drawers
Before you begin assembling the chest of drawers, you need to check the presence of all components (their list contains instructions for assembling the product) and make sure of their quality and color matching. If a defect is discovered, you can immediately file a claim with the store and demand replacement of low-quality parts or the entire product. If everything is in order, you can start assembling.
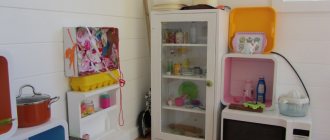
Dressers come in a wide variety of sizes and shapes. The design of individual models may contain elements that are unusual for a classic chest of drawers - a low cabinet with drawers. For example, in a changing chest intended for a newborn baby’s room, instead of the usual top cover there is a special changing table, and in a chest of drawers or a chest of drawers for a living room there may be hinged cabinets with stained glass windows, etc.
Despite the external differences, all chests of drawers are assembled in approximately the same way. The assembly diagram of these products consists of the following main steps:
- Housing assembly
- Assembling drawers
- Securing the drawer system guides
- Installation of fastening fittings and installation of doors (in models with sections with hinged doors)
- Installing handles on drawers and doors
- Installing the top cover of the chest of drawers.
Assembling the chest of drawers
The components of the chest of drawers are:
- Sidewalls
- Horizontal connections
- Base strips (not available on all models)
- Back wall.
If the model is equipped with legs or swivel casters (mobile version), before starting to assemble the case, these parts are secured to its bottom cover.
If there are no legs (swivel casters), the assembly of the chest of drawers begins by connecting the base strips to the bottom of the chest of drawers (to the horizon). Next, using tightening screws, the sidewalls are fixed and horizontal connections are installed - strips, to which the chest of drawers is subsequently attached.
The final stage of assembling the case is installing the back wall. Typically this part is made of hardboard or chipboard. The back wall is secured with small self-tapping screws or special furniture nails.
This completes the installation of the housing.
Assembling drawers
Components of boxes:
- Side walls
- Bottom
- Facades.
Before you begin assembling, all the parts of the boxes must be placed in stacks (each box separately). This will avoid confusion while working.
The process of installing box boxes is similar to assembling a body: the side walls are fastened together with confirmations (or other suitable type of fasteners), the bottom is fixed with self-tapping screws.
The last stage of assembling the drawer is installing the front and decorative handles. The fronts can be attached to the front panel of the drawer using short self-tapping screws. When using this method of fastening, you must be very careful - the length of the self-tapping screw is chosen taking into account that when fixing the facade to the front panel of the drawer, its tip does not damage the front side of the facade.
There are usually ready-made holes for handles in the front and front panel of the drawer. If they are not there, then drill the holes yourself with a drill, having previously made markings.
How to properly install the front on a drawer is shown in the video:
After assembling the main elements of the chest of drawers, guides are installed on the inner surface of the sides of the body and on the drawers. First, using a tape measure, determine their location and make markings with a pencil. The guides are fixed using self-tapping screws, which are screwed in with a screwdriver.
If the guides are installed correctly, they will ensure the drawers move smoothly and will not cling to each other.
The final stage of assembly is the installation of the upper horizon (dresser lid). It is attached to the horizontal connections of the body.
Step-by-step instructions for assembling the chest of drawers are in this video:
Assembling a chest of drawers, in general, is not difficult. To do it yourself, you don’t have to be a professional furniture assembler. However, if you don’t have at least the basic skills of a home craftsman and a suitable tool, you still shouldn’t take on this work - it’s better to seek help from a specialist. An experienced craftsman can assemble the product even in the absence of an installation diagram. You can order the services of professional furniture assembly specialists on the Yudu service.
Did you buy a new chest of drawers? Amazing! All that remains is to assemble it correctly. If for some reason it is not possible to use the services of a professional furniture assembler, there is only one way out - self-assembly.
This process is not so complicated, especially if you use the recommendations of experienced craftsmen.
All types of cabinet furniture (cabinets, chests of drawers, walls, hallways and many others) have only different sizes and shapes. In all other respects, these interior items are similar, including the assembly process. It is for this reason that the assembly rules for all types of cabinet furniture will be universal.
- Unpacking.
All components of the furniture are unpacked and removed from the boxes very carefully. Careless or sudden movement can lead to scratches and damage to the surface of the furniture.
Packaging with chest of drawers. Weighs about 30 kg.
All parts are compactly folded.
- Preparing for assembly.
The parts of a cabinet or chest of drawers are placed on the floor for better visibility, and all the fittings are placed in a box. Such organization of the workplace will speed up assembly and will not allow you to lose screws or other small parts.
All components are stacked correctly to avoid damage.
You can start assembling the chest of drawers.
- Instructions.
Do not neglect the instructions included with the furniture set. It will greatly facilitate the task and protect you from possible mistakes.
Instructions are included in the kit; it is recommended to carry out assembly by referring to it.
Assembly
- Connect the top lid of the chest of drawers to the sides. After this, you need to draw parallel lines on them at a height of 100 and 116 mm from the bottom. This is how the place for the base is marked; it needs to be done from the inside.
- Secure the base with 4 by 45 mm screws, drilling pilot holes with conical recesses. They hide countersunk screw heads.
- Use a jigsaw to cut out an apron for the bottom of the chest of drawers. It can have different shapes, choose the one you like and secure the apron in place.
- Securing the top shelf. Marks are left below the upper ends at 212 and 228 mm, the shelf is secured with the same screws.
- Set up a separator. We measure 492 mm from each sidewall and fix the part at this mark.
- We measure 212 mm from the top shelf and mark the position for the middle shelf. Its rear end should not protrude beyond the sidewall. You need to measure the distance from the bottom edge of the top shelf.
- Sixth stage. We connect the bottom with the side walls and front panels. After this we attach the back panels. We place the lower part of the front panel near the top drawer flush to the bottom. And the top part is flush with the sides.
- Each hole left by the screws can be filled with wood filler and left to dry. For greater smoothness, we process the surface with sandpaper, paying special attention to corners and sharp edges. After this, apply two or three layers of paint or varnish.
What tools are needed to assemble a chest of drawers?
To achieve a quick and good result for assembling the chest of drawers, the instructions suggest stocking up on tools. There are no professional specific devices on this list; everything can be found in every home.
Required tools include:
- Screwdriver - you can also use a screwdriver, but a screwdriver will significantly reduce the time spent at this stage of work;
- M hammer - this tool will be needed to fasten the back wall of the chest of drawers;
- Pliers;
- R Uletka;
- Pencil.
Required tools for assembly.
These parts are just enough to assemble the furniture.
In some cases, a drill with a set of drills may be useful. This rarely happens, since most furniture companies produce furniture sets with ready-made cutouts for fasteners.
Each factory product is supplied with detailed instructions from the manufacturer, but the assembly diagram for all types of chests of drawers is the same.
- Frame.
Making the frame of the product is the first stage of work. During this process, the side walls, top cover and stiffening ribs located at the bottom of the frame are fastened together. To perform this work, you will need a screwdriver and suitable sized attachments.
Assembling the chest of drawers.
Fastening the side walls.
The frame is almost ready.
At this stage of assembly it is better not to sit on the chest of drawers, but soon you will be able to.
The back wall is made of 2 halves.
Attaching the back wall to the chest of drawers frame.
- Assembling boxes.
Many people are interested in the question of how to assemble a chest of drawers. The assembly scheme will begin (as in all other cases) with the assembly of the frame. Upon completion of this stage, they move on to working with the boxes. How to assemble a chest of drawers correctly? Fastening is carried out in the following order: first, the side, front and rear walls are fastened together and only after that proceed to installing the bottom. Often the kit includes a separate overlay for the sliding cabinet, which acts as a decorative element. In such cases, fittings are installed on the overlay and the overlay is secured to the finished cabinet.
Assembling boxes.
Fastening with Euro ties.
The bottom of the drawers is covered with plastic with a fabric pattern.
On the sides, the chipboard bottom is secured with guides.
Handles for drawers.
- Installation of guides.
After preparing the frame and all the drawers, many will probably think: how to assemble a chest of drawers with drawers to a finished state? To do this, there is one more stage of work - installation of guides. One part of this system is attached to the bottom of the box (it is this part that will slide and ensure smooth movement). The second part of the system should be mounted on the inner side wall of the frame. The most important thing here is to choose the mounting location. To do this, you need to arm yourself with a tape measure and a pencil. Identical segments are marked on the front and back sides of the frame on both sides (you can make sure the marks are correct using a level). Guides are attached to the marks made using a screwdriver.
The guides with rollers were already screwed onto the side walls.
Roller guides for chest of drawers.
Screws that then do not interfere with pulling out the drawer.
The screws “sink” almost completely and securely fasten.
Ready-made fixed guides on the chest of drawers.
The finished chest of drawers looks very attractive and stylish.
Sometimes, in addition to standard parts, chests of drawers also have additional parts (mirror, changing surface). In this case, another problem arises: how to assemble a changing chest of drawers with drawers? In this case, the instructions will not change, only 1-2 more points will be added. The fastening of additional parts occurs on a completely finished product. A screwdriver can help with this - the holes are made according to the manufacturer's marks.
Features of drilling and assembling a chest of drawers with your own hands
Once absolutely all the parts are ready and you have the necessary tools, you can begin the most interesting part of the work - assembling the chest of drawers. In this case, the steps are:
- On individual elements you need to mark the places where the fastenings will be located (screws or dowels). For greater accuracy, it is better to rely on drawings.
- First, take the tabletop and attach it to the walls - here you will need corners or strips. After this, a strip is attached to the structure, which will serve as the bottom.
- Next you need to attach the legs or wheels to the bottom. If you attach wheels, the product will be easier to move.
- The next step is attaching the back wall. For it, fiberboard is taken, which must cover the ends of the side walls, table top and bottom. Attach the back wall with small nails.
- After this, you need to assemble the drawers and attach the guides for them in certain places.
Your product is ready.
Install it in the planned place, lay out your things and use the new piece of furniture. Important! It is best to check the evenness and stability of the structure at the stage of attaching the back wall; for this purpose, its diagonal size is measured. If there are any irregularities, they are immediately eliminated.
If you do everything as the instructions for making a chest of drawers with dimensions, drawings and details say, then creating a chest of drawers will not be difficult even for a beginner. In addition, you can always watch training videos.
For chests of drawers made of wood, traditional finishing methods are best suited: painting, varnishing.