Wooden mosaic, in itself, looks very unusual. Advantageously emphasizes any surface. And also fits any style interior solution. Doing a wooden mosaic with your own hands is not difficult. The main thing is to know some nuances.
In this article we will tell you how, without any special skills, anyone can make a wooden mosaic. Thus, making your home more comfortable, more beautiful and more sophisticated.
If you have an idea to decorate a wooden surface, then you should pay attention to wooden mosaics. Wooden mosaics can cover a fairly large area of the wooden surface. And not even in small areas, wooden mosaic looks amazing.
Also interesting: Woodworking for children
DIY wooden mosaic
To make a wooden mosaic, you need practiced skills and experience. But anyone can make a picture from a wooden mosaic, for example, make a bouquet of flowers.
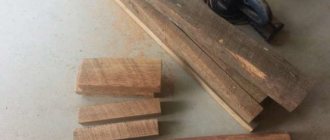
Wooden mosaic tiles are made from wood veneer. Wood veneer is thin slices of wood. These plates cut well and are easy to process.
The number of wood species includes several thousand varieties. They differ from each other in color, shade and structure. This makes it possible to select the necessary options for making a drawing.
To make a color design, choose a veneer of a suitable structure. Next, the veneer can be tinted with brilliant green, iodine or aniline dye.
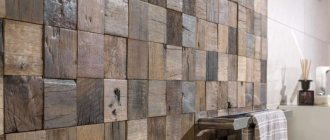
Wooden mosaic for walls
For many, wooden mosaic is something out of science fiction. Many are accustomed to the fact that mosaics are done in the bathroom or kitchen, that is, in rooms with high humidity. However, this is not entirely true. Modern mosaic is not only tiled type mosaic. The same applies to the application, modern decors are used in different rooms, thereby making it possible to create an unusual decor for those rooms where, it would seem, the use of mosaics would be alien.
In this article we will introduce you to the currently fashionable material for wall decoration - wooden mosaics. You will learn what kind of decor this is, what it is made of and how to install it correctly in order to preserve its beauty and strength for many years.
What are the features of this material?
Wood itself is very attractive, because it has its own patterns and contours. Wood fibers are always unique, which makes each mosaic element original.
Despite the fact that wood is afraid of moisture and does not tolerate temperature changes, many manufacturers of wooden mosaic claim that its characteristics contribute to durability, while maintaining the original appearance.
Not all types of mosaics are durable, for the sole reason that different types of wood are used for their production. For example, pine is a durable material in itself, but it is completely unsuitable for mosaics.
Tree species
Modern wooden mosaics are made from the following types of trees
Whatever wood is used to produce wooden mosaics, it acquires true strength only after it is coated with oil-wax impregnations.
Thanks to these impregnations, mosaics can be installed in rooms with high moisture, for example, in the bathroom or kitchen. There is only one thing: wooden mosaic should not be in constant contact with water, otherwise it will collapse and become unusable over time.
Nutshell
In addition to trees of various species, walnut shells, which are incredibly durable, are also used to produce wooden mosaics. In addition to its strength, walnut shells also have an interesting texture that looks great on the wall in the form of a wooden mosaic. In addition to texture, shell mosaic also has a relief, which gives it an unusual look.
Shell mosaics are laid in different ways, both in a row and in a herringbone pattern. The shell absorbs moisture well, like any wood, but it gives it back just as easily, so this mosaic can be used in rooms with high humidity.
Bamboo
Bamboo is also used to create wooden mosaics. Frankly speaking, it looks much worse than a mosaic made of wood or shells. Perhaps this is expressed by the fact that bamboo is still not a tree, but a grass. Mosaic made from this material is much softer than wood, so it is more susceptible to all kinds of chips and scratches. It is not recommended to use such a mosaic in rooms where children play, because it will quickly lose its original appearance.
Let's be honest recently, wooden mosaic cost a lot of money and not everyone could afford it. However, with the development of competition, these products have dropped significantly in price and now everyone can choose a product that is suitable for the price.
How to install wooden mosaic tiles
The most important point in installing wooden mosaics is the surface. It must be perfectly flat, otherwise the mosaic will follow the relief of the wall. Therefore, the walls must be made either of plasterboard or well plastered and puttied.
Don't forget about the primer either. In order for the mosaic to adhere well to the wall, it must be thoroughly primed to increase adhesion.
Not only should the walls be smooth, they should also be free of cracks and bumps, so it is recommended to use finishing putty for leveling.
When installing wooden mosaics, pay special attention to the level. Strictly define the horizon and vertical and mark them on the wall. While laying the mosaic, keep an eye on these planes.
By and large, laying a wooden mosaic is reminiscent of laying a regular mosaic or tile, but there are some nuances.
First, ask the consultant at the store where you will buy the wooden mosaic whether there is a special glue for sale for it. The glue must contain PVA - this is the basis for good contact of the mosaic with the wall.
I would also like to warn you about the seams between the mosaic pieces. You should not grout these seams with regular grout. The fact is that wood, no matter what it is, is capable of “breathing,” which will cause all the grout to soon crack and lose its original appearance.
Special grouts designed for wooden materials are available on sale. They are able to expand and contract, thereby preventing cracks from appearing on them.
If you can’t find a special grout for wood mosaics on sale, then use ordinary silicone sealant, choosing the appropriate color. Today, there are quite a lot of sealants on store shelves that are not afraid of contact with water and at the same time have different color palettes, and not just white.
Conclusion
In this article we looked at the topic of installing wooden mosaics. We learned what primary materials mosaics are made from, how to install them and how to fill the seams. In fact, you should not be afraid of new materials, even if what they are made of does not fit with your ideas. Modern materials used to process wood are able to perfectly preserve the appearance, structure, strength and beauty for which we love wood, but at the same time find practical and visual use for it in an unusual environment - a bathroom or kitchen. The main thing you must understand is that you should not neglect the general rules for selecting and installing wooden mosaics. If this article was useful to you, then add our site to your favorites, because we still have a lot of interesting things both on the topic of renovation and on the topic of decorating space!
Let's start with a drawing
To get started, we need, strictly speaking, the drawing itself. We draw up a drawing and, in accordance with it, transfer petals, etc., to the veneer, from which the bouquet will be made.
Elements of the design are cut from veneer. Using a sharp knife with a beveled blade. The knife should be held strictly perpendicular to the cutting surface. Parts should be cut in one motion from the beginning to the end of the line. To increase the contrast of the pattern, the petals are cut from two or more shades of veneer. For example, alternating light and dark veneer. If the veneer is fragile, then make several cuts along one line.
Types of finishes
Painting has many manifestations. One of them is a mosaic, where to display a composition or a selected pattern, elements of the same type are used, tightly adjacent to each other, differing in shade, texture or material of manufacture. In addition to wood, glass, ceramics, pebbles and other materials are used to create mosaics.
There are several techniques for creating wooden mosaics, which differ both in the choice of colors and in the way of imparting expressiveness to the surface. These include inlay, intarsia, marquetry and block mosaics.
Inlay method
This method involves creating decor on products and surfaces by inserting a pattern or ornament consisting of flat fragments (plates), for the manufacture of which expensive materials are used.
There are two methods of inlay that are used by modern craftsmen.
In the first case, large-format, simple-shaped inserts are used. Using a sharp object, along the contour drawn on the base, cut out the place where the part will be embedded.
In the second case, a more complex ornament is combined with an openwork pattern. A fairly deep cut is made on the surface to be decorated in accordance with the contour of the insert.
The recess, which has a beveled edge, is selected using a special tool. Inside the recesses, the inserts are fixed using an adhesive solution.
Note! You cannot make such decor with your own hands - you will need to pay for the services of a specialist, and the price will not be the lowest.
Separately, it is worth noting the technology that allows you to imitate inlay, when multi-colored pastes are used to fill cavities in the wood. To make the paste, colored pigments mixed with an adhesive solution are used.
Using this technology, you can achieve imitation of mahogany, malachite, ivory or turquoise.
Intarsia method
This type of wooden mosaic is reminiscent of inlay in that wood plates, differing in color and texture, are inserted into recesses on the surface of a wooden base. Glue or mastic is used to secure the decorative composition.
To make the front side of the plates, cypress, yew, boxwood and other resistant species are used. The surface must be polished. The natural shade of decorative inserts can be diversified by impregnating them with oil or boiling them in a special coloring composition.
Application of block mosaic
This type of wooden mosaic is the least labor-intensive to make, therefore it is used more often than others. Individual blocks are glued together in accordance with the pattern applied to the base, from bars or plates, and cut crosswise into many thinner elements with a similar pattern.
The bars that are glued into the block often have a length of about 20 cm and a cross-section of 2 x 2 cm. Valuable wood is used for their manufacture.
The resulting plates can be glued to the base or inserted into recesses on its surface. At the final stage, the decorative surface is sanded and coated with a protective colorless varnish.
Note. The required number of blocks to create a mosaic panel, with different patterns on the end, are made in accordance with the sketch drawing.
Marquetry method
When creating a mosaic using this technology, pieces of veneer are used that differ in their natural pattern and texture, as they are made from different types of wood. Veneer is used as a background and base into which mosaic pieces are cut.
Note! To create a geometrically correct pattern from a mosaic, consisting of squares or rhombuses, tightly gluing the elements along the edges or along paper is used. This technology is called "parquetry".
Gluing
It is best to glue the cut out elements using planned tape. It is made from tissue coated with bone glue. Glue is applied to the lower surface of the cut out elements. And the element is glued to the surface and pressed down. You need to press down the veneer with a flat, heavy object.
In order for the drawing to turn out the way you wanted it to be, you need to draw it with a pencil on the surface. And glue the cut veneer elements onto this template.
After gluing is completed, a colorless varnish is applied to the drawing. Often applied in several layers. With the obligatory complete drying of each layer.
Wooden mosaic has a number of advantages. Such beautiful decor is absolutely environmentally friendly and safe.
Subscribe to our Yandex.Zen channel
Designer tips
Before gluing mosaics to the walls, it is recommended that you familiarize yourself with some design tips:
- A wall decorated in this way can participate in the zoning of a room and create a bright accent that attracts attention;
- Mosaic elements differ not only in shade, but also in shape, which allows you to create the necessary optical effect in the room. Thus, oblong bars, laid vertically, will visually increase the height of the room;
- The expressiveness of the texture and shade are chosen depending on the area of the room. The larger the room, the more prominent the natural texture of the wood can be;
- To create an effective composition, a combination of elements from different types of wood, differing in natural shade and texture, is used;
- When using such decor on the surface of a fireplace or in damp rooms, the material is first treated with special protective compounds in accordance with the operating conditions.
Do not be afraid that wooden mosaic will be impractical - the high cost of the decor will pay off due to the long term.
The video in this article will tell you how to lay mosaic walls in the bathroom.
Since ancient times, mosaics have been used to decorate various rooms, allowing them to be diversified and bring something new into interior design. Wooden mosaic allows you to decorate any interior. It is used to decorate floors, walls and even furniture. It looks great not only in classic style, but also in avant-garde and modern ones.
Wooden mosaic tile set options
Over the long century of marquetry's existence, cabinetmakers have come up with many ways to create this type of mosaic. Let's list some of them.
Reverse typing on paper
A sheet of paper on which a sketch of the future image is applied is attached to the board. The necessary shaped elements are cut out of wood and work begins. The starting point of the set is the upper left corner of the composition. Gluten glue is applied to the front side of each part using a small soft brush and pieces of veneer are glued onto paper in accordance with the sketch. During the work process, the master tries to fit the mosaic elements to each other as closely as possible, checking the quality of the work against the light. This is the simplest method of typing, however, there are often gaps between the joints of parts, which ideally should not exist.
Set according to the mosaic principle
The finished model is cut into parts and transferred to thin wooden sheets (veneer). First, the main elements are collected, which serve mainly as a background, then smaller details are cut in. When all the elements are cut out, they are applied to a paper model in the form of a mosaic, fastened with tape on the front side. During the work, every effort is made to avoid gaps, gaps and cracks in the wood, and the tape is glued extremely carefully - shifts and wrinkles on its surface are not allowed.
Set on paper
First, thin contours of the elements are clearly drawn on thick Whatman paper, and then, placing the knife in a vertical position, one part is cut out to attach it to the veneer. The fallen paper element on a wooden sheet is carefully traced along the contour with a knife: this is how a part is obtained that fits into the groove as accurately as possible. It is glued with paper tape on the reverse side to the adjacent elements adjacent to it. In the same way, all the elements are cut out, along their contour - wooden parts, which are then glued onto whatman paper. So the paper model gradually replaces the veneer set without gaps or overlaps.
Set in veneer
The design is transferred onto a wooden base through carbon paper and parts are cut out in the veneer along the contour. Then the necessary inserts are made from a different type of wooden material to fill the niches on the background board. The elements are connected to each other with paper tape.
Boule technique
The method was named after the French furniture maker Andre Charles Boulle, who, during the formation of marquetry as an independent art, made a significant contribution to its development. If it is necessary to obtain two identical ornamental sets with a background and an image, work simultaneously. Two wooden canvases (one background, the other for making fragments of the composition) are glued to thick paper and folded together, fastening them in several places with a special adhesive dispersion. The intended image is transferred to the top wooden sheet and all its elements are cut out along the contour with a cutting tool. When the wooden sheets are disconnected from each other, two niches and two inserts come out at once for two sets of opposite colors.
Technology for the production of unique material
Products using the complex intarsia technique are created with more labor and time than marquetry. To begin, select the desired pattern and create a sketch. The sketch is divided into separate parts. Afterwards, these elements are cut from various types of wood, differing in texture and shade. The base is solid wood, in which recesses are cut out for the details of the design. The back side of these parts is left rough for better adhesion to the base, but the front side is polished for a long time and thoroughly, giving an aristocratic shine. If pieces of the design protrude above the base, then you have relief intarsia. When the edges of the design and the base coincide, we are talking about pictorial intarsia.
The technology for making marquetry is much simpler.
The desired pattern is drawn on thick paper, then parts are cut out from the veneer and treated with a special solution. Afterwards, a veneer design is pasted onto the paper, turned over and pasted onto the item to be decorated (or onto the base mesh).
Useful video
All photos from the article
It is noteworthy that wooden mosaics for walls are something implausible for some people, because wood is afraid of moisture and has a rather unstable structure, and we often see mosaics in rooms with high humidity.
Nevertheless, this type of finishing work is thriving and has great prospects, since every year more and more people become familiar with this cladding method, which directly affects the growth of popularity.
We will now try to introduce you to such artistic design to the best of our ability, and in addition, we invite you to watch the video in this article.
Finish options
The classic solution for using wood mosaics is to decorate walls. It can be used to decorate one wall, thereby zoning the room. You can use it to highlight a sleeping area, smooth transition from one to another room, and design a place to relax.
The mosaic looks impressive in spacious rooms when it is used to decorate a huge canvas. In this case, you can examine the texture of the wood and see the play of shades. Wooden mosaics are used to create floor coverings. It looks impressive and original. It can be used to decorate staircase steps and furniture. It looks attractive on the table.
Wooden mosaic is treated with special compounds to give it strength and reliability. The ideal solution would be a mosaic treated with an oil-wax composition. It can be used to decorate a bathroom or kitchen.
For example, you can:
- lay tiles around the bathtub or shower stall on the walls and floor;
- use a combination of mosaics in tandem with ceramic tiles, which will allow you to create original decor at minimal cost;
- decorate one wall with an unusual ornament or pattern from a wooden mosaic (a panel of different colors, a geometric pattern or an attractive landscape);
The built-in shelves, lined with mosaics and additionally decorated with lighting, look original. A bathtub lined with mosaic tiles on the outside looks impressive. You can decorate the mirror or washbasin area with an interesting accent.
Where to use wood mosaic
A practical option for using wooden mosaic tiles on the floor is zoning the space, for example, creating a relaxation area in the room: in front of the fireplace or simply in the center of the room. Warm wood will also appeal to those who like to walk barefoot - they can be recommended to lay out the area in front of the sofa or under the dining table in the living room with natural material.
You can choose stylish wooden tiles for the bathroom, natural mosaics for kitchens and living rooms based on photos from the catalogue, based on the advice of designers and your own taste. The optimal price-quality ratio is offered by the Chinese factories Opera Decor and Natural. Well, for those who are ready to spare no expense when creating the design of a living room, kitchen or bathroom, we can recommend the luxurious mosaic tiles of the Spanish brand L'Antic Colonial.
Mosaic as a facing material is in great demand today. It can process a variety of surfaces. Moreover, it allows you to convey different design styles. As for wooden mosaics, this is a real art.
This unique finishing material is used both for processing walls and for processing floors. For example, it can be used in arranging a kitchen, sauna, cafe, bathhouse, restaurant, bathroom and other premises.
Great demand and popularity is explained by a sufficient number of advantages. We invite you to learn more about what wooden mosaic tiles for walls are.
Wood mosaic laying technology
Wooden mosaics are usually sold in sections, which are most often 30x30 cm in size. This sectional type of mosaic greatly simplifies its installation.
Installation and finishing mixtures are very important when working with wooden mosaics, since ordinary glue for wooden products cannot be used in this case. When gluing mosaics onto plywood, the sheets are joined diagonally so that there is no visible divergence of the cladding along the seam lines during thermal deformation.
When finishing joints, it is not recommended to use ordinary grout, which is used when processing joints for ceramic tiles. For this purpose, there is a special two-component epoxy grout, which is designed for grouting hardwood. The grout for ceramic tiles does not have the required flexibility; if used during further use, at the slightest fluctuations in the wood, that is, with changes in temperature and humidity, when the wood “breathes,” the mineral grout may begin to crack and crumble. In addition, it must be washed off with a large amount of water, and this can damage the material of the wooden mosaic.
Teak mosaic on a cork backing is used for the floor. Floor boards are 0.7 cm thick, and wall boards are no more than 0.3 mm thick. This means that such a floor must be sanded many times. All seams in the floor are filled with silicone glue. This type of coating lasts for decades. Caring for a wooden mosaic will not cause much trouble: it can be wiped with a damp and then a dry cloth once a week.
Features of installing wooden mosaics
As we have seen, this facing material truly has unique technical characteristics.
The most important thing is that when using it you can create beautiful interior design. The following is a consistent technology for laying wooden mosaics:
- Mostly mosaics measuring 300x300 mm are used. This size is very convenient when working.
- For fixation, special wood glue is used. The choice of glue also depends on the base of the wall.
- If the base is plywood, then it is attached diagonally. This method is also recommended for joining plywood sheets. Otherwise, thermal deformations may occur. That is, the mosaic will be glued across the joints on the plywood.
- After gluing, it is necessary to process all the resulting seams. Conventional grout, which is used when laying ceramic tiles, is not suitable for sealing them.
Wooden mosaic tiles require the use of a two-component epoxy grout.
It is mainly used in all cases where it is necessary to process the seams between mosaics made of hardwood. This is explained by the fact that the tiles do not deform when exposed to moisture. As a result, the grout remains in place.
In the case of wooden mosaics, at the slightest fluctuations in temperature, humidity, etc., it begins to change its shape, that is, to deform. If you use regular grout, it will simply and quickly crack. For this reason, epoxy grout is used, which has the necessary elasticity.
If you decide to lay wooden mosaic tiles on the floor, then it is important to take into account some of the features of this work. First of all, a cork substrate should act as a base. For the floor, the tiles must have a thickness of at least 7 mm. While for walls, only up to 3 mm is allowed.
Floor preparation involves a number of important technological processes. So, it must be carefully sanded several times. If there are joints or other flaws in the wooden floor, they are leveled using silicone glue. By following installation technology, you can be sure that such a floor will last for decades.
Helpful advice! Caring for wooden mosaics does not require complex manipulations. It is enough to treat it with a damp cloth, and then wipe it dry with a napkin. It is enough to carry out this procedure once a week.
Thus, you can give a beautiful design to absolutely any covering in a house, apartment, and even when finishing the facades of buildings. At the same time, you can combine all kinds of colors, shapes and much more.
Conclusion
So, wooden mosaic tiles can be placed on a par with wooden parquet. This coating has a lot of positive aspects. Numerous reviews prove this. Gradually, this finishing method is gaining more and more attention, and after a while, it can become the main one.
Wood mosaic (Teak), laying on a concrete floor base
After all, the technique of forming a sketch from a wooden mosaic is truly impressive. We hope this material has helped you gain insight into this unique and unusual material. In addition to this material, we suggest watching an introductory video that will help you learn about other nuances of such tiles.