Summer is approaching, trips to a country house or dacha are coming. On warm sunny days you hardly want to be confined within four walls; it is much more pleasant and healthy to breathe in the fresh country air. An attractive and easily implementable idea is to build a gazebo. For self-arrangement, the design made from pallets is best suited.
Such a simple structure will allow you to sit comfortably with a gadget or book, or place a container with a refreshing drink on a stable surface. Neither rain nor scorching sun will prevent you from having a pleasant time in the company of friends or while away the evening alone, enjoying nature.
Construction material
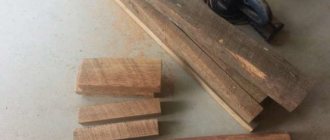
The direct purpose of pallets is to simplify the reloading and transportation of various goods: bags, boxes, boxes, etc. Pallets are durable, allowing them to be used for the construction of summer structures, for example, gazebos. They are durable, repairable, have a clear geometry, and are inexpensive.
Before use, the pallets are cleaned of dirt and dust and repaired if necessary. Restoring wooden containers involves replacing damaged boards, adding missing boards, and strengthening loose structural elements. A grinding tool will help you achieve a smooth surface quickly and easily.
The service life of a future building can be extended by treating wooden parts with special protective compounds that prevent the appearance of rot and the harmful effects of insects.
These products are sold at any hardware store.
Other ways to use pallets
As you already understand, building gazebos is not the only option for using pallets.
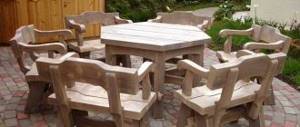
You can build anything from them, for example, country furniture. Using pallets, you can equip the gazebo with armchairs, sofas, a table and even a swing - whatever else your imagination is capable of. To build furniture, you can use everything that is left from the gazebo. Here is just a small fraction of what you can make from pallets with your own hands:
- shoe rack;
- hanger;
- table on wheels;
- sofa;
- armchair;
- vertical vegetable garden or flower garden;
- utility wall with shelves;
- swing;
- sandbox.
The most important thing in such a matter is not to limit your imagination. Good luck with your creativity!
Choosing pallets
Below is a classification of the most common products.
Euro pallet sizes
Pallets: 1 — “Eurosize”, 2 — “Eurostandard”
The length and width of wooden packaging can be different (for a certified Euro pallet these dimensions are 120 and 80 cm, respectively), the standard height is 14.5 cm.
Finnish and American pallets
Finnish pallet sizes
The length of the final pallet is 120 cm, width - 100 cm. When building a gazebo from American-style pallets, consider other dimensions: 120 x 120 cm.
American pallet sizes
Whatever choice is made, the advantages of such a building are obvious:
- The environmentally friendly material will not cause harm to health, will organically fit into the countryside exterior and provide comfort.
- The design allows sunlight and fresh air to pass through, creating a feeling of unity with nature.
- You can build a gazebo from pallets with your own hands. Even for a novice master it will take 2-3 days.
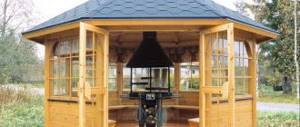
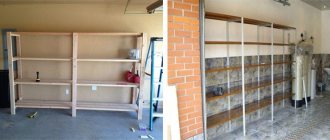
DIY gazebo made from pallets - photos and instructions
However, no matter what type of pallets you choose, the result will be positive in any case. The gazebo will not only decorate the site, but will also become a cozy place for friendly gatherings on summer evenings. During the day, you can find shelter from the hot rays of the sun without running into the house - an excellent compromise. And the best part is that you can build a similar gazebo from pallets with your own hands (example photo below) in just a day or two! Now we will tell you how to do it correctly.
In order to build a gazebo from wooden pallets with your own hands, you need to draw up a plan that you should strictly follow.
So, step by step we go from the first point to the last:
- Choosing building material
- Thinking over the appearance of the gazebo
- Making a drawing
- We directly build a gazebo
- We decorate the gazebo
Tools
Initially, you need to make sure that you have the necessary tools:
Materials:
Choosing a location on the site
The first step is to take care of the place on the site where you want to install the gazebo. To do this, you need to clear the selected area, remove stones and grass. If the ground on the site is uneven, then you need to level it (for this, crushed stone or just earth is used). Leveling the ground is especially important if you want to lay the floor directly on top of the ground. We, however, would not recommend going this route, because the proposed option is not the most durable - it is better to make something similar to a wooden pedestal, a base on which to place the gazebo.
After bringing the area into the desired form, you can apply preliminary markings using pegs and rope.
Project
Having prepared for construction, do not forget to turn to the best assistant - your own imagination. It's time to invent a pallet gazebo project.
Having used such a word, we were not mistaken - creating a gazebo is like a construction set, and therefore it becomes possible to show maximum ingenuity. In particular, this applies to the interior decoration of the gazebo: you can knock down a table and benches from pallets. It is recommended to create furniture immediately before installing the gazebo. Having thoroughly figured out what kind of gazebo you would like to see on your site, proceed to the next stage - the drawing.
Drawing
Don't worry about the fact that you are not very good at drawing - any, even the most basic graphic editors will come to the rescue. Your task is not to accurately document the entire layout of the gazebo, but to visualize it as correctly as possible on the site. It is proposed to create a drawing of a gazebo made of pallets, taking into account the structural sections - this will be clear and useful for you in the further implementation of the project.
Foundation
Let's start working on the site - we build the foundation of the gazebo from pallets with our own hands (photo below). Choosing the type of foundation depends largely on the amount of time you want to spend on construction. If the task is to do everything as quickly as possible, then the best option is to place concrete blocks on the compacted earth. Laying the brick pillars will take a little time. The longest option is pouring concrete columns (it should be noted that this type of foundation is the most reliable)
Please note that soft soils require the installation of a simple strip foundation - which will slow down the work somewhat (you will need to wait for the cement mortar to harden).
It is necessary to lay a base of timber along the perimeter of the foundation, and all this must be secured to the foundation with screws (anchor bolts are also suitable). The base is secured to each other with strapping.
Fastening the first pallet
You need to use only high-quality boards for the base - they bear the most impressive load. If you put a protective film under the base, this will help protect the foundation from moisture.
Walls and floor
Once we have the bottom strong part, we can start installing the corner posts. They are placed in the corners, in the front part on both sides of the entrance, on the rest - above the support posts. They need to be connected at the top with strapping.
Important: the racks must be placed strictly vertically, otherwise the gazebo may sway.
After all the racks are installed and secured, you need to work on the top trim. It is best to strengthen the strapping with corners - this way you will reduce the likelihood of breaks. After this, the floor boards are laid.
Important: the boards that will be used to cover the floor must be pre-treated with an anti-rotting agent - otherwise the gazebo may sag.
If according to the project you have a middle frame, then after laying the floor, proceed to this stage.
The walls of the gazebo made from pallets can be made up of either one row of pallets or several (depending on what design of the gazebo was chosen). Wall panels are fastened using cap screws or anchors. Sometimes nails are also used - this is a less reliable, but completely acceptable option.
Roof
The last thing we do is make the roof of the gazebo from pallets. The choice of material is yours - it can be roofing felt, polycarbonate, tiles. Each of the materials has its own advantages and disadvantages: the tiles look attractive, but laying them will take a lot of time; It is easiest to cover with roofing felt, but the appearance of the roof will be extremely specific; polycarbonate is the middle option. The roofing pallets themselves are not very suitable, but they can be disassembled and the boards used to lay the roof.
Decoration and operation
Having erected a gazebo, you can easily move on to the final and, probably, the most enjoyable stage - decorating and decorating the gazebo from pallets. The purpose of this stage is not only to put the gazebo in order visually, but also to ensure its long-term existence. To do this, cover the floor of the gazebo with a composition for durability, and then you can paint the floor or fill it with varnish.
The walls can either be left in their original wooden beauty, or covered with acrylic paints (here your imagination can play as you like).
If you want to change the color of the gazebo after the fact of its construction, use stain or special wood paint. The stain will help highlight the natural shade of the wood.
In any case, it is recommended to varnish the walls - this will protect them from pests and maintain an attractive appearance for a long time.
You can decorate the gazebo by hanging decorative curtains or several flowerpots on the windows. Inside the gazebo you can put benches on which it would be nice to throw a few colorful pillows. A small table would be a great addition.
Decoration
If you plan to spend evenings in the gazebo, then it is most logical to install electricity there (do not forget to insulate the wiring so as not to create flammable situations). A beautiful addition to the gazebo will be a wooden or stone path leading to it. To lay such a path, you will need leftover pallets.
Design project
This stage opens up endless possibilities for creativity. The material chosen for construction is reminiscent of design elements, and accordingly, many design options are obtained.
This version of the gazebo illustrates that quite decent structures can be made from pallets, if only there was an idea.
Perhaps it will be a simple quadrangular house, “Baba Yaga’s hut” or a multifaceted gazebo consisting of six or more corners. Various modifications are available, limited only by the author's imagination.
Drawing
After defining the architectural forms, it's time to put the gazebo design on paper. In this case, complete design documentation is not required, but it is highly desirable to make a drawing with structural sections of the structure.
Also, on the plan of the land plot, you can plot the contours of the future building to assess the general concept of landscape design of the territory. In the simplest graphic editors, you can make a 3D visualization of the gazebo and see what the structure will look like on the ground.
Final decor
So our gazebo is ready - simple and beautiful. And to make your vacation spot look even better, you can further decorate it.
It would be nice to arrange a vertical garden in the gaps of the pallets - it can be planted both inside and outside. You can paint the walls with bright colors or simply renew the varnish coating if it was damaged during the installation process.
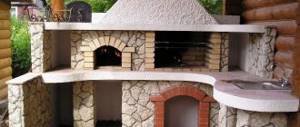
If your gazebo has a place for a barbecue, you can cover it with decorative tiles or stone.
The classic option is to plant grapes around the gazebo. Over time it will grow and create additional shade. This is especially true for gazebos covered with polycarbonate. Due to the plastic “dead” roof, they can get quite hot.
Foundation
The choice of foundation is also carried out at the design stage and depends on the design features and the type of soil on which the structure is being built. You should not repeat the mistakes of the “reckless builder” from the parable, who built the house on the sand. For clay soils, a pile foundation is suitable.
A steel pipe with blades at the end will easily enter the ground and provide adequate structural strength in adverse weather conditions. Cartilaginous soils will require a simple strip foundation. This option will extend the construction by several days required for excavation and hardening of the cement mortar.
Base and frame
Now we proceed directly to construction. First of all, you need to clear the selected area of grass and stones. Now you can begin arranging the base. It is advisable that the floor in the gazebo be placed on small stilts or on a concrete pad. If the flooring is located directly on the ground, the boards will quickly rot and everything will have to be repaired.
We dig holes to install concrete supports. It is enough to arrange piles with a depth of 30 cm and a cross-section of 20x20 cm. The distance between the supports is 100–120 cm.
We prepare the concrete solution. To do this, mix cement, sand and crushed stone in a ratio of 1:3:3. We drive several reinforcements vertically into the holes and insert a “glass” made of boards or roofing felt. This will be the formwork. Pour the concrete and wait a few days for the solution to completely harden. By the way, when pouring piles, do not forget to check all horizontal lines using a level, otherwise your floor will turn out crooked.
Now it's time to build the floor frame. To do this, we take 100x100 mm beams (joists) and lay them on piles around the perimeter. We fasten the logs together and also fasten them to the pile posts using anchor bolts. We measure everything strictly according to level.
We sew up the gaps between the joists with boards.
Now we install the corner posts vertically and make a transverse strapping on top.
Attention! When constructing a frame, it is best to use anchor bolts and screws. It is best to avoid nails, otherwise such a structure may become unstable over time.