Product description
The “Resurrection” grill complex is your inspiration for creating culinary masterpieces.
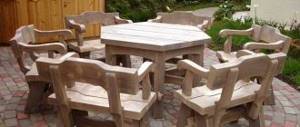
Made by hand using hot forging from sheet steel, metal profiles and steel rods. The stove and roasting pan are removable. Gable roof with smoke holes. Spacious lower shelves for dishes and firewood. There is a special place under the roasting pan for skewers. Stainless steel sink. Large corner metal tabletop with a total length of 160 cm made of 1.2 mm steel. The width of the passage is 1.5 m. The frame is covered with paint that can withstand temperatures of 150 °C and decorated with strokes of gold patina (silver or copper patination is possible for an additional fee). More photos of the gazebo:
Main stages of construction
To build an exquisite and durable brick barbecue oven with your own hands, you need to adhere to the technology at all stages of the work performed. Following the recommendations when laying bricks will help you avoid possible troubles in the future.
- Complete a drawing and specify the amount of construction raw materials. The drawing is needed in order to determine the dimensions of all parts and calculate the required amount of material used. Which will further reduce the amount of waste.
- Construction of formwork and pouring the foundation. For a barbecue oven, the foundation must be strong and reliable, supporting the oven’s own weight. There is no need for a foundation poured below the soil freezing level. You can make it in a layer of 30 cm, in the form of a reinforced slab.
- Furnace laying. Bricks are laid after 3-4 weeks, when the foundation has completely hardened. Brick laying is done using a medium-thick mortar made from a sand-cement mixture. We use jointing, which makes the appearance of the stove more attractive.
- Work with finishing materials. Such work should include installation of furnace finishing parts. Laying iron around pipes and floor tiles.
Drawing and calculations
For example, consider a stove built on a concrete base, which has a working surface and a brazier. In the future, if a sink is needed, it is possible to cut it up to replace the table. By design, the place for coals is topped with a pipe and a vault, which, with the help of the draft produced, allows you to protect yourself from smoke.
The brick laying technology under consideration is intended for this stove. But you can correct the drawing and change the dimensions a little. But you should also take into account the dimensions of the brick, standard 25x12x6 cm.
Description of the roaster
Professional roasting pan, removable, dimensions LxWxH 80*35*22 cm, made of steel 4 mm thick, depth to the grate 16 cm. Two drawers-ash pans for collecting ash and adjusting the blower. Along the upper perimeter there is a stiffening rib to prevent temperature deformations. Slots for fixing 10 skewers - you can cook ~8 kg of kebabs at the same time. The barbecue grill is included and fits inside the roasting pan.
The fryer is coated with heat-resistant paint that can withstand temperatures of 1000 °C. When using for the first time, you need to warm up the firebox smoothly, not abruptly, for 20-30 minutes to polymerize the coating.
Types of foundations for barbecue gazebos
When building gazebos equipped with a fireplace stove, barbecue stove or barbecue stove, a reliable foundation is provided. This is a guarantee of the strength of the structure being built. Several types of foundations are used for such structures:
- columnar foundation. The most popular type of base for small-sized gazebos with barbecues and grills. The depth of the holes for the pillars is from 80 to 90 cm. A cushion of crushed stone or sand is placed at the bottom of the holes. This type of base requires waterproofing, so brickwork or metal pillars are covered with roofing felt. It is recommended to pour a foundation slab as a base under the furnace installation site;
Layout of a strip foundation
Useful advice! When constructing slab foundations, it is recommended to use reinforcement. For this purpose, reinforcement bars of various sections are used.
- strip foundation base. If the structure you choose will be built from brick or natural stone, a strip shallow foundation will be most suitable. To do this, a trench up to half a meter deep is made along the perimeter of the building. A sand cushion is laid out at the bottom and compacted. Using formwork, a foundation is poured 30 cm high above the ground. The foundation is pre-reinforced;
Pavilion in the form of a tent on a personal plot
- screw piles. A rather rare type of foundation used for gazebos. This is due to the fact that its installation requires special equipment. However, if at the stage of constructing a pile foundation for the main house the dimensions of the gazebo and the location of its installation are already known, it is advisable to immediately construct such a foundation for this structure;
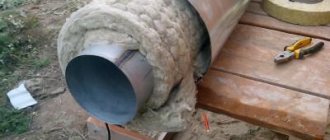
- bored foundation. The construction of such a foundation does not require the purchase of expensive piles. The technology of the device consists of drilling wells and filling them with concrete. Pipes of various diameters or roofing felt rolled into a pipe are used as formwork;
Example of a slab foundation
- monolithic slab foundation. For such a foundation, the formwork is first assembled, then the frame is made of reinforcement and concrete is poured over the entire area. The advantages of such a foundation are not only the ability to support quite massive gazebos, but also that the slab can be used as a floor. It is recommended to install such a foundation in areas with problematic soils.
User manual
The “Resurrection” grill complex is designed for cooking outdoors: kebabs on skewers, lula kebab on skewers, porridge and soups on the stove in a saucepan or frying cutlets in a frying pan. Use only wood or charcoal as fuel.
Installation on any hard surface. To increase service life, it is recommended to clean off metal oxides and renew the paint every two to three years. At the end of the summer season, removable structural elements can be stored in a shed or garage.
Additional purchased accessories increase the functionality of the product, for example, on a spit you can cook a rabbit or a whole chicken over a fire.
Stove for a gazebo: features and nuances of operation
Making a gazebo with a stove is a labor-intensive undertaking that requires a correct and responsible approach, compliance with important nuances and recommendations of specialists. Only in this case can you build a high-quality and reliable structure, remember this.
Attention: A gazebo in a dacha with a stove is not such a simple design and when starting construction you must think through everything down to the smallest detail, the stove plays an important role. Therefore, you need to know how it is built. To build such a structure, you need to use special heat-resistant bricks, which will prevent many problems.
So:
- You will definitely need a metal sheet, the thickness of which is 3 mm or more, it is needed for the manufacture of a coal pallet.
- You also need to purchase two types of sealant in advance - heat-resistant, it is intended for sealing the hood and pipes.
- You also need to purchase waterproof silicone sealant, it is intended for countertops.
How to build a foundation
The stove in the gazebo should stand rigidly and should not move over time. Otherwise, all your efforts will be wasted. Especially if you are making a stove complex for a gazebo.
Scheme for making a foundation for a furnace
Attention: It is important to note that the dimensions of the foundation will depend on the size of the furnace, which means that some features need to be taken into account here. If you want to create a barbecue oven with a tabletop, you definitely need to make a foundation, the size of which will be two meters. For a lighter structure, you can make it weaker.
- Next, you need to dig a hole, the depth of which will be 30 cm, dig the bottom and cover it with a layer of sand, after which it needs to be watered and thoroughly compacted, because this is an important condition.
- When starting to install formwork in a pit, you should know that this must be done strictly according to the building level, after which lay the reinforcing mesh and pour concrete. Concrete can be purchased ready-made, but you can also do it yourself, not forgetting to maintain the proportion.
- The reinforcement must be buried in concrete, because this is an important condition that many owners forget about.
Foundation reinforcement scheme
- Filling is done with liquid cement mortar; there should be no voids left inside. This will significantly weaken the structure.
- If you are making a stove in a gazebo with your own hands, then during production, make sure that the pillars of the gazebo walls do not bend.
- The gazebo stove is also equipped with a chimney. Its structure must be thought out in advance. It can be either internal or external. In the first case, it is used in closed gazebos and the second option is suitable for an open structure.
- A gazebo with a stove on the street is equipped with other items. For example, it can be with a cutting table. A barbecue can also be made. It's up to you to decide. Only for this you need to immediately provide a place on the foundation of the gazebo.
How to buy a gazebo
You can purchase the “Resurrection” barbecue complex by calling 8-495-764-44-02 or by submitting a request through the website. Delivery upon receipt and processing of the order by the company's transport within 1-2 days or by the date you choose. Pickup available. Payment upon delivery to Moscow and the Moscow region, to the regions and by bank transfer - by prepayment.
Additionally, you can purchase various accessories, for example, a spit, a stand for skewers, a stool or a mobile table.
Tags: Sunday, youresurrection, resurrection, resurrected, youresurrection, youresurrection, resurrection
Rules for arranging a furnace
Having decided to build a barbecue oven, or any other type, in the gazebo, you must comply with all fire safety rules , namely, not place flammable objects in the fireplace area.
The oven itself must meet the following requirements:
- ensure comfort of use;
- its dimensions must comply with the rules of ergonomics and correspond to the size of the gazebo;
- the structure itself and the material from which it is made must be durable;
- match the overall interior design of the gazebo.
Proper care of the gazebo
The gazebo with barbecue you have built will please you longer if it is cared for correctly and regularly:
- Clear the floor and walls of the open gazebo from snow, ice and fallen leaves;
- treat all wooden and metal elements of the gazebo annually with special protective agents;
- Regularly clean any cracks in the wood with putty;
- Cover open areas in the gazebo with film for the winter.
Ideas for building gazebos with barbecues or grills: video
Country gazebo and summer kitchen: photo
Stove complex for a gazebo - we build it ourselves
We will build a brick stove complex for the gazebo, with a barbecue, a cauldron and a workplace.
First of all, we determine a place in the gazebo or near it, make markings, dig a pit, 500-700 mm deep, fill it with sandstone and crushed stone, the total thickness of the cushion is approximately 400 mm, and tamp it. We place stone supports on the bottom, on which we lay a reinforcing frame made of ribbed reinforcement, cross-section 8-10 mm in diameter, cell 100*100 mm.
Important: To ensure that the metal does not rust and the stove in the gazebo lasts for a long time, the reinforcement frame must be filled with concrete on all sides, with a layer of at least 50 mm.
We make formwork from boards or plywood, check the geometry, strengthen the structure with jibs, and pour concrete. Plate thickness 100-250 mm. Leave for a month until the solution is completely formed.
We lay roofing felt waterproofing on the base under the gazebo stove; it is better to additionally lay a sheet of asbestos. We lay the first row of bricks, first without mortar, and do a fitting. The second row is exactly the same, but with the seams of the bottom layer bandaged.
Be sure to check the geometry of the masonry in each row
In the third, we install the blower door and lay out the clearance chamber in the oven under the cauldron, as shown in the diagram below. The next row of the oven is unchanged, just re-bandaging the seams. Fifth - we cover the ash chamber, leaving a small well - an exit under the grate. And we lay out the arch above the niche under the firewood; beginners can make a template and cut the bricks at the desired angle.
Please note that the arch is recessed into the furnace masonry, this is done for simplicity, so as not to remove external joints
In the sixth row we install a combustion door; it is better to mount it on a stainless steel frame. We also expand the hole for the cauldron. To facilitate installation, a square firebox is laid out, but experts insist on a well with round walls, 405-420 mm in diameter, with an air divider. We use fireclay bricks inside the furnace.
For the arch, you can use a special shaped brick, this will make your work much easier
Seventh row - we lay out a brick with a bandage, install 2 more simple arches above the work area. And in addition, we pour concrete into the slab located under the grill. We do not fill it completely, leaving a gap of 110 mm wide for laying bricks.
Instead of a slab, you can lay steel plates and lay a layer of fireclay bricks
8 - we continue laying the stove with bandaging, 9 - we close the fire door.
Pay attention to the overlap of the oven door, it is called a lock. Such an overlap is suitable if the door is installed on a stainless frame, on basalt cardboard; if it is supported by wire or steel strips, then over time the brick may burn out. And besides, as the oven heats and cools, the lock will rise and fall, and over time it will fall out.
Install the firebox door on a special frame, and then it will be reliably protected from thermal overloads
And here we pour concrete floors in the utility part of the furnace.
For a larger sink, you can increase the section size by 1 brick
In the first slab we make a cutout for the sink, 500*500 mm is enough, the second is a blank one where the grill will be located, we begin to lay out the ash drawer.
Advice: It is better to make an ash box for a barbecue to order; it is deeper and longer than standard samples, but if this is not possible, then you can install a regular ash door in the gazebo stove.
At 10 - we make hailo in the oven under the cauldron, through which the flue gases will escape.
You can cut the brick at the desired angle using an abrasive wheel.
Here, in the grill part, we install a grate. You can also put a regular grate in the gazebo stove, but coals will fall out through it, which will inevitably disrupt the temperature regime when cooking. The bricks above the blower chamber are attached at the corners.
It is better to make the grate to order, from a sheet of metal with holes
11 – install the Balezin stove under the cauldron in the oven. It is purchased ready-made; be sure to check the geometry of the slab, as the quality often leaves much to be desired.
The work area can be lined with stone, ceramic tiles, or a wooden countertop.
In the same row of the gazebo stove we finish laying the table and sink.
In the 12th row we begin to lay out the grill. On the right, between the grill and the cauldron, we have already formed a smoke channel.
It is better to cover the slab for the cauldron with fireclay bricks
With an additional row, as shown in the diagram, we overlap the Balesin cast iron plate by 20-30 mm. This is done so that the smoke from the cauldron into the chimney is as reliable as possible, and the fumes do not enter the gazebo.
13 – we continue laying, 14 – a mirror image of the 12th row.
The edges of the brick inside the stove can be filed to form grooves, then the grate will lie on them
The 15th row is the same, it completely copies 13, we lay the bricks with a bandage.
The gap between the bricks inside the stove should be no more than 3 mm
Tip: The depth of the grill should be approximately 2/3 of its width, and the width, in turn, is calculated using a special formula.
16, 17, 18 row we continue laying.
To calculate what size stove you need in the gazebo, assume that 1 skewer requires 70-100 mm
In the 19th row we block the grill portal. The brick is installed in width, in 2 layers, always fireclay, because the arch will experience large thermal loads. And also the bulk of the stove’s smoke collector will be located on it. Basalt cardboard is laid between the layers, which will protect the outer layer of the gazebo stove from heating. The second (inner) layer of bricks should be reinforced with studs.
Do not combine chimneys from the cauldron and barbecue to the pipe, then both stoves can be heated at the same time
20, 21 rows we simply lay a brick. Please note that the chimney from the cauldron runs parallel to the barbecue and does not go into it until the smoke collector begins.
Important: It is recommended to make at least two rows of bricks from the bottom edge of the stove arch to the beginning of laying the smoke collector. The volume of the smoke collector must be at least 2/3 of the volume of the grill niche.
22 - block the arch. On the 23rd row, we begin to lay out the smoke collector, narrow the well, and simply move the brick inward on three sides. In the 24th and 25th rows it’s the same, let’s narrow it even more.
The outer layer of the oven can be immediately lined with facing bricks
Please note that a protrusion has formed in the chimney; it will act as a chimney tooth and prevent cold air from penetrating inside the grill through the pipe.
26, 27, 28, row we continue laying with a ledge, by row 29 the smoke collector reaches the dimensions of the pipe, approximately cross-section 250 * 250 mm, and then the pipe is laid out to the required height. The rows repeat each other with ligation of the seams.
The height of the chimney depends on the height of the gazebo; be sure to put a protective cap on top to prevent precipitation from getting inside
At this point, the laying of the stove for the gazebo can be completed. We have told you the simplest way, but if you want it to be not only practical, but also aesthetic, the brick needs to be sharpened and well processed, as well as laying out the arches in a more complex way.
Brick gazebo stoves can be built separately or together with a working area
Do you want to receive new articles by email?
Did you like the article? Share with your friends!
stroiidea.ru
Technological process
After the sketch is drawn up, you need to select the material and tool. The advantages of making a stationary structure are obvious: it is durable, beautiful, convenient and functional. Yes, such a grill will cost more than a compact portable one and other options, but it’s worth it.
A brick fireplace for frying can be made in different designs. And now the product becomes not only a functional, but also an aesthetic component.
In order for construction to proceed quickly and efficiently, you need to prepare the tools in advance. We will need: a shovel, a rubber hammer, a tape measure, an angle grinder, and concrete mortar.
Foundation
A base will be required for structures that weigh from 450 kg. It is better to use B2 concrete with a two-layer metal mesh. This will ensure maximum design reliability.
It is advisable to install such a heavy building on a monolithic foundation
In general, the construction of the foundation occurs according to standard instructions:
- decided on the location: the smoother the surface, the easier the work, and the more effective the base;
- the best option is square dimensions with a side of 120 cm;
- We mark the area using pegs and string;
- dig a hole 20–25 cm deep;
- we install formwork;
- prepare the solution;
- pour it into the hole;
- we wait.
The base needs to be strengthened for higher strength. For reinforcement, a special mesh or piles are suitable. If you choose the first option, do not forget that the product must be laid twice.
Masonry
A good choice for this construction stage is solid ceramic brick, but fireclay brick is also suitable. On average, ordering costs 150–200 bricks. Of course, it depends on the size and design features.
For greater functionality, the stove must be lined with bricks
Up to the 5th row, use a cement-sand masonry mixture in a ratio of 1:3. Since the temperature will already rise above, a clay-sand solution will be needed. The proportions are calculated depending on the quality of the clay. The solution should not be very liquid, but the thickness should be optimal. To ensure that the construction of the barbecue proceeds accurately, with a minimum number of errors, it is better to carry out a small fitting:
- We take bricks and lay them dry on the foundation.
- We evaluate the result obtained, remember it, it is better to record it with a camera.
- You can save a lot on material by doing the right fitting.
- Having laid out the bricks, draw a masonry line. You must not stray from boundaries.
A good choice for this construction stage is solid ceramic brick
Before laying, you need to prepare the material. The day before construction, soak the bricks or leave them in buckets of water overnight. The structure can be erected when the outside is dry and the inside is wet.
Now step by step about the masonry. We take bricks and mortar and build the first row. Make sure that the space between the bricks is filled with the mixture. The stones should be installed in the order you have previously planned. To fix the stones, use a rubber hammer.
Working surface
Having completed the construction of the main structure, we will take care of ease of use. We are talking about a working surface. It makes cooking much easier.
A good countertop successfully combines:
- strength;
- minimal care;
- convenience;
- resistance to weather factors.
The tabletop must be folded so that it is high enough and does not cause discomfort in use. It wouldn’t hurt to think over its design. The work surface finished with paving slabs looks cool.
Having finished installing the barbecue, you need to build a work surface for cooking
A simple and budget option is a cutting table using the following technology:
- We lengthen the back wall, making dressing with the central post more difficult.
- We complement the above design from the side. We erect another stand close to the fireplace masonry.
- We lay a table top made of natural or artificial stone on it and the side wall.
Construction is quite simple and not too expensive. Don't forget to draw up a step-by-step action plan in advance.
Finishing decor
A standard brick grill is a pragmatic design that requires additional finishing. We will need special decorative components. As noted earlier, it is better to provide auxiliary devices at the design stage. If the idea came later, it's okay. We draw up a new drawing by hand. Since we will complicate the grill, we need to take care that its main structure is not harmed.
Usually the roasting center is supplemented with:
- cutting table;
- stove-broiler;
- washing
We mentioned the working surface above, let’s look at other options.
In addition to frying meat, sometimes you need to cook additional dishes in pots, frying pans, or simply heat up the kettle. Therefore, the place of the cutting table can be taken by a brazier stove. This is a flat surface under which hot coals will be located.
In addition to the work surface, additional equipment may be needed, such as a sink, fryer, etc.
To equip a barbecue with a sink, you need to install a stove with a recess for the sink instead of a standard countertop. We bring in communications or you can simply increase the height of the rear wall and attach a washbasin to it.