With a responsible approach, having thought through in advance and presented a complete picture of your future stretch ceiling, installing curtains will not cause you unnecessary trouble. There is a general opinion in everyday life that this is a very complex process that requires special training, but in reality, for professional installers, everything is simple and has long been brought to automaticity. All you have to do is tell us what exactly you want to see on your ceiling, indicating the desired dimensions (setback from the wall, length of the curtain protrusion on the sides of the window, etc.). You will learn about what opportunities the construction market provides, what curtains and fastening methods exist, as well as cool design solutions and more in this article.
Plastic ceiling cornice
It is a flat tire with rails in several rows. This is the most popular type of curtain rods among buyers. Its advantages are as follows:
- On the front side it has a decorative overlay of various colors, which allows you to match the cornice to the color of the ceiling;
- The length of the cornice is available in several options. Easily adjusted to the desired window length. If necessary, cut off the excess length with a hacksaw;
- Installation directly on a suspended ceiling, hiding the fastening elements underneath, or hidden installation of a cornice in a niche of a suspended ceiling;
- Optical increase in space in rooms with low ceilings.
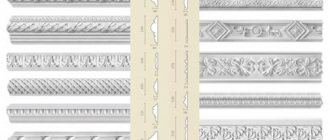
Ceiling cornices come in the following types:
- Wooden;
- Aluminum;
- Steel;
- Plastic.
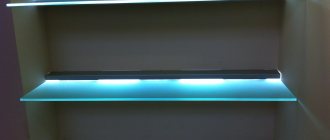
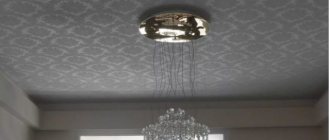
How to make a cornice to illuminate a stretch ceiling
To install a curtain rod with hidden lighting, you will need more knowledge and skills. However, this makes it possible to literally transform the room. It is recommended to carry out fixation before installing the tension fabric and finishing the walls.
The work is performed in the following order:
- We prime the surface of the future fastening using a primer.
Using a building level, a metal or wooden meter and a soft pencil or charcoal, we make a marking line for the installation of the cornice.
We fix the wooden plank at the marked level.
We glue foil tape to the inside of the product.
Using liquid nails or universal glue, attach the cornice to the installed strip and wall. You can also use acrylic-based putty for these purposes.
If necessary, cut out corners using a miter box.
We install the fixing profile of the stretch ceiling. The distance from it to the cornice should be 7-10 cm.
Preparing the LED strip. We connect the sections by soldering and remove the protective paper in these places.
We glue a special patch onto the contacts and wait for the glue to dry.
We remove the protective paper and glue the tape to the cornice, making a minimum distance at the joints to avoid the appearance of light gaps.
If desired, you can make the backlight monochromatic or multi-colored. It is also recommended to install a smooth shift mechanism. This will create an original lighting effect and extend the life of the diodes.
How to install a cornice for a suspended ceiling - watch the video:
Methods of attaching a ceiling cornice to a suspended ceiling
It would seem that installing a cornice on a suspended ceiling is impossible. After all, it is impossible to fix the cornice on a stretched film or fabric without damaging the panel. But in practice, there were several ways to solve this problem:
- The ceiling cornice is fixed to pre-prepared embedded elements hidden under the suspended ceiling;
- Hidden installation of a cornice on the base ceiling, in a special tension niche.
Open installation of ceiling cornice
Open mounting scheme
Open mounting of a ceiling cornice with embedded beams is the most popular installation method.
It is carried out by the following actions:
- Even before you start installing the stretch ceiling, you need to decide on the place where the ceiling cornice will soon be attached. Markings should be applied to the selected location on the ceiling;
- After this, it is necessary to mark the perimeter of the entire room and begin attaching the fixing profile of the stretch ceiling to the wall;
- Next, you should carry out a very important operation: attach a wooden block to the ceiling along the marking line. It is attached using dowels, which in turn will need to be driven into the drilled holes (they must first be created in the ceiling).
Note! Select the correct thickness of the block; its lower plane should be almost closely adjacent to the ceiling. To adjust this parameter, sometimes mounting wedges are forgotten between the ceiling and the backfill bar.
- After securing the block, the ceiling fabric should be tensioned;
- In the last stage, using self-tapping screws, the ceiling cornice is attached through the canvas, while trying to cause as little damage as possible. To do this, most often, with the help of polymer rings, the place where the self-tapping screws pass through the film is reinforced. In addition, the holes themselves should be burned, not cut.
If all actions were carried out correctly, then the embedded block, which combines the cornice and suspended ceiling, will be practically invisible.
Ceiling cornice in a hidden niche
This installation method is quite different from the previous one. It is somewhat more difficult to implement, but with hidden installation the cornice will not be visible and the curtains will not fall off from under the stretch ceiling.
If you like this method the most, then to implement it you should pay attention to the following rules of installation technology:
- The cornice itself should be purchased before measuring the stretch ceiling, because... the dimensions of the cornice will determine the dimensions of the niche, as well as how much the size of the ceiling will need to be reduced;
- The cornice must be mounted on the ceiling covering itself. Dowels with a metal or plastic sleeve are used as fastening;
- A few millimeters from the cornice, you will need to secure a wooden beam, to which the ceiling fixing profile will later be attached.
Note! The profile must be secured from the eaves side. Thanks to this, when stretched, the canvas will hide the bar, after which it will become almost invisible.
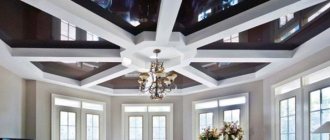
This design will look special together with a glossy ceiling.
Almost all recommendations on the Internet state that the best result from installing a ceiling cornice will only be achieved when a professional takes care of the job. But in fact, anyone can cope with such a task, the main thing is to have certain knowledge and skills, which is not at all difficult to achieve.
How to hang a curtain on a suspended ceiling
The most common method is open (visible) installation of curtains on a suspended ceiling. Installation technology:
- We install a fixing profile (baguette) on the walls;
- We apply markings that determine the future location of the curtain;
- We prepare mortgages. They can be of different types: factory-made plastic platforms, a block sawn into pieces, or a solid floorboard the entire length of the curtain. Why exactly the floor - it is perfectly smooth and light. Fastening with a solid board is the most durable and reliable method. It will not allow the curtain to be pulled away from the ceiling under the mass of curtains;
- Next, we attach the mortgages to straight hangers along the marking line (a couple of mm above the bottom edge of the baguette). This is necessary so that after stretching the canvas and installing the cornice, the mortgages are not visible;
- We stretch the ceiling;
- We fasten the cornice to the suspended ceiling with self-tapping screws through the film, trying to damage the canvas as little as possible. We recommend applying a drop of superglue to the tip of the screw, this will reduce the possibility of the ceiling tearing. You can also reinforce the places where the self-tapping screws pass through the film with heat-resistant rings of small diameter. By screwing the cornice through them you will certainly protect the stretch ceiling from further damage.
If the installers have even a little experience in installing a ceiling cornice on a suspended ceiling, this type of installation will not cause any difficulties.
How to properly install wall curtain rods
Since you plan to install a suspended ceiling, forget all the methods for installing a traditional cornice on concrete or plasterboard.
This won’t work with PVC film; the task is more complicated than it seems at first glance, but we won’t scare you either. The fact is that the film is not intended for attaching a large, weighty object, and even with hanging curtains. It won't take long to stretch the ceiling.
Therefore, the cornice is attached not to the ceiling itself, but to wooden blocks mounted in advance to the base ceiling. The wood for the bars should be made of durable hardwood. There are the following fastening methods:
- hidden support bars are attached under the ceiling, on which visible ceiling cornices are fixed;
- To install hidden ceiling curtain fastenings, they are mounted to the main ceiling, a special stand is made in front of the cornice, onto which the tension fabric is then attached.
The first option is often used, it is much easier to implement, but the hidden curtain holder looks more beautiful.
Work on installing an open ceiling cornice is carried out in the following sequence.
- Before installing suspended ceilings, you need to make marks on the canvas where the system will be attached in the future.
- Next, markings are made along the perimeter of the room on the walls to strengthen the fixing profile into which the canvas will subsequently be mounted.
- The most important operation is to lay wooden beams on the base ceiling along the marking lines. Please note that before this the wood must be treated with an antiseptic and the bars must be dried or opened with a hydrophobic primer, since the ventilation inside the ceiling will be insufficient and the wood may begin to rot over time.
- The bars are fastened using dowels driven into pre-drilled holes.
As can be seen in the diagram, the thickness of the wooden beam should correspond to the gap between the base and suspended ceiling.
After all these manipulations, it’s time to start installing the tension system. Then you should attach the cornice with self-tapping screws directly through the film, trying to do this as carefully as possible. The holes where the self-tapping screws go should be reinforced with plastic rings, but the holes themselves should not be cut or drilled, they must be burned so that the melted edges remain.
The second installation method is hidden cornices.
It is radically different from the previous one, primarily in its complexity. If you plan for your curtains to become an inconspicuous and harmonious extension of the ceiling, then you should think about hidden ceiling mounts. You need to buy them before you call a specialist to measure the stretch ceiling.
First, a ceiling cornice is mounted to the ceiling using dowels.
A wooden beam is attached nearby, as shown in the diagram. A profile for a stretch ceiling will be attached to it. Don't forget about processing wooden beams.
In fact, this work is not as difficult as everyone makes it out to be. Although many recommend trusting specialists, with certain skills and having collected useful information, you can do everything yourself.
"load...
Ceiling cornices are inexpensive, have obvious aesthetic advantages, are suitable for different types of curtains and can mask defects on the wall or wallpaper.
Before attaching the ceiling cornice, it is necessary to carry out a number of preparatory work, then the result will be neat and the fastening reliable. This decor option is optimal for rooms with low ceilings. The panels coming directly from the ceiling visually elongate the height of the walls, giving the interior elegance and additional space.
Wall cornice for suspended ceiling
The variety of appearance and design features of the wall cornice is so great that it will satisfy the needs of many consumers. The main advantages are as follows:
- Low price;
- Huge selection of models;
- Can withstand an impressive weight of curtains;
- Easy to install.
Installation of a wall cornice is so simple that many homeowners who have ever held a drill or hammer drill in their hands can handle it. Therefore, we will not take up your precious time and describe this process.
We wish you success in the renovation!!!
Installation of wall curtain rods
Wall mounted cornice is the most preferred and easiest installation method. Doing this kind of work yourself is not difficult.
Such a piece of furniture is cheap; the installation itself also reduces the cost of stretch ceiling equipment. To maintain the waterproofness of the film, you should install the cornice very carefully to keep the film intact. Accuracy will allow you to later change the interior (install blinds on the windows instead of curtains) without visible signs.
The modern market is replete with a choice of wall cornices. The most common tubular projections are installed very simply; it is only important to maintain the distance to the suspended ceiling. Even the rings being put on should not touch the surface of the ceiling so that the film remains unharmed.