What to do first: closet or suspended ceiling
The design of a stretch ceiling involves the use of wall molding, canvas and decorative edging. Depending on what the suspended ceiling will be attached to and whether it will be visible inside the cabinet, the order of the work depends. The choice remains with the owner of the premises. Today there are no restrictions on the order of work. You can install the ceilings first, and then place the built-in wardrobe from the floor, or you can do the work in the reverse order. The most important thing is to warn the furniture company and the tensile structure installer that you plan to combine these elements in the room. Then it will be possible to perfectly coordinate both designs.
How to make a mortgage for a wardrobe in a suspended ceiling
Repair is a complex process that can take months, and sometimes even years. The reason for this is, first of all, incorrect planning of the work sequence and, as a consequence, a huge number of shortcomings and problem situations, the resolution of which requires a lot of time and money. To get rid of unnecessary hassle and make repairs as quickly as possible, you need to clearly understand how and when to do this or that work.
One of the most common problems is installing a wardrobe in a room with a suspended ceiling. Many people make mistakes at this stage of repair, and to avoid them you need to think about the following things:
- Which wardrobe should you choose?
- What are the features of installing the selected cabinet?
- What's next, a wardrobe or a suspended ceiling?
- How to install a closet with a suspended ceiling?
- How to combine a wardrobe and a suspended ceiling?
You will find out the answers to all these questions below.
What difficulties may arise when installing a wardrobe in a room with a suspended ceiling?
There may be many problems, but all of them can be easily solved with careful planning at the beginning. Here are the main problems that may occur:
Installer mistakes
No matter how confident you are in the company that is doing your repairs, workers are different. Installing a wardrobe in a room with a suspended ceiling will not be the easiest task even for an experienced craftsman, let alone inexperienced installers. Careless handling can easily damage the ceiling. All this will lead to the waste of not only nerves, but also money, and a lot of it.
Limitation when choosing a cabinet
It is not always possible to install a wardrobe and a suspended ceiling together. It is quite possible that the option that you really like will turn out to be unsuitable for installation. This condition significantly narrows the number of cabinets from which you will have to choose.
Gap between ceiling and cabinet
Since nothing can be attached to the film, there will be a gap of several centimeters between the cabinet and the ceiling. This gap will quickly become the site of a huge amount of dust. It will be almost impossible to wipe it off, since the gap is very narrow. In addition, this gap will take up extra space, which means there can be no talk of rational use of the space in the room.
Overpayment for hidden ceiling meters
A stretch ceiling is, in principle, an expensive pleasure. For every square meter of high-quality stretch ceiling you will have to pay a considerable amount. In such circumstances, it will be very irrational and wasteful to hide several square meters of the ceiling with a wardrobe. It turns out that you paid for these hidden meters, but they are of absolutely no use.
Installing a wardrobe in a room with suspended ceilings is often very irrational. But sometimes that is the only possible way. Therefore, in order to avoid such problems, everything needs to be planned in advance.
Scheme of installing the cabinet before installing the ceiling
Options for installing suspended ceilings and sliding wardrobes
There can be many options, and below we will talk in detail about each of them. But before examining the features of each option, you need to understand what types of sliding wardrobes there are.
Despite all the external diversity, there are only two types of sliding wardrobes:
To the ceiling
These are cabinets whose guide rails are attached directly to the ceiling.
Independent cabinets
These cabinets do not require ceiling mounting. They are a complete structure that can be assembled regardless of the ceiling height.
These are the two main types into which all sliding wardrobes are divided. When choosing an option to combine a built-in wardrobe and a suspended ceiling, choosing the type of cabinet is a very important point.
Now let's take a concrete look at what options for installing a sliding wardrobe and ceiling there may in principle be, and what is more profitable to install first.
Installing a cabinet with an installed ceiling
A sliding wardrobe under a suspended ceiling is often sought by people who did not bother to plan the renovation in advance and are now forced to look for a way out of the current situation. Nevertheless, the situation is not critical and it is quite possible to find a good way out of it, which will not only suit you, but may even be better than other options. To better understand the essence of installing a cabinet under a suspended ceiling, let's look at its pros and cons.
Pros:
- Allows you to install a ready-made wardrobe without touching the ceiling
- Installing an independent sliding wardrobe is often cheaper
- When moving, an independent sliding wardrobe can be disassembled and assembled at a new place of residence
There are not many advantages, and most people may not even agree with them. But, nevertheless, in a hopeless situation this is far from the worst option. For the sake of objectivity, let's now turn our attention to the disadvantages.
The video clearly shows the process of installing a cabinet with a suspended ceiling installed:
Minuses:
- The gap between the closet and the ceiling, which will be the main dust storage in the apartment
- Wasteful use of space
- Overpayment for unused meters of stretch ceiling
- Limited selection of cabinets
The disadvantages turned out to be more convincing, and this is not surprising, because the work will be of the highest quality and rational only when it is thought out and planned in advance.
Installation of the cabinet, followed by installation of the ceiling
This option is the most rational. That is why experienced builders, when planning work on site, most often prefer to first install a cabinet, and then a suspended ceiling. As you know, everything is learned by comparison, so we will also consider this option, both from the positive and negative sides.
The ceiling mount is attached to the false panel of the cabinet
Pros:
- A full range of all kinds of sliding wardrobes is at your disposal. With timely planning, you will be able to choose exactly the cabinet that you like best and which you find most convenient. Now you don’t need to think about what type it will be, any type will be installed.
- Rational use of space. Cabinets up to the ceiling are the best option as they are strong enough and don't leave any gaps. But even if you choose an independent cabinet, its location will also be chosen specifically so as not to leave gaps. To solve this problem, use a box for a suspended ceiling for a cabinet made of chipboard.
- Installers are less likely to make mistakes during installation, since now the assembly will be much easier and more convenient. Now even inexperienced craftsmen are unlikely to be able to damage anything.
All these advantages are quite significant arguments in favor of choosing this installation option. However, things are not always so wonderful. To have the most complete and objective picture possible, let's look at the disadvantages.
Minuses:
- Difficulties with decorative strips.
Often people choose a wardrobe not for practicality, but for appearance. According to this criterion, cabinets with decorative strips above the rails usually win. The point is that you cannot attach a suspended ceiling to such a plank, which means you will have to put a timber overlay on it. Because of this, beauty often disappears.
There was only one minus, and this is quite objective, because this method is the most common and most rational.
Fastening the cabinet to a suspended ceiling
This method is rarely used, but it also has a right to life. The essence of it is that before installing the ceiling, a beam or a cabinet insert is attached between the concrete and suspended ceiling. The sliding wardrobe rails will subsequently be attached to this beam. Many people believe that this way the ceiling can be damaged, but in fact this is not the case. The surface of the stretch ceiling is quite strong and, with the right approach, several screw holes will not cause any damage to it.
This option is not very common, since it wastes extra meters of the stretch ceiling, despite the fact that everything is planned in advance. This is irrational, and when planning this option is most often rejected.
How exactly are the different types of cabinets installed?
So, we’ve sorted out the options for the sequence of work, now let’s talk in more detail about the process of installing certain types of sliding wardrobes.
Each type has its own installation features. Now we will look at the main types.
Cabinets with top to ceiling
The peculiarity of such cabinets is that they are ordered and installed most often after finishing work on the ceiling. There are several reasons for this. Firstly, the height of such cabinets varies depending on the wishes of the client. Therefore, before ordering a cabinet, you need to know exactly the height of the room, but you won’t be able to find out this before installing the stretch ceiling. Secondly, it will be extremely inconvenient for installers to install the ceiling if there is this cabinet in the room.
The process of assembling such a cabinet is quite standard, and the end result is a structure that rests evenly on the suspended ceiling and does not create any gaps.
Cabinets with a guide rail designed for mounting
The peculiarity of these cabinets is that the guide rail must be fixed to something. Naturally, it won’t be possible to attach it to a suspended ceiling, because you need something solid and immovable.
Most often they prefer to attach such cabinets directly to the concrete ceiling and only after that install a suspended ceiling. This is the most effective and rational option, as it saves square meters of stretch ceiling and leaves no space for gaps.
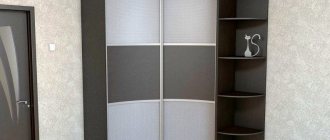
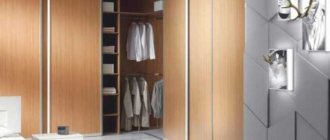
The stretch ceiling is attached to the strip in front of the cabinets, so the cabinet stands in a niche
There is another option, in which a beam or mortgage is installed under the wardrobe in the suspended ceiling to fasten the rails. The rails are attached to this beam with a regular screwdriver through the suspended ceiling. There is no need to worry about the ceiling tearing or being damaged in any other way. An experienced master will be able to do everything correctly and cleanly. However, if after the completion of the repair you have problems with the ceiling, you will not be able to contact the company that provides the guarantee. Warranties are provided that the surface has not been damaged and you already have holes in it. Accordingly, there can be no talk of any return.
Cabinets with decorative strips above the rails
Decorative strips look very beautiful and can be found both on cabinets up to the ceiling and on independent cabinets. However, their peculiarity is that a suspended ceiling cannot be attached to them. Practicality suffers greatly from this.
To solve this problem, installers usually place an additional beam along the plank. Often this beam spoils all the beauty, so if you decide to install a cabinet with a decorative strip, try to install the ceiling across the entire width of the room before installing the cabinet. In this case, with correct calculation, the bar will just reach the ceiling. Then it will look quite beautiful, and at the same time will not leave an unnecessary gap.
Installation of an extension or a mortgage under a cabinet:
Assembling the wardrobe after installing the ceiling, the structure is attached to the mortgage nailed in the previous video:
kakpotolok.ru
Option two: start by installing the cabinet
Attaching to a bar
If you decide to first assemble the wardrobe, then the door guide tracks should be attached to the concrete ceiling. And the suspended ceiling must be mounted to the block (it is placed in front of the guide). This option is good because, if necessary, you can replace suspended ceilings without touching the cabinet. But you should understand that in this case the guide track will be hidden, and not everyone likes this.
Following this layout diagram of the wardrobe and suspended ceiling, you need to calculate in detail the location of the beam attachment: the depth of the cabinet and the height of its doors depend on this. It is also important to accurately determine the lighting. If you want to place spotlights in front of the cabinet doors in a suspended ceiling, you need to calculate in advance the location of their attachment and take this into account when ordering a suspended ceiling structure. The option when the suspended ceiling is located around the wardrobe is ideal if the wardrobe is already installed and you decide to install suspended ceilings. Moreover, the cabinet should be approximately 10 cm below the main ceiling; this will allow you to calmly lower the ceiling level by installing a tension structure.
Using a false panel
As an option, you can install a special false panel (decorative horizontal strip). It is to this that the suspended ceilings will be attached. And the cabinet guide will be attached to the beam, which is located behind the panel. The height of the false panel depends on how much the suspended ceiling will be lowered.
When choosing one of the methods for assembling a built-in wardrobe and suspended ceiling, focus on the ease of work and the ability to replace the ceiling panel without affecting the cabinet. Of course, if you already have one of the designs, you just have to follow the scheme that is available in this case.
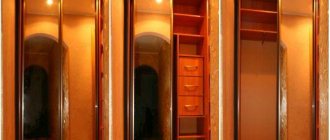
Built-in compartments under the ceiling that surrounds the closet
If your built-in furniture does not occupy the entire wall, but only part of it, you can install a tension fabric around the cabinet. This is a rather complicated process, but this design looks impressive.
You can install small spotlights on the ceiling around the cabinet, this will enhance the modern effect of the design.
For this option for arranging a room, the canvas must be made to order. You will not be able to correctly cut a hole of the required size in the film on your own.
Steps to install a cabinet with a ceiling around it:
- First of all, a box is assembled from beams and a harpoon baguette. Holes for fastenings are immediately drilled in it.
- A fully assembled box with baguettes is installed on the ceiling. Harpoon baguettes are attached to it.
- Next, the cabinet is assembled and the fabric is stretched.
This design is quite difficult to install, but in any case, when installing the tension fabric, the help of a specialist is required. The built-in wardrobe with a suspended ceiling surrounding it looks modern and stylish.
Is it possible to combine a wardrobe and a suspended ceiling?
We are used to the fact that during a renovation, the floor, walls and ceiling are immediately done, and then they start choosing furniture and decor. But if you don’t initially design the interior of the room, you can forget about harmony and comfort in the room forever.
Even if all cosmetic work is done efficiently. Moreover, difficulties can arise even during installation. And if in the future a suspended ceiling is also proposed, everything will only get worse.
And to make the room look immaculate, you need to figure out what to do first, installing the ceiling covering or installing a compartment.
When planning a renovation, immediately consider where the suspended ceiling will be so that you can combine it with the wardrobe
Options for solving the problem
In order to give a room with such tall furniture an aesthetic appearance, you can use one of three possible solutions to this problem.
Attaching a stretch ceiling to an already installed wardrobe
This is the most common and problem-free mounting option. To pair them, you only need to install one small part - a strip. The advantage of this method is the almost complete absence of points of contact, so if it becomes necessary to separate the elements from each other, there will be absolutely no problem or difficulty in implementing this idea. The only drawback of this option is the need to pre-install the wardrobe with careful coordination of the characteristics of its design with the characteristics of the stretch ceiling. It is important to consider that if the top panel is mounted crookedly, the ceiling covering will not be parallel to the floor.
Attaching a wardrobe to an already installed ceiling
This method will be relevant if you purchase a spacious and large cabinet. To do this, the furniture must be screwed to a special beam, which is fixed inside the stretch ceiling. The advantages of this option are the exquisite appearance of the ceiling with the ability to think through a variety of placement of lighting fixtures, as well as the absence of the need to pre-order a cabinet. The disadvantages include the possible loss of warranty on purchased furniture, since companies often do not provide it. This is due to the beam on which the guide rests, because it was not installed by company employees. Another disadvantage of this method is the strong interconnection of the fastening elements, which may cause difficulties when trying to carry out repair work on the ceiling.
Independent fastening of suspended ceiling and wardrobe
This method is also in great demand and is actively used if it is impossible to carry out simultaneous installation of the necessary elements. With this option, there are completely no points of contact between them, which is a big advantage when carrying out repair work on the ceiling, since it absolutely does not require their separation.
Thus, finding a way out of the current situation is a real possibility. For each specific case, you can choose the most suitable mounting method, which will allow you to make the most beautiful and practical repair. The main thing is to first discuss all the details and nuances of the installation with specialists who can help in choosing the best option. Only in this case will it be possible to carry out error-free repair work and enjoy the ideal combination of a stretch ceiling with a sliding wardrobe.
What to design first
If you stretch the ceiling and then proceed with installation, the following problems may arise:
- workers will damage the ceiling surface;
- The cost of installing a tension structure depends on the area of the ceiling. Then the question arises, why pay more?
the space formed between the cabinet and the ceiling will accumulate dust. Since it is not recommended to attach anything to the film and the distance between the surfaces will be around 70 mm;
Before installing the ceiling, warn the installers about the subsequent installation of the cabinet
Preparing to install a stretch ceiling
You can install a stretch ceiling in a few hours. But preparation, as well as connecting lighting, sometimes require even more time. So let's begin.
First, we clear everything that might fall from the ceiling. This is very important for aesthetics. Everything after the ceiling is stretched can be seen through.
Ceiling prepared for installation: everything has been cleaned, lighting fixtures have been installed
If the film is white or light, dark spots, if any, may be visible through it. The same problem exists in a log house: the dark ceiling will be visible. In this case, you can pre-sheath it with some material (plywood, plasterboard, etc.) and cover it with white paint. As an option, shoot some white material (at least a vapor barrier).
At what stage of repair should a suspended ceiling be installed?
Installation of suspended ceilings is carried out after the main “dirty” stages of repair have passed, and the walls are leveled. You can do it before wallpapering, or you can do it after. Both options are imperfect. And that's why:
- If the walls are already covered with wallpaper, they will get dirty when installing the baguette. To avoid contamination, you have to close the walls, and this is extra time.
- If you glue wallpaper after installation, you need to work very carefully: the films (if they are stretched) tear very easily. And during such work it is very easy to tear it.
What is the lesser evil for you - choose. In other periods this is not possible.
Mount the ceilings after all the dusty work is done, on flat walls
Where and at what height is it mounted?
There are two types of profiles - for the ceiling and for the wall. Ceiling ones are used in cases where for some reason it is impossible to screw a supporting structure onto the walls (wiring running in the required place, very unstable material). In other cases, a baguette is mounted on the walls.
At what height is the baguette attached? If there are no distortions, at a level of 4-5 cm below the junction with the ceiling. Why not at the very top? Because the higher the strength of the wall is reduced, it can crumble. Loads when using PVC films are created decently, so load-bearing capacity is important. In addition, wiring is often laid in this place and it can be damaged. So be careful with the wiring, designate the area where it is located. This height reserve also allows the use of a wider range of lamps. As you can see, there are enough reasons.
You need to attach the baguette to flat walls, retreating 4-5 cm from the main ceiling
If the walls in the room have not been leveled, but you want to install a suspended ceiling, level the area in which the molding will be attached. If this is not done, it will bend, which will be clearly visible from below.
On walls made of foam concrete, a beam is mounted to the wall, and a baguette is attached to it. The tension created in this way is transferred predominantly to the beam, and the wall experiences less stress.
For normal ceiling tension, it must be stretched in a strictly horizontal plane. Therefore, they find the lowest point of the ceiling, set aside those same 4-5 cm from it, and then beat off the horizontal along all the walls. So relative to the existing ceiling, the height difference may be different.
The drop relative to the main ceiling may be uneven...
It is most convenient to apply a line using a painting cord (a thin cord “stained” in loose dye such as blue).
If you decide to make a two-level stretch ceiling, it is attached to a plasterboard structure. If the fastening is on one of the horizontal guides, everything is fine and there are no problems. If lower or higher you need to add gain. This can be a profile fixed in the right place or a strip of plywood 5-6 mm thick. Both methods have been tried and work well.
When installing in a room whose walls are tiled, attach the baguette 2 cm below the edge of the tile. It is important that there are no voids underneath.
Electrical wiring and fittings for suspended ceiling lamps
Since lower-power lamps are used in suspended ceilings (no more than 40 W for incandescent lamps and 35 W for halogen lamps), a larger number of lamps is required. In addition to the main chandelier, peripheral lighting is also provided in the center. In this case, built-in lamps are usually used.
It turns out that there are a lot of wires running along the ceiling. They must be well and correctly secured. If a suspended ceiling is made in a wooden house, all electrical wires are laid in fireproof pipes, a special corrugated hose or mounting box. In other cases, it is enough to secure them to the ceiling with mounting tapes or using clips.
Reliable way to secure wiring
For the installation of lamps in a suspended ceiling, embedded elements are made. Their design depends on the type of lamp and is selected separately each time. It is only desirable that the lampshades be either directed downward or located no closer than 40 cm from the ceiling. Otherwise, after a while, yellowish spots from overheating will appear on it.
Perhaps the best solution when choosing lamps for a suspended ceiling would be LED ones. They produce a powerful stream of light, last a very long time, draw very little electricity and practically do not heat up. The downside is the high price. But it is justified quickly - by saving on electricity.
Options for installing a ceiling with a cabinet
There are several installation methods:
- The split design is presented in the form of fastening two independent fastening systems. This allows you to tension the coating at any stage of the work. The first step is to secure the door guides to the ceiling. Moreover, you need to immediately know exactly the dimensions of the cabinet. Along the surface of the ceiling there is a beam that serves as a profile holder. Whereas on the side of the cabinet, fasteners are already made for the tension structure.
Split design
- Film inside. They immediately install the ceiling, and then install the furniture. A beam is attached to the ceiling surface and the film is stretched. In this case, the beam will be between the main covering and the tension structure. The canvas contains special inserts and guides for doors.
Mount with film inside
- Built-in compartment that surrounds the furniture. This is a rather complicated process. But if it only takes up part of the room, the result will be amazing. First of all, a box is assembled from beams and a harpoon baguette. Holes for fastening are made along the perimeter of the beam. At the same time, the cabinet is being assembled. The ceiling covering is stretched and the frame is attached.
Built-in wardrobe
- Attaching to a stretched ceiling covering occurs using a beam. In this case, it is necessary to coordinate both elements. Although in practice this installation option is extremely rare. The technique is typical for a built-in structure, which serves as a large storage room.
Fastening with timber
Stretch ceiling level
When installing the ceiling covering, it is extremely important to take accurate measurements. Professionals should name the ceiling line that will be in contact with the wall partition. There are cases in which furniture or window openings are located without taking into account the level. The optimal solution to this problem may be to mount it based on existing levels, that is, try to install the ceiling parallel to non-standard elements. Therefore, in order to avoid poor-quality repairs and erroneous installations, it is better to turn to experienced professionals.